Fluffy Gluten-Free Waffles
- Morning Bliss: The Joy of Gluten-Free Waffles
- Let’s Talk Waffles: A Quick Overview
- Unleashing the Magic of Waffles
- Ready to Cook Some Waffles?
- Essential Ingredients Guide
- The Professional Cooking Method: Creating Your Best Gluten-Free Waffles
- Pro Tips & Secrets for Your Fluffy Gluten-Free Waffles
- Perfect Presentation
- Storage & Make-Ahead
- Creative Variations
- Complete Nutrition Guide
- Frequently Asked Questions
- 📝 Recipe Card
Morning Bliss: The Joy of gluten-free Waffles
Ah, saturday mornings! they always remind me of cozy family breakfasts, filled with laughter and the sweet smell of waffles wafting through the house.
Picture this: kids in pajamas, the tv playing cartoons in the background, and everyone gathered, ready to dive into my mom's homemade waffles.
Now that i’m cooking for my own family, i wanted to recreate that magic, but with a twist. that’s when i discovered this gluten-free waffle recipe that truly knocks it out of the park! it’s light, fluffy, and totally celiac friendly.
You feelin’ me?
Let’s Talk Waffles: A Quick Overview
Waffles date back to the middle ages, believe it or not! they’ve evolved from being simple cakes baked over an open flame to the delicious breakfast staple we love today.
Nowadays, with everyone more health conscious, gluten-free options are popping up everywhere. seriously, who wouldn't want a crispy, warm waffle that’s also good for you?
These fluffy wonders are not only perfect for weekend brunch, but they also make for quick breakfast options on those busy school mornings.
This recipe comes together in about 25 minutes; about 10 minutes to prep and 15 to cook if you’re on the ball.
And let’s be real who doesn’t love a good meal prep? you can whip a batch, stash some in the freezer, and pop 'em in the toaster on those rushed mornings.
The Benefits of Going gluten-free
Now, why choose a gluten-free breakfast idea over the regular stuff? well, besides catering to those with celiac disease and trust me, gluten-free cooking has come a long way! there are perks even if you don’t have any dietary restrictions.
Gluten-free flours can pack a nutritional punch. you’ll find flour made from almonds or coconuts offers healthy fats and proteins.
And let’s not forget about healthy waffle toppings ! you can get creative here. think fresh fruits, drizzles of honey, or even a dollop of greek yogurt.
Seriously, packed with nutrients and totally satisfying, these waffles are great for everyone, even the kiddos!
Unleashing the Magic of Waffles
So, how does this recipe stack up against others? first off, the flavor is on point thanks to a hint of vanilla and nutty gluten-free flour.
This easy waffle recipe gains its fluffiness from the secret ingredient; it isn’t just about getting the mix right it’s also how you cook it!
For every pancake lover out there don't worry, fluffy pancakes and fluffy waffles aren’t in competition! each has its charm.
But let me tell you, you won't miss regular waffles once you get a load of these crispy beauties!
Waffles are a go-to for special occasions birthdays, or even a random tuesday when you just want a little extra love in your life.
Plus, they’re super versatile; you can add chocolate chips, swap out milk for almond milk to create a dairy-free waffle recipe , or toss in some fresh blueberries to switch things up a bit.
Unique, right?
Ready to Cook Some Waffles?
Before we jump into the ingredient list, let’s get one thing straight: tips for perfect waffles come down to three simple things don’t overmix, let the batter rest, and always let your waffle iron do its magic without peeking too soon!
No one likes a soggy waffle, am i right? if you keep these in mind while you're cooking, you're in for a treat.
Now, grab your waffle iron, and let’s get to the good stuff: the ingredients!
So, stick around as we dive right into what you’ll need to whip up your own batch of fluffy gluten-free waffles.
Trust me; your breakfast game is about to get a serious upgrade!
Essential Ingredients Guide
Let’s talk waffles ! who doesn’t love the crispy, fluffy goodness of a warm waffle, right? i mean, it’s like brunch on a plate.
Today, we’re diving into everything you need for the fluffiest gluten-free waffle recipe you’ve ever tried. ready? let's get it!
Premium Core Components
Before you start, let’s focus on premium core ingredients . For the perfect waffle, you need good stuff.
Measurements : Here’s a quick guide: 1 cup is about 120 grams for gluten-free all-purpose flour. Make sure you measure right, or it can turn into a complete noodle mess!
Quality indicators : always check the flour’s packaging for a gluten-free label. if it says “made in a facility that processes wheat,” pass.
We don’t want that drama, especially if you have celiac or are just gluten-free curious.
Storage : keep your flour in a cool, dry place. also, let’s be real gluten-free flour can get funky faster than you think.
Aim to use it within three to six months of opening.
Freshness Tips : Always give it a whiff. If it smells off, toss it! Old flour can ruin your whole smiling breakfast vibe.
Signature Seasoning Blend
Don’t underestimate the power of a good seasoning blend . This isn’t just a basic waffle; we’re talking full-on flavor party!
Essential Spice Combinations : For a hint of something different, a dash of cinnamon can kick things up. Just watch how it transforms the vibe!
Herb Selections : Think outside the box. While herbs aren’t typical in sweet waffles, a pinch of rosemary in savory versions can be a game changer.
Flavor Enhancers : Vanilla extract is a must. Trust me on this one. It adds that “oomph” that makes each bite sing.
Smart Substitutions
Now, sometimes you’re in a pinch, and that’s okay! Here’s where smart substitutions come into play.
Common Alternatives : Can’t find gluten-free flour? Try almond flour or coconut flour —but those ratios can be tricky, so do some homework first.
Dietary Modifications : Making a dairy-free waffle recipe ? Swap regular milk for almond or oat milk. Seriously, it works wonders.
Emergency Replacements : Out of eggs? Mix a tablespoon of flaxseed meal with three tablespoons of water. Let it sit for five minutes, and you’ve got yourself a vegan “egg”!
Kitchen Equipment Essentials
Alright, let’s not forget the tools of the trade. Here’s your kitchen equipment essentials list:
Must Have Tools : A waffle iron is non-negotiable. Look for one with non-stick plates; your future self will thank you.
Alternative Equipment : You can use a skillet if you’re in a bind just not the same when it comes to those classic waffle shapes!
Preparation Tips : Preheat the waffle iron before you pour on that batter. No one likes a soggy waffle!
Storage Solutions : Waffles freeze great! Keep them in a freezer bag. Pop ‘em in the toaster for a quick breakfast option later.
Wrapping It Up
There you have it! a full-on guide to making those fluffy gluten-free waffles that’ll make your family beg for seconds.
And they’re definitely packed with nutritional benefits, too perfect for those of you trying to maintain a gluten-free diet or whip up some healthy brunch ideas .
So, grab your ingredients and those essential tools. it’s time to get cookin’! next up, let me show you exactly how to make these delightful homemade waffles, step-by-step.
Trust me; you don’t wanna miss this!
The Professional Cooking Method: Creating Your Best gluten-free Waffles
So, you wanna whip up some awesome waffles that are not only delicious but also cater to all those gluten-free diets? count me in! let’s dive into this gluten-free waffle recipe magic, but first, let me hit you up with some essential preparation steps to make your waffle making a breeze.
Essential Preparation Steps
1. Mise en Place: Get Your Game Face On
Before you even think about cooking, gather all your ingredients and equipment. seriously, this step is a game changer. measure out 1 cup gluten-free all-purpose flour , 1 tablespoon sugar , and the rest of your ingredients.
Having everything ready upfront saves you from scrambling around mid-cooking. no more “where’s the baking powder?” panic!
2. Time Management Tips
You know those mornings when you’re running late? yeah, we don’t want those. prep your batter the night before! mix your dry ingredients and store them in an airtight container in the fridge.
Then, in the morning, just whisk in your wet ingredients. boom! quick breakfast options that don’t compromise on taste.
3. Organization Strategies
Keep your workspace tidy. a clutter free kitchen is a happy kitchen! plus, it helps avoid those oops, i spilled the milk moments.
Set up your cooking station close to your waffle iron, so you're not making two trips across the kitchen.
4. Safety Considerations
Always be careful with hot appliances. if your waffle iron says 375° f , you better believe it’s hot! to prevent burns, use a spatula when removing those golden beauties.
And pro tip never leave the hot iron unattended.
Step-by-step Process
Let’s break this down, step by step. Follow these clear, numbered instructions and you’ll be serving up fluffy waffles in no time.
Preheat your waffle iron. Most irons take about 5 minutes to heat up. Make sure you're following the manufacturer’s instructions.
In a large mixing bowl, combine your measured dry ingredients: gluten-free flour, sugar, baking powder, and salt. Whisk until blended.
In a separate bowl, whisk together your wet ingredients: egg, 1 cup milk (dairy-free works too!), oil, and vanilla until smooth.
Pour the wet ingredients into the dry ones and mix just until combined. We’re talking small lumps don’t overmix!
Lightly grease the waffle iron. I swear by cooking spray or a dab of oil on a paper towel.
Pour the batter onto the preheated waffle iron according to the manufacturer’s guidelines. Usually, it’s about ½ cup of batter, depending on your iron.
Close the lid and cook for about 5 minutes until they’re golden brown. But don’t open too soon; trust me, crispy waffles are where it’s at!
Carefully remove your waffles with a spatula and serve immediately.
Expert Techniques
Now, let’s get the insider scoop on some expert techniques to help you nail this fluffy waffle recipe !
Quality Checkpoints: Look for that perfect golden brown color too pale means they need more time; too dark means oops, burnt .
Troubleshooting Tips: If your waffles are soggy, you might need to increase cooking time. Humidity can also play a wild card with gluten-free baking, so adjust as needed.
Success Strategies
Ah, the path to perfect waffles isn’t always smooth. Here’s what to avoid to keep your breakfast dreams alive:
Common mistakes: Overmixing your batter is a biggie. Stop mixing once you see most of the dry flour combined.
Quality assurance: Always taste your batter for sweetness. Add a little more sugar if needed it’s about balance!
Perfect results guide: Experiment with toppings, too! Healthy waffle toppings like fresh fruit or yogurt can elevate your dish.
make-ahead options: Don't forget about leftovers! These puppies freeze beautifully. Just pop them in the toaster for a quick breakfast go-to!
Once you've nailed these steps, you'll be ready to take on any brunch situation or impress your friends with your homemade waffles at the next gathering.
And there you go! with these pro cooking methods and a killer gluten-free waffle recipe , you’re set to become the waffle king or queen! stay tuned for the additional information section, where i’ll share even more secrets about jazzing up your breakfast game.
We’re just getting started!
Pro Tips & Secrets for Your Fluffy gluten-free Waffles
Oh my gosh, let’s dive into the behind the-scenes magic of making the perfect gluten-free waffle recipe ! First of all, these waffles can be as easy as pie or shall I say, easy as waffles? So, here’s a few personal tricks learned from trial and error in my own kitchen!
Chef’s Personal Insights
When whipping up your batter, think about giving it a bit of a rest. just 5 to 10 minutes can really make a difference.
Trust me, letting those ingredients mingle leads to fluffier waffles. seriously, each bubble in the batter needs its time to party or you’ll miss out on heavenly texture.
Time Saving Techniques
If you’re rushing in the morning, prep is key. mix your dry ingredients the night before. just toss them in a ziplock bag.
Only add the wet ingredients in the morning, and you’re golden! this hack is a lifesaver for busy families, and it means more time sipping coffee!
Flavor Enhancement Tips
You can easily enhance the flavor of your waffles by adding a splash of vanilla or a sprinkle of cinnamon.
If you’re feeling adventurous, toss in some lemon zest for a fresh zing! it ties together perfectly with fruits like strawberries in your gluten-free breakfast ideas .
Quick Presentation Hacks
Now, let’s talk presentation. it’s all about that eye-catching look! serve your waffles stacked high and drizzle some maple syrup on top.
Throw in a handful of fresh berries and maybe a dusting of powdered sugar. that color pop is what makes your breakfast instagram worthy!
Perfect Presentation
Once your waffles are ready, how you present them can elevate your brunch game. And we all know, a good looking platter can make anyone dig in faster!
Plating Techniques
Layering is all the rage! Stack those waffles! Maybe even offset one waffle slightly. It creates visual interest. Serve it on a bright plate for an extra wow factor.
Garnish Ideas
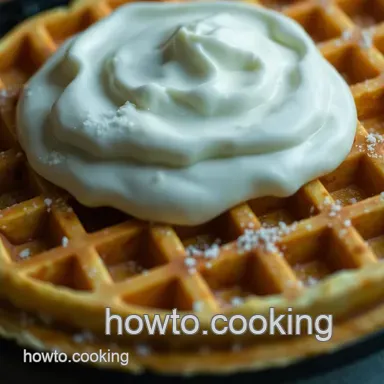
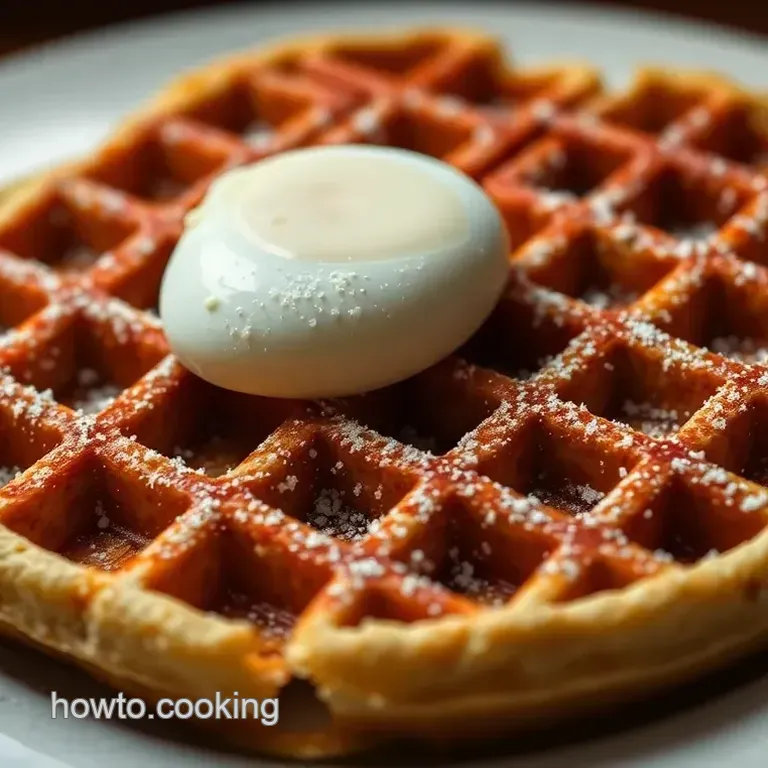
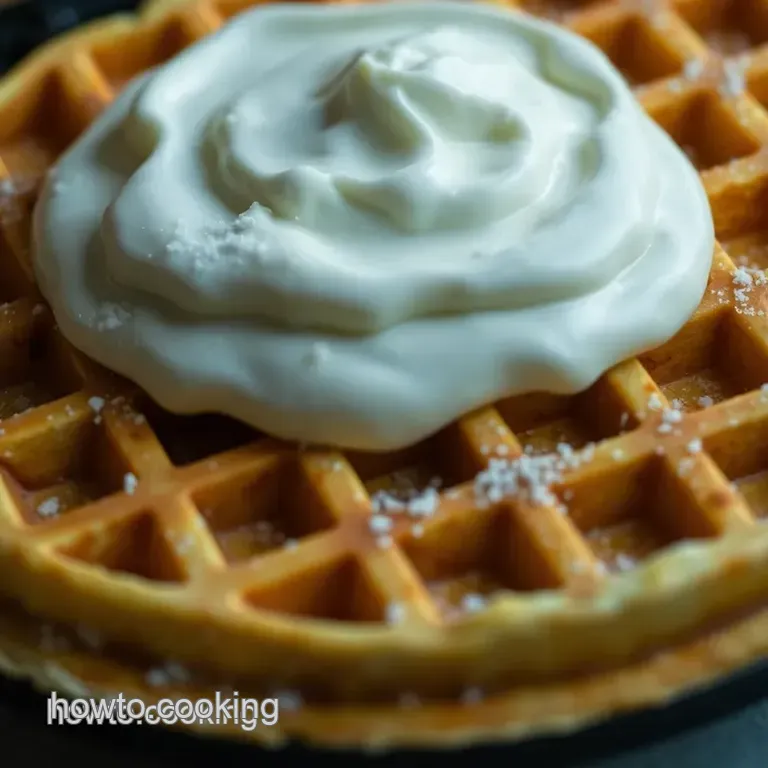
Fresh mint leaves, or a sprinkle of nuts can jazz up any waffle. And let’s not forget about whipped cream! Just a dollop can turn simple into sensational.
Color Combinations
Pair your golden brown waffles with vibrant red strawberries or bright green mint. A splash of color not only looks appetizing but makes for a fun eating experience, too.
Visual Appeal Tips
How about serving one waffle with some colorful toppings on the side? Let people mix and match. It’s interactive, and who doesn’t love to customize their own breakfast?
Storage & make-ahead
These fluffy treats are fantastic hot off the iron, but what if you want to save some for later?
Storage Guidelines
Store your cooked waffles in an airtight container or a ziplock bag. They’ll stay fresh for about 2-3 days in the fridge. If you want to keep them longer, they freeze beautifully.
Preservation Methods
For freezing, place parchment paper between each waffle. It stops them from sticking together nobody wants a glued together mess, right?
Reheating Instructions
When you're ready to enjoy, pop them directly from the freezer into the toaster. They come out crispy and warm. Trust me, it’s super convenient.
Freshness Duration
Don’t let them sit too long! maximize freshness by consuming within a month if frozen. if they’re in the fridge, they’re best eaten within those 2-3 days to avoid that stale flapjacks vibe.
Creative Variations
Now for the fun part getting creative with your waffles!
Flavor Adaptations
Add a touch of cocoa powder to make chocolate waffles ! Oh, and don’t skip on the gluten-free chocolate chips. They melt into gooey perfection!
Seasonal Twists
In fall, spice it up with pumpkin puree and our good friend, cinnamon. The aroma fills your kitchen with cozy vibes.
Dietary Modifications
Need a dairy-free waffle recipe ? Just switch regular milk for almond or coconut milk. Easy peasy!
Regional Variations
Why not go international? Make savory waffles like cornbread waffles; serve with chili or fried chicken for a fun Southern twist.
Complete Nutrition Guide
Eating delicious doesn't mean you have to compromise on nutrition!
Detailed Breakdown
Each serving of these gluten-free waffles packs a punch with around 210 calories. They offer plenty of energy perfect for a jam-packed day ahead!
Health Benefits
Mainly using gluten-free flour means that folks with celiac disease can happily indulge without worry talk about a celiac friendly recipe !
Dietary Considerations
Keep in mind, you can make these vegan too. Simply substitute for a flaxseed egg, and you’re good to go.
Portion Guidance
Two waffles a serving sounds about right, but feel free to adjust based on your hunger vibe that day.
In short, making fluffy gluten-free waffles is not just about satisfying a craving it’s about crafting a memorable meal, whether it’s for yourself or your friends.
So, go ahead, play with these tips. trust me, you’ll be whipping up the best easy waffle recipes in no time and your breakfast table will be the talk of the town! happy cooking!
Frequently Asked Questions
Can I make this gluten free waffle recipe vegan?
Yes! You can easily make this gluten-free waffle recipe vegan by replacing the egg with a flaxseed egg (mix 1 tablespoon of ground flaxseed with 2.5 tablespoons of water and let it sit for a few minutes) and using a non-dairy milk alternative like almond milk or oat milk.
You can also replace the oil with melted coconut oil or another vegan friendly fat.
What are some variations I can try with this gluten free waffle recipe?
There are numerous fun variations you can explore! For example, you can make chocolate chip waffles by adding gluten-free chocolate chips, or for a fruity twist, mix in mashed bananas and chopped walnuts. Spicing it up with cinnamon can also add a delightful flavor to your waffles.
How do I store leftover gluten-free waffles?
To store leftover waffles, allow them to cool completely, then place them in an airtight container or zip-top bag. You can refrigerate them for up to 3 days or freeze them for up to 3 months.
For reheating, either pop them in the toaster or warm them up in an oven preheated to 350°F (175°C) until heated through.
Why are my gluten free waffles not coming out crispy?
If your gluten-free waffles are coming out soggy instead of crispy, ensure that you are allowing them to cook fully in the waffle iron without opening it too early. Additionally, consider using a bit more oil in the batter or greasing the waffle iron more generously.
Finally, letting the batter rest for a few minutes before cooking can help improve the texture.
Can I use a different type of gluten-free flour?
Absolutely! While a gluten-free all-purpose flour blend works well, you can also use almond flour or oat flour as alternatives. Just be sure to check that they're labeled gluten-free, especially with oat flour to avoid cross contamination.
Different flours may yield slightly different textures, so be prepared for some experimentation!
What toppings do you recommend for gluten free waffles?
There are endless possibilities for topping your gluten-free waffles! Popular choices include fresh fruits like berries or sliced bananas, a drizzle of pure maple syrup or honey, and a dollop of Greek yogurt. You can also try spreading nut butter or adding a sprinkle of powdered sugar for an extra touch of sweetness!
Fluffy gluten free Waffles