Air Fryer Banana Bread: Caramelized Exterior
- Time: Active 15 minutes, Passive 35 minutes, Total 50 minutes
- Flavor/Texture Hook: Caramelized exterior with a fudgy, chocolate studded core
- Perfect for: Weekend breakfast or a wholesome lunchbox treat
- Achieve Moist Crumb Air Fryer Banana Bread
- Science of the Golden Crust
- Essential Recipe Specifications
- Sourcing Your Wholesome Ingredients
- Required Kitchen Tools and Setup
- Step-by-Step Cooking Timeline
- Comparing Homemade and Store-Bought
- Fixing Common Baking Errors
- Flavor Variations and Substitutions
- Storing for Long Lasting Freshness
- Best Serving Suggestions
- Recipe FAQs
- 📝 Recipe Card
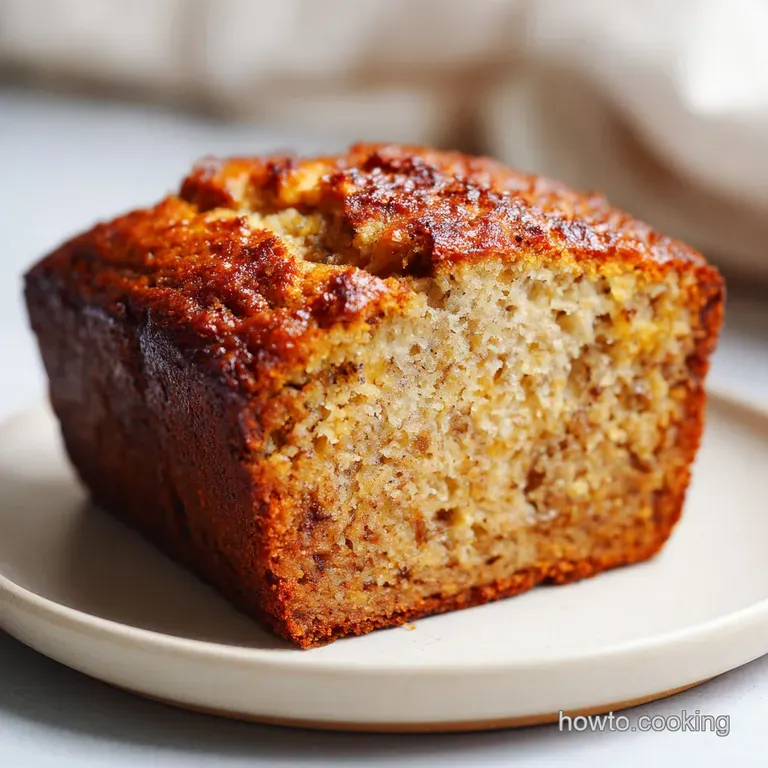
Achieve Moist Crumb Air Fryer Banana Bread
The aroma of toasted walnuts hitting the air is enough to pull anyone out of bed. I remember the first time I tried this; my traditional oven was occupied by a massive roast, and I had three bananas that looked like they were about to turn into liquid on my counter.
I shoved a small loaf pan into my Ninja fryer and honestly, I wasn't expecting much more than a burnt brick.
But then that scent started wafting through the kitchen deep, sugary, and spiced. When I pulled it out, the top had this incredible crackled texture that you just don't get in a standard bake. It felt like I’d found a secret shortcut that actually tasted better.
The way the chocolate chips had softened into the crumb without sinking to the bottom was a win I hadn't anticipated.
We’ve all been there with a soggy center or a top that looks done but hides raw batter underneath. I've dialed in the temperature to 320°F to make sure it’s a success every single time.
It’s about building confidence in your kitchen equipment and realizing you don't need a massive setup to create something truly nutritious and flavorful. Trust me, once you see that crust shatter under your knife, you'll never go back to the long wait of a standard oven.
Science of the Golden Crust
Rapid Convection: High velocity air strips away moisture from the surface instantly, triggering the Maillard reaction faster than a still air oven. This creates a sturdy, mahogany exterior that protects the velvety crumb from drying out during the 35 minutes of cooking.
Physics of Rapid Heat
The compact space of the fryer means the heat source is closer to the batter. This proximity would normally burn the cake, but the constant airflow prevents hotspots. By setting the unit to a lower temperature than a traditional oven, we allow the center to set through conduction while the air handles the exterior texture.
The Moisture Balance
Using three large overripe bananas provides the essential fructose and structural moisture. As the bread bakes, the starch in the 1 1/2 cups of all purpose flour gelatinizes, trapping the steam released by the fruit. This creates that dense, brownie like consistency that makes this specific recipe so satisfying.
| Method | Time | Texture | Best For |
|---|---|---|---|
| Air Fryer | 35 minutes | Crisp crust, dense core | Small batches |
| Standard Oven | 60 minutes | Even, soft exterior | Large family loaves |
| Microwave | 8 minutes | Spongy and pale | Emergency cravings |
While the bread is cooling, I often think about the next meal. If you want something savory to follow this sweet treat, you might enjoy the balance of my Peanut Butter Satay recipe for a quick dinner.
Essential Recipe Specifications
When planning your bake, precision is your best friend. The air fryer is less forgiving than a large oven because the margins for error are smaller. I always use a digital scale to measure my 190g of all purpose flour because "a cup" can vary wildly depending on how you scoop it.
Too much flour leads to a crumb that feels like sawdust, and we want velvety perfection.
The timeline is straightforward: 15 minutes for prep and 35 minutes for the fryer. You need to account for the carryover cooking that happens once the pan is removed. If the center feels just slightly soft but a toothpick comes out clean, it's time to pull it.
The residual heat will finish the job without turning the edges into hard crackers.
Sourcing Your Wholesome Ingredients
Selecting the right components is the difference between a mediocre loaf and a showstopper. Your bananas should be past the point of "yellow with spots" they should be nearly black and soft to the touch. This is where the concentrated sugar and deep banana flavor live.
| Ingredient | Science Role | Pro Secret |
|---|---|---|
| Overripe Bananas | Hydration & Fructose | Use skins with black spots only |
| Baking Soda | Leavening & Browning | Sift to avoid metallic clumps |
| Brown Sugar | Humectant | Pack tightly for deep molasses notes |
| Sea Salt | Flavor Contrast | Use flaky salt to brighten the chocolate |
Wet Base Components
The foundation of this loaf relies on the 1/3 cup of melted unsalted butter and the single large egg. The egg provides the protein structure needed to hold up the heavy mash of bananas. I always ensure the egg is at room temperature so it emulsifies properly with the melted butter, preventing the batter from breaking.
Dry Foundation Mix
Your dry mix of flour, baking soda, and cinnamon acts as the scaffolding. The 1/2 tsp of ground cinnamon isn't just for flavor; it complements the earthy notes of the 1/4 cup of chopped walnuts.
When these meet the wet ingredients, a short period of gluten development occurs just enough to give the bread chew without making it tough.
Gourmet Finishing Additions
The 1/2 cup of semi sweet chocolate chips adds pockets of molten cocoa throughout. If you're feeling adventurous, you can swap half of these for dark chocolate chunks to add a bit of bitterness. While this bakes, I sometimes prep a savory snack like my Garlic Bread Crostini recipe to balance the sweetness of the kitchen aromas.
Required Kitchen Tools and Setup
You don't need a professional kitchen, but a few specific items make this much easier. A 6x3 inch or 7x3 inch loaf pan is the standard size that fits most 4 quart to 6 quart air fryers. Before you start mixing, physically place your empty pan inside the fryer basket to ensure the drawer closes completely.
Chef's Tip: To ensure a clean release, create a "parchment sling." Cut a strip of parchment paper the width of your pan and let the excess hang over the sides. This allows you to lift the loaf out without damaging the delicate crust.
step-by-step Cooking Timeline
Preparing the Pan
Start by greasing your loaf pan thoroughly with butter or a neutral oil spray. Lay in your parchment sling. This is also the time to preheat your fryer to 320°F for 3 minutes.
Even though fryers heat up fast, starting with a hot chamber ensures the leavening agents react immediately when the batter enters.
Combining the Batter
In a large bowl, mash your 3 bananas until almost liquid. Whisk in the 1/3 cup melted butter, then stir in the white and brown sugars, the egg, and the 1 tsp of vanilla extract. In a separate bowl, whisk the flour, soda, salt, and cinnamon.
Gently fold the dry ingredients into the wet until just combined seeing a few streaks of flour is actually a good sign that you haven't overmixed.
Monitoring the Center
Pour the batter into the pan and smooth the top. Sprinkle the 1/2 cup of chocolate chips and 1/4 cup of walnuts over the surface. Place the pan in the basket and set the timer for 35 minutes. At the 20 minute mark, check the color.
If the top is already deep brown, loosely tent it with a small piece of foil to prevent burning while the center finishes.
Comparing Homemade and store-bought
| Feature | Homemade Air Fryer Loaf | Bakery/store-bought |
|---|---|---|
| Texture | Crispy shell, fudgy center | Uniformly soft/cakey |
| Ingredient Control | No preservatives, real butter | Often uses oils and stabilizers |
| Cost | Minimal (uses pantry staples) | $4-$7 per loaf |
Fixing Common Baking Errors
Causes of Sunken Centers
A sunken middle usually happens because the leavening agent (baking soda) reacted too quickly or the bread was pulled too early. If the internal temperature doesn't reach roughly 200°F, the structure hasn't set enough to support its own weight.
Another culprit is over mashing the bananas until they are too watery, which throws off the liquid to dry ratio.
Preventing Top Burn
Because the heating element in an air fryer is often only inches away from the food, the sugars in the banana and chocolate can scorch. This is why we use a lower temperature of 320°F compared to the standard 350°F.
If your unit runs hot, move the pan to the lowest possible position or use the foil tenting method mentioned earlier.
| Problem | Root Cause | Solution |
|---|---|---|
| Gummy center | Underbaked or too many bananas | Use exactly 3 bananas; check with toothpick |
| Burnt top | Basket too close to element | Tent with foil after 20 minutes |
| Flat loaf | Expired baking soda | Test soda in vinegar before mixing |
Common Mistakes Checklist
- ✓ Pat the bananas dry if they seem excessively watery after mashing.
- ✓ Use a digital thermometer to check for an internal temp of 200°F.
- ✓ Avoid opening the air fryer drawer every 5 minutes; it drops the temp.
- ✓ Do not overfill the pan; leave at least an inch of headspace for the rise.
- ✓ Let the bread rest in the pan for 10 minutes to stabilize the crumb.
Flavor Variations and Substitutions
If you find yourself missing an ingredient, don't panic. This recipe is resilient. Just remember that substitutions often alter the final texture. For instance, using honey instead of brown sugar will result in a much darker, stickier crust that might brown faster.
| Original Ingredient | Substitute | Why It Works |
|---|---|---|
| Unsalted Butter | Coconut Oil (melted) | Same fat ratio. Note: Adds a subtle tropical flavor profile. |
| All Purpose Flour | Whole Wheat Flour | Adds fiber. Note: Resulting loaf will be much denser and nuttier. |
| Walnuts | Toasted Pecans | Similar fat content. Note: Pecans offer a sweeter, more buttery crunch. |
Mini Muffin Variations
If you want to speed things up, you can use silicone muffin liners. Fill them 3/4 full and air fry at 300°F for 12 to 15 minutes. This is perfect for meal prep because they freeze individually and thaw in a lunchbox by noon.
The texture becomes more like a traditional muffin lighter and with more surface area for that crispy "muffin top."
Storing for Long Lasting Freshness
Storage Guidelines
Once completely cool, wrap the loaf tightly in plastic wrap or store it in an airtight container at room temperature for up to 3 days. To keep that "shatter" on the crust, I recommend avoiding the fridge, as the moisture can make the exterior tacky.
If you must keep it longer, the fridge will extend it to 6 days, but I'd suggest toasted slices after day three to bring back the life.
Zero Waste Tips
Never throw away the peels! While we don't use them in this bread, you can steep banana peels in water for 48 hours to create a nutrient rich "tea" for your houseplants.
If you have leftover walnuts that are starting to taste a bit stale, toast them in the air fryer for 2 minutes at 320°F to refresh their natural oils before adding them to your next batch of muffins.
Best Serving Suggestions
This bread is best served slightly warm. I love a thick slab with a smear of salted butter that melts into the crumb. For a more decadent experience, drizzle a little honey over the top or serve it alongside a dollop of Greek yogurt for a protein boosted breakfast.
The chocolate chips provide a velvety contrast to the crunch of the walnuts, so you don't really need a heavy frosting. However, if you're serving this for a special occasion, a light dusting of powdered sugar makes the dark, crackled top look absolutely stunning.
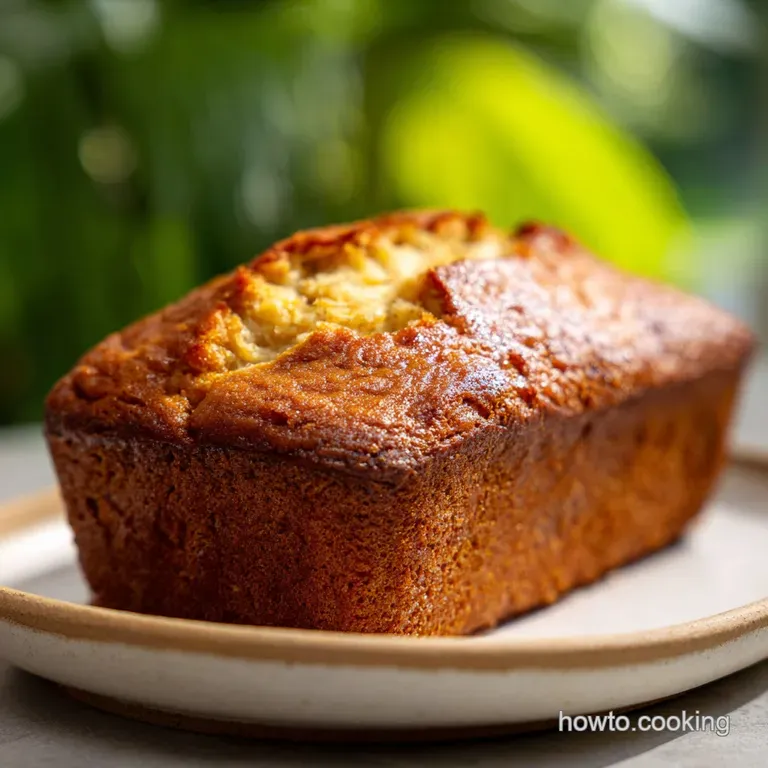
It's a confident, wholesome bake that proves you don't need a lot of time to make something that feels like a labor of love.

Recipe FAQs
Can I cook banana bread in an air fryer?
Yes, you absolutely can. Air frying yields a loaf with a uniquely crisp, caramelized exterior while keeping the interior incredibly moist due to the concentrated, circulating heat.
How does air frying affect the texture of banana bread?
It creates a denser, fudgier crumb with a superior crust. The rapid convection strips moisture from the surface quickly, promoting immediate browning (Maillard reaction) which locks in the interior moisture.
What is the number one mistake made when making banana bread in an air fryer?
Using too high a temperature, which burns the top before the center sets. Stick to 320°F and use a small loaf pan so the heat source isn't too close to the batter surface.
Is an air fryer good for baking bread in general?
It is excellent for small items like rolls or quick breads, but challenging for large loaves. The smaller chamber concentrates heat, which can lead to uneven baking in very large recipes, though it works perfectly for the size required for banana bread.
How do I prevent my banana bread from sticking to the air fryer pan?
Create a parchment paper sling before mixing your ingredients. Cut a strip slightly wider than the pan so you have handles to lift the finished loaf out easily once it cools slightly.
What temperature should I use for air fryer banana bread?
Set your air fryer to 320°F for approximately 35 minutes. If the top starts browning too fast around the 20-minute mark, loosely tent it with aluminum foil to shield it while the center finishes cooking.
If my bananas are too firm, can I use them anyway?
No, aim for heavily spotted or black bananas for the best results. The ultra ripe fruit provides the essential concentrated sugar and moisture content necessary for a dense, fudgy crumb, similar to the richness achieved in our Peanut Butter Cookies recipe.
Air Fryer Banana Bread

Ingredients:
Instructions:
Nutrition Facts:
| Calories | 359 kcal |
|---|---|
| Protein | 4.9 g |
| Fat | 14.3 g |
| Carbs | 56.2 g |
| Fiber | 2.9 g |
| Sugar | 31.2 g |
| Sodium | 287 mg |
