Chocolate Chip Cookie Bark Delight
- A Sweet Journey: Discovering Cookie Bark
- The Scoop on Cookie Bark: A Timeless Treat
- Why You’ll Love This Recipe
- Ingredients: A Simple Setup
- Essential Ingredients Guide: Crafting the Perfect Cookie Bark
- Mastering Professional Cooking: The Secret Behind Cookie Bark
- Pro Tips & Secrets for Cookie Bark Success
- Perfect Presentation: Make Your Cookie Bark Eye Candy
- Storage & Make-Ahead Tips
- Creative Variations to Spice Things Up
- Complete Nutrition Guide: Treat Yourself Smartly
- Wrap-Up: look into into Your Own Cookie Bark Adventure!
- Frequently Asked Questions
- 📝 Recipe Card
A Sweet Journey: Discovering Cookie Bark
Oh my gosh, let me take you back to that one rainy saturday afternoon when i decided to dive into the kitchen with an urge to bake.
I found myself with a random mix of chocolate and cookie dough, and voila cookie bark was born! like, what’s not to love about that combo, right? it’s like taking your classic chocolate chip cookies and giving them a crunchy, chocolatey twist.
Seriously, if you haven’t tried it, you're missing out.
The Scoop on Cookie Bark: A Timeless Treat
Now, cookie bark may sound like a new trend, but it’s got roots! this treat is a delicious mash-up of two classic american favorites: chocolate chip cookies and crunchy snack bark.
It gained popularity as people started looking for ways to combine these beloved treats. fast forward to today, and cookie bark has taken center stage, appearing at everything from family gatherings to fancy parties.
Honestly, it’s become a staple for those late night snack cravings!
You can whip this up in under an hour roughly 15 minutes for prep, a quick 10 minutes in the oven, and about 30 minutes to chill.
And don’t worry; difficulty level? easy peasy! if you can melt chocolate and mix some ingredients, you’re golden.
As for cost, it’s pretty budget friendly, making it a great choice if you’re looking to feed a crowd. With just under $15, you can treat approximately 12 folks unless you eat half the batch before sharing!
Why You’ll Love This Recipe
Let’s talk health benefits for a sec. sure, we’re indulging, but chocolate has antioxidants, and you get a little protein from the eggs that go in the cookie layer.
Not that i’m trying to give you a health lecture while we indulge! but hey, a perk is a perk, right?
What sets cookie bark apart? it's versatility! you can customize this recipe with your favorite mix-ins. go nuts with nuts, or throw in some sprinkles for a colorful pop seriously, the options are endless!
this makes it perfect for special occasions, like birthday parties, holiday gatherings, or even just as a sweet treat while binging your favorite show on netflix.
Another fantastic selling point? It’s way easier than traditional cookies or brownies. No fussing around with scooping dough or waiting for pans to cool. Just spread, chill, cut, and serve.
Ingredients: A Simple Setup
Now that you’re sold, let’s see what you need to get cookin’. Here’s the ingredient list, and I promise you’ll have most of these in your pantry already!
For the cookie layer, gather:
- 1 cup of softened butter
- 1 cup of packed brown sugar
- ½ cup granulated sugar
- 2 large eggs
- 2 teaspoons vanilla extract
- 2 cups of all-purpose flour
- 1 teaspoon baking soda
- ½ teaspoon salt
- 1 cup of chocolate chips (semi sweet or milk)
And for that luscious chocolate layer, grab:
- 2 cups of chocolate chips (your choice of dark or milk)
- A teaspoon of coconut oil (for that shiny finish)
You might wanna sprinkle some sea salt on top too trust me, it’s like adding the cherry on top of a sundae!
So, what do you say? are you ready to transform your kitchen into a cookie bark haven? let’s mix that chocolate chip cookie brittle magic and dive into a yummy adventure together.
Stay tuned as we dive deeper into the delicious world of cookie bark recipes and how to make them a star in your baking lineup!
Essential Ingredients Guide: Crafting the Perfect Cookie Bark
Ever thought about creating a dessert that’s as simple as pie (or, like, cookie bark)? cookie bark is like that perfect hybrid of a classic chocolate chip cookie and a crunchy treat, just sitting there waiting for you to indulge.
So, let’s break down the essential ingredients you need to whip up this delightful snack!
Premium Core Components
When building your cookie bark masterpiece, the core ingredients matter. Here's your handy guide.
Measurements matter! for a successful bake, use 1 cup (225g) of unsalted butter, softened , and 1 cup (200g) of packed brown sugar .
If you’re in europe, that’s 2 cups (250g) of all-purpose flour and 2 large eggs . stick with it, and you’ll have no issues whipping up that buttery goodness!
Quality indicators are huge too. Look for butter that’s creamy without any weird lumps. Check your sugar fresh, rather than clumpy, is a must! And did you know that when it comes to chocolate chips, higher cocoa content translates to richer flavor? Win-win, right?
Now, let’s talk storage guidelines and shelf life . keep your cookie bark in an airtight container in the fridge, and it'll be fresh for about a week.
Of course, it probably won’t last that long this stuff is addictively good!
Freshness tips? check your eggs for expired dates, and ensure your flour doesn’t have the smell of an abandoned pantry (eew).
For cookie bark that shines bright, use dark or milk chocolate chips with that perfect sheen you know, the kind that makes you drool.
Signature Seasoning Blend
The secret to elevating your cookie bark is in the flavors. a quick blend of essential spices and herbs transforms your ordinary treat into something extraordinary! a hint of sea salt on top can make all the difference, balancing that sweet chocolatey taste (think chocolate chip cookie brittle).
For flavor enhancers , toss in some vanilla or almond extract. trust me, a little dash goes a long way.
And don’t forget regional variations! whether you’re in the south with pecan pieces or out west with a sprinkle of chili powder for that kick there are no wrong choices.
Smart Substitutions
Okay, every cook has faced the dreaded inventory check! what do you do when you’re outta one ingredient? smart substitutions save the day.
If you’re missing chocolate chips, how about crushed oreos or toffee bits? yes, it can be that easy!
Are you watching your diet? no sweat! try coconut oil instead of butter, or swap regular flour for a gluten-free version.
Honestly, the possibilities are endless. you could even experiment with white chocolate and nuts, creating a cookie bark that’s so unique it’ll impress your friends!
Kitchen Equipment Essentials
Now let’s get to the must have tools . you don’t need much for cookie bark just a mixing bowl, a baking pan , and some parchment paper.
If you don’t have a silicone spatula for spreading, a regular old spoon works just fine.
Got a microwave? Great! It’s perfect for melting chocolate without fuss. Just keep it to 30-second increments until smooth. Cool, right?
For storage solutions , try keeping that cookie bark in a nice jar. makes it look so pretty on your kitchen counter, and you can impress your guests when they come by for a coffee and want to snack on something sweet.
Once you’ve got all your ingredients ready and your equipment in place, you’re primed to jump straight into the cookies zone and bring our Chocolate Chip Cookie Bark Delight to life.
Ready to dive into the step-by-step instructions? Let’s do this! 🍪✨
Mastering Professional Cooking: The Secret Behind Cookie Bark
So, you want to dive into the exciting world of professional cooking, huh? let’s break it down a bit and sprinkle in some cookie bark magic along the way.
One of the coolest aspects of cooking like a pro is how you can elevate something simple, like chocolate chip cookie brittle , to a whole new level.
Buckle up, my friend i’m about to share some essential steps and sweet pro tips!
Essential Preparation Steps
First things first, mise en place . this fancy french term just means "everything in its place." gather your ingredients before you start cooking.
It helps keep your kitchen from looking like a disaster zone! trust me, you don’t want to be searching for that last cup of flour while your butter is melting away.
Speaking of butter, make sure it's softened if you're using it for the cookie layer.
Now, let’s talk time management . timing is key in professional kitchens! remember, the total preparation time for our chocolate chip cookie bark delight is around 55 minutes .
So set a timer when you pop those bad boys into the oven; it makes all the difference. and organization? that’s a no-brainer.
Keep your workspace tidy, utilize bowls for ingredients, and keep notes to remind yourself of steps.
Oh, and don’t forget about safety! Always watch out for hot surfaces and sharp knives especially when you’re melting chocolate for our decadent bark. Ouch!
step-by-step Process
Ready to whip this cookie bark together? Let’s roll! Here’s your step-by-step guide, broken down like your favorite cozy recipes.
- Preheat your oven to 350° F . Perfect for that golden cookie goodness.
- Line a baking pan with parchment paper. It’s a game changer for cleanly removing your creation later.
- Mix it up ! In one bowl, cream your butter and sugars. Then, add those eggs. Just mix those bad boys in until you get a fluffy texture maybe 2- 3 minutes.
- Combine your dry ingredients in a separate bowl and fold them in. This step should take you about 5 minutes , max.
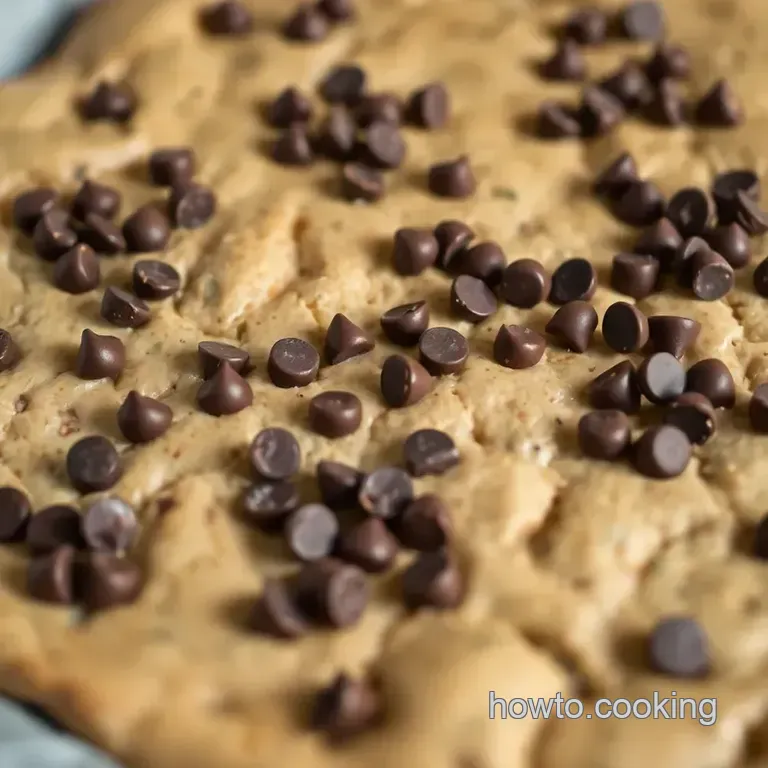
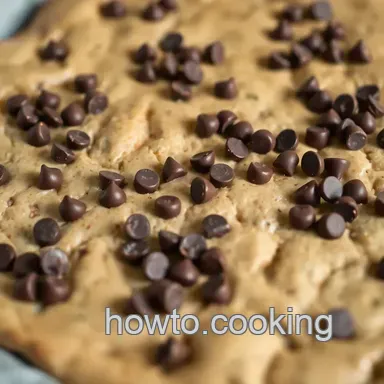
- Spread that cookie mixture into the pan, and bake for 10- 12 minutes . Use those visual cues golden edges are your best friend!
- Let it cool for a hotter second while you melt those chocolate chips. Nuke it in 30-second increments ; you’ll thank me later for this tip!
You’ll know the chocolate is ready when it’s smooth and shiny. Pro tip : Add a teaspoon of coconut oil for that stunning sheen you see in bakeries!
- Spread the melted chocolate evenly over your cookie layer, sprinkle on that sea salt (oh yeah), and chill it for about 30 minutes . Trust me let the fridge do its thing!
Expert Techniques
Let’s up our game with some expert techniques . one critical step is making sure your cookie bark has those perfect layers.
Start by mixing your dough just until combined no need for over kneading!
Don't forget your quality checkpoints. test a small piece of the cookie layer it should be chewy in the middle and crispy on the edges.
If you see it getting too brown, quickly pull it from the oven.
Now, for those who run into trouble, we’ve all been there! if your bark breaks instead of cuts into nice squares, don’t sweat it.
Just call it “cookie brittle” and serve it as a snack!
Success Strategies
Want to nail this dessert every time? here are some success strategies . first, avoid overbaking; that’s the biggest mistake rookie bakers make! you seriously want that soft center for the perfect bite.
Quality assurance? Taste test as you go! If someone offers to help, hand them a spoon and let them be your taste tester. Who doesn’t love sneaking a bite?
If you’re thinking ahead, this cookie bark also shines as a make-ahead option. store it in an airtight container, and it’s good for about a week.
Perfect for parties or just chilling at home!
And voila! you now know how to transform your dessert game with cookie bark . whether you go for easy cookies for a crowd or stick with the classic chocolate brittle , the skills you pick up will serve you well in your cooking adventures.
Additional Information
Feeling inspired? Great! The world of baking is expansive and filled with possibilities. Next up, we’ll explore variations on this recipe, so buckle up for more sweet treats!
Pro Tips & Secrets for Cookie Bark Success
Oh my gosh, let’s talk about cookie bark ! it’s like the cooler cousin of traditional cookies think a dreamy collaboration of cookie goodness and chocolatey bliss.
Honestly, there are a few pro tips i picked up along the way that’ll take your game to the next level.
First off, for that perfect texture , use room temperature butter when whipping up your cookie layer. it makes the creaming process easier and gives your bark that melt-in-your mouth vibe.
Another tip? don’t overbake the cookie layer! you want it to be just slightly soft in the center. trust me; it’ll set as it cools, giving you that chewy bite you love.
And flavor enhancers? Yes, please! Try adding a sprinkle of sea salt on top of the chocolate layer. This little touch makes everything pop! It’s sweet, it’s salty, it’s downright delightful.
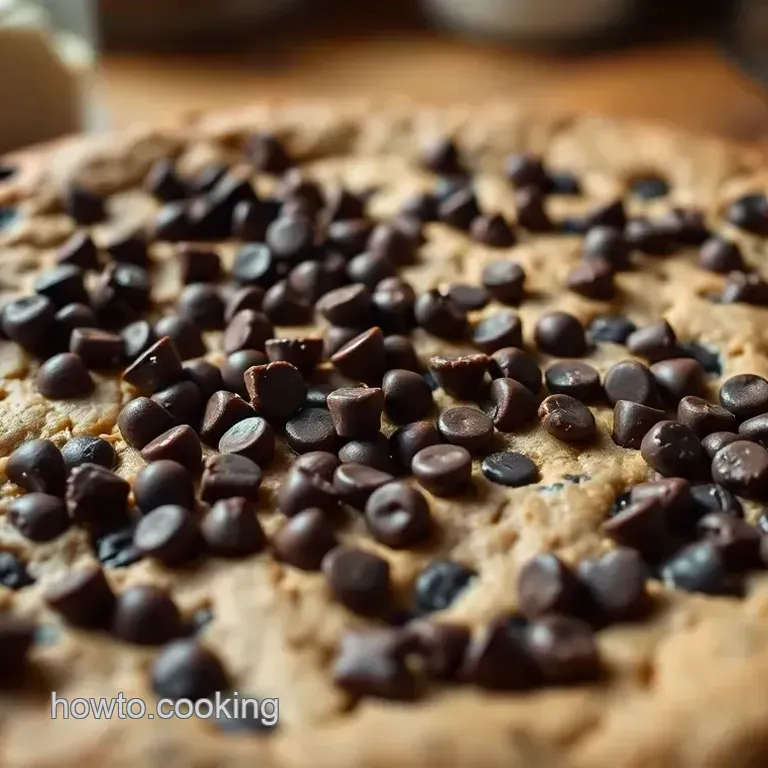
Perfect Presentation: Make Your Cookie Bark Eye Candy
Now, let’s get to the fun part how to make your cookie bark simply gorgeous. plating can be an art, folks! when cutting your cookie bark, go for nice, even squares.
If you want to feel fancy, layer your pieces on a rustic wooden board or colorful plate. it transforms your dessert from "meh" to "wow" in a heartbeat!
Garnishes can elevate your display even further. think about tossing on some colorful sprinkles or a few crushed nuts for crunch.
When it comes to color combinations, contrasting dark chocolate with vibrant toppings creates that “i need to instagram this” look.
Let’s be real; it’s all about the visual appeal!
Storage & make-ahead Tips
So, maybe you whipped up a batch of this cookie bark and you want to make it last? here’s the deal: store it in an airtight container in the fridge.
That’ll help keep everything fresh for about a week. if you’re like me and can’t resist sneaking a piece here and there, you’ll want to make sure they stay good!
If you plan to enjoy this homemade delight later, go ahead and make it ahead of time. just follow the recipe, chill it, and keep it sealed.
It'll stay solid for a week when kept cold. for reheating, i wouldn’t recommend it. the chocolate layer is best enjoyed fresh.
But you can let it sit out a bit before serving room temperature makes it extra yummy!
Creative Variations to Spice Things Up
The beauty of this recipe is its versatility! feeling adventurous? switch things up based on your taste or what’s in season.
For instance, swap out chocolate chips for white chocolate and add a swirl of raspberry jam. that combo is totally on point for summer!
If you’re into chocolate chip brittle, try thinner layers it gives a different texture altogether. got vegan friends? no problem! substituting coconut oil for butter and using dairy-free chocolate can create a deliciously inclusive treat.
You can even go the diy brownie brittle route by incorporating brownie bits into your cookie bark!
Complete Nutrition Guide: Treat Yourself Smartly
Alright, let’s chat about the numbers. a rough estimate for a piece of this cookie bark is around 200 calories .
Seems pretty fair for a decadent treat, right? it's packed with carbs, fats, and all those sweet vibes, but hey, let's keep it balanced!
If you're looking out for dietary considerations, feel free to mess around. Choose gluten-free flour if necessary or play around with low-sugar chocolate.
Wrap-Up: look into into Your Own Cookie Bark Adventure!
In the end, making cookie bark is all about having fun and getting creative in the kitchen. whether it’s a party treat or just a late night snack, the joy of baking can make any day better.
So grab your ingredients, put on your favorite tunes, and don’t be shy about experimenting. let your personality shine through it’s what brings these treats to life!
Happy baking, friends! I can't wait to see your yummy results get ready for some big smiles when you share this deliciousness with your loved ones!
Frequently Asked Questions
What is cookie bark and how is it different from regular cookie recipes?
Cookie bark is a delicious dessert that combines the elements of cookies and chocolate bark into a single treat. Unlike traditional cookies, cookie bark is layered with a cookie base and topped with melted chocolate, resulting in a crunchy, chewy texture.
It's a delightful mashup that’s perfect for snacking or gifting!
Can I make cookie bark in advance, and how should I store it?
Absolutely! You can prepare cookie bark a few days in advance. Just store it in an airtight container in the fridge to keep it fresh and prevent it from getting too soft. If you want to keep it for a longer period, it can be frozen, but make sure to wrap it tightly to prevent freezer burn.
What are some fun variations I can try with my cookie bark?
The possibilities are endless! You could add in crushed nuts, toffee bits, or even dried fruits for a unique twist. For a festive touch, try mixing in some holiday themed sprinkles. Alternatively, experiment with flavored chocolate like white chocolate or peppermint for an extra layer of taste.
Is cookie bark easy to make for beginners?
Yes, indeed! Cookie bark is perfect for novice bakers due to its straightforward technique just mix, spread, and chill. With no complicated steps, it's a great dessert to get started with, and it allows for creativity in toppings!
Can I make a gluten-free version of cookie bark?
Certainly! Simply substitute the all-purpose flour with a 1:1 gluten-free flour blend. Just keep in mind that the texture may differ slightly, but it will still taste delicious! Be sure to check that your chocolate chips are gluten-free as well.
Do I need special equipment to make cookie bark?
No special equipment is necessary! All you need is a baking pan lined with parchment paper, mixing bowls, and something to melt the chocolate either a microwave or a double boiler. To keep things mess free and easy, just utilize tools you already have in your kitchen.
Chocolate Chip Cookie Bark Delight
Ingredients:
Instructions:
Nutrition Facts:
| Calories | 200 |
|---|---|
| Protein | 2g |
| Fat | 10g |
| Carbs | 28g |
| Fiber | 1g |
| Sugar | 18g |
| Sodium | 100mg |
