Classic Cherry Pie with a Flaky Double Crust
Oh, i remember the first time i tried to make a recipe for cherry pie i totally botched it.
I mean, i was so excited to impress friends, but my crust ended up more like a thick cracker than that flaky, buttery layer i was craving.
Still, i learned a lot especially that keeping ingredients cold and not rushing the process is key . honestly, that experience made me so determined to nail the next one, and now, making homemade cherry pie is kinda my thing.
It’s become my favorite summer treat nobody’s complaining when i roll out that golden crust and fill it with juicy cherries.
You know, cherry pie isn’t just some dessert you whip up after dinner. it’s got a pretty cool backstory. originating from traditional american baking, it’s one of those classic comfort foods that’s been passed down through generations.
And honestly? it’s more relevant now than ever, especially with all the pie cherries recipes hitting the internet. nothing says “summer” like a slice of that vibrant, sweet tart filling nestled inside a flaky crust.
Plus, it’s easy enough to make in about two hours start to finish a little prep, some patience for chilling, and a good oven.
Either way, it’s approachable for most home cooks, even if you’re a beginner. and saving on costs? pretty simple. with basic ingredients and canned cherry pie filling recipes easy as a backup, you can whip up a crowd pleaser without breaking the bank.
Now, here’s what i love about this kind of recipe it’s not just about tasting amazing. it’s packed with benefits, too.
Making a homemade cherry pie filling using fresh cherries gives you a real nutritional boost cherries are full of antioxidants and anti inflammatory compounds.
Plus, when you make your own filling, you skip all those preservatives and artificial flavors you find in store-bought stuff.
For the health conscious, it’s a winner! and sweet cherry pie is perfect for celebrations birthdays, holidays, or even just a lazy sunday.
Plus, it beats those boring pre-made desserts. there’s nothing quite like pulling a steaming pie out of the oven, sharing it with friends or family, and watching everyone’s face light up.
Another thing? a fresh cherry pie really outshines any store-bought version. it’s a simple pleasure, and trust me, once you learn some easy dessert recipes using cherry pie filling , you’ll want to make this over and over.
Whether you prefer it topped with a crumble, lattice, or just a straightforward crust, the flavor speaks for itself. and compared to other dessert recipes using cherry pie filling , this one hits that perfect sweet tart balance all homemade, no compromises.
All right, i think i’ve gushed enough. ready to dive into the ingredients and get started? trust me, once you see how easy it is to make that best cherry pie recipe at home, you’ll be hooked.
Plus, i’ll share some of my favorite tips to make sure it turns out perfectly flaky and bursting with flavor every time.
So grab your cherries whether fresh or frozen and let’s get baking!
Hey, so you want the scoop on the essential ingredients to nail that perfect recipe for cherry pie ? well, buckle up, because i’ve learned a few things from messing around in my own kitchen, and trust me no matter if you’re going for cherry pie from scratch or just some easy cherry filling recipes , a good foundation makes all the difference.
Let’s start with the premium core components . sounds fancy, but it really just means using the best ingredients you can find.
Gotta be honest crust is king here. i swear, a flaky, buttery pie crust from scratch is what truly elevates your cherry pie to that "wow" level.
I always measure my flour and sugar with a good set of measuring cups. for us and metric , i’d say: 2 1/2 cups (310 g) all-purpose flour, and if you're not in the mood for measuring? a standard scoop works too.
For the butter, stick with 1 cup (226 g) of cold, cubed unsalted butter. no shortcuts cold butter equals flaky heaven.
When shopping, look for butter that’s firm, not soft. freshness is key because melted or old butter makes your crust tough.
Storage? keep butter chilled and use within the expiry date. same with your flour store it in a cool, dry spot, and you’ll keep that homemade cherry pie filling tasting fresh.
Now, onto the signature seasoning blend . here’s where the magic happens. for cherry pie, a sprinkle of vanilla can really deepen the flavor just a teaspoon or so.
Lemon juice is your secret weapon it brightens the cherries and balances out the sweetness, especially if you're doing sour cherry pie filling recipes .
Herbs? not typical for cherry pies, but i love a pinch of cinnamon or even some allspice if you’re feeling adventurous.
For regional spins, like nanking cherry recipes or canned cherry pie filling recipes easy , sometimes a dash of almond extract adds a lovely twist.
Flavor enhancers and aromatics like lemon zest or a splash of bourbon can make your filling stand out. and if you’re trying to keep it simple, just stick to the staples.
Basically, recipe for cherry pie is all about balancing tartness and sweet so don’t forget the pinch of salt it enhances everything.
Now, let’s chat smart substitutions . sometimes your fresh cherries are out of season, and you gotta get creative. no worries! frozen cherries or even canned pitted cherries work perfectly in most dessert recipes using cherry pie filling .
Honestly, i’ve used canned cherry pie filling recipes easy , and nobody even knew! just drain the excess juice so your crust doesn’t turn into a soggy mess.
If you’re avoiding gluten, opt for a gluten-free flour blend . for vegan buds, swap butter for coconut oil or plant based butter.
And in a pinch, if you run out of vanilla, almond extract or even a splash of cherry liqueur can add a punch of flavor.
And don't forget seasonal options . summer’s prime cherry time, but in winter, i buy frozen pitted cherries from the store because they work just as well, especially in cherry pie filling with frozen cherries .
Plus, they’re cheaper and still super tasty.
Now, a quick word on your kitchen equipment . a good food processor or pastry cutter speeds up crust making, and a rolling pin is a no-brainer.
I also keep a pie dish handy because nothing beats a classic 9 inch pie dish for that perfect presentation. for those of you wanting a sheet pan cherry pie bars or cherry pie filling bars recipes , a sturdy baking sheet works great, too.
Oh, and a pastry brush helps you get that shiny, golden egg wash on top. trust me, that little step makes your cherry pie look restaurant ready! also, don't forget foil or a pie shield not fancy, but super helpful to keep the crust from burning before the filling is just right.
So, with all these ingredients and tools , you’re prepped to whip up the best cherry pie . whether you’re doing a fresh cherry pie or using a starter homemade cherry pie filling , getting these basics right will make a huge difference.
From here, once you've checked all the boxes like perfect crust, flavor packed filling, and smart substitutions, it’s time to move on to the fun part actually assembling and baking your masterpiece!
think of this as the foundation for the best cherry pie recipe you’ll ever make, and i promise, it’s easier than it sounds.
Next stop? Let’s talk step-by-step instructions —because your gorgeous, flaky cherry pie is just a few tips away from being ready to wow everyone at your next dinner!
Hey friend! so, you're thinking about tackling that perfect recipe for cherry pie , huh? honestly, there's just something so satisfying about creating a homemade cherry pie from scratch.
I’ve been there trying to nail that flaky crust and that juicy, bright filling. trust me, once you get the hang of it, it’s totally worth it.
Today, i want to share some pro tips and guide you through the whole cooking method so your cherry pie turns out amazing every time.
Let’s start with Essential Preparation Steps.
First off, mise en place is your best friend yeah, that fancy french phrase just means get everything prepped before you start.
You want your pie crust ingredients , your cherry filling , and all your tools ready to go. for the crust, that means measuring your flour, chopping your butter , and getting your water icy-cold.
Here's the deal: keeping ingredients cold helps the crust stay flaky. i learned this the hard way i once skipped chilling and ended up with a dense crust that no one wanted.
Time management wise, give yourself about an hour of chill time for the dough, plus some extra for prepping the filling.
Organization is key, so i keep all my measuring cups close and line up my ingredients in order. and don't forget safety when handling sharp knives or hot oven, be cautious.
Plus, always work on a clean surface.
Now, onto step-by-step Process .
Numbered instructions are best, so here goes:
Mix together flour, salt, and sugar. Cut in cold butter until you get coarse crumbs. This is crucial — you want those little pea-sized butter bits for that puffed-up crust.
Slowly add ice water, about a tablespoon at a time, just until the dough sticks together. don't overmix! overworking dough can make it tough, and nobody wants a dense crust for their homemade cherry pie filling .
Divide your dough into two disks, wrap ’em up, and refrigerate for at least 1 hour — I usually do overnight, but an hour does the trick if you're in a rush.
For the filling, toss your cherries with sugar, cornstarch, a splash of lemon juice, vanilla, and a pinch of salt.
If you’re using frozen cherries , make sure to thaw and drain excess water so your filling isn’t all watery.
Roll out one disk on a floured surface to about a 12 inch circle. gently transfer it to your pie dish.
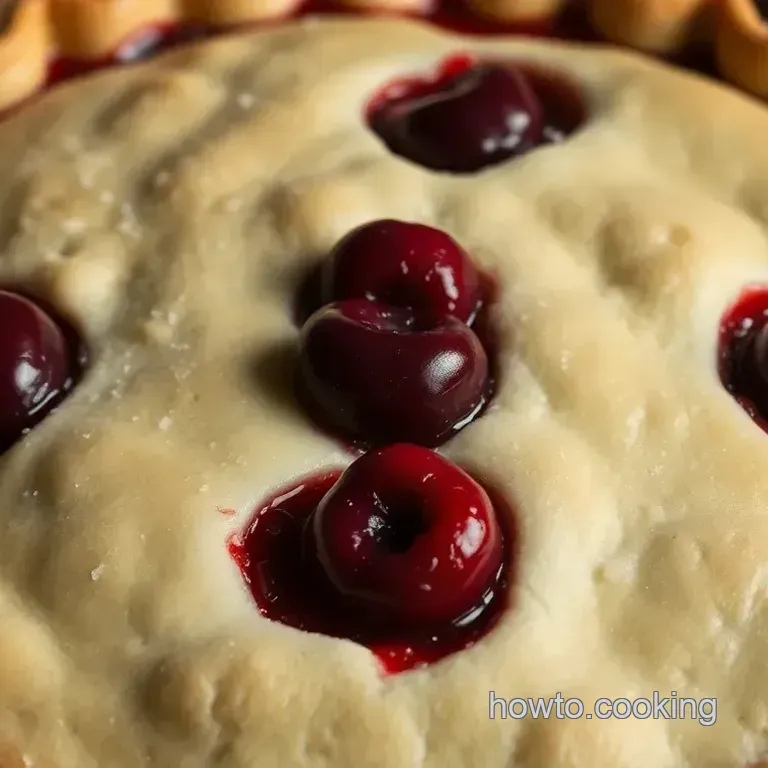
Now, pour in that sweet, tangy cherry filling . it should just about reach the top without spilling over.
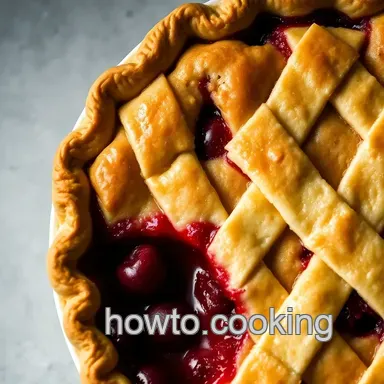
For the top crust, repeat the rolling. You can go full cover or do a lattice honestly, things like pie cherries recipes really shine in their presentation, so lattice is fun and looks cute!
Seal the edges by crimping or pinching the dough. Brush the top lightly with beaten egg and sprinkle some sugar for that glossy, golden finish.
Pop it in a preheated oven at 375° f for around 45 minutes . keep an eye on those edges if they brown too quick, cover with foil.
You want a golden crust and bubbling filling to signal it’s done.
Now, here’s my hot tip : cooling the pie for at least 2 hours is a must. otherwise, the filling stays runny, and the first slice is a disaster.
I’ve totally made that mistake wanted to dive right in and ended up with a cherry mess. patience, my friend!
Next, Expert Techniques .
One thing i swear by is blind baking the bottom crust for about 10 minutes if you want to avoid a soggy bottom.
Just pop it in, covered with parchment and some pie weights or dried beans. this is especially helpful when you’re doing canned cherry pie filling recipes easy or dessert recipes using cherry pie filling .
If you use fresh cherry pie filling recipes with a mix of sweet and tart cherries, you’ll want to taste your filling before pouring it in.
It helps you adjust sugar if necessary. when selecting cherries whether pie cherries recipes or nanking cherry recipes look for firm, bright picks with a deep color.
That vibrant flavor translates into a more flavorful filling.
Troubleshooting? if your crust is getting too dark before the filling bubbles, try covering the edges with foil. or, if the cherry filling seems too runny even after cooking, gently simmer the filling on the stove with a bit more cornstarch mixed into cold water, then cool before filling your crust.
Finally, Success Strategies .
Avoid common mistakes like over flouring your dough or not chilling long enough. both lead to a tough pie. use quality ingredients good butter and fresh or properly thawed cherries make all the difference.
Want a perfect result ? keep an eye on your oven. you’re aiming for that beautifully golden crust and bubbly filling .
If you’re short on time, you can also prepare the filling a day ahead and store it in the fridge.
That way, all you need to do is assemble and bake.
When it comes to things to do with cherry pie filling , i love making quick cherry pie filling bars recipes or even sheet pan cherry pie bars those are such a hit, and they’re super easy to make-ahead.
So, that sums up the professional cooking method for your best cherry pie recipe . Master these steps, and you’ll be serving up a show stopping, deliciously nostalgic dessert in no time.
And hey, if you’re curious about more tips or want some fun variations, I’ve got some extra info coming up in the last section. Stay tuned you’re gonna love it!
Hey, so you've been thinking about that perfect recipe for cherry pie , huh? honestly, it’s one of those desserts that instantly makes me think of summer picnics, fourth of july gatherings, and flipping through family cookbooks with my grandma.
There’s just something about biting into a warm slice of homemade cherry pie that feels so nostalgic, you know?
Pro Tips & Secrets
Let me share some secrets i’ve picked up over the years. first off, my personal tip always keep your butter cold.
I can’t tell you how much flaky, buttery crust makes the pie shine. when i make my pie crust from scratch , i toss in a little vinegar to get that delicate layer separation, kinda like that perfect flaky texture you get in bakery pies.
Using a food processor definitely saves time here, but if you’re old school like me, a pastry cutter works just as well.
Now, for the cherry filling , i swear by using fresh cherries if you can get them. the bright, tart taste from fresh is just next level , but hey, i get it not always in season.
That’s where canned cherry pie filling recipes easy come to rescue. just make sure to drain the liquid well; nobody wants a soggy crust, and a good trick is to add a spoonful of cornstarch to your filling, so it thickens up perfectly during baking.
Oh! and here's a time saver : toss your filling together while your crust is chilling. it’s incredible how flavors meld while the dough rests.
Plus, chilling helps prevent the dough from shrinking in the oven. when it’s time to bake, brushing the crust with an egg wash gives that shiny, golden finish.
Trust me, presentation makes all the difference a shiny crust instantly makes your home-made cherry pie filling recipe look extra fancy.
Perfect Presentation
Speaking of looks, don’t underestimate the power of good plating and garnishes. i love doing a lattice top it’s classic, cute, and shows off your sweet cherry filling peeking through.
If you’re feeling a little crafty, you can do a freeform lattice with strips of dough or even make a heart shaped top for special occasions.
As for garnishing, sprinkle a pinch of coarse sugar right before baking for a pearly, sparkly effect. after it cools, a dusting of powdered sugar, plus a sprig of mint, adds a pop of color and makes your pie a real showstopper on instagram (or just your dinner table).
Storage & make-ahead Tips
A lot of people ask, “can i make this ahead?” totally! wrap your cooled pie tightly with plastic wrap and stash it in the fridge up to 2 days.
That way, you get to savor the aroma and freshness without rushing. if you’re planning to make it days in advance, just reheat in the oven at 350° f for 10- 15 minutes to bring back that crisp crust.
To keep your leftover slices , stash them in an airtight container in the fridge. it’ll stay good for about 2-3 days just remember, the crust might soften, but reheating helps revive it.
Creative Variations
Feeling adventurous? there are so many ways to switch up your cherry pie game. you can try mixing in a handful of blueberries or even some raspberries for a more colorful, tart twist.
Want to go healthier? swap sugar for honey or agave in the filling super easy, and honestly, it adds a subtle depth to the flavor.
And if you’re trying to avoid gluten? Use a good gluten-free flour blend in your crust. Oddly enough, that makes the crust a bit more tender, which I really like.
Thinking seasonal? swap the cherries for nanking cherries . they have that unique tartness and are a cool regional twist. or, for a fun, sheet pan cherry pie bars vibe, just spread your filling over a graham cracker crust and bake in a sheet pan.
Easy to cut into squares, and perfect for potlucks!
Complete Nutrition & Healthy Tips
If you’re watching your sugar, consider using less or switching to natural sweeteners. cherries are packed with antioxidants, fiber, and vitamin c, so your homemade cherry pie filling isn’t just delicious it’s got some health perks too.
Keep an eye on portions, especially if you’re adding a lot of butter or sugar. like most desserts, moderation is key, but hey, don’t deny yourself the joy of a slice now and then!
Wrapping It Up
Honestly, making the best cherry pie isn’t rocket science. it’s about patience, good ingredients, and a little love. when you crack open that oven and the smell hits you? trust me, all your efforts come together in that one perfect bite.
Whether you’re doing a quick cherry filling recipes easy or going all-in with a from scratch version, the reward is totally worth it.
So, next time you’re craving something sweet, give this recipe for cherry pie a shot. it’s simple, satisfying, and a guaranteed crowd pleaser.
And hey, don’t forget to share it with your friends because honestly, the only thing better than eating a slice of homemade cherry pie is enjoying it with people you love.
Frequently Asked Questions

What’s the best way to make a flaky crust for my recipe for cherry pie?
For a flaky crust, keep your butter and water cold, handle the dough minimally, and avoid overmixing. Using a food processor or pastry cutter helps incorporate the butter evenly, which creates those delicious layers when baked.
Can I use frozen cherries for the recipe for cherry pie, and do I need to adjust anything?
Yes, frozen cherries work just fine just thaw and drain them well before using. Since frozen cherries are often more watery, consider reducing the added liquid slightly or adding a touch more cornstarch to keep the filling thick and luscious.
How can I prevent my cherry pie’s bottom crust from getting soggy?
To avoid a soggy bottom, try blind baking the crust for a few minutes before filling or sprinkle a layer of almond meal or crushed cookies at the bottom. Also, ensure the filling isn’t too watery adding extra cornstarch helps thicken the juices during baking.
What variations can I try with my recipe for cherry pie?
You can mix cherries with blueberries or raspberries for a colorful blend, swap sugar for natural sweeteners like honey, or make a vegan version using dairy-free butter. Lattice tops or crumbly streusel finishes add a delightful touch too!
How should I store leftover cherry pie, and how long will it stay fresh?
Store leftovers in an airtight container at room temperature for up to 2 days, or refrigerate for up to a week. To maintain crispness, reheat slices gently in the oven or enjoy at room temperature with a scoop of ice cream for extra indulgence.
Classic Cherry Pie With A Flaky Double Crust
Ingredients:
Instructions:
Nutrition Facts:
| Calories | 375 |
|---|---|
| Fat | 20g |
| Fiber | 3g |
