Chocolate Pie: the Silky Smooth Dark Chocolate Dream Pie
- Unveiling The Silky Smooth Dark Chocolate Dream Pie: A True Classic
- The Science of Silk: Why This Cooked Custard Filling Sets Perfectly
- Essential Building Blocks: Key Ingredients for Your Dark Chocolate Pie
- Step-by-Step Guide: Baking Your Dream Chocolate Pie
- Expert Tips and Troubleshooting for the Perfect Finish
- Storage and Prep: Making Your Chocolate Pie Last
- Elevating the Experience: Serving Suggestions and Pairings
- Recipe FAQs
- 📝 Recipe Card
Unveiling The Silky Smooth Dark Chocolate Dream Pie: A True Classic
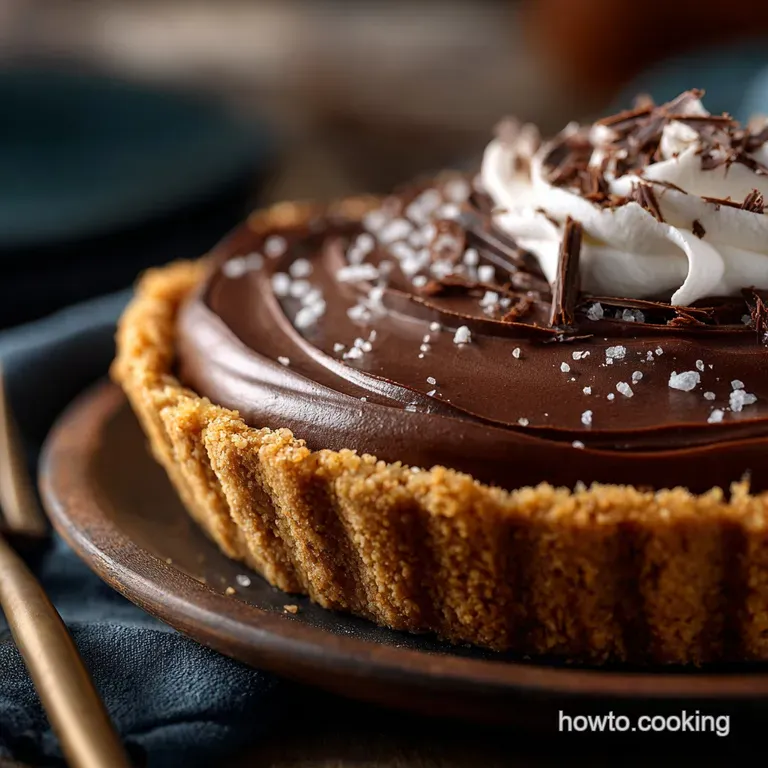
Oh my goodness, you absolutely have to try this pie. When it comes out of the oven, the entire kitchen smells like the best, darkest, coziest hot chocolate you have ever imagined, then you chill it down and the whole texture transforms.
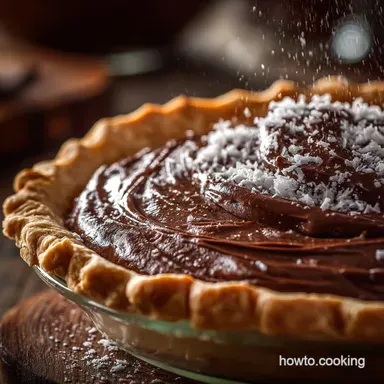
It’s rich, almost fudgy, but still manages to be incredibly silky and perfectly smooth. This is the ultimate, show stopping dark chocolate pie.
Listen, forget those gelatinous, overly sweet pudding pies we all grew up with. This recipe is different because we are making a proper cooked chocolate custard it’s intense, elegant, and tastes like a million bucks.
Best of all, once you master the simple custard technique, the whole thing becomes easy, fast, and surprisingly cheap to put together for a dessert this impressive.
We're talking about a classic recipe, perfected through years of trial and error (read: many scrambled egg failures on my part). Stop stressing about fancy techniques, darling, because I’m going to walk you through every single step.
Let’s crack on and get this unbelievably decadent, perfect chocolate pie into your belly.
The Science of Silk: Why This Cooked Custard Filling Sets Perfectly
What Makes This Chocolate Pie Different? (The Chess Pie Connection)
This is a baked custard pie, not a refrigerator pudding pie, which is the crucial difference here. We are using egg yolks and cornstarch as our primary stabilizers, much like a traditional Southern Chess Pie, rather than gelatin or instant pudding mix.
That combination gives you a velvety mouthfeel that just melts when it hits your tongue. The chocolate is the undisputed star because we aren't drowning it in stabilizer sludge.
A Nod to Nostalgia: The Classic Tearoom Filling
This particular chocolate pie recipe is an homage to those classic tearoom desserts, where pies were simple but flawless. The goal is deep flavor, not just overwhelming sweetness.
By using quality dark cocoa powder and chopped dark chocolate, we layer the flavor, ensuring a richness you simply cannot get from using milk chocolate alone.
Is This Chocolate Pie Hard to Make? Assessing the Difficulty
You might think that making a cooked custard from scratch sounds terrifying, but it’s totally doable, trust me. The technique requires attention, not skill, especially when dealing with the pastry. Once you have a handle on blind baking a shell (which we cover in my Maple Pecan Pie Recipe with Brown Butter and No Corn Syrup guide, too), the filling itself comes together in about 15 minutes. It’s easier than most people assume.
The Role of Tempering Eggs for a Luxurious Texture
This is the big secret to silkiness: tempering . Tempering simply means gently warming the egg yolks with hot liquid before introducing them to the main heat source.
If you skip this, the yolks will seize instantly when they hit the hot dairy, creating nasty, lumpy, chocolate flavored scrambled eggs. We want a luxurious texture, so we must be patient and whisk continuously.
Balancing Intensity: Selecting the Right Dark Chocolate Percentage
I am strongly opinionated about the chocolate here. For a truly intense, complex flavour, you want a 70% dark chocolate. Anything lower, like standard semi sweet, just won't cut through the richness of the cream and sugar.
If you choose a higher percentage (like 80% or 85%), you might need to add an extra tablespoon of sugar to balance the bitterness.
Achieving the Perfect Shortcrust Shell
A flaky, sturdy crust is non-negotiable for this chocolate pie crust recipe . We need a crust that is fully blind baked, dry, and strong enough to support the heavy, dense custard filling without going soggy.
The secret is keeping the butter ice-cold and then freezing the lined shell right before baking.
Essential Building Blocks: Key Ingredients for Your Dark Chocolate Pie
I always tell my friends: use the best ingredients you can afford, especially when the ingredient is in the title. Here’s what you need and what you can swap out if you're in a pinch.
high-quality Chocolate: Cacao Content Recommendations
We need two chocolate components: Dutch process cocoa powder (for deep color) and 70% dark chocolate (for intensity). Don't use natural cocoa powder unless you adjust the baking soda elsewhere; Dutch process is less acidic and gives a richer flavor.
| Ingredient | My Recommendation | Viable Substitute |
|---|---|---|
| Dark Chocolate | 70% Cacao Baking Bar | Semi Sweet Chocolate Chips (reduce sugar by 1 tbsp) |
| Dutch Cocoa Powder | Droste or Guittard | Standard Baking Cocoa (filling may be slightly lighter in color) |
Butter vs. Shortening: Creating the Flakiest Crust
For the shortcrust, use unsalted butter. It delivers superior flavor and that beautiful crispness. While shortening can make a flakier crust, I find butter just tastes better, and the flavor complements the rich filling. Keep that butter rock solid cold for maximum flakiness!
Sweeteners and Extracts: Controlling the Intensity
We use granulated sugar in the filling, which dissolves easily into the hot dairy. The vanilla extract is non-negotiable; it helps bring out the underlying notes in the chocolate, it doesn't just add vanilla flavor.
Crucial Tip: Add a tiny pinch of salt to the filling. Seriously, it brightens the entire chocolate flavor and prevents the pie from tasting flat. Trust me on this one.
Troubleshooting Dairy: Best Milk and Cream Options
This pie demands full fat dairy for that luxurious mouthfeel. Whole milk and heavy cream (double cream) are essential for richness and fat content, which helps the custard set smoothly.
| Ingredient | Required Fat Content | Substitute Notes |
|---|---|---|
| Whole Milk | Full fat only | Oat Milk (Full Fat Barista Blend) for non-dairy |
| Heavy Cream | 35% or higher | Evaporated Milk (will be less rich but still thickens) |
step-by-step Guide: Baking Your Dream Chocolate Pie

Phase I: Preparing and Blind Baking the Pastry Shell
- Work Cold: Cut the cubed, icy-cold butter into the flour, sugar, and salt mixture until you have mostly pea-sized crumbs. Now add the ice water, one tablespoon at a time, until the dough just holds together. Stop mixing the second it looks shaggy.
- The Essential Chill: Form the dough into a disc, wrap it up tight, and chill it for at least one hour. I often make my crust the day before.
- Roll and Fit: Roll the chilled dough out and gently ease it into your 9 inch pie plate. Trim the edges and crimp them neatly. Now, prick the bottom all over with a fork this is "docking."
- Freeze It! This is my biggest trick for preventing shrinkage. Stick the whole lined pie plate into the freezer for 20 minutes. Frozen crusts shrink less.
- Blind Bake: Preheat the oven to 375°F (190°C). Line the frozen crust with parchment paper, fill it completely with pie weights or dried beans, and bake for 15 minutes. Remove the weights and paper, then bake for another 8- 10 minutes until the crust looks dry and lightly golden. Cool completely! If you love a great flaky crust, you might also like my guide to Old Fashioned Peanut Butter Pie: The Best Creamy No-Bake Recipe which explores both cooked and no-bake crust options.
Phase II: Mastering the Cooked Chocolate Custard Base
- Prep the Chocolate: Place the finely chopped dark chocolate and the two tablespoons of butter in a large heatproof bowl. You’ll be pouring the hot custard right over this.
- Whisk the Thickener: In a separate bowl, vigorously whisk together the egg yolks, sugar, cornstarch, cocoa powder, and salt until the mixture is thick, pale yellow, and totally smooth. This slurry is your thickening base.
- Heat the Dairy: Combine the milk and heavy cream in a saucepan over medium heat. Heat until the edges are steaming heavily, but don't let it boil hard.
- Tempering Time: Slowly, very slowly, ladle about 1 cup of the hot dairy mixture into your yolk slurry while continuously whisking. This gentle process warms the yolks without cooking them.
- Cook the Custard: Pour the tempered mixture back into the saucepan with the remaining dairy. Reduce the heat to medium low and whisk constantly . Cook until the mixture thickens dramatically, heavy bubbles break on the surface, and it coats the back of a spoon thickly (usually 5- 7 minutes).
- Finish the Filling: Immediately pour the scorching hot custard over the chopped chocolate and butter you set aside earlier. Let it sit untouched for two minutes to melt everything, then whisk until the mixture is uniform, glossy, and perfectly smooth. Stir in the vanilla extract last.
Phase III: Assembling, Baking, and Cooling for Optimal Set
- Assembly: Pour the warm, silken chocolate filling into your fully cooled, blind baked pie shell.
- Chill Out: Place the pie, uncovered, into the refrigerator. It needs a minimum of four hours, but overnight chilling is really the best. The filling must be completely firm before you slice it.
- Topping: Just before serving, whip the cold cream, icing sugar, and vanilla until stiff peaks form. Top the pie generously, slice with a hot knife, and watch the appreciation pour in!
Knowing When It’s Done: The Crucial Pie Jiggle Test
Because we don't bake the filling again (the cooking on the stovetop sets the cornstarch and eggs), the main "doneness" test happens in the fridge. However, when you remove the filling from the heat, it should be so thick that a line drawn on the back of your spoon holds its shape briefly.
If it's runny, keep cooking it gently until it bubbles thickly.
Expert Tips and Troubleshooting for the Perfect Finish
Preventing a Cracked Filling Surface
The most common cosmetic issue is a dry "skin" forming on the surface as it cools, which cracks when you slice it. The fix is ridiculously easy. Immediately after pouring the filling, press a piece of cling film (plastic wrap) directly onto the surface before chilling.
This traps the moisture and ensures a mirror smooth finish.
Avoiding a Soggy Bottom: Crust Protection Techniques
Soggy bottoms are the bane of every baker's existence. The fix lies in Phase I: Blind baking is mandatory. Make sure the crust is dry and lightly golden brown before the filling goes in.
Also, keep the filling slightly warm when pouring, which prevents condensation from forming beneath the crust.
When Chocolate Seizes: How to Recover Your Filling
If you encounter lumps or the filling looks strangely grainy or separated when you whisk in the chocolate, it may have seized. This often happens if the bowl had a drop of water in it, or if the temperature was unstable. Don’t panic!
If it’s minor, whisk in a tablespoon of very hot water or hot milk, one drop at a time, until it smooths out. If it’s severe, you might need to try immersion blending it carefully.
Storage and Prep: Making Your Chocolate Pie Last
Refrigeration: Shelf Life and Serving Temperature
Once chilled, this chocolate pie is best stored in the refrigerator. It will keep beautifully for 3 to 4 days, though I doubt it will last that long in your house. Serve it cold, straight from the fridge; the texture is best when fully firmed up.
Can You Freeze Chocolate Custard Pie?
You can! The texture of a baked custard pie can become slightly grainier after freezing, but it is acceptable. Freeze the whole, cooled pie (without the whipped cream topping) for up to 2 months, wrapped tightly in plastic wrap and then foil.
Thaw overnight in the refrigerator before slicing and adding the fresh whipped cream.
Best Practices for Advance Prep (Pastry vs. Filling)
The pastry dough can be made up to three days in advance and kept chilled, or the entire blind baked shell can be made one day ahead. The filling is best made the day you plan to serve the pie, or the night before.
Do not make the filling more than 48 hours in advance, as the texture can start to soften.
Elevating the Experience: Serving Suggestions and Pairings
This rich dark chocolate pie doesn’t need much, but a little something tart helps cut the intensity.
- Fresh Fruit: A side of slightly tart raspberry compote or some sliced, juicy strawberries provides the perfect acidic contrast.
- The Cream: Always, always use fresh whipped cream, dusted lightly with cocoa powder or dark chocolate shavings. This light contrast balances the heavy custard perfectly.
- A Grown-Up Splash: If you’re feeling extra fancy, sprinkle a dash of espresso powder into the whipped cream before beating it for a lovely mocha kick.

Recipe FAQs
Why is my chocolate pie filling runny and not setting properly?
The most common cause is not cooking the custard long enough or accurately measuring the cornstarch or flour thickener. Ensure the mixture reaches a gentle simmer and coats the back of a spoon thickly (about 175°F or 80°C), cooking for at least one full minute after thickening.
Another possibility is slicing the pie before it has fully chilled for the recommended 6 hours, which is necessary for stabilization.
How can I prevent the shortcrust pastry base from becoming soggy after filling?
You must “blind bake” the crust completely until it is golden brown before adding the filling. Additionally, painting a thin layer of egg wash (or melted butter) onto the hot, blind baked shell and letting it set for a minute seals the crust, creating a necessary moisture barrier against the wet custard filling.
Is it possible to use milk chocolate instead of high-quality dark chocolate (70% Cacao)?
While possible, substituting milk chocolate will drastically change the flavor profile, making the pie significantly sweeter and less intense. If you must use milk chocolate, consider reducing the amount of sugar specified in the recipe by 1/4 cup to balance the sweetness, but know the texture may be slightly softer due to the higher fat content.
What is the purpose of tempering the eggs in this chocolate pie recipe?
Tempering gradually warms the egg yolks by slowly introducing a hot liquid (like the heated milk mixture) to them. This technique prevents the yolks from scrambling upon contact with high heat and ensures they blend smoothly into the custard, resulting in a silky, homogenous final texture rather than a lumpy filling.
What is the best way to store this pie, and can I freeze leftovers?
Store the pie tightly covered in the refrigerator for up to 3 days; custard fillings should not be left at room temperature for long periods. Freezing is not recommended, as the custard filling may weep or develop an undesirable grainy texture upon thawing due to its high moisture content and reliance on cornstarch stabilizers.
Can I adapt the shortcrust recipe to be gluten-free?
Yes, you can substitute a high-quality 1:1 gluten-free flour blend for the regular pastry flour, typically without needing other major adjustments. Be mindful not to overwork the dough, as gluten-free crusts tend to be more delicate and crumbly, requiring extra gentle handling during rolling and pressing into the pie dish.
Why does a skin sometimes form on the surface of the pie filling while it cools?
The skin forms due to surface moisture evaporation while the filling is still warm. To prevent this, immediately cover the hot filling surface directly with plastic wrap (pressing it down gently so it touches the entire surface) before chilling it. This traps the moisture and keeps the top silky smooth until it sets.
Dark Chocolate Dream Pie Recipe
Ingredients:
Instructions:
Nutrition Facts:
| Calories | 520 kcal |
|---|---|
| Fat | 38 g |
| Fiber | 2 g |
