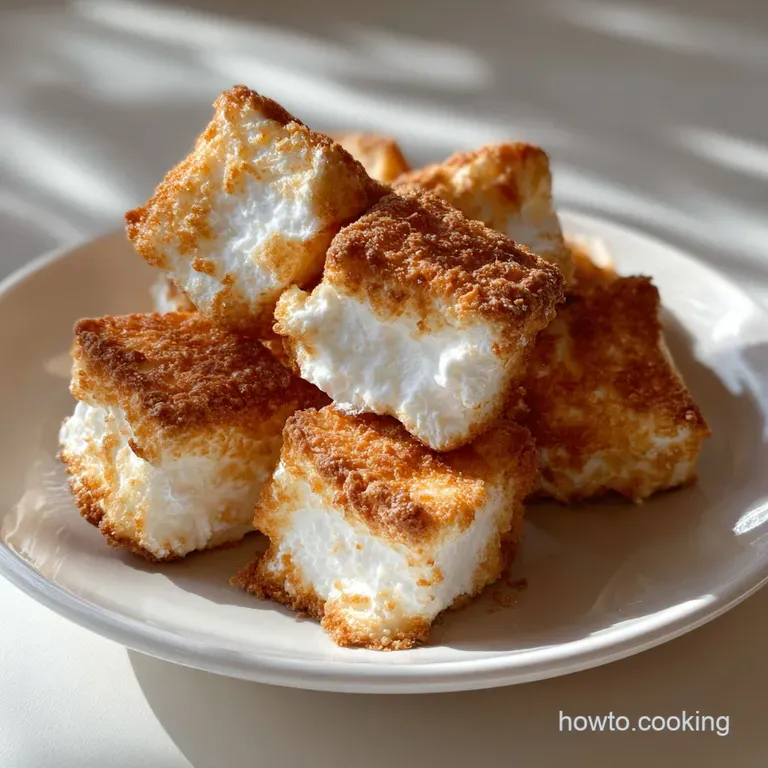
Deep Fried Marshmallows Recipe
- Time: Active 10 minutes, Passive 5 minutes, Total 15 minutes
- Flavor/Texture Hook: Shatter crisp golden shell with a velvety molten core
- Perfect for: Backyard movie nights, festive gatherings, or a confidence boosting weekend project
- Master the Crispy Deep Fried Marshmallows Recipe
- The Perfect Melt: Why This Recipe Works
- Component Analysis for Peak Performance
- Essential Elements for a Golden Batter Crust
- Tools for High Temperature Dessert Success
- Executing the Dip and Fry with Confidence
- Solving Common Texture and Temperature Pitfalls
- Scaling Your Production for a Crowd
- Expanding Your Flavor Profile with Fun Additions
- Preservation Tactics for Your Sugary Creations
- Ideal Companions for Your Finished Sweet Plate
- Kitchen Wisdom and Debunking Myths
- Recipe FAQs
- 📝 Recipe Card
Master the Crispy Deep Fried Marshmallows Recipe
The oil starts to sizzle with a gentle hiss as the first battered cloud hits the pan. Within seconds, the aroma of toasted sugar and warm vanilla fills the air, a scent that instantly transports me back to the dusty fairgrounds of my childhood.
I remember my first attempt at this - I didn't chill the marshmallows, and they simply dissolved into the oil, leaving me with a pot of sugary syrup and a lot of frustration. It was a mess, but it taught me everything about the importance of temperature control and structural integrity.
We are going for that specific, high contrast experience where your teeth crack through a light, airy crust before hitting a center so soft it's practically liquid. This isn't just about frying candy; it's about managing the thermodynamics of sugar.
When done correctly, the pancake mix forms a protective cocoon that allows the marshmallow to expand without escaping its golden cage. You'll feel a massive sense of accomplishment when you pull that first batch of Deep Fried Marshmallows out of the oil and they hold their shape perfectly.
I've refined this process through dozens of trials in my own kitchen, focusing on what makes a recipe truly wholesome and reliable for family treats. We aren't looking for shortcuts here, but rather a solid technique that builds your confidence as a cook.
Once you understand how the batter interacts with the heat, you'll be looking for other things to fry, but trust me, nothing beats the simple joy of a hot, powdered sugar dusted marshmallow.
The Perfect Melt: Why This Recipe Works
Understanding the "how" behind the heat is what separates a soggy disaster from a crisp success. We are dealing with high sugar content and over high heat oil, which requires a specific scientific approach to keep things contained.
- Cryogenic Stabilization: Freezing the marshmallows before frying slows down the internal melting process, ensuring the batter sets before the sugar liquefies.
- Leavening Synergy: The complete pancake mix contains balanced ratios of baking soda and monocalcium phosphate, which create tiny air pockets for a shattering crunch.
- The Starch Barrier: A preliminary dust in all purpose flour creates a dry surface that allows the wet batter to cling tightly, preventing "slippage" during the sizzle.
- Maillard Reaction Control: Using whole milk in the batter provides natural sugars and proteins that brown at exactly the same rate the interior softens.
Serving Size and Prep Logistics
| Servings | Marshmallow Count | Batter Volume | Pot Size | Total Fry Time |
|---|---|---|---|---|
| 2 People | 10-12 Large | 1 cup total | Small Saucepan | 6 minutes |
| 5 People | 1 Bag (10 oz) | 3 cups total | 4 quart Pot | 12 minutes |
| 10 People | 2 Bags (20 oz) | 6 cups total | Large Dutch Oven | 20 minutes |
Planning for the right crowd ensures your oil temperature stays consistent. If you overcrowd a small pot with too many chilled marshmallows at once, the oil temperature will plummet, leading to a greasy rather than crispy finish. For our 5 serving batch, working in groups of four or five is the sweet spot.
Component Analysis for Peak Performance
Every ingredient in this Deep Fried Marshmallows recipe serves a structural purpose. We aren't just adding things for flavor; we are building a miniature edible fortress.
| Ingredient | Science Role | Pro Secret |
|---|---|---|
| Pancake Mix | Provides structure and leavening | Use "Complete" mix for consistent protein levels |
| Whole Milk | Fat content for browning | Cold milk keeps the batter thick and tacky |
| Large Egg | Protein binder for the shell | Room temp eggs emulsify faster into the mix |
| Neutral Oil | High smoke point medium | Canola or Grapeseed allows the sugar aroma to shine |
While some might suggest using water for the batter, I find that whole milk adds a richness that complements the sweetness. The fat in the milk also interferes slightly with gluten development, ensuring the crust is tender crisp rather than bread like.
Essential Elements for a Golden Batter Crust
When gathering your elements, precision matters. We want a batter that is thick enough to coat but light enough to puff. If you've ever mastered the technique in my Doughnut Darling recipe, you'll find the batter consistency here feels quite similar.
- 1 bag (10 oz) Large Jet Puffed Marshmallows: Why this? Density matters; cheaper brands may collapse or dissolve too quickly.
- 0.5 cup All purpose flour: Why this? Acts as a primer so the wet batter doesn't slide off.
- 2 cups Complete Pancake Mix: Why this? Pre mixed leaveners ensure a reliable, airy lift.
- 0.75 cup Whole milk: Why this? Provides the hydration and fat needed for a golden hue.
- 1 large Egg: Why this? The structural "glue" that keeps the batter from shattering prematurely.
- 1 tsp Pure vanilla extract: Why this? Mimics the flavor profile of the marshmallow core.
- 1 quart Neutral vegetable oil: Why this? High smoke point is essential for the 375°F target.
- 0.25 cup Powdered sugar: Why this? Adds a final hit of sweetness and hides minor imperfections.
Substitution Guidelines
| Original Ingredient | Substitute | Why It Works |
|---|---|---|
| Whole Milk | Buttermilk | Adds a slight tang to balance the sugar. Note: Batter will be thicker. |
| Pancake Mix | Homemade Mix | Flour, baking powder, and salt. Note: Harder to get the exact airiness. |
| Vegetable Oil | Peanut Oil | Exceptional heat stability. Note: Adds a distinct nutty aroma. |
Tools for High Temperature Dessert Success
You don't need a professional kitchen, but a few specific tools will give you the confidence to handle hot oil safely. A heavy bottomed pot, like a cast iron Dutch oven or a sturdy 4 quart stainless steel pot, is non negotiable for heat retention.
You'll also want a candy thermometer or an infrared thermometer to monitor your oil. If the oil is too cool, the batter soaks up fat; too hot, and the outside burns before the marshmallow can soften. A spider strainer or a slotted spoon is the best way to move these delicate treats without puncturing the crust.
Finally,, a wire cooling rack set over a baking sheet is far superior to paper towels for draining, as it allows air to circulate and keeps the bottom from becoming soggy.
Executing the Dip and Fry with Confidence
This process moves fast once the oil is hot. I highly recommend setting up a "station" flow: Freezer -> Flour -> Batter -> Oil -> Cooling Rack.
- Freeze the marshmallows. Place the 10 oz bag of marshmallows on a tray and freeze for 15 minutes. Note: This prevents them from melting into nothingness the moment they hit the heat.
- Heat the oil. Pour 1 quart of neutral oil into your pot and heat to exactly 375°F. Note: Consistency is key; use a thermometer to track this.
- Prepare the primer. Place 0.5 cup all purpose flour in a shallow bowl.
- Mix the batter. Whisk 2 cups pancake mix, 0.75 cup milk, 1 egg, and 1 tsp vanilla until a thick, smooth consistency forms.
- Coat in flour. Roll a chilled marshmallow in the flour, tapping off any excess. Note: This dry layer ensures the wet batter actually sticks.
- Dip in batter. Submerge the floured marshmallow into the pancake mix batter using a fork or toothpick.
- Fry in batches. Carefully drop the marshmallow into the oil. Cook for 30-45 seconds until the shell is deep golden and puffy.
- Flip halfway. Use your spider strainer to gently roll the marshmallows so they brown evenly on all sides.
- Drain properly. Lift them out and place them on a wire rack for 1 minute.
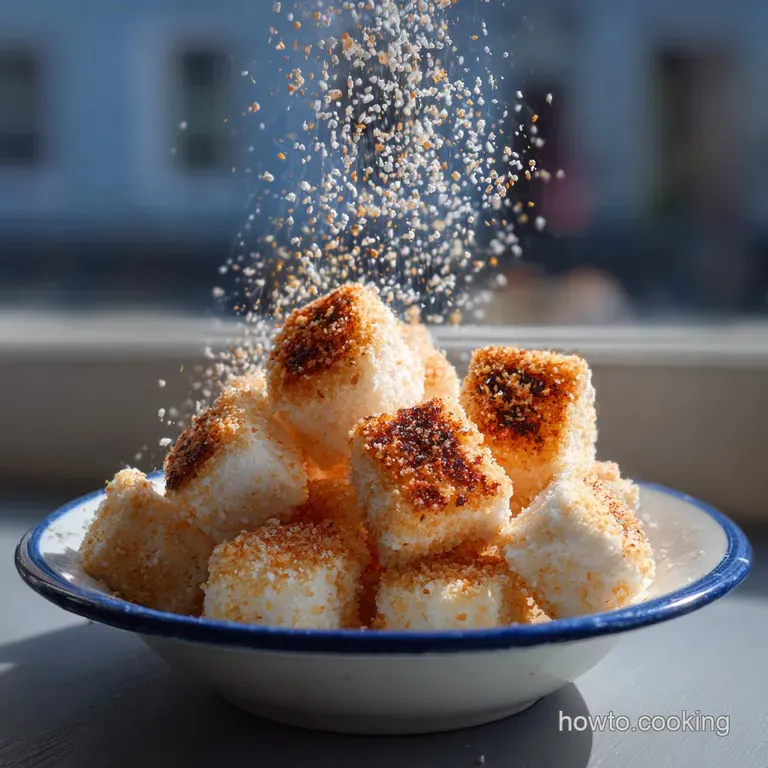
- Finish with sugar. Dust generously with 0.25 cup powdered sugar while they are still hot enough for it to cling.
Solving Common Texture and Temperature Pitfalls
Even the most confident home cooks can run into issues when frying sugar. It's a delicate dance between the exterior and the interior.
To Prevent the "Disappearing Marshmallow" Act
If you bite into your fried treat and find an empty cavity, your oil was likely too hot, or you fried them for too long. The marshmallow essentially vaporizes if exposed to high heat for more than a minute. Stick to the 30-45 second window. If you've had success with my How Do You recipe for homemade marshmallows, you know that fresh sugar behaves differently than store-bought, so keep that in mind if using artisan mallows.
To Fix Batter Slippage
If the batter slides right off the marshmallow in the oil, it's usually a moisture issue. Ensure the marshmallows are completely dry before the flour step. If the batter feels too thin, whisk in an extra tablespoon of pancake mix until it coats the back of a spoon without immediately running off.
| Problem | Root Cause | Solution |
|---|---|---|
| Batter is doughy inside | Oil too hot / Cook too short | Lower heat to 370°F and cook slightly longer. |
| Marshmallow explodes | Puncture in the batter | Ensure a complete, gap free coating before frying. |
| Greasy texture | Oil too cold | Wait for oil to return to 375°F between batches. |
Common Mistakes Checklist
- ✓ Don't skip the flour "primer" step; the batter needs something to grip.
- ✓ Never crowd the pot - three or four at a time is plenty for most home setups.
- ✓ Use a thermometer; "guessing" the oil temperature leads to burnt or soggy food.
- ✓ Let the marshmallows sit in the freezer; room temperature sugar is too volatile.
- ✓ Use a wire rack for cooling; paper towels can steam the bottom and ruin the crunch.
Scaling Your Production for a Crowd
When you're the star of the party, you might need to double or triple this. It's not as simple as multiplying everything by two, though.
If you are scaling down for a solo treat (1/2 batch), use the whole egg but reduce the milk and mix proportionately. The extra egg protein will just make the shell a bit more resilient. When scaling up (2x or 3x), keep your oil volume the same but work in more batches.
You don't need three quarts of oil unless you have a commercial sized fryer. Just be sure to skim any loose bits of batter out of the oil between batches to prevent them from burning and tainting the flavor of the fresh ones.
For those looking for a different approach to fried sweets, the technique for these is quite different from the Truly Classic Fry recipe, which relies more on yeast and dough structure than a wet batter.
Stovetop Frying vs. Countertop Deep Fryer
| Feature | Stovetop Pot | Electric Deep Fryer |
|---|---|---|
| Temp Recovery | Slower (requires monitoring) | Fast (automatic thermostat) |
| Cleanup | Moderate (splatter potential) | Easy (enclosed system) |
| Control | Manual (highly tactile) | Set and forget (less "feel") |
Expanding Your Flavor Profile with Fun Additions
Once you've mastered the classic Deep Fried Marshmallows, you can start playing with the profile. I love adding a pinch of cinnamon to the pancake mix for a "churro" vibe. You can also press a small piece of dark chocolate into the center of the marshmallow before dipping to create a "lava" effect.
Another fantastic variation is to replace 1/4 cup of the pancake mix with crushed graham cracker crumbs. This gives you a "Deconstructed S'mores" experience that is absolutely nostalgic.
If you want a more colorful approach, try using flavored marshmallows (like strawberry or toasted coconut) for a surprising pop of color inside the golden shell.
Chef's Note: If you really want to go wild, try a "double dip." Fry the marshmallow for 10 seconds, pull it out, dip it back in the batter, and fry again. It creates a thick, biscuit like shell that is incredibly satisfying.
Preservation Tactics for Your Sugary Creations
Let's be honest: these are best eaten within five minutes of leaving the oil. That's when the contrast between the hot, crispy shell and the velvety interior is at its peak. However, if you do have leftovers, there is a way to save them.
- Storage
- Keep them in an airtight container at room temperature for up to 24 hours. Do not refrigerate, as the moisture in the fridge will turn the crisp batter into a gummy mess.
- Reheating
- Use an air fryer or a toaster oven at 350°F for about 2 minutes. This will crisp the outside without completely liquefying the marshmallow again. Avoid the microwave at all costs!
- Zero Waste
- If you have leftover batter, don't throw it out! Use it to fry slices of apple or banana. Leftover oil can be cooled, strained through a coffee filter, and reused once more for sweet frying projects.
Ideal Companions for Your Finished Sweet Plate
To balance the intense sweetness of the fried sugar, I always serve these with something slightly acidic or salty. A side of fresh raspberries or a tart lemon curd dip works wonders. If you're feeling decadent, a warm dark chocolate ganache or a salted caramel drizzle is the way to go.
For a full "fairground at home" spread, these pair beautifully with other crispy treats. You might even consider serving them alongside something with a different crunch profile, like a Deliciously Crisp Fried recipe for cookies. The key is to provide a variety of textures. A cold glass of whole milk or a bitter espresso also provides the perfect palate cleanser between these rich, sweet bites.
Kitchen Wisdom and Debunking Myths
There's a lot of fear surrounding frying at home, especially with high sugar items. Let's clear up a few things so you can cook with confidence.
Myth: The marshmallow will always disappear. Truth: This only happens if your oil is too cold (taking too long to cook) or your coating is too thin. A proper flour and batter "armor" protects the sugar.
Myth: You need a specialized deep fryer. Truth: A heavy bottomed pot and a reliable thermometer are actually superior for small batches because you have more control over the heat source.
Myth: Frying makes everything "unhealthy." Truth: While this is a treat, frying at the correct temperature (375°F) creates a steam barrier that prevents the oil from soaking into the food. The result is a quick "flash" cook that leaves the interior light rather than greasy.
By following these steps and understanding the logic of the batter, you’ve turned a simple bag of marshmallows into a sophisticated, texturally brilliant dessert. It’s all about having the confidence to manage the heat and the patience to prep your ingredients correctly.
Now, go share these while they’re hot!

Recipe FAQs
Can marshmallows be deep fried?
Yes, they can be deep fried successfully. Achieving the perfect result requires freezing the marshmallows first to create structural integrity before they hit the 375°F oil.
What is a cooked marshmallow called after being fried?
There is no single official name for it. It is generally referred to as a deep fried marshmallow or sometimes a puffed sugar cloud, depending on the batter used.
How are crispy marshmallows made?
Flash fry a chilled, fully coated marshmallow for 30 45 seconds. The coating must be perfectly sealed to create a crispy shell that protects the sugar from immediately liquefying in the hot oil.
What is the most important step to prevent the marshmallow from dissolving in oil?
Pre-freezing the marshmallows is the most crucial step. Freezing slows down the internal heating rate, allowing the exterior batter to set completely before the sugar core melts.
What fats should I avoid when deep frying desserts?
Avoid oils with low smoke points, like unrefined olive oil. These oils will break down, smoke excessively, and impart a bitter flavor to your sweet coating.
Is it true you must use a very thick batter to seal the marshmallow?
No, this is a common misconception. The batter should be thick enough to coat evenly, but if it is too dense, the crust becomes bready rather than crispy; use a flour primer first.
What can I serve alongside these deep fried treats to balance the sweetness?
Serve with something tart or slightly savory to cut the sugar richness. Try a side of fresh berries or a slightly salty topping; these pair well with many fried delights, similar to the textural balance needed in our How to Make recipe.
Deep Fried Marshmallows Recipe

Ingredients:
Instructions:
Nutrition Facts:
| Calories | 574 calories |
|---|---|
| Protein | 8.4 g |
| Fat | 15.8 g |
| Carbs | 101.4 g |
| Fiber | 1.2 g |
| Sugar | 61.8 g |
| Sodium | 612 mg |
