Flaky Cinnamon Danish: a Sweet Morning Delight
- A Flaky Cinnamon Danish: Your New Morning Obsession
- Recipe Overview: A Taste of History
- Key Benefits: More Than Just a Sweet Treat
- Ingredients List
- Your Go-To Essential Ingredients Guide: Baking Made Simple
- Mastering the Art of Professional Cooking: Your Guide to Flaky Cinnamon Danish
- Pro Tips & Secrets for the Perfect Cinnamon Danish
- Perfect Presentation of Your Cinnamon Danish
- Storage & Make-Ahead
- Creative Variations
- Complete Nutrition Guide
- Wrapping it Up with Sweet Encouragement
- Frequently Asked Questions
- 📝 Recipe Card
A Flaky Cinnamon Danish: Your New Morning Obsession
Oh man, let me tell you about that one saturday morning when i decided to try my hand at making a cinnamon danish .
Coffee brewing, sunlight streaming in everything was perfect, right? but when i popped those heavenly pastries out of the oven, the kitchen smelled like a cozy cafe in denmark.
Honestly, if that’s not a dreamy breakfast vibe, i don’t know what is!
Have you ever faced a recipe that made you a little nervous, but also super excited? that’s where i found myself with this classic sweet pastry recipe.
Turns out, the effort is so worth it. so grab your apron and let’s dive into all things cinnamon danish !
Recipe Overview: A Taste of History
This delightful danish pastry hails from the rich baking traditions of denmark, known for its flaky layers and sweet filling.
You could say danes have it figured out when it comes to breakfast pastries! it's like they’re penning a love letter to brunch, right? and these treats have transformed over the years; they aren’t just for special occasions anymore because let's be real, what keeps the family happy on a lazy sunday morning better than warm, buttery goodness?
While preparing this indulgent pastry might seem intimidating due to the laminated dough and the all-important yeast dough , it’s really not that bad.
You’ll be working with butter layers that create that luscious flakiness we adore. in about 70 minutes , plus some rising time, you’ll have 12 servings of total bliss!
if you're thinking about costs well, most ingredients are kitchen staples, making this not only a delicious breakfast recipe but also a wallet friendly option.
Key Benefits: More Than Just a Sweet Treat
Alright, let’s talk about the benefits of whipping up this easy cinnamon danish recipe . for starters, they are downright delicious! the warm cinnamon sugar mixture combined with that flaky texture is like comfort food wrapped in a stylish bow.
And let's not forget nutritional highlights: with some protein, healthy fats from butter, and carbs, they fit right into a balanced breakfast.
Serving them at brunch? yes, please! your friends will think you're a baking superhero, and trust me, they’ll flock to your kitchen for a taste.
Plus, you can easily switch it up! from adding fruit filled pastries to incorporating spices like cardamom, your creativity can run wild, making these a crowd pleaser for festive baking, holiday gatherings, or any sunday morning.
But here’s a game changer: the frosting ideas ! drizzle on a powdered sugar glaze or even some caramel, and you've just taken your cinnamon danish game to a whole new level.
Pro tip: serve them warm with a cup of coffee, and i guarantee you’ll be in breakfast heaven!
So, are you ready to dive into making your own homemade pastries ? Gather your ingredients, and let’s prepare to bake these flaky dreams .
Ingredients List
Before we roll up our sleeves, let’s get our checklist ready for what you’ll need to create this masterpiece. you’ll need all-purpose flour, sugar, whole milk, eggs, active dry yeast , and of course lots of unsalted butter!
and if you’re in the mood for a filling, grab some brown sugar, cinnamon, and softened butter.
Don’t forget that dreamy glaze; it just ties everything together beautifully!
You’ll be amazed at how the smell of that laminated dough fills your home, transforming your kitchen into a warm, inviting cafe.
So, let’s get things rolling literally! get ready to experience the joy of baking and sharing your own cinnamon danish with family and friends!
Your Go-To Essential Ingredients Guide: Baking Made Simple
Hey there, fellow food lovers! today, we're diving deep into the heart of baking the essential ingredients that will take your creations from “meh” to “wow!” whether you’re whipping up a batch of fluffy cinnamon rolls or mastering a flaky danish pastry , knowing your ingredients is key.
Buckle up!
Premium Core Components
First things first, let’s talk about some premium core components . It's like the building blocks of baking. Here’s what you need to know:
- Measurements : You can’t guess your way through a recipe! A good rule of thumb is 1 cup of flour is about 120 grams or 4.25 ounces . Seriously, precision matters!
- Quality Indicators : Look for fresh ingredients! Flour should smell neutral , while yeast should be a bit “fragrant.” Opt for unsalted butter that feels firm and cold this’ll make those buttery layers in your pastries sing!
- Storage Guidelines : Store your flour and sugar in airtight containers to prolong freshness. Ditch the fridge unless you want your butter to turn into a cold lump. And remember, most spices are good for about 2-3 years .
- Freshness Tips : When buying eggs, the fresher, the better! Check the sell-by date and give ‘em a shake. If they bounce , they’re a no-go.
Signature Seasoning Blend
Now, let’s spice things up with our signature seasoning blend . Here are some key combinations to elevate your pastry game:
- Essential Spice Combinations : Think classic like cinnamon and sugar for that sweet application perfect for our cinnamon Danish , right?
- Herb Selections and Pairings : Fresh herbs like rosemary can add an unexpected twist to your sweet treats.
- Flavor Enhancers and Aromatics : Vanilla extract, folks, it's the star that brings depth! Add it into your dough, and you'll smell the magic happening.
- Regional Variations : Want to switch things up? Try adding cardamom for a Scandinavian flair, or go nuts with hazelnut oil instead of butter for that extra richness.
Smart Substitutions
Let’s face it, life is busy, and sometimes your kitchen misbehaves. Enter smart substitutions :
- Common Alternatives : No cinnamon? No problem! Try nutmeg or allspice for a different flavor twist.
- Dietary Modifications : Vegan? Substitute eggs with flaxseed meal mixed with water. It'll bind your ingredients and keep it eco-friendly.
- Emergency Replacements : Out of buttermilk? Mix vinegar with regular milk and let it sit for a few minutes boom, instant buttermilk!
- Seasonal Options : Swap cinnamon for pumpkin spice in the fall for those cozy vibes or add fresh berries when summer rolls around.
Kitchen Equipment Essentials
Okay, now onto the fun part— kitchen equipment essentials ! Here’s what you need to nail your baking game:
- Must Have Tools : A good rolling pin is a must for rolling out your laminated dough . You'll also want a quality whisk, a mixing bowl, and parchment paper for easy clean-up.
- Alternative Equipment : No stand mixer? A regular mixing bowl and some elbow grease will do the trick!
- Preparation Tips : Have everything measured out before you start, it’ll save you time.
- Storage Solutions : Keep your baking essentials organized; trust me, you’ll thank yourself later!
Now that you’ve got all the bases covered, it’s time to put this knowledge to the test! grab your apron, preheat that oven, and let’s jazz up your kitchen with a heavenly cinnamon danish recipe that’ll blow your family’s mind.
Next up, i’ll walk you through each step to create those sweet, flaky pastries! let's get baking!
Mastering the Art of Professional Cooking: Your Guide to Flaky Cinnamon Danish
Alrighty, friends! let’s dive into the delicious world of cinnamon danish making. i can tell you from experience there's something magical about waking up to the smell of warm pastries that envelop you in comfort.
Imagine your kitchen filled with that cozy, aromatic vibe. it’s like a warm hug from your oven! let’s break it down and make this baking adventure fun and easy.
Essential Prep Steps
Let’s start with the basics mise en place . this fancy term just means everything in its place. before you even think about turning on the oven, gather all your ingredients.
You'll be like a well oiled machine if you have flour, sugar, butter, and eggs ready to go. trust me; you don’t wanna be scrambling to find the cinnamon when your butter’s already melting!
Time management is key, especially if you’re aiming to impress. set a timer for each step. i can’t tell you how many times i’ve lost track of time and ended up with charred pastries.
Aim for a prep time of about 20 minutes and allow an additional 30 minutes for chilling in between.
Organization is where it’s at! having a clean workspace can do wonders for your sanity. and let's not forget safety considerations .
Make sure you're careful with hot ovens and sharp knives. that’s a no-brainer, but you’d be surprised how many times i’ve forgotten to keep an eye on my pastry as it’s baking until et.
step-by-step Process
Now, for the main event the actual making of the danish! Follow these clear, numbered instructions and keep your cool.
Prepare the dough. Start by whisking 1 cup (240ml) of warm milk with yeast in a bowl until it’s nice and foamy.
Round up 4 cups (500g) of flour, 1/4 cup (50g) sugar, and 1 teaspoon of salt in a large bowl, then mix in those eggs and the yeast mixture.
Knead until smooth; chill for 30 minutes. This part always feels like a workout, but it’s so worth it!
Incorporate that butter! roll out your dough into a rectangle and place 1 cup (227g) of chilled butter in the middle.
Fold it all over, seal that butter in, and roll it back out again into a rectangle. this is where the magic of laminated dough begins!
Fold and repeat. You won't believe how simple it is to create layers after rolling and folding the dough. Chill between each roll to keep things cool!
Assemble your filling. Mix 1/2 cup (100g) brown sugar and 2 tablespoons cinnamon together. The aroma will be a sneak peek of the goodness to come!
Shape and proof. Cut your rectangles, twist them up a bit, and let them rise for about 30 minutes . Meanwhile, preheat that oven to 375° F ( 190° C) .
Bake & glaze for 20 minutes or until golden brown. After they cool a bit, drizzle with the icing made from 1 cup (120g) powdered sugar and a touch of milk.
Expert Techniques
Let’s talk like the pros. Temperature control is a huge player in baking. Too hot? Your danishes will burn. Too cool? They won’t rise correctly. Aim for that perfect balance.
Timing precision is vital. Use a timer. I lured friends over once for a pastry party and forgot all about my danish because I was chatting away!
Check for doneness visually; the pastries should be golden and flaky.
Now, if your dough starts to feel too warm, just pop it back in the fridge for a few minutes. It’s totally okay you can thank me later!
Success Strategies
Avoid common mistakes like overworking your dough this can lead to tough pastries. you want flaky goodness, not a workout for your jaw! also, don’t rush the proofing stage.
Let your danish take their time to puff up.
Nail that quality assurance by checking if the cinnamon danish is browned evenly across. Always taste test at the end (a given)!
And hey, if you want to save some for later, these babies freeze like a dream! you can whip together a breakfast that feels like a treat without the fuss any day of the week.
So there you have it, your go-to guide for perfecting the art of cinnamon danish making! in the next section, we’ll dive deeper into the additional information you might want to consider for your pastry adventures.
Are we ready? let’s keep those ovens hot!
Pro Tips & Secrets for the Perfect Cinnamon Danish
Oh, the cinnamon danish ! it’s like waking up in a bakery. these flaky pastries are pure comfort food that comes with that warm, gooey goodness.
Trust me , once you nail this recipe, your brunch game will be on point, and your friends will be begging for your secret .
Here are some of my best tips.
Chef's Personal Insights
First things first, don't rush this! the lamination process can be tricky, but patience pays off in buttery layers! make sure your butter is chilled like, it better be straight from the fridge this keeps those incredible butter layers intact and creates that mouthwatering flaky texture.
I’ve learned the hard way: don’t skip the chilling time. your future self will thank you !
Time Saving Techniques
If you're short on time, consider prepping the dough ahead of time. you can even make this dough the night before.
Just wrap it tightly and pop it in the fridge. it’s such a lifesaver for busy mornings ! plus, you’ll have a batch of warm danish pastries baking while you sip coffee what a way to elevate your morning!
Flavor Enhancement Tips
Now, let’s talk about that cinnamon sugar mixture . instead of just cinnamon and sugar, why not throw in a pinch of nutmeg or cardamom? it’s like a flavor party! and if you want an extra indulgent touch, mix some vanilla extract in your filling for that aromatic twist.
Your taste buds will do the happy dance.
Presentation Advice
Alright, so you’ve pulled your hot cinnamon danishes out of the oven and they’re golden brown. now, let’s make them look as good as they taste! a beautiful drizzle of a powdered sugar glaze or even a simple frosting idea goes a long way.
Pair it with some fresh berries for color, and boom! insta worthy breakfast!
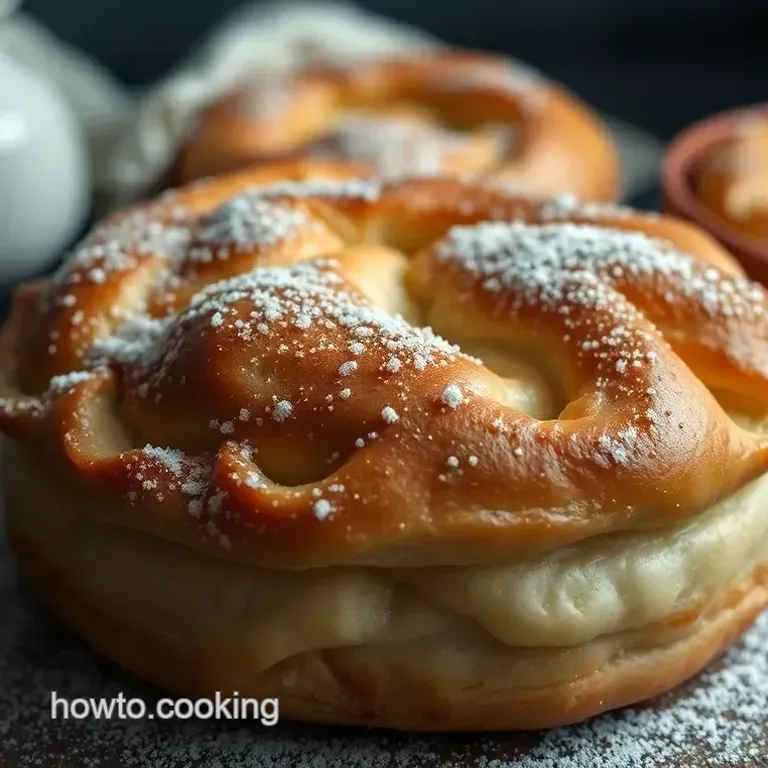
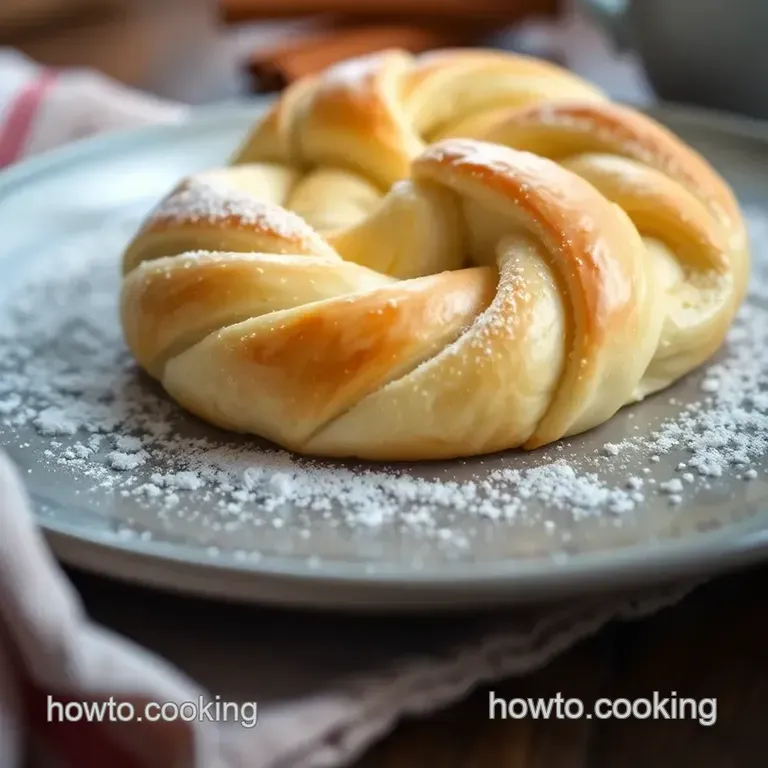
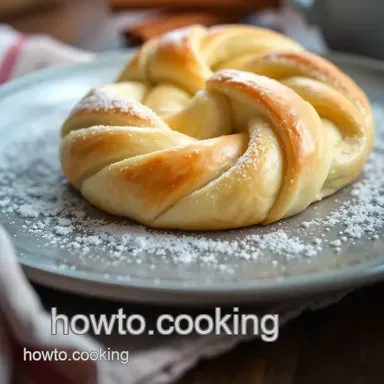
Perfect Presentation of Your Cinnamon Danish
Now we’re getting to the fun part: how to plate these beauties like a pro! Presentation can make or break a dish, right? So let’s get creative.
Plating Techniques
Try serving the danishes in a stacked formation on a nice cake stand or a rustic wooden board. this gives a cozy vibe.
You can even sprinkle some cinnamon sugar on top for that wow factor!
Garnish Ideas
For garnish, a sprinkle of pistachios or almonds adds a nutty crunch. you can even toss some fruit filled pastries on the side for a pop of color.
Think red raspberries or nectarines; they're not just for looks but add freshness and balance to the sweetness.
Color Combinations
We eat with our eyes first, right? The golden brown of the Danish, the vibrant red of fresh fruit, and the white glaze create a striking contrast. It’s eye-candy!
Visual Appeal Tips
Make sure to place the pastries generously apart; no one wants a squished danish! A little space gives that warm vibe like it’s sitting comfortably on your breakfast table.
Storage & make-ahead
So, what do you do with the leftovers? Let’s be real if there are any left!
Storage Guidelines
Once cooled, wrap these babies in plastic wrap or store them in an airtight container. they typically last up to 3 days at room temperature.
But if you want to prolong their life, you can pop them in the fridge; they’ll keep for a week.
Preservation Methods
You can also freeze them! just make sure to flash freeze them on a baking sheet before transferring to a freezer bag.
When you're ready to devour them, thaw them out in the fridge overnight, then warm them up in the oven.
Reheating Instructions
To reheat, place them in the oven at 350° F for about 10 minutes. This brings back that flaky pastry texture, and the aroma will fill your kitchen with nostalgia.
Freshness Duration
Honestly, for the best taste, enjoy them fresh out of the oven. But the flavor holds well for a few days just don’t expect them to last a whole week!
Creative Variations
Once you're a pro at the classic easy cinnamon danish recipe , it’s time to experiment!
Flavor Adaptations
Swap out the cinnamon for cocoa powder for a chocolate spin. Or mix it up with apple pie filling for that comforting taste of the season.
Dietary Modifications
Want to go gluten-free? There are great all-purpose gluten-free flours available nowadays that work wonders. You can even swap regular butter with a dairy-free option!
Seasonal Twists
Think about seasonal fruits like pumpkin for fall or cranberry for winter. Embrace what’s available and complement the flavors!
Regional Variations
Explore flavors from different cultures. Try adding orange blossom water or lemon zest for a Middle Eastern twist, or even a hint of espresso for something richer.
Complete Nutrition Guide
So, just how healthy is our indulgent breakfast? Let’s break it down!
Detailed Breakdown
Each cinnamon danish serving has about 250 calories —not bad for such an indulgent treat! You’re also getting around 3g of protein.
Health Benefits
Depending on the ingredients, whole grain flour can offer fiber, keeping you fuller longer. Plus, cinnamon has the added benefit of having anti inflammatory properties. It's a win-win!
Dietary Considerations
Keep in mind, if you're watching sugar intake or carbs, those can add up quickly in this recipe. Maybe enjoy them occasionally as a treat rather than an everyday breakfast.
Portion Guidance
When sharing, cut them into smaller pieces for that crowd pleaser effect. They’re perfect for brunches or holiday gatherings!
Wrapping it Up with Sweet Encouragement
You’ve got this! making cinnamon danishes from scratch may seem tricky, but with practice, you’ll be rolling them out like a pro in no time.
Whether it’s a lazy sunday morning or a special occasion, these sweet and flaky treats will have everyone asking for seconds.
So gear up, get your aprons on, and dive into this delicious adventure of baking. You’ll make warm memories and tasty breakfast traditions that last a lifetime. Happy baking!
Frequently Asked Questions
What is the best way to make flaky cinnamon danish dough?
The key to making flaky cinnamon danish dough is to keep your butter and ingredients cold throughout the process. Laminating the dough by folding and rolling it multiple times helps create layers that will puff up during baking, resulting in a light and flaky pastry.
How can I store leftover cinnamon danish?
To store leftover cinnamon danish, let them cool completely, then place them in an airtight container. They can be kept at room temperature for up to two days or refrigerated for about a week. For longer storage, you can freeze them for up to three months; just reheat in the oven when you're ready to enjoy them.
Can I make the cinnamon danish ahead of time?
Yes, you can prepare the cinnamon danish dough ahead of time! After making the dough, chill it in the refrigerator for up to 24 hours before rolling and shaping it. Once shaped, you can either let them rise and bake right away or refrigerate them overnight to bake in the morning for a fresh breakfast treat.
What are some creative variations for cinnamon danish?
You can get creative with your cinnamon danish by incorporating various fillings. Consider using cream cheese or fruit preserves alongside the cinnamon filling for added flavor. Nuts, such as pecans or hazelnuts, can also provide a delightful crunch, and swapping cinnamon for cardamom can give a unique twist to the classic recipe.
Is it possible to make a healthier version of cinnamon danish?
Absolutely! To make a healthier cinnamon danish, consider substituting whole wheat flour for all-purpose flour and using less sugar or a natural sweetener. You can also reduce butter in the dough and filling for a lighter option, while adding fruit like apples or berries can provide natural sweetness and enhance nutrition.
Can I use store-bought dough for cinnamon danish?
Yes, using store-bought puff pastry or croissant dough is a great time saver and can yield delicious results for your cinnamon danish. Just roll out the dough, fill it with your cinnamon mix, shape, and bake according to package instructions.
This option is perfect for beginners who want to skip the dough lamination process.
Flaky Cinnamon Danish A Sweet Morning Delight
Ingredients:
Instructions:
Nutrition Facts:
| Calories | 250 |
|---|---|
| Fat | 12g |
| Fiber | 1g |
