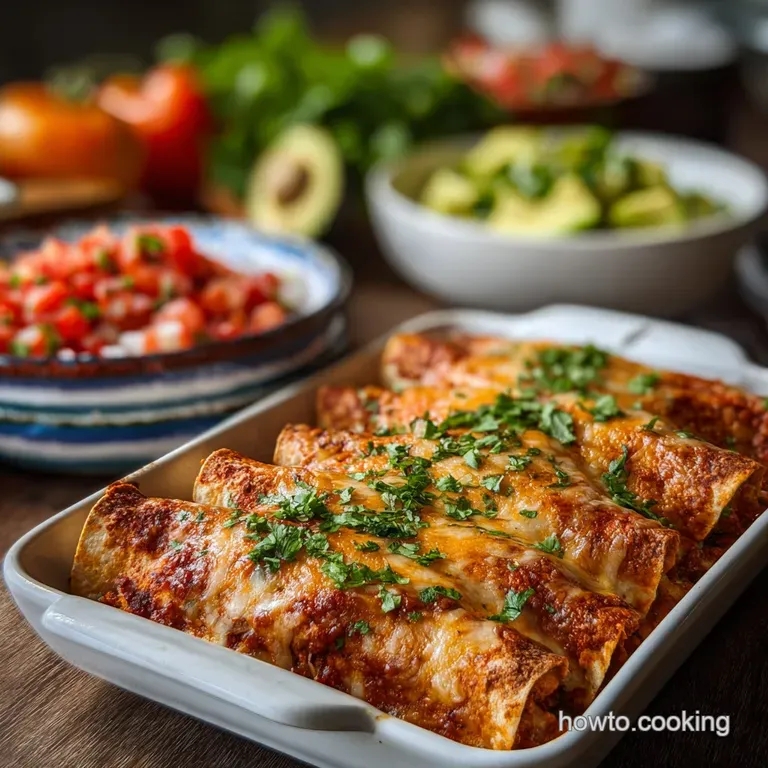
Meal Prep Freezer Enchiladas: Make Ahead
- Time: Active 45 minutes, Passive 30 minutes, Total 1 hours 15 mins
- Flavor/Texture Hook: Velvety chicken filling wrapped in a toasted, corn rich shell.
- Perfect for: High volume monthly meal prep or low effort weeknight dinners.
- Achieving Incredible Results with Your Meal Prep Freezer Enchiladas
- Strategic Planning for High Quality Recipe Specifications
- Component Analysis and Ingredient Functions
- Gathering Components for Your Budget Friendly Meal Prep
- Essential Tools for a Smooth Prep Session Workflow
- Step by Step Guide to a Flawless Execution
- Resolving Typical Issues During the Preparation Process
- Strategic Scaling for Large or Small Batches
- Debunking Classic Freezer Meal Misconceptions
- Storing and Saving Your Batch for Future Dinners
- Simple Ideas for Serving Your Family a Complete Meal
- Very High in Sodium
- Recipe FAQs
- 📝 Recipe Card
Achieving Incredible Results with Your Meal Prep Freezer Enchiladas
The sound of red sauce hitting a hot pan with a sharp hiss always brings me back to my first big meal prep Sunday. I was staring at a mountain of corn tortillas and thinking, there's no way these won't turn into mushy cardboard once they hit the freezer.
I had spent my last forty dollars for the week on ingredients, and the thought of wasting it made my stomach do flips. But then I smelled the cumin and garlic blooming in the oil, and I realized that the secret wasn't in the sauce, it was in the architecture of the roll itself.
Honestly, don't even bother with low-fat cheese or skipping the tortilla fry. I've made that mistake, and the result was a soggy, sad mess that even my hungriest self couldn't enjoy. This recipe is the culmination of three years of trial, error, and a lot of freezer burned dinners.
We're focusing on a thrifty approach that prioritizes texture over everything else, because a meal prep win only counts if it tastes like it was made ten minutes ago.
You’re going to love how these hold up. We are using chicken thighs because they are budget friendly and stay juicy through the reheating process, unlike breasts which can turn into wood chips.
By the time we’re done, you’ll have a stash of meals that feel like a luxury on those nights when your brain is too fried to even look at a stove. Trust me on this, the prep work pays for itself the second you smell that bubbling Monterey Jack.
Strategic Planning for high-quality Recipe Specifications
The secret to a successful freezer meal is understanding how ingredients react to extreme temperatures. When water in your filling freezes, it expands and forms crystals. If your filling is too watery, those crystals will shred your tortillas from the inside out.
That’s why we use a specific filling logic that creates a stable environment, ensuring your meal prep freezer enchiladas survive the thaw without losing their structural integrity.
- Fat Barrier Shield: Lightly frying tortillas in neutral oil creates a hydrophobic layer that prevents sauce from soaking in.
- Emulsified Core Stability: Using cream cheese binds the moisture in the chicken, stopping liquid from migrating into the tortilla during the freezing process.
- Protein Denaturation Control: Chicken thighs contain more connective tissue than breasts, which breaks down into gelatin, providing a silky mouthfeel that doesn't go dry when reheated.
| Method | Time | Texture | Best For |
|---|---|---|---|
| Oven from Fresh | 30 minutes | Crisp edges, molten cheese | Immediate dinner |
| Freezer to Oven | 1 hours | Soft, velvety, uniform heat | Hands off convenience |
| Thawed then Baked | 40 minutes | Balanced, classic texture | Planned weekday meals |
Choosing the right approach depends on your schedule. If you have the foresight to move a tray to the fridge the night before, the thawed method gives you that "just made" quality. However, the freezer to oven path is a lifesaver for those truly chaotic days when you haven't planned a single thing.
Just remember that the longer cook time for frozen trays is necessary to ensure the center hits a safe temperature without burning the top cheese layer.
Component Analysis and Ingredient Functions
Understanding the "why" behind your grocery list helps you make smarter choices at the store. For this recipe, we aren't just picking things that taste good together; we are selecting components that act as a team to withstand the harsh environment of a freezer.
| Ingredient | Science Role | Pro Secret |
|---|---|---|
| Corn Tortillas | Structural foundation and starch base | Use standard corn, never flour, to maintain a distinct bite after reheating |
| Cream Cheese | Moisture binder and emulsifier | Soften it completely to avoid lumps that can cause uneven freezing |
| Monterey Jack | High fat meltability and moisture seal | Grate it yourself from a block for a smoother melt and better fat distribution |
| Neutral Oil | Starch sealer and heat conductor | Keep the oil hot enough to sizzle but not smoke to seal the tortilla surface |
Each of these items plays a specific role in the thermodynamics of the dish. The cream cheese, for instance, isn't just for flavor; it acts as a stabilizer. If you’re doing a big meal prep session, you might also like this Velvety Chicken Cabbage recipe for another fast weeknight win that uses similar storage logic. It's all about making the most of your time in the kitchen.
Gathering Components for Your Budget Friendly Meal Prep
This list is designed to be thrifty while delivering high impact flavor. Stick to the quantities below to ensure the ratios of sauce to filling are exact, which prevents the enchiladas from becoming either too dry or too soupy.
- 1.5 lbs chicken thighs: Braised and shredded. Why this? Thighs stay tender and are much cheaper than chicken breasts.
- 12 standard corn tortillas: Why this? Corn holds up better to sauce than flour alternatives.
- 28 oz red enchilada sauce: Why this? Provides the essential acidity and moisture for the bake.
- 3 cups shredded Monterey Jack cheese: Why this? It has the perfect fat content for a silky melt.
- 4 oz cream cheese: Why this? Binds the filling to prevent the chicken from drying out.
- 1 medium yellow onion: Finely diced. (Substitute: 1 tbsp onion powder if you’re in a rush).
- 3 cloves garlic: Minced. (Substitute: 1 tsp garlic powder).
- 1 tbsp ground cumin: (Substitute: Ground coriander for a lighter, citrusy note).
- 1 tbsp chili powder: (Substitute: Paprika mixed with a pinch of cayenne).
- 1 tsp smoked paprika: (Substitute: Liquid smoke, but use only a tiny drop).
- 0.25 cup neutral oil: For tempering. (Substitute: Lard for a more traditional, rich flavor).
Essential Tools for a Smooth Prep Session Workflow
You don't need a professional kitchen, but having the right gear makes the assembly line move much faster. Efficiency is the name of the game when you're dealing with a dozen tortillas and a hot pan of oil.
- Cast iron skillet: Ideal for tempering the tortillas because it holds heat consistently.
- 9x13 inch baking dishes: You'll need two if you're doubling the recipe, preferably glass or ceramic.
- Large mixing bowl: For combining the shredded chicken and spices without making a mess.
- Tongs: Essential for flipping tortillas in hot oil without tearing them.
- Aluminum foil: Heavy duty version is best for creating a tight seal against freezer burn.
Chef Tip: If you don't have a cast iron skillet, any heavy bottomed pan like a Lodge stainless steel skillet will work, but you'll need to monitor the oil temperature more closely to avoid scorching.
step-by-step Guide to a Flawless Execution

The key to a great prep freezer enchiladas experience is the order of operations. We want to work in a logical flow: filling, tempering, rolling, then sealing. This keeps your workspace clean and ensures the tortillas don't cool down too much before they are filled.
- Prep the chicken. Shred the 1.5 lbs of braised chicken thighs into a large bowl. Note: Keep the shreds slightly chunky for better texture.
- Sauté the aromatics. Cook the diced yellow onion in a small pan until translucent and fragrant. Add the 3 cloves of minced garlic for the last 60 seconds.
- Mix the filling. Combine the chicken, sautéed onions, garlic, 1 tbsp cumin, 1 tbsp chili powder, 1 tsp smoked paprika, and 4 oz of softened cream cheese. Mix until the chicken is velvety and evenly coated.
- Heat the oil. Add 0.25 cup neutral oil to your skillet over medium high heat until the oil shimmers and a drop of water sizzles.
- Temper the tortillas. Dip each corn tortilla into the hot oil for 5 seconds per side. Note: This creates the fat barrier that prevents sogginess.
- Layer the sauce. Spread 0.5 cup of the red enchilada sauce across the bottom of your baking dish.
- Assemble the rolls. Place 2 tablespoons of filling in the center of a tempered tortilla, roll it tightly, and place it seam side down in the dish.
- Top and cheese. Pour the remaining sauce over the rolls and sprinkle with 3 cups of Monterey Jack cheese until every inch is covered in a white blanket.
- Bake or Freeze. If eating now, bake at 375°F for 30 minutes until the cheese is molten and bubbling. If freezing, let the dish cool completely to room temperature before sealing.
- Final Seal. Wrap the cooled dish in plastic wrap, followed by a tight layer of heavy duty foil.
Resolving Typical Issues During the Preparation Process
Even with a solid plan, things can go sideways. The most common complaint with any freezer meal is the texture, but most of these issues are easily solved if you know what to look for during the assembly stage.
Dealing with Cracked Tortillas
If your tortillas are snapping when you try to roll them, they haven't been tempered long enough or the oil wasn't hot enough. The oil needs to literally soften the starch fibers. If they are already cold and cracking, a 10 second zap in the microwave under a damp paper towel can save the batch, but you'll lose that fat barrier protection, so eat those ones first!
Rescuing Overly Dry Fillings
If you find your chicken mixture is crumbly rather than creamy, you might have over shredded the meat or used breasts that were too dry. The fix is simple: stir in an extra tablespoon of the enchilada sauce or a dollop of sour cream.
You want the filling to hold its shape on a spoon, not fall apart into individual fibers.
| Problem | Root Cause | Solution |
|---|---|---|
| Soggy Bottoms | Skipped the oil tempering step | Flash fry tortillas in oil for 5-10 seconds before filling |
| Bland Flavor | Spices didn't bloom in heat | Sauté spices with the onions and garlic to release oils |
| Cheese is Rubber rubbery | Used pre shredded cheese with cellulose | Grate cheese fresh from the block for better moisture content |
Common Mistakes Checklist
- ✓ Never use flour tortillas for freezer meals; they turn into a gummy paste when reheated with sauce.
- ✓ Ensure the dish is 100% cool before freezing to prevent condensation and ice crystals.
- ✓ Pat the chicken dry before mixing if it was braised in a lot of liquid.
- ✓ Don't skimp on the cream cheese; it's the glue that keeps the interior moist.
- ✓ Always place the rolls seam side down so they don't unravel in the oven.
Strategic Scaling for Large or Small Batches
If you're cooking for one or two, you might want to scale this down. You can easily cut the recipe in half. Just use 0.75 lbs of chicken and a smaller 8x8 pan. Since you can't really use "half an egg" (though we don't use eggs here), the main thing is ensuring your spice ratios remain balanced.
When scaling up to 2x or 4x the amount, don't just double the salt and spices. Start with 1.5x the spice amount and taste the filling. Spices can become overwhelming in large batches. For the tortillas, work in small stacks so they don't get cold and brittle while you're rolling the first few trays. If you're looking for something sweet to prep alongside this, my Homemade Limoncello Recipe is a great project that also sits happily in the freezer (or fridge) for months.
| Servings | Chicken Amount | Tortillas | Pan Size | Cook Time |
|---|---|---|---|---|
| 3 People | 0.75 lbs | 6 | 8x8 inch | 25 minutes |
| 6 People | 1.5 lbs | 12 | 9x13 inch | 30 minutes |
| 12 People | 3.0 lbs | 24 | Two 9x13 inch | 35-40 minutes |
Debunking Classic Freezer Meal Misconceptions
There is a huge myth that canned enchilada sauce is always inferior to homemade. In the context of meal prep freezer enchiladas, canned sauce is often more stable because it contains emulsifiers that prevent the sauce from breaking (separating into oil and water) during the freeze thaw cycle.
Unless you are a master of roux based sauces, a high-quality canned version is a strategic win for consistency.
Another common belief is that you should "undercook" the chicken before freezing. This is actually dangerous. You should always fully cook your protein. The "cooking" that happens in the oven during reheating is mainly to melt the cheese and marry the flavors.
Using raw or undercooked chicken in a freezer assembly increases the risk of bacteria growth during the slow thawing process.
Storing and Saving Your Batch for Future Dinners
Once your enchiladas are assembled and cooled, they can live in the fridge for up to 4 days if you plan on eating them soon. For long term storage, they are best used within 3 months. Beyond that, the quality begins to dip as freezer burn sets in, regardless of how well you wrapped them.
Don't throw away those onion skins or the ends of your garlic cloves! Toss them into a freezer bag. When the bag is full, boil the scraps with some water to make a quick vegetable stock that you can use for the next time you braise chicken. It’s a zero waste way to keep your kitchen thrifty and your flavors deep.
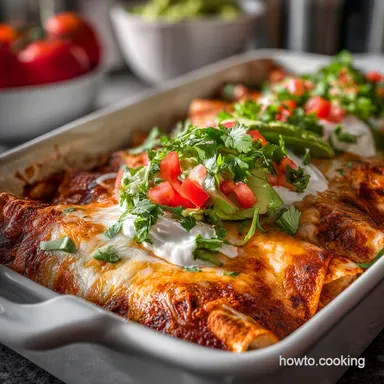
Simple Ideas for Serving Your Family a Complete Meal
When you finally pull that tray out of the oven, the cheese will be browned and bubbling, and the aroma will fill the house. To round out the meal without much extra effort, I usually go for a simple cabbage slaw.
The crunch of raw cabbage and the acidity of a lime based dressing perfectly cut through the richness of the Monterey Jack and cream cheese filling.
If you have some leftover rice, a quick toss with lime juice and cilantro makes the perfect bed for these rolls. The rice will soak up any extra red sauce that escapes the tortillas.
For a truly indulgent experience, a dollop of cold sour cream or a few slices of avocado can transform a basic freezer meal into something that feels like a Saturday night at your favorite local spot. It’s satisfying, budget friendly, and most importantly, it’s already done.

Very High in Sodium
1240 mg mg of sodium per serving (54% of daily value)
The American Heart Association recommends limiting sodium intake to about 2,300mg per day for most adults. These enchiladas are significantly over that amount per serving.
Tips to Reduce Sodium in Your Enchiladas
-
Low-Sodium Enchilada Sauce-25%
The enchilada sauce is a major source of sodium. Use a low-sodium enchilada sauce or, even better, make your own from scratch to control the sodium content.
-
Reduce or Substitute Cheese-15%
Monterey Jack cheese is high in sodium. Reduce the amount used or substitute with a lower sodium cheese option like Swiss or fresh mozzarella in part of the recipe.
-
Fresh Ingredients-10%
Using freshly chopped onions and garlic instead of any pre-prepared or jarred versions will cut down on added sodium and enhance flavor. Sauté in olive oil and use generously.
-
Unseasoned Chicken-10%
Ensure the chicken thighs are unseasoned before cooking. Many pre-packaged chicken products contain added sodium. Season the chicken yourself with sodium free spices.
-
Corn Tortilla Choice-5%
Check the sodium content on the corn tortilla packaging. Some brands add more salt than others. Choose a lower sodium brand or consider making your own.
-
Herb Power
Enhance the flavor of your enchiladas with a variety of fresh or dried herbs like oregano, cilantro, or parsley. Herbs and spices add flavor without adding sodium.
Recipe FAQs
How to freeze enchiladas for meal prep?
Assemble completely, cool fully, then cover tightly. Mix the sauce, filling, and cheese layers, then allow the assembled dish to cool completely to room temperature before tightly wrapping it in plastic wrap and heavy duty foil for the freezer.
Is it better to freeze enchiladas baked or unbaked?
Unbaked is strongly recommended for best texture preservation. Freezing them before the final bake helps the tortillas absorb the sauce evenly during the long thaw/reheat process, preventing excessive dry spots compared to refreezing a cooked dish.
Can you make enchiladas ahead of time and freeze?
Yes, this is the primary purpose of the recipe. Assemble the entire dish (sauce, filling, cheese), cool it completely, and then cover and freeze for up to three months for quality retention.
Can I meal prep enchiladas?
Yes, meal prepping enchiladas is highly effective. Focus on using slightly less liquid in your filling and lightly frying the tortillas first to create a moisture barrier against the sauce.
What is the ideal cooking method when baking from frozen?
Bake covered at 375°F for about an hour. Keep the dish covered with foil for the first 40 minutes to steam the center through without burning the cheese, then remove the foil for the last 15 minutes to brown the topping.
Why do my frozen enchiladas always turn out mushy when reheated?
Mushiness usually results from moisture migration into the tortilla. To combat this, ensure you temper your tortillas in hot oil before rolling, which creates a hydrophobic seal against the sauce.
Should I use chicken breast or thighs for freezer prep?
Chicken thighs are superior for freezer survival and moisture. Thigh meat retains significantly more juice during the freeze/thaw cycle than leaner breasts, which can become dry and stringy. If you enjoy cooking with leaner protein, applying the fat sealing technique here is essential, similar to how we control texture in our Salmon in Roasted recipe.
Freezer Enchilada Meal Prep
Ingredients:
Instructions:
Nutrition Facts:
| Calories | 712 kcal |
|---|---|
| Protein | 41 g |
| Fat | 43 g |
| Carbs | 37 g |
| Fiber | 6 g |
| Sugar | 7 g |
| Sodium | 1240 mg |
