Layer Dip with Refried Beans and Sour Cream: Stable Structure
- Time: Active 15 minutes, Passive 0 minutes, Total 15 minutes
- Flavor/Texture Hook: Velvety dairy layers against crisp toppings
- Perfect for: Potlucks, game nights, and confident hosting
- Constructing Layer Dip with Refried Beans and Sour Cream
- Reasons This Dip Always Wins
- Essential Preparation and Timing
- Sourcing Quality Fresh Components
- Tools for a Clean Build
- Step-By-Step Assembly Guide
- Solving Texture and Flavor Issues
- Creative Swaps and Variations
- Scaling for Different Crowds
- Myths About Layered Dips
- Preservation and Leftover Logistics
- Ideal Pairings for Serving
- Recipe FAQs
- 📝 Recipe Card
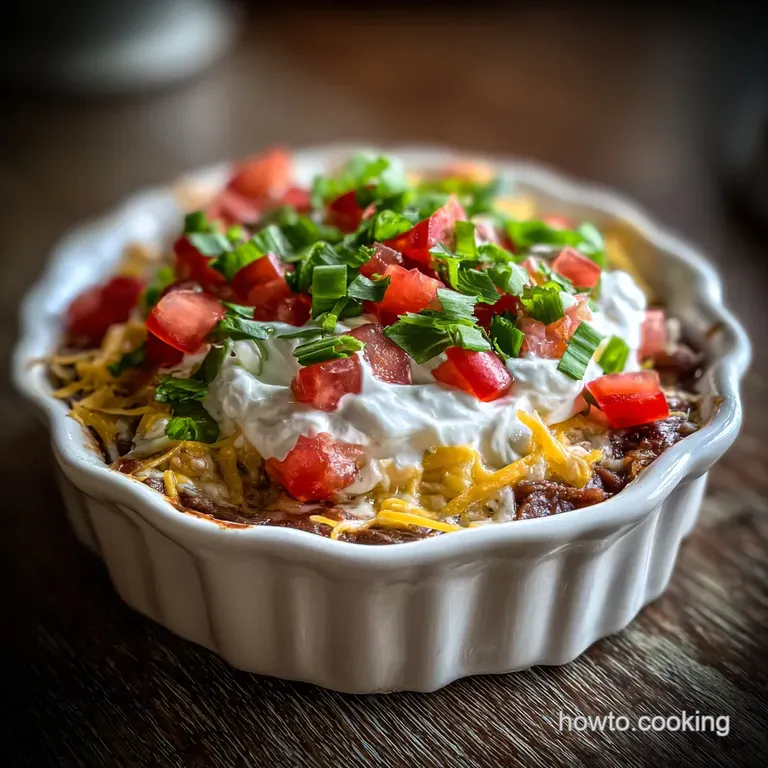
Constructing Layer Dip with Refried Beans and Sour Cream
Imagine walking into a party and seeing that shimmering, multi colored tower of goodness sitting on the table. You grab a sturdy chip, dive deep, and pull up a perfectly stacked sample of every single layer without the whole thing collapsing into a beige puddle. That's the dream, right?
But we've all been there, standing over a bowl of what looks like taco flavored soup because someone forgot to drain the salsa or used a runny bean base.
This Layer Dip with Refried Beans and Sour Cream is the ultimate crowd pleasing appetizer you need to try. I learned the hard way that a great dip isn't just about throwing ingredients in a glass dish, it's about structural engineering.
My first attempt was a literal landslide of sour cream that migrated into the guacamole, turning the whole thing a weird shade of pastel green. Now, I use a specific dairy blend technique that locks everything in place so you get those clean, distinct lines every single time.
We aren't just making a snack here, we're building a centerpiece. This recipe focuses on wholesome, high-quality ingredients that provide real nutrition alongside that classic comfort.
By the time you finish this guide, you'll have the confidence to whip this up in fifteen minutes and know it'll look just as vibrant three hours later. Let's get into the mechanics of why this specific build works so well and how to avoid the common pitfalls of amateur dipping.
Reasons This Dip Always Wins
- Hydrophobic Barrier: The fat heavy cream cheese and sour cream layer acts as a waterproof seal, preventing the moisture from the salsa and tomatoes from soaking into the beans.
- Starch Stability: Refried beans contain high levels of amylose starch which, when seasoned correctly, creates a firm "foundation" that supports the weight of the heavier toppings.
- Acid Brightness: Adding 1 tbsp lime juice to the beans doesn't just add flavor, it helps break down the dense bean proteins, making the bottom layer more scoopable without being runny.
- Emulsification Strength: Mixing the taco seasoning into the cream cheese first ensures the spices are evenly distributed in a fat medium, which carries flavor across your palate more effectively than water based seasoning.
| Preparation Method | Time Required | Texture Result | Best Application |
|---|---|---|---|
| Fresh Ingredients | 15 minutes | Crisp, vibrant, snappy | High end family gatherings |
| Shortcut/store-bought | 5 minutes | Softer, more unified | Last minute casual snacks |
| Warm Bean Style | 20 minutes | Molten, rich, heavy | Winter comfort appetizers |
The choice between a fresh forward dip and a shortcut version usually comes down to the salsa and the tomatoes. If you have the extra five minutes, seeding those tomatoes and straining that cup of salsa makes a world of difference.
It prevents the water from pooling at the bottom of the dish, which is the number one reason these dips fail.
Essential Preparation and Timing
Building a dip is like a short sprint. You want everything lined up before you start the assembly line. I've found that having all your containers open and your mixing bowls ready keeps the layers looking sharp instead of smudged.
| Checkpoint | Measurement | Target Metric |
|---|---|---|
| Dairy Temperature | 21°C | Room temp softened |
| Salsa Drainage | 10 minutes | Zero liquid runoff |
| Tomato Prep | 125ml | Seeded and diced |
This recipe makes 15 servings, which is usually enough for a standard 9x13 inch glass dish or a deep 10 inch round trifle bowl. If you're feeding a massive crowd, don't just double the recipe in one bowl it becomes too deep to scoop without breaking your chips. Instead, make two separate dishes.
Sourcing Quality Fresh Components
| Ingredient | Science Role | Pro Secret |
|---|---|---|
| Refried Beans | Structural Base | Mix with lime to soften the starch |
| Cream Cheese | Moisture Barrier | Whip it first for a velvety spread |
| Strained Salsa | Flavor Infusion | Use "thick style" to minimize weeping |
| Roma Tomatoes | Texture Contrast | Always remove the watery pulp first |
For the foundation, we use 30 oz refried beans. I prefer the traditional style because the fat content provides a better mouthfeel and more "grip" for the chips. You'll season these with 1 tsp ground cumin and 1/2 tsp chili powder to ensure the base isn't bland.
The heart of the dip is the 16 oz full fat sour cream and 8 oz softened cream cheese. Honestly, don't even bother with low-fat versions here. The water content is too high, and they won't hold their shape. Mix these with a 1 oz taco seasoning packet for that signature punch.
Then you have your 16 oz guacamole look for one with visible chunks of avocado for better texture.
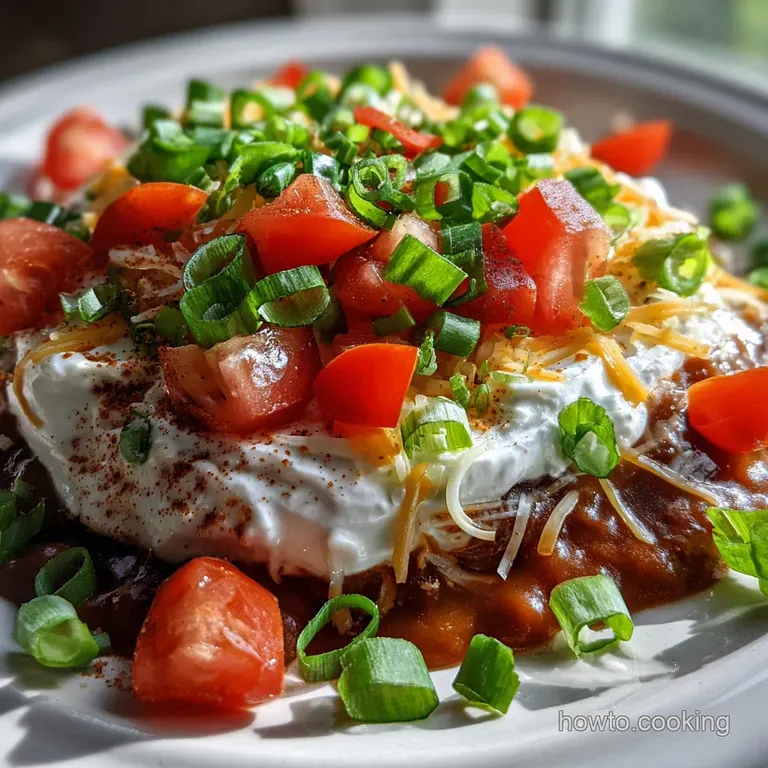
For the garnish, you'll need 1 cup thick style salsa (strained), 2 cups shredded Mexican blend cheese, 1/2 cup sliced black olives, 1/2 cup Roma tomatoes (seeded and diced), and 1/4 cup green onions. Each of these adds a different sensory note, from the salty olives to the sharp bite of the onions.
Tools for a Clean Build
You don't need fancy gadgets, but a few specific tools make the process much smoother. An offset spatula, the kind used for frosting cakes, is my secret weapon for leveling the beans and dairy layers without pulling them up into each other.
A fine mesh strainer is non negotiable for the salsa. Even the "chunky" brands have a lot of excess liquid that will ruin your dip if left unchecked. You'll also want a sturdy whisk or a hand mixer to get that 8 oz of cream cheese perfectly smooth before you fold in the 16 oz of sour cream.
Finally,, choose a clear glass dish. Half the joy of a 7 layer dip is seeing those gorgeous, distinct stripes through the side. A deep dish pie plate works well for smaller groups, but a rectangular baking dish is the standard for a reason it maximizes the surface area for the toppings.
step-by-step Assembly Guide
- Prepare the beans. Mix 30 oz refried beans with 1 tbsp lime juice, 1 tsp cumin, and 1/2 tsp chili powder. Note: This loosens the beans for easier dipping.
- Smooth the base. Spread the bean mixture into the bottom of your dish until perfectly level and reaching all corners.
- Whip the dairy. Beat 8 oz softened cream cheese with 16 oz full fat sour cream and 1 oz taco seasoning until velvety and no lumps remain.
- Create the barrier. Carefully spread the dairy mixture over the beans. Note: Work from the center outward to avoid dragging the beans.
- Add the guacamole. Layer 16 oz guacamole over the dairy until the green layer is opaque and even.
- Strain the salsa. Pour 1 cup salsa into a mesh strainer for 5 minutes, then spoon it over the guacamole until lightly covered but not swimming.
- Shower with cheese. Sprinkle 2 cups Mexican blend cheese evenly across the top until the salsa is mostly hidden.
- Garnish with precision. Distribute 1/2 cup olives, 1/2 cup diced tomatoes, and 1/4 cup green onions until the top looks like a vibrant garden.
Solving Texture and Flavor Issues
The most frustrating part of a layer dip is when it looks great for ten minutes and then starts to "weep." This usually happens because the vegetables or salsa are releasing water. If your dip looks watery, it's almost always a drainage issue.
Why Your Layers Are Smearing
If you try to spread a cold layer over a room temperature one, the friction will cause them to blend. This is why we soften the cream cheese and "loosen" the beans with lime juice. If you see the layers mixing, stop, chill the dish for ten minutes, and try again with a lighter touch.
The Problem of the Broken Chip
We've all been there you go for a scoop and crack, half your chip is buried in the beans. This happens when the refried beans are too cold or too dense. Ensure you're using the lime juice trick and let the dip sit at room temperature for about 20 minutes before serving.
| Problem | Root Cause | Solution |
|---|---|---|
| Watery Bottom | Salsa or tomatoes not drained | Strain salsa; seed and pat tomatoes dry |
| Tough Scooping | Beans are too cold/stiff | Mix beans with lime juice or a splash of water |
| Muddy Layers | Spreading too forcefully | Use an offset spatula and chill between layers |
Common Mistakes Checklist
- ✓ Never skip straining the salsa, even if it looks "thick" in the jar.
- ✓ Seed your tomatoes completely; the pulp is 90% water.
- ✓ Use full fat dairy to ensure the structure holds up under the weight.
- ✓ Spread each layer all the way to the edges of the glass to "seal" the one below.
- ✓ Don't build this more than 24 hours in advance or the colors will bleed.
Creative Swaps and Variations
If you want to move away from the traditional profile, there are several ways to adjust this recipe while keeping the structural integrity. Substituting the refried beans for a black bean mash can offer a more earthy, wholesome flavor. Just ensure you mash them thoroughly so the texture remains consistent.
| Original Ingredient | Substitute | Why It Works |
|---|---|---|
| Full Fat Sour Cream | Greek Yogurt (Plain) | Similar tang and thickness but adds more protein |
| Mexican Blend Cheese | Sharp Cheddar | Provides a bolder, more distinct salty bite |
| Taco Seasoning | Smoked Paprika & Garlic | Note: Less salty, more aromatic and sophisticated |
If you're looking for a different main dish to follow this appetizer, I often suggest a hearty Cabbage Rolls recipe for a cold weather gathering. The savory, oven baked rolls provide a nice contrast to the fresh, cold dip.
Adjusting the Heat
For those who want a spicy kick, you can swap the mild salsa for a habanero version or add diced jalapeños to the garnish layer. Just remember to warn your guests nothing ruins a party faster than an unexpected spice bomb!
Scaling for Different Crowds
Scaling this recipe is fairly straightforward because it doesn't involve cooking. If you need to cut it in half for a small family movie night, just use a standard pie plate. You'll still want to keep the layer thickness about 1 cm each to ensure every bite has a bit of everything.
When doubling the recipe for a big tailgate, I recommend using two separate 9x13 containers rather than one giant vat. This prevents the "bottom heavy" problem where the beans get buried too deep.
If you are using a very large platter, keep the salt and spices at about 1.5x the original amount to avoid over seasoning, as flavors tend to amplify in larger volumes.
If you want a lighter version: Swap sour cream for 2% Greek yogurt. Use "Fat Free" refried beans (though you may need extra lime juice to soften them). Double the amount of fresh tomatoes and green onions for more bulk.
Myths About Layered Dips
One major misconception is that you should "cook" the beans first. While warm beans are great for some dishes, adding heat to a layered dip causes the sour cream and guacamole to melt, creating a messy, unappealing slurry. Always start with room temperature or chilled beans for a stable build.
Another myth is that guacamole will always turn brown in this dip. While oxidation is real, the "guac sandwich" technique placing the guacamole between the dairy and the salsa actually protects it from the air.
The acidity in the salsa and the lime juice in the beans also act as natural antioxidants, keeping the green layer vibrant for much longer than you'd expect.
Preservation and Leftover Logistics
Storage is simple: cover the dish tightly with plastic wrap, pressing the wrap directly onto the surface of the toppings to minimize air contact. This will keep in the fridge for up to 3 days. I don't recommend freezing this dish, as the sour cream and tomatoes will separate and become grainy and mushy upon thawing.
For zero waste, if you find yourself with leftovers that look a bit "shuffled," you can stir the remaining dip together and use it as a filling for quesadillas or as a topping for baked potatoes the next day. The flavors are still there, even if the pretty layers have vanished.
Ideal Pairings for Serving
A dip is only as good as its delivery vehicle. You want something with "structural integrity." Avoid thin, flaky chips that will shatter under the weight of the beans. Instead, look for "scoop" style tortilla chips or thick cut corn chips that can handle a heavy load.
For a well rounded spread, I like to serve this alongside fresh crudités like carrot sticks or thick bell pepper wedges. It adds a nutritious crunch and lightens up the overall meal. If you're planning a full menu, consider finishing the night with something sweet and comforting, like a Homemade Butter Pecan recipe, which balances the salt and spice of the Mexican flavors perfectly.
| Servings | Dish Size | Bean Quantity | Dairy Quantity |
|---|---|---|---|
| 8 People | 9 inch Round | 15 oz | 12 oz total |
| 15 People | 9x13-inch Rect | 30 oz | 24 oz total |
| 30 People | Two 9x13-inch | 60 oz | 48 oz total |
Building this dip gives you a lot of pride because it's such a visual win. When you set it down and people see those perfect stripes of beans, cream, and green, they know they're in for a treat. Just remember: drain your liquids, soften your dairy, and use a light touch with the spatula. You've got this!

Recipe FAQs
Can I make this dip completely ahead of time, like a day before serving?
No, 24 hours is the absolute maximum. This dip relies on distinct layers, and prolonged refrigeration causes moisture migration, making the layers bleed into each other.
How to prevent the refried beans from being too stiff for dipping?
Mix the beans with 1 tablespoon of lime juice before spreading. The acid slightly softens the starch structure, making the bottom layer easier to scoop without sacrificing its foundational stability.
Is it true that I must use full fat dairy for the cream layer?
Yes, full fat dairy is essential for structural integrity. low-fat alternatives contain too much water, which will seep into the lower bean layer and cause the entire dip to collapse into soup.
How to ensure the salsa does not make the top layer watery?
Strain the salsa vigorously using a fine mesh sieve for at least five minutes. Excess liquid is the number one cause of a weeping layer dip; you want only the solids and thick sauce remaining.
What is the best way to achieve clean, visible layers during assembly?
Use an offset spatula and chill the dish between the heavier layers. Spreading cold ingredients over room temperature ones causes smearing; chilling solidifies the base layer before you add the next topping.
Can I use black beans instead of refried beans for the base?
Yes, but you must mash them very thoroughly. Similar to controlling the spread in a thin cookie dough, you need to ensure your black bean mash is as smooth as possible to match the density of refried beans.
Are there specific chips recommended to avoid breakage?
No, do not use thin, delicate chips. Choose scoop style tortilla chips or thick, sturdy corn chips that can handle the weight of the dense bean and dairy layers without snapping.
Layer Dip With Beans Cream

Ingredients:
Instructions:
Nutrition Facts:
| Calories | 284 kcal |
|---|---|
| Protein | 8.9 g |
| Fat | 21.0 g |
| Carbs | 15.6 g |
| Fiber | 5.2 g |
| Sugar | 2.8 g |
| Sodium | 573 mg |
