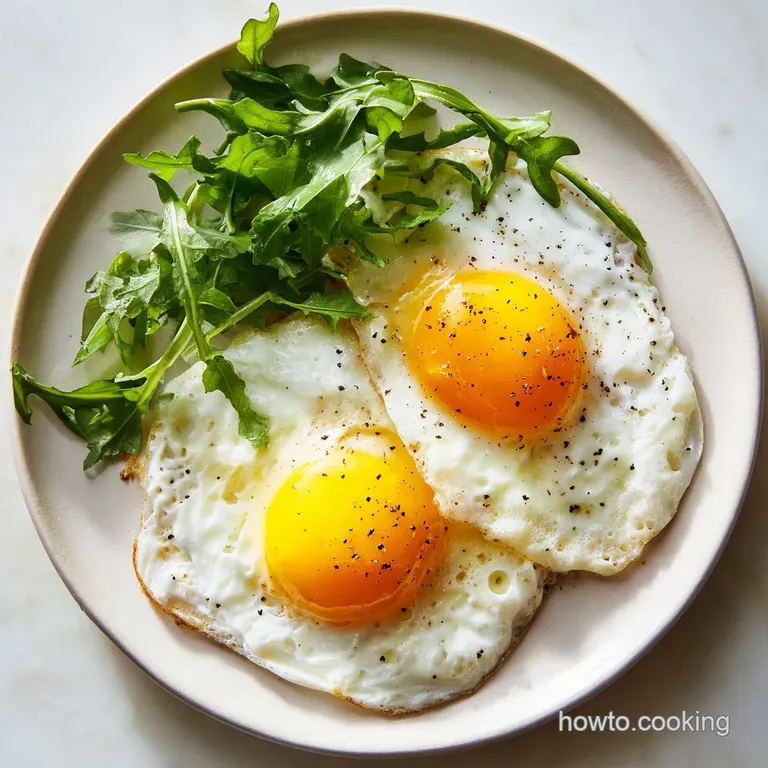
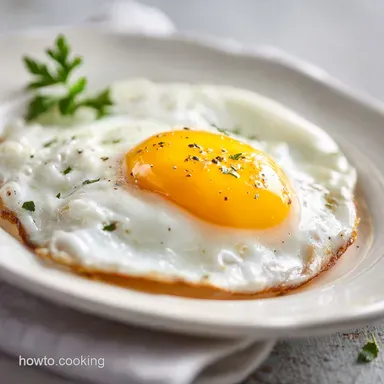
Over Easy Eggs: Velvety Whites
- Time: Active 1 min, Passive 3 mins, Total 4 mins
- Flavor/Texture Hook: Velvety whites with a buttery, liquid gold yolk
- Perfect for: Wholesome weekday breakfasts or a slow Sunday brunch
- Reasons This Technique Wins
- Component Analysis and Selection
- The Essentials for Rich Flavor
- Minimal Tools for Maximum Results
- Step by Step to Success
- Fixing Common Breakfast Failures
- Adjusting Your Batch Size
- Busting Old Kitchen Legends
- Keeping Leftovers and Using Scraps
- Wholesome Pairings for Your Meal
- Over Easy Egg FAQs
- 📝 Recipe Card
Reasons This Technique Wins
- Coagulation Control: By using a mix of butter and oil, we manage the temperature so the whites set without the edges becoming "lacey" or tough.
- Thermal Buffering: The low and slow approach allows the yolk to warm through without the underside of the egg becoming brown and leathery.
- Surface Tension: Cracking the egg into a small bowl first ensures the yolk is centered and the "loose" whites stay contained for a neat shape.
- Vapor Management: Using a lid for just thirty seconds uses residual steam to set the top layer of whites, making the flip much safer for the yolk.
| Method | Time | Texture | Best For |
|---|---|---|---|
| Stovetop Skillet | 3 mins | Silky whites, liquid yolk | Quick daily breakfast |
| Oven Baked | 6 mins | Firm whites, jammy yolk | Large family batches |
| Air Fryer | 4 mins | Slightly crispy edges | Minimal cleanup needs |
Using the stovetop is my favorite way to handle these because you have instant control. If you see the butter starting to brown too fast, you can literally lift the pan off the heat to regulate the energy. It's a tactile experience that helps you build kitchen intuition.
Component Analysis and Selection
| Ingredient | Science Role | Pro Secret |
|---|---|---|
| Large Eggs | Protein Structure | Use cold eggs for a tighter, more compact white. |
| Unsalted Butter | Flavor and Browning | Milk solids provide a nutty aroma that oil lacks. |
| Neutral Oil | Smoke Point Stability | Prevents the butter from burning at lower temperatures. |
The Essentials for Rich Flavor
- 2 large eggs: Why this? Farm fresh provides a sturdier yolk membrane less prone to breaking.
- 1/2 tbsp unsalted butter: Why this? Controls salt levels while adding a creamy mouthfeel.
- 1/2 tsp neutral oil: Why this? A tiny bit of grapeseed or canola stabilizes the fat.
- 1 pinch kosher salt: Why this? Coarse grains provide a better "pop" of flavor on the tongue.
- 1 pinch freshly cracked black pepper: Why this? Pre ground pepper loses the essential oils that provide heat.
Chef's Tip: If you want a restaurant quality look, strain your eggs through a fine mesh sieve for 30 seconds before cooking. This removes the "loose" watery whites that usually spread out and create those messy, thin edges.
Minimal Tools for Maximum Results
You don't need a drawer full of gadgets to get perfect eggs over easy. I honestly suggest avoiding the heavy cast iron for this specific task unless it’s exceptionally well seasoned. A small, 8 inch non stick skillet is your best friend here.
It’s light, responsive to heat changes, and lets the egg slide around without resistance.
A thin, flexible spatula often called a fish spatula is another secret weapon. Most standard plastic spatulas are too thick and "plow" into the egg rather than sliding under it. You want something that can gently navigate the curve of the pan.
Finally,, a small glass bowl for cracking the eggs into is a must. It lets you check for shells and ensures the yolk hasn't already broken before it hits the heat.
step-by-step to Success

- Warm the pan. Place your skillet over medium low heat for 2 minutes. Note: A preheated pan prevents sticking.
- Add the fats. Drop in the 1/2 tbsp butter and 1/2 tsp oil, swirling until the butter foam subsides. Listen for the sizzle to soften.
- Crack the eggs. Gently slide the 2 large eggs from your small bowl into the center of the pan.
- Season immediately. Sprinkle the pinch of salt and pepper over the yolks while they are still wet.
- Cook the base. Let the eggs sit undisturbed for about 2 minutes until the whites are mostly opaque.
- Perform the flip. Slide your thin spatula under the yolk, support the egg, and turn it over with a gentle roll of the wrist.
- Flash cook. Let the second side cook for only 30 seconds. Wait for the white to fully set.
- Slide to serve. Tilt the pan and let the eggs glide onto a warm plate. Watch for the yolk wobble.
Chef's Tip: Freeze your butter for 10 minutes before adding it to the pan if you're using a stainless steel skillet. The temperature difference helps create a temporary non stick barrier as the fat melts.
Fixing Common Breakfast Failures
Dealing With Rubbery Whites
This usually happens because the heat was too high. Egg proteins are like tiny springs; when they get too hot, they coil up tight and squeeze out all the moisture, leaving you with a texture like a bouncy ball. Keep the flame low. If the edges are brown and crispy but the middle is raw, your pan is definitely too hot.
Avoiding the Broken Yolk
The most common cause is a "sticky" pan or a heavy handed flip. If the egg doesn't move when you shake the pan, don't try to force the spatula under it. Add a tiny drop of oil right at the edge of the egg and let it seep under.
When flipping, don't throw the egg into the air just roll it over the edge of the spatula.
| Problem | Root Cause | Solution |
|---|---|---|
| Yolk breaks on flip | Spatula too thick | Use a thin metal or silicone fish spatula. |
| Slimy top whites | Cooking too fast | Cover with a lid for 30 seconds to steam. |
| Stuck to pan | Not enough fat | Use the butter and oil combo for better glide. |
Common Mistakes Checklist
- ✓ Use eggs straight from the fridge to keep the yolk centered and firm.
- ✓ Never crack eggs directly into the pan; shells are harder to find in hot grease.
- ✓ Avoid high heat, which toughens the delicate protein structures.
- ✓ Don't flip too early; the bottom white must be fully set to support the yolk.
- ✓ Ensure your spatula is dry; water on the tool causes the oil to pop and splatter.
Adjusting Your Batch Size
When you're cooking for a crowd, the "one-by-one" method becomes a nightmare. If you need to scale up to 4 or 6 eggs, use a larger 12 inch skillet. However, be careful with the flip.
It’s often easier to cook them in pairs and keep them warm in a low oven (150°F or 65°C) on a parchment lined sheet.
For a single egg, reduce the butter slightly to about 1 teaspoon, but keep the oil the same. The oil is there for the surface tension, not just the flavor. If you are doubling the recipe in one pan, increase the salt and pepper by only 50% to avoid over seasoning, as the surface area of the eggs doesn't double at the same rate as the count. This is a trick I learned making a Quiche Base Recipe for brunch seasoning doesn't always scale linearly.
Busting Old Kitchen Legends
Many people believe you must salt eggs only at the very end to prevent them from becoming tough. Science tells us otherwise. Salting early actually helps the proteins bond more loosely, resulting in a more tender curd or fried white. It’s a subtle difference, but it’s real.
Another myth is that you need a massive amount of oil to fry a runny egg. In reality, you only need enough to create a thin film. If the egg is "swimming," you're essentially deep frying it, which leads to those bubbly, crispy edges that are the opposite of a true "over easy" style.
We want a velvety finish, not a crunch.
Keeping Leftovers and Using Scraps
- Storage
- Fried eggs are best enjoyed immediately. However, if you have extras, store them in an airtight container in the fridge for up to 2 days.
- Reheating
- Avoid the microwave at all costs it will turn the yolk into a rubber ball. Instead, reheat in a warm pan with a teaspoon of water and a lid for 60 seconds.
- Zero Waste
- If you have leftover whites or yolks from another project, don't toss them. Leftover eggshells can be crushed and added to your garden soil for a calcium boost. If you accidentally break a yolk while cooking, just scramble it into the whites and use it as a filling for a breakfast burrito.
Wholesome Pairings for Your Meal
There is nothing quite like the way a runny yolk acts as a natural sauce for other components. I love serving these over a thick slice of sourdough toast rubbed with a garlic clove. The acidity of the bread cuts right through the richness of the yolk.
If you're looking for a full spread, a Fluffy Buttermilk Pancakes recipe provides the perfect sweet and savory balance. The maple syrup mingling with the salty yolk is a flavor profile that never gets old. For a lighter option, a side of sliced avocado with a squeeze of lime and a dash of chili flakes offers a nutritious fat source that complements the eggs beautifully. If you have extra eggs in the carton, consider making a Classic Deviled Eggs Recipe for an appetizer later in the day.
Three Bullet Decision Shortcut: If you want a creamy finish, use only butter and keep the heat at the lowest setting. If you want crispy edges, increase the heat to medium and use only oil.
If you want a foolproof flip, use a small lid to steam the top for 30 seconds before turning.

Over Easy Egg FAQs
What is an over easy egg?
It is a fried egg flipped briefly to set the white. The white should be completely opaque and set, while the yolk remains completely liquid and runny when cut. This quick flip is what defines the "over" part of the process.
What is the difference between sunny side up and over easy?
Sunny side up eggs are never flipped; over easy eggs are flipped once. Sunny side up cooks only on one side, leaving the yolk completely raw and uncovered on top, whereas over easy involves a quick turn to barely cook the surface of the yolk.
What are the 4 types of fried eggs?
The four main styles are sunny side up, over easy, over medium, and over hard. These categories are determined purely by how long the egg cooks after being flipped, which dictates the final runniness of the yolk.
Why is it called over easy?
The name refers to how easily the yolk breaks after cooking. The egg is flipped "over," and cooked only "easy," meaning the minimum amount of time required to set the white without disturbing the liquid yolk underneath.
How do I ensure the top white is set without overcooking the yolk?
Cover the pan with a lid for the final 30 seconds before flipping. This traps residual steam which gently cooks the thin, slimy layer of white still sitting atop the yolk. This technique is similar to the gentle heat control needed when tempering for the Classic Greek Lemon recipe.
Should I crack the egg directly into the hot fat?
No, crack the egg into a small bowl first. This allows you to remove any stray shell pieces and ensures the yolk is intact before it hits the pan. Starting with the egg already separated reduces the risk of a broken yolk or a messy splatter, which can compromise the structure when you try to flip it.
What is the best fat to use for perfect texture?
Use a combination of butter for flavor and neutral oil for a higher smoke point. This blend prevents the butter solids from burning before the egg whites are fully set. Mastering this fat ratio is key to achieving the velvety texture you want in your whites.
Perfect Over Easy Eggs
Ingredients:
Instructions:
Nutrition Facts:
| Calories | 214 calories |
|---|---|
| Protein | 12.6 g |
| Fat | 17.5 g |
| Carbs | 0.7 g |
| Fiber | 0 g |
| Sugar | 0.4 g |
| Sodium | 292 mg |
