Jasmine Rice Recipe Mastering the Fluff with the Stovetop Method
- Stop the Sticky Mess: Why Your Jasmine Rice Fails (The Science of Starch)
- Elevating the Staple: The True Aroma of Hom Mali Grains
- Selecting the Finest Grains: A Guide to Premium Jasmine Rice
- The Foundation: Step-by-Step Technique for Flawless Stovetop Grains
- Unlocking the Secret Fluff: Mastering the Steam and Rest Phase
- Troubleshooting & Advanced Tips for Home Chefs
- Maximizing Your Batch: Storage, Reheating, and Usage Variations
- Recipe FAQs
- 📝 Recipe Card
Stop the Sticky Mess: Why Your Jasmine Rice Fails (The Science of Starch)
I am obsessed with good rice. Seriously. But for years, I struggled. I’d order Thai takeout, and the jasmine rice would be perfectly fluffy, every grain distinct, radiating that lovely floral scent. Then I’d try to recreate it at home and end up with a pot of sticky, gluey, edible concrete. Sound familiar?
The biggest mistake home cooks make isn't the heat level or the timing; it’s neglecting the enemy hiding on the outside of the rice: surface starch .
When you measure out a cup of dry, uncooked jasmine rice, look closely. It’s covered in a milky, powdery residue. When that powder hits hot water, it dissolves into a thick paste (that’s the glue!).
It essentially acts as cement, welding all your beautiful, separate grains together into one solid, unfortunate block. We need to eliminate that surface starch before it gets a chance to ruin our dinner. Period.
Elevating the Staple: The True Aroma of Hom Mali Grains
If you’re only eating jasmine rice because it’s cheap and generally available, you’re missing out on a truly transcendent experience. We’re talking about hom mali grains, the true Thai fragrant rice.
When cooked correctly, this isn't just filler it's the silky, aromatic counterpoint that makes a spicy Thai curry sing.
The goal here isn't just "cooked rice." The goal is perfectly structured, subtly fragrant, beautifully separate grains. Achieving that relies on three simple, non-negotiable steps: managing the starch, respecting the grain’s chemistry, and using the right water ratio.
Understanding Amylose: The Key to Separate Grains
This is where we get nerdy for one second. Rice starch is made up primarily of two types: amylose and amylopectin. Sticky, glutinous rice (like what you’d use for mango sticky rice) is high in amylopectin.
Jasmine rice, however, is a long grain variety with a medium amylose content, meaning it naturally wants to separate. The problem is the loose amylopectin dust clinging to the surface from the milling process. That stuff is incredibly sticky.
By washing it off, we let the natural amylose structure do its job, resulting in light, fluffy, individual grains.
The Rinsing Ritual: Separating Fact from Starch Washing Fiction
You absolutely, positively must rinse your jasmine rice. Don't listen to anyone who says otherwise. I used to think a quick splash would suffice. Rookie mistake! That did nothing.
The method is simple: place your measured rice in a fine mesh sieve. Run cold water over it. Swirl the rice gently with your fingers. The water draining out will initially look like milk. Keep rinsing, shaking the sieve, and running fresh water over it until the water draining from the bottom runs completely clear.
This usually takes about four to six changes of water, depending on how fresh your rice is.
Crucial Note: If the water draining is still cloudy after five minutes of rinsing, you might be agitating the rice too vigorously. Be gentle. We want to remove surface starch, not break the grains themselves.
The Essential 1:1.2 Water Ratio Explained for Perfect Absorption
Okay, ditch the "two cups of water for one cup of rice" rule. That ratio is designed for older, tougher, enriched white rice that takes forever to hydrate. Jasmine rice is much more delicate and prone to absorbing liquid quickly.
If you use too much water, you’ll boil the grains instead of steam them, creating mush.
For the stovetop method, I swear by the 1 cup rice to 1.25 cups water ratio. Sometimes I even go slightly lower, depending on the age of the rice. This precise, slightly skimpy ratio guarantees that by the time the cooking phase is complete, all the water is absorbed, leaving zero liquid, only moist, ready-to-steam grains.
Trust me on this.
Selecting the Finest Grains: A Guide to Premium Jasmine Rice
You can’t make amazing rice if you start with questionable grains. Your jasmine rice should not be broken, dusty, or smell musty. Good quality matters here, perhaps more than with any other staple.
How to Identify high-quality Fragrant Rice
When shopping, look for packaging that explicitly states "Thai Hom Mali Rice." It should be clear that it was grown in Thailand. Look for a recent harvest date printed on the bag fresher rice retains more of that incredible popcorn/pandan scent. If you open a bag and it smells like nothing, put it back.
You want that distinctive floral fragrance. It should also look uniform. Too many broken grains means too much loose starch, even after rinsing.
The Importance of Filtered Water in Rice Preparation
Have you ever wondered why restaurant rice seems to taste so clean? Often, it's the water. Rice is incredibly absorbent. If your tap water has a strong mineral content, or if it’s heavily chlorinated (common in city water systems), those flavors will transfer directly to the cooked grain.
It’s subtle, but it makes a difference. If you filter your drinking water, use filtered water for your rice. It’s a simple upgrade that noticeably improves the final flavor profile.
Equipment Deep Dive: Choosing the Perfect Heavy Bottomed Pot
Do not use a thin, cheap saucepan for this. Thin metal leads to terrible heat distribution, meaning the center of the pot scorches while the edges are still barely simmering. You need a heavy bottomed saucepan (cast iron enamel or a thick stainless steel pot is ideal).
And the lid must fit tightly. Tightly is the operative word. We need to trap the steam like a hostage negotiator locks down a building. No vents, no gaps.
Related Recipes Worth Trying
- 25Minute Keto Taco Cauliflower Rice Bowls Quick Healthy — A proper weeknight hero These satisfying Taco Cauliflower Rice Bowls skip the faff and deliver vibrant smoky Mexican flavor in under 30 mins Perfect low...
- Proper Beefy Mexican Rice Soup Hearty Quick and Easy Weeknight Comfort — This deeply flavourful Beefy Mexican Rice Soup is the ultimate quick and easy soup for busy evenings Rich ground beef and tender rice make it incredibly...
- The Sunday Best Chicken Pot Pie Rice Bake with Quick Cheddar Scone Topping — This Chicken Pot Pie Rice Bake delivers creamy comfort without the pastry faff Its a splendid tidy onepot creamy chicken and rice casserole topped with...
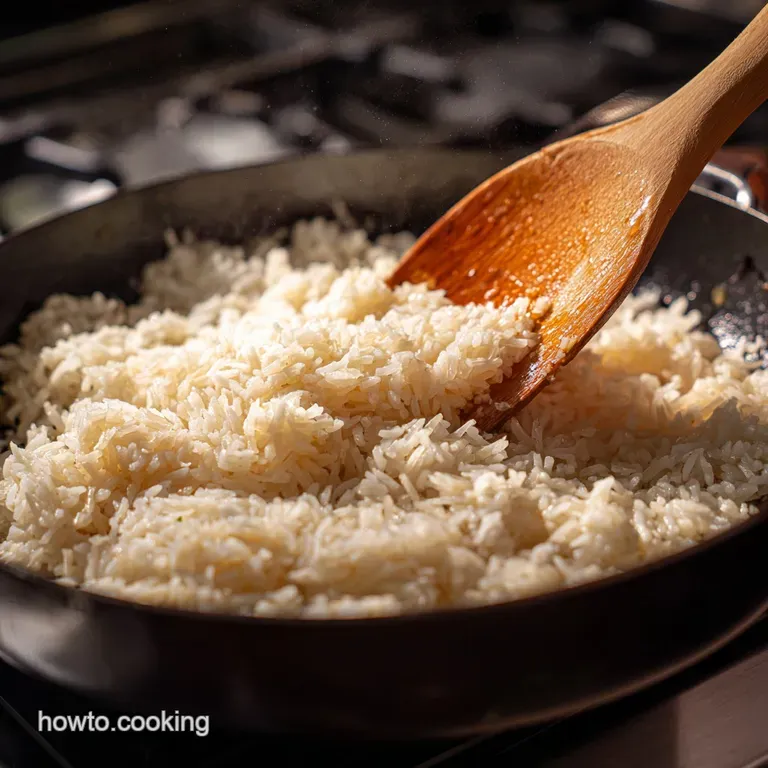
The Foundation: step-by-step Technique for Flawless Stovetop Grains

Right then, let's crack on. We’ve rinsed the starch away, we’ve measured the water perfectly. Now for the heat. Remember, the cooking process is short, but the resting period is long. Patience is your secondary ingredient.
- Prep: Place the rinsed, drained rice, the precisely measured cold water (1:1.25), and a pinch of salt into your heavy pot.
- Boil: Bring the mix to a vigorous boil over medium high heat, uncovered. Do not stir it!
- Simmer: As soon as you see a rolling boil, drop the heat immediately to the lowest setting possible.
- Cover: Slap that tight fitting lid on. Cook for 12– 15 minutes.
- Rest: Remove from heat, but keep the lid sealed, and rest for 10 minutes.
- Fluff: Use a fork to aerate and serve. Easy.
Unlocking the Secret Fluff: Mastering the Steam and Rest Phase
This is where beginners drop the ball. They rush the process. They lift the lid. They try to stir it. Don’t do any of that! The true magic of great jasmine rice happens after the heat is off.
Phase 1: Achieving the Perfect Boiling Point (The Roiling Simmer)
We start hot to get everything moving. We want a rapid boil, letting the water evaporate slightly from the surface. Once you see those big, bursting bubbles not just little wisps it's time to transition. This usually takes about 3 to 5 minutes.
Phase 2: The Critical Cover and Low Heat Transition
Drop the heat. I mean, all the way down. Your stove might even barely keep a pilot light going that’s what we want. The moment the lid goes on, the rice shifts from boiling to controlled steaming.
This gentle simmer allows the rice to continue absorbing the last of the moisture without exploding or scorching the bottom. This 12 to 15-minute window is non-negotiable. Don’t peek. You’ll lose precious steam.
Phase 3: The Mandatory 10-Minute Steam and Waiting Game
Turn off the burner. Walk away. This is the moment of maximum flavor and textural development. By keeping the pot covered and letting it rest off the heat, the internal temperature equalizes. The grains on top, which might feel slightly drier than those on the bottom, now absorb the residual moisture evenly.
This is what gives you that light, uniform fluffiness, rather than some grains being squishy and others hard.
The Final Fluff: Aerating the Cooked Grains Correctly Before Serving
When the 10 minutes are up, remove the lid. You should see small indentations (little volcanoes) where the steam escaped. Use a fork never a spoon or spatula, which crushes the fragile grains and gently rake through the rice from the sides toward the center.
This releases any final pockets of trapped steam and separates the grains, giving the rice that light, airy texture we crave.
Troubleshooting & Advanced Tips for Home Chefs
| Problem | Likely Cause | Quick Fix |
|---|---|---|
| Mushy/Sticky | Too much water, or not enough rinsing. | Next time, reduce water by 2 tablespoons. |
| Grains Undercooked/Hard | Heat was too low during the simmer, or rest time was skipped. | Add 2 tablespoons of boiling water, cover, and rest for another 5 minutes. |
| Burned Bottom | Heat was too high during the 12-minute simmer phase. | Use a heavier pot next time. Don't scrape the bottom layer serve only the fluffy top portion. |
- Butter is Optional: If you want richer rice, add half a tablespoon of butter or a teaspoon of coconut oil along with the water and salt before boiling. It adds fat, which helps keep the grains separate and adds flavor.
- Keep it Cold: Start with cold water and room temperature rice. Starting cold allows the rice to hydrate slowly and evenly as the water heats up, preventing the exterior from bursting before the center is cooked.
Maximizing Your Batch: Storage, Reheating, and Usage Variations
The great thing about this method is how reliable it is for making large batches. Perfect rice is a joy, but handling leftovers safely is paramount.
Why Your Rice Might Still Be Mushy (Common Errors Solved)
If you followed the 1:1.25 ratio and still ended up with porridge, you likely lifted the lid during the simmer. Truly. That short drop in temperature allows the steam to collapse back into the pot as water, over hydrating the grains. The steam phase requires monastic discipline!
Also, make sure you are measuring your water accurately a tenth of a cup difference can matter a lot.
Safe Storage Practices: Keeping Leftovers Fresh for Days
Cooked rice can harbor bacteria if left to cool slowly at room temperature. Don't risk it! As soon as the rice is fluffed, transfer the leftovers immediately to a wide, shallow container to cool it down fast. Seal it once cool, and refrigerate within one hour of cooking. It keeps perfectly for three to four days.
Reheat thoroughly, either by microwaving with a sprinkle of water or by steaming it again on the stove.
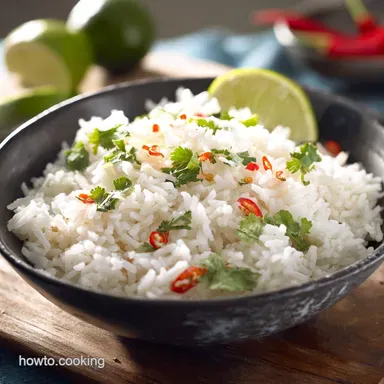
Serving Suggestions: Pairing Jasmine Rice with Southeast Asian Dishes
This beautifully fragrant jasmine rice is the essential sidekick for anything involving a rich sauce or intense spice.
- Thai Green or Red Curries (it soaks up the coconut milk beautifully)
- Vietnamese Grilled Pork (Com Thit Nuong)
- Chicken Satay skewers with thick peanut sauce
- As the base for a simple rice bowl topped with fresh herbs, a fried egg, and chili oil. It's brilliant.
Quick Nutritional Snapshot (What’s in a Serving?)
This is just a general estimate based on a standard 200g cooked serving, completely plain. It provides energy, pure and simple.
| Nutrient | Estimate |
|---|---|
| Calories | 205 kcal |
| Carbohydrates | 45 g |
| Protein | 4 g |
| Fat | < 1 g |

Recipe FAQs
I followed the steps, but my rice is still sticky! What went wrong?
Chances are, you didn't rinse enough; starchy water is the main culprit for gluey rice, so make sure the water is crystal clear before cooking rinsing is non-negotiable for fluffy grains.
I’ve made too much, how long can I safely store leftover Jasmine Rice?
Absolutely; store it in an airtight container in the fridge for 3 4 days, but ensure you cool it quickly and reheat it until piping hot to maintain food safety standards.
Is the 1:1.25 ratio essential, or can I just use a standard one-to-one measure for this Jasmine Rice?
While 1:1 is common in rice cookers, the 1:1.25 ratio (rice:water) is vital for the stovetop method, as it gives the rice enough liquid to steam perfectly without becoming mushy or running dry.
I normally use a rice cooker; does the method change if I use that kit instead of the hob?
If you're using a rice cooker which is brilliant for consistency you can relax the water measure and use a straightforward 1:1 ratio, as the sealed environment handles the precise timing and steaming for you.
I want a bit more flavour; what can I add to make it a bit fancy?
For a lovely South East Asian twist, try adding a knotted piece of pandan leaf or a couple of strips of fresh ginger to the water before boiling, and don't forget that a touch of salt makes a world of difference.
Perfect Stovetop Jasmine Rice Guide
Ingredients:
Instructions:
Nutrition Facts:
| Calories | 205 kcal |
|---|---|
| Fat | 1 g |
| Fiber | 0.5 g |
