The Proper Green Bean Casserole: Fresh Beans and Homemade Crispy Shallots
- Elevating the Holiday Table: Why We Ditched the Canned Soup
- Our Secret Weapon: The Homemade Mushroom Cream Sauce
- Essential Components for the Ultimate Comfort Dish
- Prepping Your Mise En Place and Required Kitchen Tools
- Crafting the Perfect Crispy Shallot Topping
- Step and by-Step Guide to the Savory Mushroom Béchamel
- Combining and Baking the Green Bean Casserole
- Expert Tips for a Flawless, Never and Fail Dish
- Planning Ahead: Preparation and Storage Guidelines
- Savory Swaps: Ingredient Variations and Dietary Modifications
- Recipe FAQs
- 📝 Recipe Card
Elevating the Holiday Table: Why We Ditched the Canned Soup
Okay, friend, let’s be honest. When you hear "Green Bean Casserole," what flashes into your mind? Is it that comforting, creamy, deeply savory dish? Or is it that gloopy, gray and ish mess made strictly from three cans the kind that sits sadly untouched next to the mashed potatoes?
For years, I avoided the dish completely because of the latter. It felt mandatory, but never truly good.
But we are evolving. We are home cooks now, and we deserve better. The moment I started making my Green Bean Casserole from scratch, honoring the texture and flavor instead of relying on heavily processed shortcuts, everything changed.
We aren’t trying to reinvent the wheel, we’re just swapping out the cheap, rusted parts for high and performance tires. We are trading that generic cream of mushroom soup for a proper, earthy béchamel built on real sautéed fungi. It’s a little more effort, sure.
But the richness, the flavour depth, and that killer crunch? Absolutely worth it. This version is the main event, not the sad side dish.
Our Secret Weapon: The Homemade Mushroom Cream Sauce
The difference between "okay" and "wow" in any casserole is almost always the sauce. And when it comes to Green Bean Casserole without mushroom soup (the classic enemy!), the answer is simple: you build your own.
We’re essentially making a mushroom and infused béchamel, but we’re pushing the flavour hard. We start by really browning those cremini mushrooms. That tiny step is where 80% of your umami flavour lives. If you rush it, you get watery mushrooms and a weak sauce. Take the time.
Let them sweat, shrink, and brown. That beautiful, concentrated mushroom essence becomes the foundation of the roux. It's brilliant.
The Culinary Sin of Gloopy Sauce: A Fresh Perspective
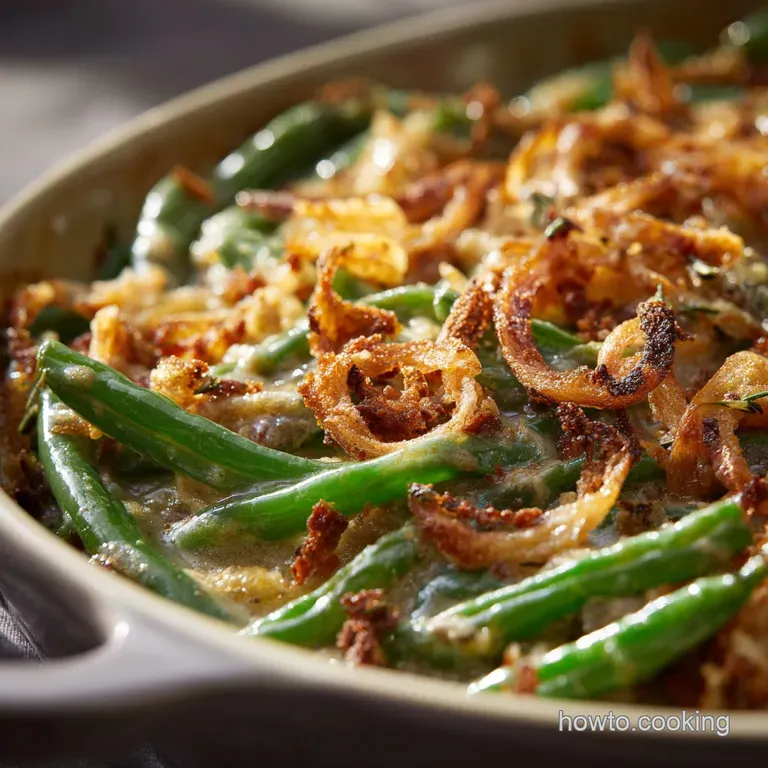
The sin of the canned version isn't just the flavor (which is usually overwhelmingly salty). It’s the texture. It’s thick, yes, but it’s a thick sludge that seems to suction itself to the beans, making them soft and sad.
My homemade mushroom cream sauce aims for thick but flowing, clinging to the fresh green beans just enough to coat them without drowning them. The secret here is using a blend of stock and whole milk, then finishing it with heavy cream for that velvety mouthfeel.
It keeps the Green Bean Casserole rich without feeling like cement.
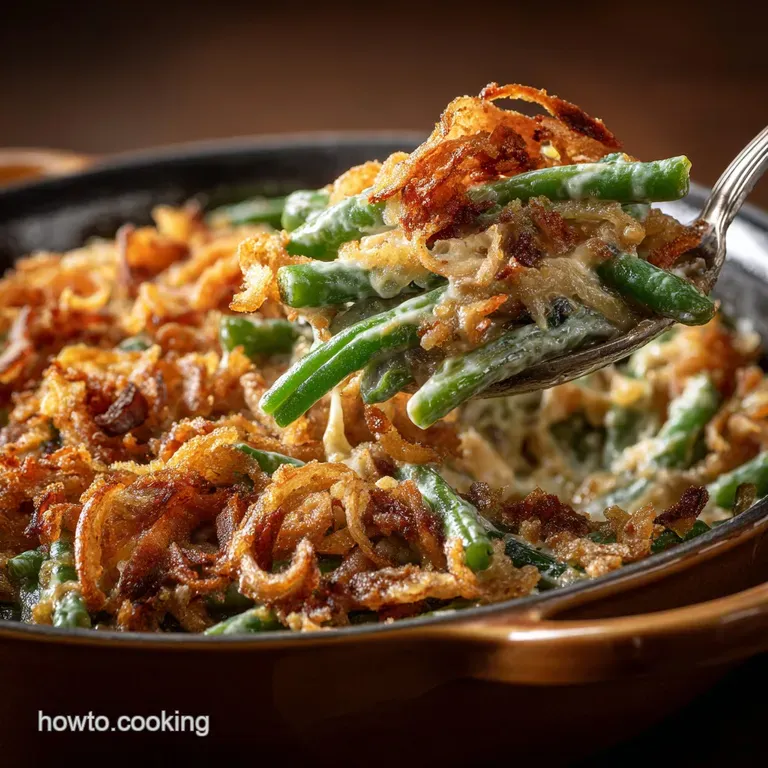
Mastering Texture: The Crunch Factor in This New Green Bean Casserole
Let’s be real: this whole dish hinges on the crunch. If the beans are mushy and the topping is soft, you’ve failed. Sorry, but it’s true. The crunch is twofold here: first, the fresh green beans must remain al dente (we'll cover the blanching magic later).
Second, we absolutely have to make the crispy shallots ourselves. Seriously, ditch the store and bought tin this year. Making them at home ensures they are shatteringly crisp and freshly salted, which provides the necessary sharp contrast to the creamy sauce. This texture duality is non and negotiable.
Essential Components for the Ultimate Comfort Dish
When you upgrade a classic, you have to upgrade the ingredients. We are focusing on maximum flavor extraction from minimal items. You need truly fresh green beans haricots verts if you can get them, but good old string beans work, too. Don't even bother with the tinned stuff.
The milk needs to be whole milk, and the cream needs to be heavy cream (or double cream, depending on where you live). Trying to make a deeply comforting dish "light" just results in sadness and disappointment.
We also use unsung heroes here: shallots and thyme. Shallots have a sweeter, more complex flavor than standard onions and melt beautifully into the sauce base. Thyme is the perfect autumnal herb to pair with both mushrooms and creamy dairy.
Don't skimp on the Worcestershire sauce either (just one teaspoon!), because it adds a foundational savory depth that mimics the umami you lost when you ditched the canned soup.
Prepping Your Mise En Place and Required Kitchen Tools
Before you even think about firing up the stove, get organized. This dish moves quickly once the sauce starts cooking. Have your green beans trimmed, your shallots sliced super thin (a mandoline is your best friend here, seriously), and all your liquid components measured out and warmed slightly.
I always use my heavy and bottomed Dutch oven for the frying stage because it holds heat consistently, which is crucial for perfect crispy shallots. Having a good whisk nearby for the sauce is also essential; a wire whisk ensures no lumpy surprises when you add the liquids.
Selecting the Best Fresh Green Beans (No Tinned Here!)
When you're at the store, look for beans that snap cleanly when you bend them. If they feel rubbery, pass. Once you get them home, trimming takes a while, but it's meditative (or maybe I just need a hobby). The single most important technique for the beans, though, is the blanch and shock method.
Three minutes in boiling, salted water, followed immediately by an ice bath. This locks in the chlorophyll, keeps them vibrant green, and ensures they remain tender and crisp in the final bake.
The Cream Base: Dairy and Broth Ratios for Richness
My mistake, early on, was making the sauce too heavy. It felt like eating straight butter. My perfected ratio is one cup of stock (chicken or veggie) to one cup of whole milk, finished with a half and cup of heavy cream. Why the stock?
It provides a savory layer that dairy alone can’t offer, thinning the sauce just enough to incorporate those mushrooms perfectly while still tasting incredibly rich. Always warm your liquids first! That prevents the roux from seizing up.
Beyond the Basics: Shallots, Thyme, and Seasoning Upgrades
We’re not just throwing salt and pepper in and calling it a day. When sautéing your mushrooms, add the dried thyme right alongside them (or fresh thyme, if you have it). Toasting the herb in the butter helps release its oils and deepen the flavor immediately.
Then, once the sauce is thick, taste constantly. Sometimes you need a pinch more salt. Sometimes you need a tiny splash of hot sauce for depth, not heat. Trust your palate.
CRUCIAL WARNING: Do not taste the sauce until the roux has cooked for at least two minutes! Raw flour tastes chalky and awful, and that flavor will ruin the whole batch. Cook it out properly.
Crafting the Perfect Crispy Shallot Topping
This is the fun part, and the part where I always burn one batch (it’s okay, it happens!). The key to perfect crispy shallots is consistency. You need those slices razor thin seriously, use a mandoline if you have one. Toss them in a tiny bit of flour first.
The flour helps them crisp up evenly and gives the exterior a lovely, light crust.
When frying, keep the oil temperature around 325°F (160°C). If it's too high, the outside burns before the inside dries out. If it’s too low, they absorb too much oil and get soggy. Fry them in small batches.
They will look ready in the pan, but remember: they keep cooking for a minute after you pull them out. Remove them when they are golden brown, not dark brown. Drain them immediately on a wire rack (not just paper towels) and hit them instantly with a good sprinkle of kosher salt. That’s the crunch insurance.
Related Recipes Worth Trying
- Sweet Potato Casserole with Marshmallows The Best Creamy Spiced Recipe — Sweet Potato Casserole with Marshmallows is the cornerstone of holiday dinners Learn how to make the Best Sweet Potato Casserole Recipecreamy spiced and...
- Green Bean Casserole From Scratch Fresh Beans Crispy Shallots — The ultimate Green Bean Casserole recipe starts here Ditch the soup tin for a rich homemade sauce using fresh green beans and crispy shallots This is the...
- Chicken and Stuffing Casserole The Easiest Sunday Dinner Bake — This easy Chicken and Stuffing Casserole recipe uses Rotisserie Chicken for minimal effort Get creamy filling savory herbs and crispy topping in one simple...
Step and by-Step Guide to the Savory Mushroom Béchamel
We already sautéed the mushrooms, garlic, and thyme until fragrant. Now for the real foundation: the roux.
Building the Roux: The Foundation of Flavor
Sprinkle that measured flour over the mushroom mixture. Stir continuously with a wooden spoon or spatula for two full minutes. It will look like a thick, savory paste. This is the crucial stage where you eliminate the raw flour taste. Keep stirring!
Simmering the Sauce to the Ideal Thickness
Once the roux is cooked, grab your whisk. Slowly, slowly stream in the warm chicken stock while whisking vigorously. It will thicken almost instantly. Then, follow with the milk and cream, still whisking. Bring the whole thing to a gentle simmer. Once it starts to bubble lightly, reduce the heat.
Let it simmer gently for about 5 to 7 minutes. It needs to be thick enough to smoothly coat the back of a spoon, leaving a clear trail when you drag your finger across it. Remove it from the heat and stir in the Worcestershire sauce and your initial seasonings.
Combining and Baking the Green Bean Casserole
This is easy street now. Gently fold the blanched, dried green beans into the beautiful sauce. Make sure every bean is lovingly coated. Transfer the mixture to your baking dish.
Bake it uncovered at 375°F (190°C) for about 15 minutes. We are not cooking the beans here; we are just heating the sauce through and letting the flavors marry. Once the edges are bubbly, pull it out.
Sprinkle about three and quarters of your crispy shallots over the top this amount goes back into the oven to bond with the sauce. Bake for the final 5 minutes until those shallots start to smell deeply savory.
The last step is crucial for ultimate crunch: reserve the final quarter of shallots and scatter them over the casserole immediately before you carry it to the table. Seriously, right before serving. It ensures that last, glorious snap.
Expert Tips for a Flawless, Never and Fail Dish
- Lump Prevention: If your sauce starts to get lumpy when adding the liquid, take the pan off the heat immediately and whisk like crazy. If it persists, pour the sauce through a fine and mesh sieve before adding the green beans. It’s simple chemistry.
- Mushroom Moisture Control: Don't crowd the pan when browning the mushrooms. If you have too many, the steam stays trapped, and they boil instead of brown. Use two pans if necessary, or work in batches.
- Oil Quality for Shallots: Use fresh, clean, neutral oil (like canola or vegetable oil) for frying the shallots. If the oil smells old or has previously been used for fish or heavy frying, your delicate shallots will taste off.
Planning Ahead: Preparation and Storage Guidelines
Green Bean Casserole is an absolute godsend for holiday planning because you can do so much in advance.
Making Green Bean Casserole Components 24 Hours in Advance
You can make both the mushroom cream sauce and the crispy shallots up to two days ahead.
- Sauce Storage: Store the cooled sauce in an airtight container in the fridge. It will thicken significantly. When you reheat it (before combining with beans), whisk in a splash or two of warm milk until it reaches its original consistency.
- Shallot Storage: Store the cooled, crispy shallots in a container at room temperature with the lid slightly ajar or lined with a paper towel. Storing them sealed in the fridge will make them steam and go soggy.
Ensuring Beans Remain Tender and Crisp (Al Dente Perfection)
If you plan to make the entire casserole (sauce and beans combined) ahead of time, hold off on the beans until the morning of your dinner. Combining them too early means they soak up the liquid and start softening.
You can blanch them 24 hours ahead, store them covered in the fridge, and mix them with the sauce just before baking.
Freezing and Reheating Instructions for Leftovers
Honestly, Green Bean Casserole isn't the best freezer candidate, especially once it’s baked. The cream sauce tends to break down when thawed, becoming grainy. However, if you must, freeze the unbaked combined bean and sauce mixture (without the topping) in a freezer and safe dish for up to 2 months.
Thaw overnight in the fridge. Bake as directed, adding a few extra minutes since it’s coming from the fridge, and then top with freshly fried shallots. Leftovers, stored in the fridge, are best eaten within 3 days.
Savory Swaps: Ingredient Variations and Dietary Modifications
This is a flexible dish, allowing you to tailor it to your table.
| Substitution Goal | Ingredient Swap | Notes |
|---|---|---|
| Gluten and Free Sauce | Replace AP Flour with 1:1 GF flour blend | Works perfectly for the roux. |
| Dairy and Free/Vegan | Use full and fat coconut milk (not light), cashew cream, or oat cream | Be careful; coconut milk flavor can sometimes dominate. |
| Nutty Flavor | Add 1/2 cup grated Gruyère or Parmesan | Stir in when the sauce is off the heat. |
Troubleshooting: What to Do If Your Sauce Breaks
If your sauce separates (it looks oily and watery), it means the fat and liquid emulsification failed, usually due to overheating or adding cold liquid too fast. Don't panic! Remove the pan from the heat. Whisk a tablespoon of cold milk into a small separate bowl.
Slowly drizzle the broken sauce into the cold milk while whisking aggressively. It often re and emulsifies, bringing it back together.
Slicing and Soaking: Ensuring Maximum Crispness
This applies to the shallots: if you don’t have a mandoline, slice them thinly by hand, then soak them in cold water for 10 minutes before drying and tossing in flour. Soaking removes some starch, which aids in crisping and prevents them from burning too quickly.
Shallow Frying Techniques for Golden Results
Remember that temperature range: 325°F (160°C). Don't walk away. Frying shallots is a commitment. Once they start to turn color about 4 minutes in they go from golden to burnt in seconds.
Remove them before they hit the perfect color you want, because residual heat will finish the job. A slotted spider is the best tool for quick removal.

Recipe FAQs
How much of this fancy Green Bean Casserole can I prep ahead of time to save myself a headache?
You can prepare the creamy mushroom sauce and the blanched beans up to two days in advance; keep them stored separately and simply combine before baking.
Help! My creamy mushroom sauce has gone lumpy is it salvageable?
Absolutely, don't panic! Whisk the sauce vigorously off the heat, or for stubborn lumps, strain it through a fine mesh sieve before combining it with the beans.
Frying shallots feels a bit risky; what’s a safer alternative for that essential crunch?
If the deep fryer is giving you the jitters, simply toss the floured shallots with a small amount of oil and bake them on a sheet tray at 400°F (200°C) until beautifully golden and crisp.
I'm trying to cut back on richness; do I really need the full fat heavy cream?
Full fat dairy provides the best body and prevents the sauce from splitting, but you can reduce the amount of cream by replacing half of it with extra chicken stock or whole milk.
How should I store the leftovers, and can I reheat the casserole without losing the crunch?
Store leftovers covered in the fridge for up to three days; for best results, reheat portions gently in the oven or microwave and add a fresh sprinkle of crispy shallots right before serving.
Proper Green Bean Casserole From Scratch
Ingredients:
Instructions:
Nutrition Facts:
| Calories | 569 kcal |
|---|---|
| Protein | 19.1 g |
| Fat | 24.2 g |
| Carbs | 68.9 g |
