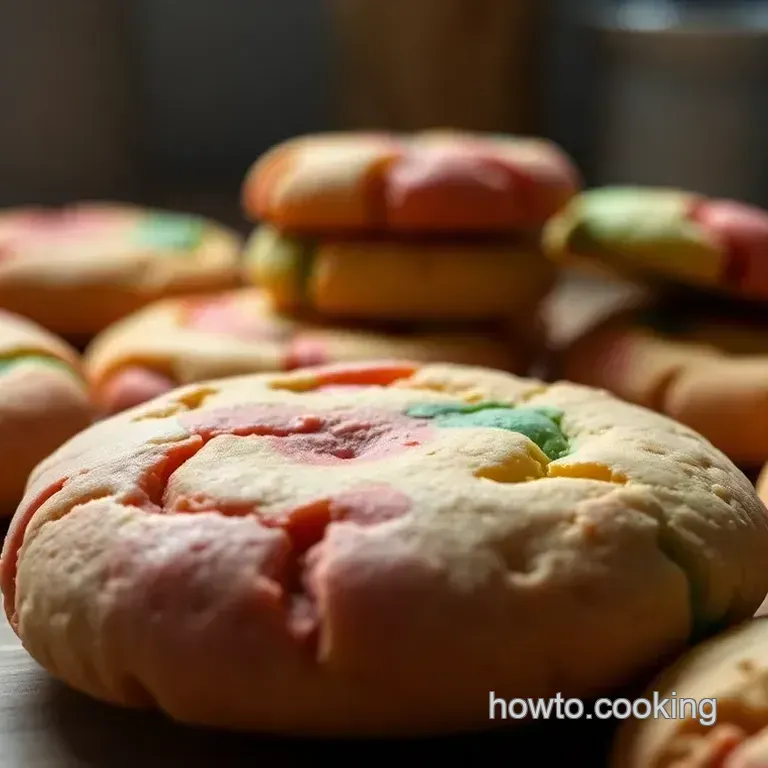
Rainbow Delight Cookies
- Get Ready for a Flavor-packed Adventure!
- Recipe Overview: How Did They Come About?
- Key Benefits: Why You Need These Cookies in Your Life!
- Ready to look into into Ingredients?
- The Essential Ingredients Guide: Bake Like a Pro!
- Unlocking the Magic of Professional Cooking
- Pro Tips & Secrets for Perfect Rainbow Cookies
- Perfect Presentation Ideas to Wow Your Guests
- Storage & Make-Ahead Tips for Busy Bakers
- Creative Variations for Every Occasion
- Complete Nutrition Guide
- Conclusion: look into into Your Baking Adventure
- Frequently Asked Questions
- 📝 Recipe Card
Get Ready for a Flavor packed Adventure!
Let me take you back to the day i discovered the rainbow cookies recipe it was one of those days when the sun was shining bright, and i felt like sprucing up my dessert game.
I thought, “wouldn’t it be awesome to bake something colorful and cheerful?” and that's when i stumbled upon these vibrant rainbow delight cookies .
Honestly, it's like a cupcake and cookie had a party, and all the colors jumped right in!
The first time i took a bite, it felt like my taste buds were on a carnival ride! imagine a soft, chewy cookie with hints of almond and rich chocolate, all wrapped in layers of joy.
And i remembered, this cookie isn’t just about taste it's about the smiles it brings to the table, especially at parties.
Whether it's a birthday bash, or even a princess party these cookies steal the show!
Recipe Overview: How Did They Come About?
These little gems hail from italian american cuisine, where families whip them up during holidays and special occasions. you could spot them on dessert tables during christmas or easter , just waiting to catch your eye with their fun colors.
Nowadays, they’re a total crowd pleaser!
Now, let’s talk time. this isn’t a quick fix dessert. it’ll take you about 1 hour and 45 minutes from start to finish, but trust me! every minute is so worth it.
Plus, it yields around 24 cookies ! so, perfect for sharing or hiding in the back of the pantry for late night snacking!
In terms of difficulty, i’d say it’s around a medium level. the dough is straightforward to whip up, but layering those colors just right might need some patience.
But hey, if i can do it without turning into a rainbow sloppy mess , so can you!
Key Benefits: Why You Need These Cookies in Your Life!
Now, onto the juicy stuff the benefits of these cookies! first off, they’re made with almond extract , so they’ve got that lovely nutty flavor that's hard to beat.
They’re also visually stunning, making them the perfect candidate for special occasions . want to impress your friends at the next potluck? just whip up a batch of these and watch the magic happen .
On the health front, the almond in these cookies brings some protein for a touch of guilt free indulgence. plus, they’re pretty fun to make with kids, making them perfect for anyone looking for kid-friendly baking recipes that are fun and easy .
You know what they say baking is just science with a pinch of fun!
Thinking about a unicorn party theme? These cookie beauties fit right into the lineup of any unicorn dessert ideas . I mean, who wouldn’t love bright colors and delicious flavors? They’re just so right for an afternoon tea or a festive gathering trust me, the compliments are going to roll right in!
Ready to look into into Ingredients?
Alright, my fellow bakers! now that your mouth is watering and your mind is racing with visions of colorful cookie magic, let’s get into the nitty gritty here’s what you’ll need for your homemade rainbow delight cookies.
Get your aprons ready because we’re about to embark on a vibrant baking journey!
The Essential Ingredients Guide: Bake Like a Pro!
Let’s talk ingredients, shall we? whether you’re diving into a delightful rainbow cookies recipe or whipping up some easy unicorn cookies , knowing your stuff is key.
So grab your apron, and let’s dive into this essential ingredients guide!
The Must Have Core Ingredients
First up, let’s break down those premium core components . When it comes to baking, quality matters. Here’s what I usually keep stocked:
Unsalted Butter: Always have 1 cup (226g) on hand. Make sure it’s softened to room temp for the best mixing action. If it’s hard like a rock, it won’t whip properly trust me!
Granulated Sugar: You’ll need about 1 cup (200g). Look for fine, white granules. It should feel almost like sand.
Eggs: Ideally, large and fresh. You need 3 large eggs for that perfect lift. Fresh eggs are key; they will help your cookies rise nicely!
All-Purpose Flour: About 2 cups (240g) should do it, but always measure carefully for baking accuracy.
Oh, and don’t forget your baking powder —1 teaspoon (5g) should keep that dough fluffy.
Smart Storage Tips
Now, let’s talk storage and shelf life . most of your dry ingredients can chill out in your pantry for months (just keep them away from moisture).
But your butter? that should stay in the fridge until you’re ready to bake! a good rule of thumb is to check expiration dates often.
The Magic of Signature Seasonings
No baking adventure is complete without the right signature seasoning blend . Here’s my go-to:
Almond extract: just 1 teaspoon (5ml) goes a long way! it brings a nutty flavor that totally elevates your rainbow cookies.
If you’re making unicorn dessert ideas , you might want to swap it for vanilla extract for a different vibe!
Food Coloring: Get a basic box of food colors. You’re gonna need red, yellow, blue, and green for those vibrant layers. The more vivid, the better, I say!
Smart Substitutions to Save the Day
Do you ever find yourself knee deep in a recipe and realize you’re missing an ingredient? Don't sweat it! Here are a few common alternatives :
- Butter can often be replaced with coconut oil in a pinch.
- Eggs ? Use flaxseed meal or applesauce if you’re looking for dietary modifications —it's a game changer, especially for plant based bakes.
- If you don’t have almond extract, vanilla works beautifully too!
Kitchen Equipment Essentials
Now that we’ve got the ingredients down, let’s not forget about the kitchen equipment essentials . You don’t need fancy gadgets just the basics:
Mixing Bowls: A must for combining your dry and wet ingredients!
Mixer: A hand mixer is perfect, but if you're fancy or have a stand mixer, even better ! You’ll save time and effort.
Baking Sheet and Parchment Paper: For those colorful cookie layers, a lined baking sheet ensures no sticking and easy cleanup.
Pro Tips From My Kitchen to Yours
A little wisdom never hurt! Here are my tips and tricks :
Chill Your Dough: Seriously, it’s crucial! It makes cutting and layering so much easier.
Use Quality Ingredients: This is the key to tasty treats. Quality chocolate or butter can change everything just ask the cookie jar!
Experiment with Colors: Don’t be afraid to mix it up! You can create seasonal themes with your coloring. Think Halloween orange and black or Christmas red and green.
Avoid Overbaking: Keep an eye on your cookies! They should look golden around the edges but still soft in the center.
Let’s Bake!
Alright, now you’re all set with the ingredients. what’s next? well, if you’re ready to dive into that cheerful rainbow cookie adventure, just follow along for easy, yummy baking recipes.
You’ll impress your friends and family in no time!
Now let’s roll up our sleeves and get baking!
Unlocking the Magic of Professional Cooking

Cooking can feel like a true art form, especially when you dive into the world of professional techniques. if you’ve got visions of rainbow cookies dancing in your head, let’s talk about some essential steps and expert tips to become a kitchen pro!
buckle up, because we’re about to make this journey fun, straightforward, and maybe even a little silly (because, why not?).
Essential Preparation Steps
First things first: mise en place , which is just a fancy chef’s term for having everything in its place.
Before you start baking those stunning rainbow cookies , gather all your ingredients and equipment. this saves you time and energies like hunting for that measuring spoon you just know is hiding somewhere.
Now, let’s talk time management. if you’re prepping and baking, keep an eye on your clock. those 30 minutes of prep can quickly turn into a mad dash if you're not careful.
Set a timer, and stick to it! speaking of organization, try making a checklist. nothing feels better than crossing off tasks!
And hey, we can't forget safety considerations. Always wash your hands before cooking, and be cautious with hot ovens. It’s easy to get swept away in the fun, but trust me, nobody wants a visit to the ER because of a silly kitchen mishap!
step-by-step Process
Ready for the magic? Let’s break it down with clear, numbered instructions!
Prep the dough: cream that 1 cup unsalted butter and 1 cup granulated sugar until they’re light and fluffy (you’ll want about 3- 5 minutes for this ).
Add in 3 eggs , mixing well after each. don’t rush this bit it really helps all the flavors meld.
Mix the dry ingredients: in a separate bowl, whisk together 2 cups flour , 1 teaspoon baking powder , and a pinch of salt.
Gradually combine it with your wet mix, but be careful not to stir too much!
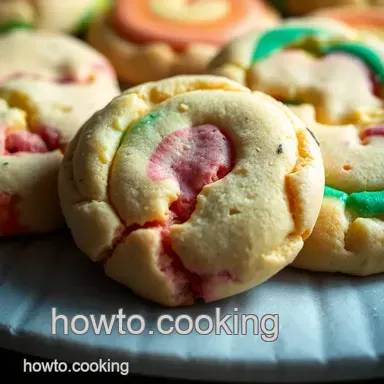
Customize your colors: divide your dough into four parts and dye them. use your imagination! you can go with classic red, yellow, blue, and green.
Rolling these out into rectangles can be a bit messy, but embrace it! it’s all part of the fun.
Chill and bake: once you’ve layered your lovely dough, wrap it up tight and chill it for at least 1 hour .
Preheat your oven to 350° f before you slice and bake. pop those cookies in for 15 minutes . keep an eye out for those golden edges!
Temperature control during baking is critical if you see that golden goodness, you're on your way to success.
Expert Techniques
Here’s where the pros shine. quality checkpoints matter, so always ensure the colors are visible and the edges are not overbaked.
If said edges start to brown too much, you might end up with some sad cookies.
And if things go sideways, remember to troubleshoot. is your dough too sticky? a sprinkle of flour can save the day.
If they’re flat instead of fluffy, check your baking powder it should be fresh!
Success Strategies
We’ve all made mistakes in the kitchen. I once forgot to add sugar to a cookie recipe yikes! Avoid those common slip ups. Always double check your ingredients!
Quality assurance is the name of the game. taste test along the way (you know, for science), and get creative with your flavors.
Maybe add some nutmeg or a splash of vanilla extract for an extra kick!
And if it's a busy week? no problem! these rainbow cookies can be made ahead of time. just freeze them after baking and dip them in chocolate when you need a little sweetness in your life.
As we wrap this up, remember that cooking is all about enjoying the process. Whether you’re whipping up unicorn cookies or soft no chill sugar cookies , just have fun with it! You've got this, friend!
Additional Information...
If you need more ideas for kid-friendly baking recipes or that perfect treat for a unicorn themed party, hang tight! there's a whole magical world of fun and easy baking recipes waiting for you.
Keep exploring, and most of all, enjoy each colorful bite. happy baking!
Pro Tips & Secrets for Perfect Rainbow Cookies
Oh boy, are you in for a treat with this rainbow cookies recipe ! these gems aren’t just about being pretty; they pack a punch with flavor too! here are some pro tips to elevate your cookie game straight from my kitchen to yours.
First things first, time saving techniques are key! chill your dough well; it makes the layering so much easier! don't rush it.
One lesson i learned is that a little patience goes a long way when you’re trying to make those layers perfect.
For flavor enhancement, don’t skip on using high-quality almond extract. trust me, it makes a world of difference. and if you're feeling fancy, try adding a splash of orange or lemon zest for that extra kick.
It’s like giving your cookies a little sunshine!
When it comes to presentation, remember: it’s all about the eye candy ! dust a little powdered sugar on top of your finished cookies, or drizzle some melted chocolate over them.
Presentation matters, especially if you’re trying to impress at a party. you want them to look as good as they taste, right?
Perfect Presentation Ideas to Wow Your Guests
Let’s talk plating techniques . layer your cookies on a vibrant platter to really make those colors pop! a plain white plate is classic, but it kind of makes those rainbow cookies look a little dull.
Try a colorful dish or even a wooden board for something rustic.
Garnishes are your best friends here. think about using colorful sprinkles or edible glitter. i mean, who doesn’t love a little sparkle, am i right? you can also slice a few cookies in half and display them upright to showcase those gorgeous layers.
It’s all about that visual appeal !
Play with color combinations as well. you can coordinate your serving plates with the hues in the cookies. it’s not just food; it’s art! plus, it gets everyone at the table talking.
“wow, where did you get the idea?” bonus points for you!
Storage & make-ahead Tips for Busy Bakers
Now, if you’re planning on making these ahead of time, you’re in luck! storage guidelines are pretty straightforward. once your cookies have cooled and the chocolate has set, layer them in an airtight container with parchment paper in between.
They’ll hold up well for about a week if they even last that long!
As for preservation methods , you can freeze these cookies for up to three months. Just make sure you wrap them really well! Nobody wants freezer burn ruining their rainbow dreams!
When it's time to enjoy them again, for reheating , just let them sit out for a bit to get back to room temp.
If you're in a hurry, a quick zap in the microwave for 10-15 seconds does the trick, but be careful not to overdo it.
Creative Variations for Every Occasion
Get your creative juices flowing with these flavor adaptations ! Want a twist? Add some coconut flakes to the dough. Feeling fruity? Toss in some freeze dried strawberries for surprise bursts of flavor.
For dietary modifications, these cookies can easily go gluten-free by swapping out regular flour for a gluten-free blend. what about a vegan version, you ask? simple! use flax eggs instead of regular eggs and a plant based butter.
Everyone can enjoy these beauties!
And for those seasonal twists, how about swapping in fall spices like cinnamon or pumpkin spice? Perfect for a festive autumn gathering or any time, really!
Complete Nutrition Guide
Nutritionally, a single cookie has about 150 calories. it’s not too bad if you’re indulging on special occasions! each one offers simple carbs and a bit of fat, so balance it out with a healthy meal earlier in the day.
Check out the health benefits too! almonds can be good for heart health, and a little dark chocolate? it’s known for those antioxidants.
Pair with some fresh fruit afterward, and you’ve got a delightful dessert without that heavy guilt.
Remember to watch your portions . I know, I know, it’s hard to just have one, but it’s about enjoying them without going overboard. Moderation is key!
Conclusion: look into into Your Baking Adventure
So go ahead, dive into this rainbow cookies recipe and let your artistic side run wild! baking should be fun and enjoyable.
With these tips and tricks, you’re sure to impress anyone who gets a taste.
Time to invite some friends over for a colorful baking session or even the kiddos for some kid-friendly baking recipes fun ! so roll up those sleeves and get started with making not just cookies, but memories.
Happy baking, friends!
Frequently Asked Questions
What is the best way to store leftover rainbow cookies?
Once your rainbow cookies have cooled and the chocolate coating is set, store them in an airtight container at room temperature. They can last up to a week, but for the best taste and texture, enjoy them within a few days! If you want to keep them longer, consider freezing them for up to three months.
Can I use different colours for my rainbow cookies recipe?
Absolutely! Feel free to get creative with your food coloring. You can experiment with shades, pastels, or even seasonal colours like orange and black for Halloween. The only limit is your imagination, so have fun with it!
Are there any nutritional alternatives for the rainbow cookies recipe?
Yes! You can use gluten-free flour instead of all-purpose flour for a gluten-free version. Additionally, you can replace granulated sugar with a natural sweetener like coconut sugar, or for a healthier twist, use a sugar substitute that works for baking.
Keep in mind that these substitutions can alter the texture and taste slightly, but they still yield delicious results!
What other flavours can I add to these rainbow cookies?
You can mix things up by adding cocoa powder to one of your layers for a chocolate flavour, or swap out the almond extract for vanilla or even citrus zest for a zesty pop. The layers are a great base for experimenting with other flavours!
Do rainbow cookies need to be refrigerated after baking?
No need to refrigerate the cookies once they are baked and cooled! They can be stored at room temperature in an airtight container. However, if you live in a particularly warm climate, refrigeration can help keep them fresh for a longer time.
What’s the secret to perfect layers in my rainbow cookies?
The key to achieving beautiful layers is making sure your dough is well chilled before you cut and layer it. Rolling each color to an even thickness helps maintain consistency, and be patient when stacking them not only will it look impressive, but it'll ensure each cookie bakes evenly!
Rainbow Delight Cookies
Ingredients:
Instructions:
Nutrition Facts:
| Calories | 150 |
|---|---|
| Fat | 7g |
| Fiber | 0g |
