Ranch Roll Ups: Creamy and Smokey
- Time: Active 15 minutes, Passive 30 minutes, Total 45 minutes
- Flavor/Texture Hook: Smokey, velvety, and crisp
- Perfect for: Game day appetizers, school lunches, or stress free party hosting
- How to Master the Perfect Ranch Roll Ups
- Science Behind the Creamy Bond
- Official Recipe Specs and Yields
- Selecting Your Flavorful Components
- Essential Tools for Easy Prep
- Simple Steps for Tight Rolls
- Fixing Common Slicing Mishaps
- Fun Flavor Variations to Try
- Maintaining Freshness and Texture
- Creative Serving Styles for Parties
- Kitchen Myths Debunked
- Recipe FAQs
- 📝 Recipe Card
How to Master the Perfect Ranch Roll Ups
The first time I brought a batch of these to a neighborhood block party, I barely made it from my car to the buffet table before the tray was half empty. There is something about the aroma of sharp cheddar and smoky bacon that draws people in like a magnet.
I remember watching my friend Sarah pick one up, expecting a standard tortilla wrap, only to see her eyes widen as she hit that hit of tangy ranch and the crunch of fresh green onions.
I used to struggle with wraps that fell apart or turned into a soggy mess by the time guests arrived. It was frustrating to put in the effort only to have the filling slide out of the tortilla.
But after a few trials (and some very messy kitchen counters), I discovered the trick isn't just about what you put inside, it's about how you prep the ingredients to keep moisture in check.
We've all been there trying to roll a cold tortilla only to have it shatter in our hands. Or worse, biting into a roll up that tastes like wet cardboard because the vegetables leaked too much liquid.
Today, I'm sharing the exact method I use to ensure every bite is packed with flavor and holds together perfectly, whether you're serving them at a high stakes tailgate or just packing a nutritious lunch for the kids.
Science Behind the Creamy Bond
The Physics of the Set: When you chill the cream cheese mixture, the saturated fats realign into a firm lattice structure that physically "glues" the chicken and tortilla together.
Osmotic Control: Drying the pimientos and onions prevents water from migrating into the tortilla starch, which would otherwise lead to a gummy, unappealing texture.
Protein Adhesion: Finely chopping the rotisserie chicken increases the surface area, allowing the ranch infused fats to coat every fiber for maximum structural integrity.
| Method | Time | Texture | Best For |
|---|---|---|---|
| Traditional Chill | 30 minutes | Velvety and firm | Classic party appetizers |
| Oven Baked | 15 minutes | Melty and toasted | Warm winter snacking |
| Quick Freezer Set | 10 minutes | Firm but soft | Last minute guests |
It is worth noting that while the oven baked version offers a lovely sizzle, the traditional chilled method is far superior for achieving those clean, round discs that look so organized on a platter.
If you choose to bake them, the cheese will melt and the "glue" will soften, so expect a more rustic, pull apart experience rather than a neat slice.
Official Recipe Specs and Yields
When you are planning your spread, knowing exactly how much you'll end up with is vital. This recipe is designed to be efficient, using standard package sizes to minimize waste. We are aiming for about 48 individual slices, which usually serves a crowd of 10 to 12 people if they are part of a larger snack lineup.
Chef's Tip: For the cleanest look, use a serrated knife and wipe the blade with a damp cloth between every single cut. This prevents the cream cheese from smearing and keeps the layers distinct.
Component Deep Dive
| Ingredient | Science Role | Pro Secret |
|---|---|---|
| Full Fat Cream Cheese | Structural Binder | Soften it for 45 mins so it whips into a velvety cloud. |
| Sour Cream | Emulsion Softener | Adds a tangy lactic acid kick that cuts through the heavy fats. |
| Dry Ranch Mix | Flavor Catalyst | The MSG and buttermilk powder in the mix provide an instant savory "umami" punch. |
| Rotisserie Chicken | Protein Foundation | Use the dark and white meat mixed for the best fat to moisture ratio. |
Selecting Your Flavorful Components
Choosing the right elements is where you can really make this dish your own. I always reach for a full fat cream cheese because the lower fat versions tend to have more water and stabilizers, which can lead to a "weeping" filling that ruins the tortilla. Similar to the logic we use in my Ranch Dressing Ready recipe, the quality of your dairy base determines the final mouthfeel.
- 450g (16 oz) Cream Cheese: Softened to room temperature. Why this? Essential for a smooth, spreadable base without lumps.
- 60ml (0.25 cup) Sour Cream: For tang. Why this? Lightens the density of the cream cheese.
- 28g (1 oz) Dry Ranch Seasoning: Use a high-quality blend. Why this? Concentrated flavor without adding excess liquid.
- 2.5g (0.5 tsp) Garlic Powder: For depth. Why this? Enhances the savory notes of the chicken.
- 200g (1.5 cups) Rotisserie Chicken: Finely chopped. Why this? Pre cooked and seasoned, saving you massive prep time.
- 115g (1 cup) Sharp Cheddar Cheese: Finely shredded. Why this? Distributes more evenly than thick shreds.
- 110g (0.5 cup) Bacon Crumbles: Cooked until they shatter. Why this? Provides a smoky, salty crunch in every bite.
- 25g (0.25 cup) Green Onions: Thinly sliced. Why this? Adds a necessary fresh, sharp bite.
- 30g (2 tbsp) Diced Pimientos: Drained and patted dry. Why this? Offers a pop of color and mild sweetness.
- 5 Large Flour Tortillas: 25cm (10 inch) size. Why this? Large surface area allows for multiple spirals.
| Original Ingredient | Substitute | Why It Works |
|---|---|---|
| Rotisserie Chicken | Canned Tuna | Same flaky texture. Note: Drain extremely well to avoid sogginess. |
| Sharp Cheddar | Pepper Jack | Similar melting point but adds a spicy kick. |
| Diced Pimientos | Roasted Red Peppers | Similar sweetness. Note: Must be dried thoroughly first. |
Essential Tools for Easy Prep
You don't need a kitchen full of gadgets for these Ranch Roll Ups, but a few specific items will make your life much easier. I prefer using a hand mixer to get the cream cheese base perfectly aerated.
If you try to do it by hand with a spatula, you might end up with small pockets of unseasoned cheese, which isn't the experience we're going for.
A good offset spatula is another secret weapon. It allows you to spread the filling all the way to the very edge of the tortilla without getting your knuckles messy. This is important because the filling at the edge acts as the sealant for the roll.
If you leave the last inch dry, your roll ups will unravel the moment you try to slice them.
Finally,, make sure you have plenty of plastic wrap. Wrapping the logs tightly is what compresses the filling and ensures that beautiful spiral look. Think of it like a sushi roll; the tighter the wrap, the more professional the result.
Simple Steps for Tight Rolls
- Whip the base. Combine the 450g softened cream cheese, 60ml sour cream, ranch seasoning, and garlic powder in a bowl. Use a hand mixer until the mixture is velvety and smooth.
- Fold in textures. Add the 200g chopped chicken, 115g cheddar, 110g bacon, green onions, and dried pimientos. Note: Use a spatula to fold gently so you don't break up the bacon crumbles.
- Warm the tortillas. Place your tortillas in the microwave for 10 to 15 seconds. Watch for them to become pliable and soft to prevent cracking during the rolling process.
- Spread the filling. Place about 0.75 cup of the mixture onto a tortilla. Spread it in an even layer, leaving about a 1cm border at the very top edge.
- Execute the roll. Starting from the bottom, roll the tortilla up as tightly as possible. Note: Apply gentle pressure as you go to push out any air pockets.
- Seal and wrap. Ensure the seam is on the bottom. Wrap each log tightly in plastic wrap, twisting the ends like a candy wrapper to maintain pressure.
- Chill for stability. Place the logs in the refrigerator for at least 30 minutes. Wait until the logs feel firm to the touch before attempting to slice.
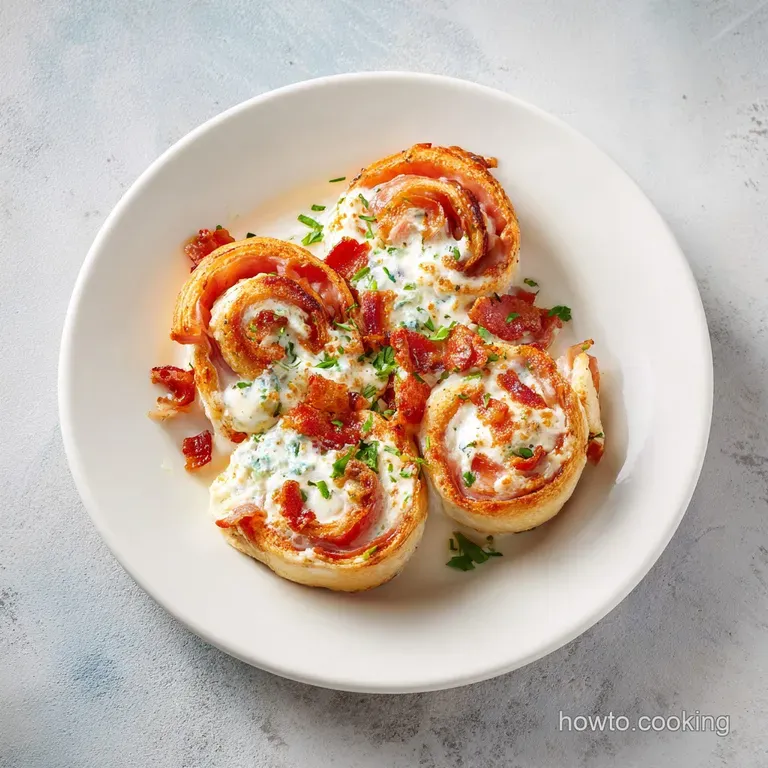
- Slice with precision. Remove the plastic. Using a serrated knife, trim the uneven ends (the "cook's snack") and then cut the log into 2cm thick slices.
- Arrange for serving. Place the spirals cut side up on a platter. Look for the vibrant pimiento red and green onion colors to pop against the white filling.
Fixing Common Slicing Mishaps
Even with the best intentions, things can go sideways in the kitchen. The most common issue people face is the "squish." This happens when you try to slice the roll and the knife flattens the circle into an oval. If this is happening, your knife isn't sharp enough, or you haven't chilled the rolls long enough.
Another headache is the "soggy bottom." This usually happens if you've used frozen chicken that wasn't thawed and dried properly, or if your pimientos were still sitting in their brine.
If you notice moisture pooling, you can try to salvage them by placing the sliced roll ups on a paper towel for a few minutes before moving them to the serving tray.
Quick Fix Table
| Problem | Cause | Fix |
|---|---|---|
| Tortilla Cracking | Dry or cold tortilla | Microwave for 10 seconds under a damp paper towel. |
| Filling Leaking | Excess moisture in veg | Pat pimientos and onions dry with a towel before mixing. |
| Loose Spirals | Not rolled tight enough | Rewrap in plastic and use a "rolling pin" motion to tighten. |
Common Mistakes Checklist
- ✓ Soften the cream cheese fully to avoid "lumpy" bites that don't stick to the tortilla.
- ✓ Finely chop the chicken; large chunks create gaps that cause the roll to fall apart.
- ✓ Don't skip the chill time; the cold "sets" the fats for a clean, professional slice.
- ✓ Use a serrated knife (like a bread knife) to saw through the tortilla without crushing it.
- ✓ Pat the pimientos until the paper towel comes away dry to prevent pink streaks in the cheese.
Fun Flavor Variations to Try
If you want to move beyond the classic chicken and bacon, there are plenty of ways to shake things up. For those who love a bit of heat, I often swap the pimientos for finely diced jalapeños. It gives it a "jalapeño popper" vibe that is incredibly addictive. If you are looking for a more "nutritious" spin, you could even try the base from my Greek Yogurt Ranch Dip recipe to reduce the overall fat content.
The Mediterranean Twist
Swap the cheddar for crumbled feta and the bacon for sun dried tomatoes and Kalamata olives. This version feels a bit lighter and pairs beautifully with a glass of crisp white wine. It's a sophisticated take on the standard party appetizer.
Low Carb Substitution
If you're watching your carbs, you can find high fiber, low carb tortillas at most grocery stores now. They behave a little differently often being a bit more fragile so I recommend warming them slightly longer to ensure they are extra stretchy before you start rolling.
Maintaining Freshness and Texture
Storage: These roll ups are best served within 4 hours of slicing to maintain the best texture. However, you can store the unsliced logs in the fridge for up to 24 hours.
Once sliced, keep them in an airtight container with a piece of parchment paper between layers to prevent sticking. They will stay safe to eat for 3 to 4 days, but the tortilla will gradually soften.
Freezing: I don't recommend freezing the fully assembled roll ups. The cream cheese and sour cream can undergo a textural change when thawed, often becoming grainy or "broken." Plus,, the tortillas tend to get quite soggy during the defrosting process.
Zero Waste Tip: Don't throw away those uneven end pieces you trim off! They might not look pretty enough for a platter, but they make an excellent "deconstructed" salad topper. Just chop them up and toss them over some romaine lettuce for a quick, flavorful lunch.
You can also use leftover filling as a spread for crackers or inside a grilled cheese sandwich the ranch and bacon flavors are incredible when melted!
Creative Serving Styles for Parties
Presentation is half the fun with these Ranch Roll Ups. Instead of just laying them flat, try stacking them in a "Christmas Tree" shape for holiday parties, using extra green onion tops as the "branches." For a more casual look, a wooden board with small bowls of extra ranch dressing for dipping works perfectly.
If you are serving these as part of a larger meal, they act as a fantastic starter for a hearty bake like my Cowboy Casserole Recipe. The creamy, cool nature of the roll ups balances out the warm, savory depth of a baked dish beautifully.
Decisions for Your Batch
- If you want a cleaner slice, freeze the wrapped logs for 10 minutes just before cutting.
- If you want extra crunch, add 0.25 cup of finely diced celery to the filling.
- If you want a spicier bite, add a dash of buffalo hot sauce to the cream cheese base.
Kitchen Myths Debunked
One common misconception is that you need to use "spreadable" cream cheese from a tub. In reality, block cream cheese is better because it has a lower moisture content and a higher fat ratio, which results in a much firmer set. Tub varieties are often whipped with air or water, which can make your roll ups collapse.
Another myth is that you must use fresh chicken. While fresh is great, rotisserie chicken is actually preferred by many pros because it has been slow roasted, making the meat tender and easy to shred or chop finely.
It also brings a pre developed depth of flavor that you just can't get from boiling a chicken breast at home.
Finally,, some people think the pimientos are just for color. While they do look beautiful, they also provide a subtle, sweet acidity that cuts through the richness of the bacon and cheese. Without them, the roll ups can feel a bit "one note." Trust the process and keep them in just make sure they're dry!

Recipe FAQs
Can I substitute the cream cheese with Neufchâtel or low-fat cream cheese?
No, stick to full fat block cream cheese. Lower fat options contain more water, which causes the filling to weep and results in loose, mushy roll ups.
How long must the assembled rolls chill before slicing for the cleanest presentation?
Chill for a minimum of 30 minutes. This allows the fats in the cream cheese mixture to firm up and lock the filling structure, ensuring neat spirals when sliced.
How to ensure the flour tortillas do not crack when rolling them tightly?
Warm the tortillas briefly in the microwave. Microwave them for 10 to 15 seconds until they are pliable and soft, which prevents brittle shattering.
Is it true that draining the pimientos is unnecessary since they are just for color?
No, this is a common misconception. Pimientos must be patted completely dry; excess moisture leaks out during chilling and turns the tortilla base soggy.
Can I prepare these ahead of time using my Slow Cooker Chicken recipe instead of rotisserie?
Yes, but ensure the chicken is dry before mixing. If you use slow cooked chicken, shred it finely and press out any residual liquid to maintain the filling's stability, similar to our Slow Cooker Chicken recipe.
What is the key technique to achieve perfectly round, non-squished slices?
Use a sharp, serrated knife and wrap the log tightly. Tightly twisting the ends of the plastic wrap compresses the roll, and sawing gently with a sharp knife avoids flattening the edges.
How do I adapt the filling flavors if I want a spicy, cheesy variation?
Substitute the cheddar with Pepper Jack cheese and add diced jalapeños. If you enjoy this concept of flavor infusion, see how we apply intense seasoning in the Golden Crack Chicken recipe.
Ranch Roll Ups Recipe

Ingredients:
Instructions:
Nutrition Facts:
| Calories | 91 kcal |
|---|---|
| Protein | 4.3 g |
| Fat | 6.1 g |
| Carbs | 5.2 g |
| Fiber | 0.3 g |
| Sugar | 0.8 g |
| Sodium | 194 mg |
