Reeses Crinkle Cookies: Fudgy Peanut Butter Treasures
- Time: Active 20 mins, Passive 1 hours 10 mins, Total 1 hours 30 mins
- Flavor/Texture Hook: Fudgy, cocoa rich crumb with a velvety peanut butter core and a sugary shatter.
- Perfect for: Holiday cookie swaps, late night cravings, or impressing guests at a casual potluck.
- Mastering This Homemade Reeses Crinkle Cookies Recipe
- The Physics of the Fissure
- Deep Dive Into Ingredient Roles
- Essential Tools for Cookie Success
- Step-by-Step Guide to the Perfect Crackle
- Correcting Common Baking Mishaps
- Adjusting Batch Sizes for Crowds or Solo Snacking
- Debunking Myths About Achieving the Perfect Crinkle
- Preserving Freshness and Minimizing Kitchen Food Waste
- Finishing Touches for a Professional Bakery Aesthetic
- Reeses Crinkle Cookies FAQs
- 📝 Recipe Card
Mastering This Homemade Reeses Crinkle Cookies Recipe
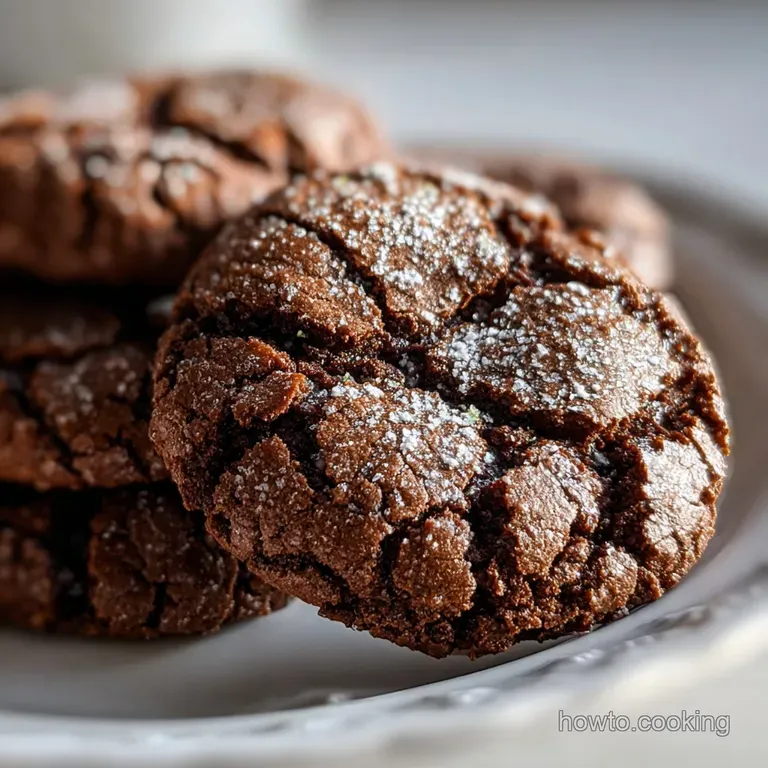
Imagine the kitchen filling with the deep, earthy scent of blooming cocoa while a tray of dark, snowy globes sits in the oven. You peek through the glass and watch as the heat forces the dough to expand, tearing through the white veil of powdered sugar to reveal dark, fudgy canyons underneath.
It’s the kind of sensory experience that makes you lean against the counter and just breathe it in. I first stumbled onto this method when I realized my standard chocolate cookies were missing that "wow" factor, so I decided to shove a whole frozen peanut butter cup inside. The result was a total transformation.
You aren't just making another cookie; you’re building a multi textured experience. We’ve all had those dry, cakey crinkles that leave you reaching for a glass of milk after one bite. This version is different.
We lean into the moisture of brown sugar and melted butter to ensure the center stays dense and fudgy, while the outside gets that signature crackle. If you’ve ever felt intimidated by stuffed cookies, trust me, it’s easier than it looks.
We're going to use smart, practical tricks to make sure the peanut butter doesn't leak out and the sugar doesn't melt into a grey mess.
We are going to focus on wholesome ingredients and smart techniques to get that bakery style finish without the bakery style price tag. By the time we’re done, you’ll have a batch of 24 cookies that look like they belong in a window display.
Whether you’re a seasoned pro or just getting your confidence in the kitchen, this guide will walk you through the nuances of temperature and timing. Let’s get that oven preheating and talk about why this specific method works so well every single time.
The Physics of the Fissure
Starch Gelatinization: The high ratio of cocoa to flour creates a structural framework that sets quickly, allowing the expanding dough to tear through the sugar coating.
Thermal Lag: Freezing the peanut butter cups ensures they don't fully melt into the dough during the short 10 minute bake, preserving a distinct, velvety core.
Sucrose Saturation: A base layer of granulated sugar prevents the powdered sugar from absorbing moisture from the dough, keeping the white finish bright and crisp.
| Method | Total Time | Texture | Best For |
|---|---|---|---|
| Classic Stuffed | 1 hours 30 mins | Fudgy with melty core | Maximum "wow" factor and texture |
| Fast Mix in | 25 mins | Uniformly chewy | Quick weeknight cravings or kids |
| Brown Butter | 1 hours 45 mins | Toasted, nutty notes | Advanced flavor seekers |
Choosing the classic stuffed method provides that incredible surprise in the middle, but if you're in a massive rush, chopping the cups and folding them into the dough works in a pinch. However, for the true reeses crinkle cookies experience, the stuffing technique is king.
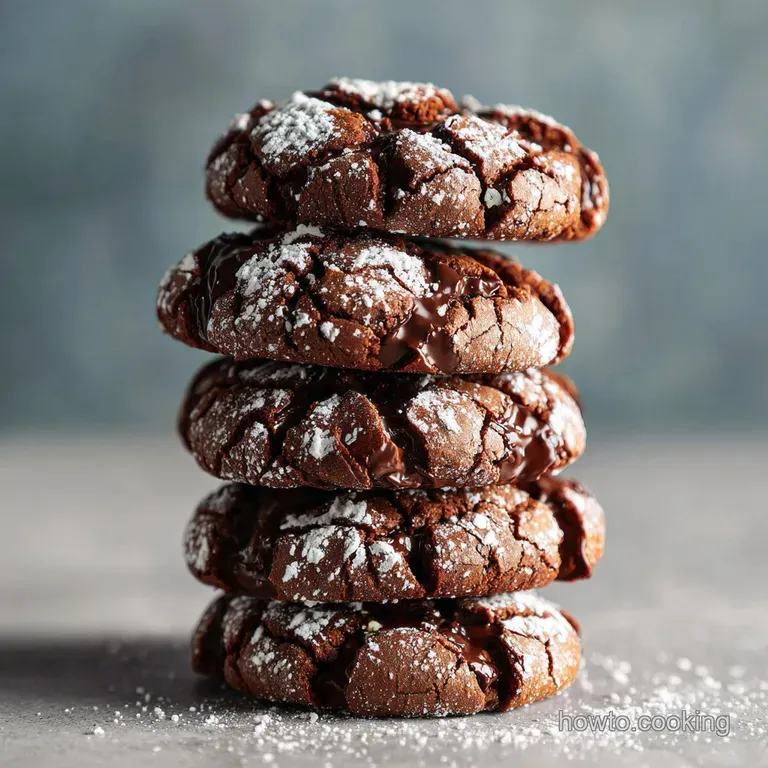
The contrast between the dark chocolate exterior and the creamy interior is simply unmatched.
Deep Dive Into Ingredient Roles
Understanding what each component does helps you bake with more confidence and adjust when things go sideways. We aren't just throwing things in a bowl; we're creating a chemical reaction that results in that perfect fudgy crumb. For instance, using melted butter instead of creamed butter significantly changes the density, leaning more toward a brownie texture than a fluffy cake. If you enjoy this type of rich, chocolatey base, you might find it similar to the technique used in our Peppermint Brownie Cookies recipe.
| Component | Science Role | Pro Secret |
|---|---|---|
| Unsweetened Cocoa | Provides structure and acidity | Sift it with the flour to prevent stubborn "cocoa bombs" in the dough |
| Light Brown Sugar | Adds moisture and chew via molasses | Pack it firmly to ensure the correct volume and sugar concentration |
| Baking Soda | Reacts with cocoa for lift and browning | Ensure it's fresh; older soda leads to flat, dull colored cookies |
| Frozen PB Cups | Acts as a temperature stable core | Keep them in the freezer until the very second you are ready to stuff |
For the dry base, you’ll need 250g all purpose flour and 65g unsweetened cocoa powder. Don't skip the 0.5 tsp kosher salt; it’s the bridge that connects the sugar and the chocolate. You’ll also use 1 tsp baking soda to get that expansion that creates the crinkles.
For the fats and sweeteners, grab 115g unsalted butter (melted), 150g light brown sugar, and 100g granulated sugar. The 2 large eggs and 2 tsp vanilla extract provide the binding and aroma. Finally, the "stars" are the 24 frozen Reese’s miniature cups and 0.5 cup Reese’s pieces for that extra crunch.
| Original Ingredient | Substitute | Why It Works |
|---|---|---|
| Unsalted Butter | Neutral Oil (90g) | Keeps cookies moist but loses the rich, dairy flavor profile |
| Light Brown Sugar | White Sugar + 1 tbsp Molasses | Mimics the acidity and moisture needed for a chewy texture |
| Kosher Salt | Table Salt (0.25 tsp) | Provides the necessary saltiness, but use half the volume due to grain size |
Essential Tools for Cookie Success
You don't need a professional kitchen to make world class reeses crinkle cookies, but a few specific tools make the process much smoother. A standard stand mixer or a sturdy hand mixer is great for getting the eggs and sugar properly combined.
However, I often find a simple whisk and a silicone spatula are all you really need since we're using melted butter. The goal is to avoid overworking the flour once it's added, as that can lead to a tough, bread like cookie.
A cookie scoop (about 1.5 to 2 tablespoons in size) is my absolute favorite tool for this recipe. It ensures every single one of your 24 cookies is the same size, which means they all finish baking at exactly the same time.
You’ll also want at least two large rimmed baking sheets and some parchment paper or silicone mats. Avoid greasing the pans directly with butter or spray; this can cause the cookies to spread too thin before they have a chance to crinkle.
step-by-step Guide to the Perfect Crackle
Phase 1: The Melt and Mix
Start by whisking your 115g melted butter with 150g light brown sugar and 100g granulated sugar in a large bowl. You want to whisk for about 2 minutes until the mixture looks like wet sand and the sugar is starting to dissolve. Add your 2 eggs one at a time, followed by the 2 tsp vanilla.
In a separate bowl, sift together the 250g flour, 65g cocoa, 1 tsp baking soda, and salt.
Phase 2: Combining and Chilling
Fold the dry ingredients into the wet mixture using a spatula. Stop the second you see no more white streaks of flour. The dough will be quite soft and sticky this is normal! Cover the bowl and chill it in the fridge for at least 1 hour. This step is non negotiable.
If the dough is warm, it won't hold onto the peanut butter cup, and it will melt into a puddle in the oven.
Phase 3: The Stuffing Technique
Once the dough is firm, take about 1.5 tablespoons of dough and flatten it in your palm. Grab one of your 24 frozen Reese’s miniature cups and place it upside down in the center. Wrap the dough around the cup, pinching the edges to seal it completely.
Roll it between your palms to form a smooth ball about the size of a golf ball.
Phase 4: The Double Sugar Coating
Set out two small bowls: one with 50g granulated sugar and one with 120g powdered sugar. Roll the dough ball in the granulated sugar first. Note: This creates a moisture barrier so the white sugar stays bright. Then, roll it generously in the powdered sugar until it's heavily coated.
You shouldn't see any chocolate dough peeking through at this stage.
Phase 5: over High heat Precision
Place the balls on your prepared baking sheets, spaced 2 inches apart. Bake at 350°F (175°C) for exactly 10 minutes. Cook 10 mins until the surface has shattered into deep dark cracks and the edges feel set.
They will look slightly underbaked in the center, but they will firm up as they cool on the pan. Let them rest for 5 minutes before moving them to a wire rack.
Chef's Tip: If you want an even more intense chocolate flavor, try adding 1 teaspoon of espresso powder to your dry ingredients. It won't make the cookies taste like coffee; it simply makes the cocoa taste more like itself.
Correcting Common Baking Mishaps
Even with the best intentions, baking can be fickle. The most common issue people face with reeses crinkle cookies is the sugar disappearing. If your powdered sugar looks wet or yellow after baking, it's usually because the dough was too warm or you skipped the granulated sugar "primer" coat.
Another common frustration is the cookie flattening out. This usually happens if the butter was too hot when mixed or if the dough didn't chill long enough to solidify the fats.
Troubleshooting Your Crinkle Failures
| Problem | Root Cause | Solution |
|---|---|---|
| Disappearing Sugar | Dough moisture absorbed the sugar | Roll in granulated sugar first, then extra thick powdered sugar |
| No Crinkles | Oven temp too low or soda is old | Ensure oven is preheated to 350°F; check baking soda expiration |
| PB Cup Leaking | Dough wasn't sealed properly | Ensure there are no thin spots or holes when wrapping the cup |
If you're looking for a similar bake with a different flavor profile, you might want to try the Chewy Crinkly recipe which focuses on that same texture but with a browned butter base.
Common Mistakes Checklist ✓ Never skip the 1 hour chill time; warm dough is the enemy of the crinkle. ✓ Use frozen peanut butter cups to prevent them from dissolving into the dough. ✓ Don't overbake! 10 minutes is the sweet spot for a fudgy, non cakey texture.
✓ Use a kitchen scale for the 250g flour; "cup" measurements are often inaccurate and lead to dry cookies. ✓ Avoid silicone mats if you want the absolute crispest edges parchment paper is better for airflow.
Adjusting Batch Sizes for Crowds or Solo Snacking
If you’re baking for a big bake sale or a large family gathering, doubling this recipe is straightforward. However, when doubling, only increase the baking soda to 1.5 tsp instead of 2 tsp to prevent a soapy aftertaste.
You should also work in batches, keeping the unused dough in the fridge while the first tray bakes. This ensures the dough stays cold and the sugar remains crisp.
For a smaller "treat yourself" batch, you can easily halve the recipe. Use 125g flour, 32g cocoa, and one large egg. Since you can't really halve an egg easily, I recommend beating one egg in a small cup and using about 2 tablespoons of it.
Use a smaller baking pan and keep an eye on the timer, as smaller batches can sometimes bake about 1 minute faster due to more efficient heat circulation in the oven.
| Servings | Dough Ball Size | Pan Size | Cook Time |
|---|---|---|---|
| 12 Cookies | 1.5 tbsp | 9x13 inch | 9-10 mins |
| 24 Cookies | 1.5 tbsp | Two 12x17 inch | 10 mins |
| 48 Cookies | 1.5 tbsp | Four 12x17 inch | 10-11 mins |
Debunking Myths About Achieving the Perfect Crinkle
One of the biggest myths is that you need to "slam" the pan on the counter to get the cracks to form. While pan banging is a legitimate technique for some cookies, reeses crinkle cookies should crack naturally due to the leavening and the surface tension of the sugar.
If they aren't cracking, your oven temperature is likely too low, preventing the quick expansion needed to tear the surface.
Another misconception is that more baking soda equals more crinkles. In reality, too much baking soda will make the cookies rise too fast and then collapse, leading to a flat, wrinkled mess rather than beautiful, distinct fissures. Stick to the 1 tsp measurement for the best structural integrity.
Finally, some people think you can't use generic peanut butter cups. You absolutely can! Most store brand miniature cups work perfectly fine as long as they are frozen solid before you start stuffing.
Preserving Freshness and Minimizing Kitchen Food Waste
To keep your cookies fudgy, store them in an airtight container at room temperature for up to 5 days. Adding a small piece of white bread to the container can help keep them soft, as the sugar in the cookies will pull moisture from the bread. If you want to keep them longer, these cookies freeze beautifully.
You can freeze the baked cookies for up to 3 months. Just thaw them at room temperature for an hour before serving.
- Cocoa Dust
- If you have leftover cocoa and sugar in your sifter, stir it into your morning coffee or oatmeal for a quick mocha flavor.
- Broken Cups
- If any peanut butter cups break while unwrapping, chop them up and use them as a topping for vanilla ice cream or fold them into a batch of brownie batter.
- Sugar Scraps
- The leftover powdered sugar from your coating bowls can be saved in a jar for the next time you make Toffee Cookies recipe.
Finishing Touches for a Professional Bakery Aesthetic
For that final "wow" factor, I like to press a few Reese’s pieces into the top of each cookie immediately after they come out of the oven. The residual heat will soften the candies just enough to make them stick without melting their colorful shells.
This adds a pop of orange and yellow that signals exactly what's inside the cookie. It’s a small detail, but it really makes the "Reese's" identity stand out.
If you want a truly decadent presentation, serve these slightly warm with a scoop of peanut butter swirl ice cream. The cold creaminess of the ice cream against the fudgy, warm chocolate dough is a match made in heaven.
You could even drizzle a little bit of melted peanut butter over the top if you're feeling extra indulgent. No matter how you serve them, the contrast of the snowy white sugar and the deep dark chocolate will always draw a crowd.
Precision Checkpoints
- Dough Temperature: Should feel cold and firm (not soft) before rolling; target 40°F (4°C) internal dough temp.
- Oven Calibration: Use an oven thermometer to ensure you are at a true 350°F (175°C); even a 10 degree difference can ruin the crinkle.
- Weight Consistency: Each dough ball should weigh approximately 35-38 grams including the stuffed cup for even baking.
If you love the bright flavors of fruit alongside your chocolate, these also pair surprisingly well with a side of fresh raspberries. For a different flavor profile entirely that still gives you that satisfying chew, check out my Lemon Cranberry Cookies recipe. They offer a completely different citrusy vibe while using some of the same foundational baking principles we've mastered here today. Now, grab a glass of milk and enjoy the fruits of your labor!

Reeses Crinkle Cookies FAQs
Can I use regular peanut butter cups instead of frozen ones?
No, stick with frozen. Using regular peanut butter cups will cause them to melt excessively into the dough, potentially leaking out and making the cookies greasy instead of fudgy.
Why are my crinkles not showing up?
Your oven temperature is likely too low or your baking soda is old. The crinkles form from rapid expansion, which needs sufficient heat. Ensure your oven is accurately preheated to 350°F (175°C) and that your baking soda is fresh.
How do I get the powdered sugar coating to stay white after baking?
Roll the dough ball in granulated sugar first, then powdered sugar. The granulated sugar acts as a moisture barrier, preventing the powdered sugar from absorbing moisture from the dough and turning grey.
My peanut butter cups leaked out. How can I prevent this?
Ensure the dough is completely sealed around the frozen peanut butter cup. Pinch the dough edges together tightly to form a smooth ball, making sure there are no thin spots or holes where the peanut butter can escape during baking.
How long do I need to chill the dough?
Chill for at least 1 hour. This step is crucial for the dough to firm up, which prevents the peanut butter cup from melting out and helps the cookies maintain their structure for proper crinkling.
Can I make these cookies ahead of time?
Yes, the dough balls can be frozen for up to 3 months. Scoop and stuff the dough balls, then freeze them on a baking sheet until solid before transferring to an airtight container or freezer bag. Bake from frozen, adding a minute or two to the baking time.
Is it true that I shouldn't use silicone mats for these cookies?
No, while parchment paper is often preferred for crispier edges, silicone mats can work. Silicone mats provide a more even heat distribution and can sometimes lead to softer edges, which might be desirable depending on your texture preference. If you enjoyed mastering heat distribution here, see how the same principle of controlling spread applies to our Crisp No-Spread Sugar Cookies recipe.
Reeses Crinkle Cookies

Ingredients:
Instructions:
Nutrition Facts:
| Calories | 188 kcal |
|---|---|
| Protein | 3.2 g |
| Fat | 8.1 g |
| Carbs | 27.8 g |
| Fiber | 1.4 g |
| Sugar | 19.2 g |
| Sodium | 132 mg |
