Simple Artisan Bread: a Loaf of Love
- The Magic of Baking: My Journey to Easy Artisan Bread
- A Bite of History
- Health Benefits in Every Slice
- What Sets It Apart
- Your Go-To Essential Ingredients Guide for Baking
- The Secrets of Professional Cooking: Getting the Bread Just Right
- Pro Tips & Secrets
- Perfect Presentation
- Storage & Make-Ahead
- Creative Variations
- Complete Nutrition Guide
- Wrapping It All Up
- Frequently Asked Questions
- 📝 Recipe Card
The Magic of Baking: My Journey to Easy Artisan Bread
Oh my gosh, have you ever walked into a bakery and caught a whiff of that fresh, warm bread? it’s like a warm hug for your nose! i remember the first time i tried making easy artisan bread in my tiny apartment kitchen.
Let me tell you, i had doubts. would i really be able to whip up a loaf that tasted like the ones i’d buy from those fancy bakeries? spoiler: yes, i could! and so can you.
Making homemade bread is genuinely one of life’s simple joys. there’s just something mesmerizing about mixing up some basic ingredients flour, water, yeast, and salt and waiting for them to transform into a crusty loaf.
This recipe is a go-to in my house, especially when we’re having one of those cozy soup nights. the satisfaction that comes from pulling out a freshly baked loaf is beyond words!
A Bite of History
Now, let’s take a moment to appreciate the history behind artisan bread recipes . this isn’t just a modern trend. artisan bread dates back to the european baking traditions, where bakers honed their craft over centuries.
It’s rustic, it’s real, and it’s so relevant today. we all want to experience the wholesome goodness of homemade breads, don’t we? plus, it’s a total game changer for your meals, lending a special touch to everyday dinners.
This recipe is the easiest bread recipe ever . seriously, it requires minimal equipment and only a handful of ingredients. you can whip it up in about 1 hour and 45 minutes, including baking time! and all it takes is 15 minutes of active prep.
So, even if you’ve got a busy life trust me, i get it you can fit this in without breaking a sweat.
And, let’s talk cost. making this homemade bread is way cheaper than buying it at a bakery. you’ll yield a large loaf, enough for about 8 servings, and you won’t be breaking the bank either.
Health Benefits in Every Slice
Let’s face it: we all know that making homemade breads is a hit when it comes to nutrition. this easy artisan bread recipe is lower in preservatives than most supermarket options.
Plus, it's all about controlling what you put in your body. you know what you’re eating because you mixed it! it’s got good carbs too, giving you that energy boost without the crazy sugar crash from processed bread.
Now, if you’re wondering about the occasions to serve this beauty, let’s count the ways! from brunch spreads paired with jams and butters to complementing a robust chili, there’s no limit.
Planning a cozy family dinner? serve it alongside a crisp salad or fluffy mashed potatoes to elevate your meal. i mean, don’t we all love a good bread with soup? it just makes everything feel so homey .
What Sets It Apart
You might think, “eh, it’s just another bread recipe,” but hold on! what makes this homemade bread recipe stand out is the incredibly simple process.
The knead bread method is so inviting; you don’t have to work up a sweat. you can even use the stretch and-fold method right in the bowl.
This bread is versatile too. feel free to toss in some herbs or spices for an extra flavor kick!
And for those who aren’t keen on gluten, no worries! You can easily whip up a gluten-free version too. It’s all about adapting this recipe to fit your needs.
So, gather your ingredients, and let’s dive into this delightful journey of baking some easy artisan bread . Trust me, once you taste that warm, home baked goodness, you’ll never want to reach for store-bought bread again!
Ready to get going? Let’s check out what you’ll need to create this loaf of love…
Your Go-To Essential Ingredients Guide for Baking
Oh my gosh! if you’ve ever wandered through the baking aisle and felt like you were taking a trip to a foreign country, you’re not alone! understanding your ingredients is like having a cheat sheet to ace your baking game.
Whether you’re whipping up easy artisan bread or cozy soups, knowing your ingredients makes all the difference. let's dive into this essential ingredients guide and turn you into a baking pro!
Premium Core Components
First up, let’s chat about premium core components for your baking adventures.
Measurements matter! whether you're measuring in cups or grams, accuracy is key. for instance, you'll need 3 cups of all-purpose flour (360g) for that artisan bread.
Clean and simple, just like we like it! keep a good set of measuring cups and a scale handy.
Quality Indicators: Fresh ingredients make for tasty treats. Look for flour that’s smooth and free of lumps. Your yeast should be bubbly when mixed with warm water like little fizzy fireworks!
Storage Guidelines: Flour can sit in your pantry for up to six months if stored in an airtight container. If you want to stretch its life, pop it in the fridge! Yeast? Store it in the fridge too; it likes the cool just as much as we do!
Freshness Tips: Always sniff before you use! If your flour has a weird smell, toss it. Same with the yeast if it doesn’t fizz, it’s time to get a new packet.
Signature Seasoning Blend
Now, let’s sprinkle in some flavor with signature seasoning blends. Our bread won’t just sit there like a wallflower; it’ll dance with flavor!
Essential Spice Combinations: Don’t underestimate the power of salt. It’s the secret handshake that brings all your ingredients together. A pinch of garlic powder can also do wonders!
Herb Selections: Fresh herbs can elevate your artisan bread like nothing else. Imagine biting into a loaf with hints of rosemary or thyme. You’re gonna want to try that!
Flavor Enhancers: Ever thought of adding a bit of vinegar to your dough? It gives a lovely tang think of it as flavor’s little secret sauce.
Smart Substitutions
Here’s where it gets fun! Let’s talk smart substitutions for when you’re in a pinch.
Common Alternatives: No bread flour? No problem! You can use all-purpose flour. Just adjust your water a tad since bread flour absorbs more moisture.
Dietary Modifications: Vegan? Swap the usual butter for coconut oil that’ll give it a nice, rich flavor without the dairy.
Emergency replacements: out of yeast? you can try some sourdough starter if you’ve got one. or mix a bit of baking soda and vinegar for a quick fix (it’s science, i promise you).
Kitchen Equipment Essentials
Time to gear up! Here’s your must have kitchen equipment essentials for creating delicious homemade breads.
Must Have Tools: A mixing bowl, wooden spoon, and a baking sheet are essentials. If you wanna get fancy, a bread lame can help you make beautiful scores on your bread.
Alternative Equipment: Don't have a dough whisk? A fork works just as well! Sometimes, it's all about getting a little creative in the kitchen.
Preparing Tips: Don’t skimp on the rise. Cover your dough with a towel it’s like giving it a little warm hug while it grows.
So, Are You Ready to Bake?
Now that you’re armed with all this knowledge about ingredients, seasoning blends, and smart substitutions, it’s time to roll up your sleeves.
Follow these guides and whip up easy artisan bread right in your kitchen. whether you're making this for a cozy family dinner or just because you want to impress yourself (trust me, it's worth it!), you’re all set for your baking adventure.
Stick around, we’ll get into the nitty gritty instructions next! Happy baking, friend!
The Secrets of Professional Cooking: Getting the Bread Just Right
Let’s spill the beans about something heavenly: easy artisan bread . you know, that warm, crusty loaf that just begs for a pat of butter or a dip in olive oil? trust me, mastering this is easier than pie but without the pie crust drama!
so, buckle up, because we’re diving into some essential professional cooking techniques to elevate your homemade bread game.
Essential Preparation Steps: Get It Right, Right From the Start
First things first, you can't cook well if you're all over the place. that’s where mise en place which is fancy french for “everything in its place” comes in.
It’s like decluttering your kitchen before guests arrive. measure everything out beforehand. flour, yeast, salt have them ready to go.
Now, let’s talk time management . you might have a busy schedule (who doesn't?), so set timers for those 1-hour rising periods.
This way, you can do the dishes, watch an episode of your favorite show, or even sneak in some cozy soup time.
Multitasking is where it's at!
Organization strategies will save your sanity, too. keep things tidy and layout your tools within arm's reach. a wooden spoon or dough whisk, mixing bowl, and a baking sheet should be your bread making buddies.
Oh, and don’t forget safety considerations ! if you're using a hot oven (which you are, because we’re baking!), watch out! use oven mitts like a pro and don’t let the cat play around near your hot spot.
step-by-step Process: Follow the Breadcrumbs
Here's how to nail it:
Mix Dry Ingredients: Start off by whisking your 3 cups of flour , 1.5 teaspoons yeast , and 1.25 teaspoons salt in a large bowl.
Add Water: Pour in 1.25 cups of warm water (around 110° F ). Stir until it’s looking like a shaggy mess don’t stress!
Knead: Roll that dough out onto a floured surface and knead it for about 5 minutes until it’s smooth. You can also do the stretch and-fold method if you're feeling fancy!
First Rise: Cover the dough with a towel and let it rise for 1 hour . Watch a show, and boom, dough’s doubled!
Shape Dough: Throw the dough onto a floured surface, shape it into a round loaf, and pop it on a baking sheet lined with parchment.
Second Rise: Cover it up and let it rise for another 30 minutes .
Preheat Oven: Heat that oven to 450° F . It’s showtime!
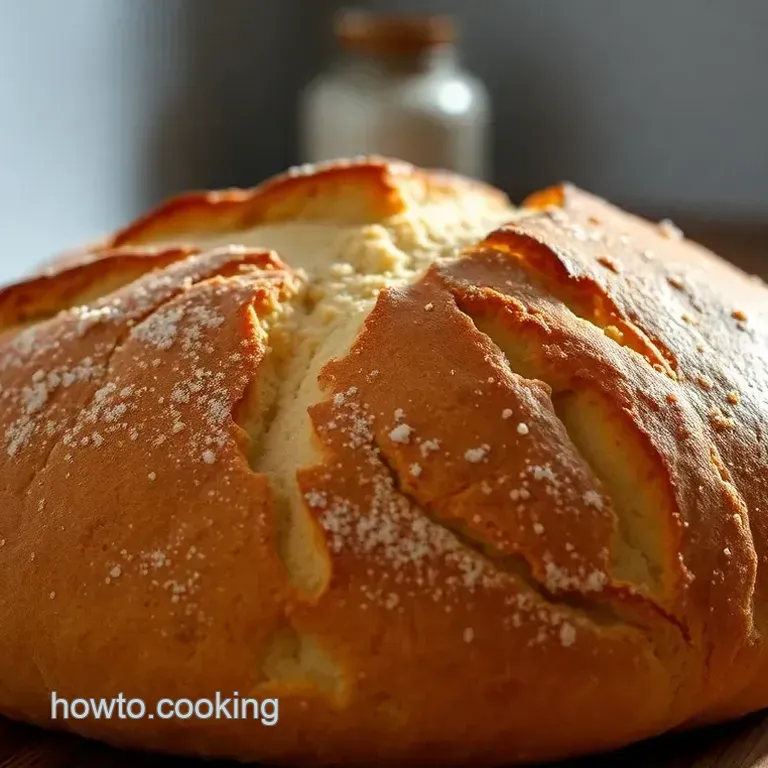
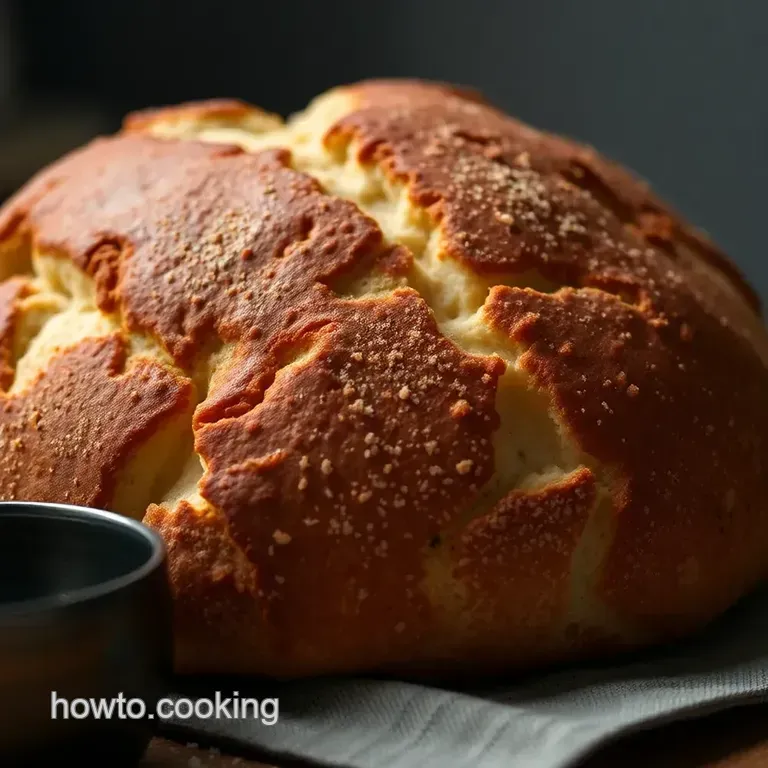
Score Loaf: With a sharp knife, make a slash on top of your loaf. Get artsy!
Bake: optional: place a dish of water in the oven for steam (this makes it crusty!). bake that loaf for 25- 30 minutes until it’s golden brown.
If it sounds hollow when you tap the bottom, you nailed it!
Cool: Let it cool on that wire rack before slicing. You're not in a race!
Expert Techniques: Unleashing the Baker in You
Now, let’s sprinkle in some expert techniques. keep a close eye on those temperature control points . too hot? your yeast might freak out and die.
Too cold? it's a snoozefest and won’t rise nicely. you want a nice balance, folks.
Timing precision is your best friend, particularly during those rising phases. Don't rush it patience makes perfect bread.
And hey, don’t overlook those visual cues for doneness . You want a lovely golden crust that looks like it belongs in a bakery.
In case things go awry (we’ve all been there), i often turn to my trusty troubleshooting guide! if it doesn’t rise enough, maybe you didn’t activate the yeast properly.
Don’t fret; just try again. you’ll get it!
Success Strategies: Avoiding Kitchen Fails
Here’s the scoop: Common mistakes often come from impatience or skipping necessary steps. Don’t be that person. Quality assurance comes from checking every little detail rise times, dough texture, and even taste!
Want perfect results? it’s all about repetition. the more you make this bread, the better you’ll get. fold in some practice! and if you’re ever in a bind, consider make-ahead options .
You can let the dough sit in the fridge overnight. a little slow fermentation never hurt anyone!
Alright, my budding bread makers, it’s time to let those loafs rise and shine! with this easy artisan bread recipe, you’ll be the star of all the potlucks.
Get ready to earn those "wow" looks from your friends and family when they take a bite.
Additional Information : In the next segment, we’ll explore some delightful bread variations, tips to pair your artisan wonder with cozy soups, and much more! So stay tuned!
Pro Tips & Secrets
Alright, let’s dive into my pro tips for making this easy artisan bread ! You know, those little nuggets of wisdom that turn a good loaf into a great one.
First off, don’t rush. Seriously. Allow that dough to rise! A longer first rise enhances flavor and gives you that delightful artisan texture that’ll have you feeling like a pro baker.
And i gotta say the warm water is key. it needs to be at about 110° f (think just warm to the touch).
Too hot and you’ll kill your yeast. no one wants a dead yeast party, right?
As for kneading , if you’re feeling adventurous, try the stretch and-fold method in the bowl instead of slapping it around on the counter.
Way less mess, and you can feel like a baking ninja.
Perfect Presentation
Once your easy artisan bread is done, let’s talk presentation . It’s all in the details, folks!
A lovely loaf deserves a stylish slice! when you cut into that bread, make sure to use a sharp knife or a bread lame .
A clean cut means less tearing, and nobody wants a messy slice when it’s time to impress the fam.
Now, let’s talk about garnishes ! a sprinkle of sea salt on top can take it from “just good” to “holy moly, is this from the bakery?” and why not pair it with some vibrant colors?
a drizzle of olive oil alongside a dash of balsamic vinegar doesn’t just taste good; it looks stunning too.
Storage & make-ahead
Let’s face it, sometimes you make too much homemade bread (is there such a thing?). storage is key! keep your artisan bread wrapped in a kitchen towel and in a paper bag.
It’ll stay fresh for two to three days . if you want to keep it longer, toss that loaf in the freezer.
Just slice it first; that way, you can pull out what you need, when you need it.
Reheating is a cinch too! just pop it in the oven for a few minutes at 350° f and you’re ready to go.
Want to bring back that crispy crust? toss in a splash of water while it heats up for some steaming magic!
Creative Variations
Ah, the sweetness of variations ! You can totally spice up this easy artisan bread and make it your own.
For a flavor twist, herbed artisan is where it’s at. Just toss in some rosemary or thyme into your flour mix. Or try half whole wheat flour for an earthy vibe.
Now, if you’re looking to go gluten-free, you can swap in a good gluten-free flour blend. No one will know the difference, trust me!
Complete Nutrition Guide
Let’s not ignore the health benefits of this glorious bread. each slice packs about 160 calories and is super low in fat (around 0.
5g ). it’s a great source of carbs, giving you that energy boost for the day.
Now, if you're counting carbs or watching your sodium (about 300mg per slice), just keep it in mind. and hey, the beauty of homemade bread? you can adjust portion sizes to suit your needs.
Wrapping It All Up
So there you have it! your guide not just to making the easiest bread recipe ever but to enjoying every artisan bread recipe moment.
Whether you’re dipping it in cozy soups or serving it at a dinner party, this easy artisan bread is sure to impress.
Don’t hesitate to play around with ingredients or techniques. the beauty of baking is in the journey, fam! so roll up those sleeves, get messy, and bake with love.
You’ll be the rock star of your own kitchen before you know it. enjoy every bite, and remember, once you try this homemade goodness, you'll never go back to store-bought!
Frequently Asked Questions
What makes this easy artisan bread recipe so simple?
This easy artisan bread recipe is straightforward due to its minimal ingredients and simple techniques. With just flour, water, yeast, and salt, you don’t need any special equipment or culinary skills perfect for both novice and experienced bakers looking for a delightful homemade loaf!
Can I use whole wheat flour instead of all-purpose flour in this artisan bread?
Absolutely! You can substitute half of the all-purpose flour with whole wheat flour. This will add a nutty flavour and more fibre to your easy artisan bread, but keep in mind the texture may be a bit denser.
What’s the best way to store freshly baked artisan bread?
To keep your easy artisan bread fresh, let it cool completely, then store it in a paper bag or loosely wrapped in a kitchen towel at room temperature. Avoid plastic bags as they can make the crust soft, and if you want to keep it longer, slice and freeze portions for up to three months!
How can I create a crustier bread using this recipe?
For a crustier exterior, try placing a small oven safe dish filled with water on the bottom rack while the bread bakes. This generates steam, helping to form a lovely golden crust on your easy artisan bread. You'll feel like a true baker from a French boulangerie!
Can I add herbs or other flavours to the dough?
Yes, feel free to get creative! Adding dried or fresh herbs such as rosemary or thyme can elevate the flavour of your easy artisan bread. Just stir them into the flour during the mixing stage for a tasty twist!
Is it okay to use instant yeast instead of active dry yeast?
Definitely! Instant yeast can be used in place of active dry yeast without needing to dissolve it in water first just mix it directly with the flour. This can save you a bit of time and still yield that lovely loaf you’re after!
Simple Artisan Bread A Loaf Of Love
Ingredients:
Instructions:
Nutrition Facts:
| Calories | 160 |
|---|---|
| Fat | 0.5g |
| Fiber | 1g |
