Homemade Stuffing with Sourdough Sage: the Perfect Crispy Cracker
- Why Homemade Stuffing Elevates the Roast Dinner
- Essential Ingredients for the Best Homemade Stuffing
- Mastering the Science of Moist, Herbaceous Stuffing
- The Method: Step-by-Step Guide to Baking Perfect Stuffing
- Chef's Secrets: Troubleshooting Your Sourdough Stuffing
- Make-Ahead, Storage, and Serving Your Delicious Homemade Stuffing
- Recipe FAQs
- 📝 Recipe Card
Why Homemade Stuffing Elevates the Roast Dinner
Stop buying the box mixes, seriously. That sad, dusty stuff cannot hold a candle to real, homemade stuffing . When the baking dish hits the table, steam unfurling scented with sage and brown butter, that’s when you know dinner is going to be epic.
It’s comforting, it’s deeply savoury, and honestly, the texture contrast crisp crust giving way to a moist, herbaceous core is everything I crave in winter.
I used to think stuffing was complicated or messy, reserved only for huge holiday feasts, but I was so wrong. This recipe is ridiculously simple; it relies on smart prep rather than fancy technique.
It is the cheapest, easiest way to make your Sunday roast feel instantly celebratory and luxurious, and it’s a brilliant way to use up that slightly old loaf sitting on your counter.
This particular recipe harnesses the strength of sourdough and leans heavily into fresh herbs, giving us that classic, bold flavour profile we all adore. Forget gummy, dense blocks; we are aiming for greatness, textural perfection, and maximum sage punch. Let’s get our hands buttery and make this thing happen.
The Sourdough Advantage: Tang and Structural Integrity
The bread choice is absolutely non-negotiable here; sourdough is the secret weapon. Unlike soft white bread, sourdough has a robust crumb structure that doesn't instantly dissolve into mush when soaked with stock.
That tangy, yeasty base also adds a subtle complexity to the finished product, complementing the richness of the butter and fresh herbs.
Defining the Perfect Stuffing Texture: Crisp Top vs. Moist Crumb
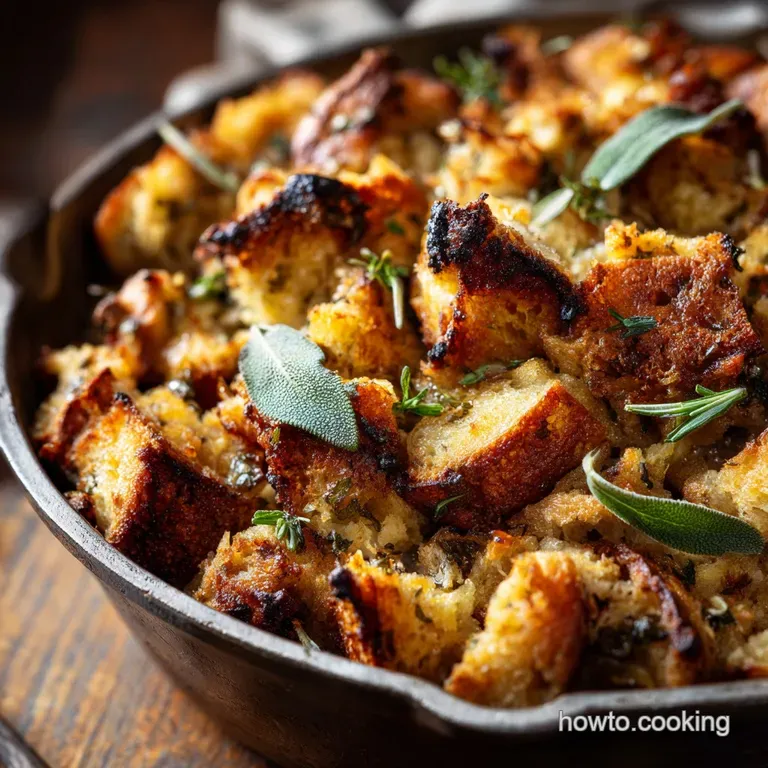
Stuffing needs to hit two distinct notes to be perfect. The top crust must be deeply golden and shatteringly crisp —this comes from baking uncovered at the end and relying on dried out bread cubes.
The inside, however, must remain beautifully moist, almost custard like, which is achieved by baking the dish covered for the majority of the time. This dual texture approach elevates the homemade stuffing far beyond anything you buy premade.
Beyond Blandness: The Importance of Robust Herb Layering
My biggest mistake when I first started making stuffing was being stingy with the herbs. We are not making a delicate dish; we need punch! We layer the herbs by starting with fresh sage and thyme, which we "bloom" in hot butter, maximizing their fragrant oils.
This initial step builds a powerful foundation, ensuring every bite is wonderfully savoury and far from bland.
Essential Ingredients for the Best Homemade Stuffing
This is the traditional stuffing recipe, meaning we keep the ingredient list tight and focus on quality and freshness. Remember, using the right fat (butter!) and fresh herbs is key to developing that incredible flavour depth.
| Ingredient | Role | Substitution Tip |
|---|---|---|
| Sourdough Bread | Structure, tang | Any high-quality rustic loaf (ciabatta, French boule) works well; just avoid soft sandwich bread. |
| Unsalted Butter | Flavour, moisture, fat | Use good quality olive oil or clarified butter (ghee) if avoiding dairy. |
| Yellow Onion & Celery | Aromatics, sweetness | Shallots can substitute the onion for a milder, sweeter flavour. |
| Fresh Sage & Thyme | The essential flavour profile | Never swap fresh for dried here, but if forced, halve the quantity of dried herbs. |
| Stock (Chicken/Veg) | The binder, moisture | Use water plus bouillon paste in a pinch, but ensure it is low-sodium to control seasoning. |
| Eggs | Structure, emulsifier | Vegan bakers can omit the egg if using a thick, starch heavy stock, but the texture may be slightly looser. |
Mastering the Science of Moist, Herbaceous Stuffing
Selecting and Prepping Your Sourdough Bread Cubes
You need structure, not squish. I recommend using sourdough that’s at least two days old; otherwise, it’s too soft and will turn to mush when you add the stock. The crucial step is to lightly toast the cubed bread in the oven.
This creates dried out, absorbent sponges ready to soak up the butter and stock without losing their shape.
A Deep Dive into Fresh Sage and Thyme Ratios
These two are the dynamic duo of classic homemade stuffing. You need far more than you think I use 1/4 cup of chopped fresh sage, which sounds like a lot, but trust me, it’s necessary. Sage brings the earthiness, while thyme adds a lovely, subtle pepperiness.
If you skip the toasting of the herbs in the butter, you won't release those amazing essential oils, and your stuffing will taste flat.
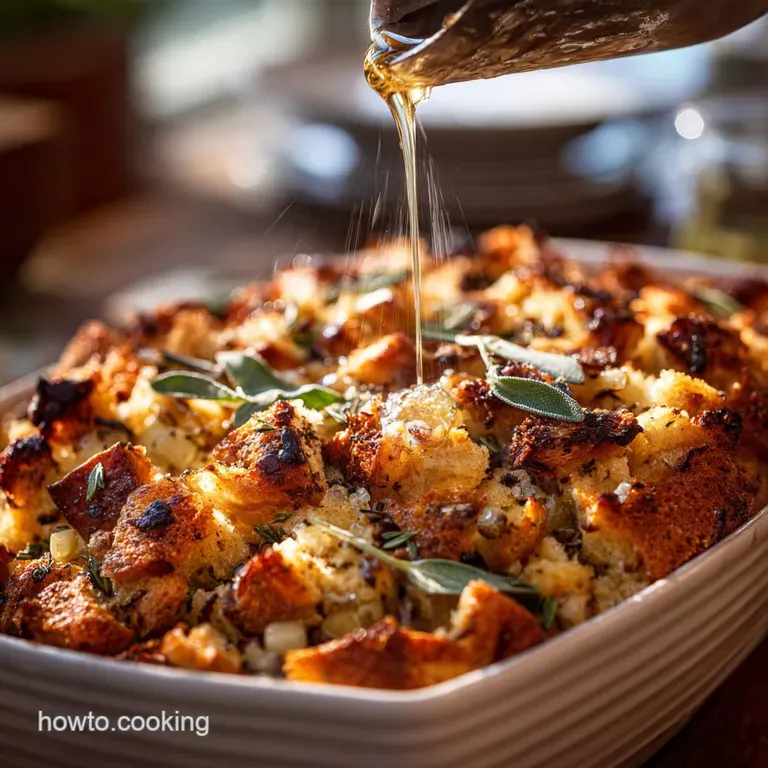
The Critical Role of Quality Butter and Stock
Butter serves two purposes: carrying the herb flavour and coating the bread, preventing it from instantly turning to paste. Use proper unsalted butter so you can control the salt content precisely. For the stock, always use warm stock, as it helps the bread absorb liquid faster and more evenly.
Using a high-quality, flavorful stock makes a huge difference to the final depth of flavour.
Swapping Out Ingredients: Enhancing Aromatics Naturally
If you want to add a little zip, try incorporating a touch of orange zest with the dried cranberries. It echoes the notes found in my classic Cranberry Sauce Recipe with Orange Homemade Classic Sauce . Another great trick is deglazing the pan with a splash of dry sherry after the vegetables are cooked. That tiny amount of alcohol evaporates, leaving behind incredible depth and complexity a truly pro move.
The Method: step-by-step Guide to Baking Perfect Stuffing
Prepping the Bread: Drying Versus Staling for Optimal Absorption (Pro-Tip)
Staling is passive; drying is active, and active drying is always better. Cutting the bread and baking it at 300°F (150°C) for 15 minutes forces the moisture out quickly. This guarantees your cubes are structurally sound and porous, ready to absorb the liquid binder perfectly.
Do not skip this step, or you risk a soggy, dense interior.
Sweating the Aromatics and Blooming the Dried Herbs
"Sweating" means cooking the onions and celery low and slow until they are completely tender and translucent, releasing their sweetness without browning. This takes about 8 to 10 minutes. Only then do you add the minced garlic, sage, and thyme; cook them for just 60 seconds.
This process, called "blooming," releases the herb flavour into the hot butter before anything burns.
Achieving the Ideal Binder-to-Bread Ratio
This is where many cooks fail. You must add the liquid gradually. I suggest starting with 3 cups of hot stock and adding more only if absolutely necessary. The goal is bread that is thoroughly damp, almost like a wet sponge, but not sitting in a puddle of liquid.
If you squeeze a handful, a drop or two of liquid should fall out, but the cube shouldn't collapse entirely.
Chef's Note: Always add the eggs before the stock. This way, the hot butter coats the eggs immediately, preventing them from scrambling as you mix. We want them acting as a seamless binder, not chunks of cooked egg.
Mixing, Packing, and Achieving the Ideal Bake
Once everything is moistened, mix it gently with a spatula or clean hands; aggressive mixing develops gluten and leads to a gummy texture. Transfer the mixture to your baking dish, pressing it down very lightly .
Baking covered for the first 30 minutes traps the moisture, steaming the inside to keep it tender. Removing the foil for the final 10– 15 minutes is what gives you that glorious, crisp crust.
Chef's Secrets: Troubleshooting Your Sourdough Stuffing
Stuffing is deceptively simple, but those simple steps hide traps! Here are the common failures and how to avoid them.
Preventing a Soggy Bottom or Overly Dry Crumb
Sogginess is usually caused by either using bread that wasn't dried out enough or adding too much stock. The fix? If you realize your mixture is too wet before baking, toss in an extra handful of toasted bread cubes. If the crumb is dry, you likely under measured the stock or over baked it uncovered.
Always cover the stuffing tightly for the first part of the bake!
The Importance of Internal Temperature and Resting Time
Like most bakes, stuffing benefits from a short rest. Its internal temperature should reach at least 165°F (74°C) to be considered safe, but I aim for 180°F (82°C) for ideal texture. Once out of the oven, let it sit for 5 minutes.
This allows the internal moisture to redistribute, resulting in a more cohesive and tender final product.
Adjusting Salt and Pepper Levels for Savoury Depth
Taste your stock mixture before you add the eggs and bread. If you are using unsalted butter and low-sodium stock, you will need more salt than you think. Salt is crucial for enhancing the savouriness of the herbs.
If it tastes slightly flat, add another pinch of salt and a grind of pepper; remember, the finished product will serve many portions, so the base flavour needs to be robust.
make-ahead, Storage, and Serving Your Delicious Homemade Stuffing
Safe Storage and Reheating Baked Stuffing
Baked stuffing stores beautifully in the fridge for up to four days. To reheat, wrap individual portions tightly in foil and place them in a 350°F (180°C) oven for about 15 minutes, or until piping hot throughout. Adding the foil prevents the already crisp top from drying out further.
Can You Freeze Stuffing? The Definitive Guide
Yes, you absolutely can! Cooked and cooled homemade stuffing freezes exceptionally well. Transfer the leftovers to a freezer safe container, ensuring it is sealed airtight to prevent freezer burn. It will keep well for up to 3 months.
To reheat from frozen, thaw it overnight in the fridge first, then proceed with the covered oven reheating method described above.
The Perfect Pairings: Serving Suggestions for Roast Dinner
This classic, herb forward stuffing is the quintessential partner for a slow cooked turkey or any robust roast. It needs partners that cut through its richness. Naturally, a bright, tart sauce is mandatory, ideally the Cranberry Sauce Recipe with Orange Homemade Classic Sauce . For dessert, you need something contrasting and equally classic, like my recipe for a Homemade Apple Pie: The Flakiest All-Butter Classic Recipe . Honestly, once you nail this stuffing recipe, your roast dinner game is permanently levelled up.

Recipe FAQs
Why is my homemade stuffing turning out dry and crumbly?
Dry stuffing typically indicates insufficient moisture (stock or butter) or that the bread was not properly dried, causing it to absorb the added liquid too quickly during baking. To troubleshoot, gently incorporate additional warm stock, about 1/4 cup at a time, until the mixture feels moist and holds together loosely when squeezed.
Should I bake this stuffing inside the turkey or separately?
For optimal texture and safety, we strongly recommend baking this stuffing separately in a casserole dish. Baking inside the bird can lead to the stuffing becoming dangerously undercooked or excessively soggy from the turkey juices, and it prevents the formation of the desirable crisp top layer.
Can I use regular white sandwich bread instead of sourdough?
While you can substitute the bread, using white sandwich bread will yield a softer, less structured stuffing. If substituting, ensure the bread is thoroughly dried out or toasted before mixing, as the robust texture and slight tang of sourdough are key components of this recipe’s excellent flavor profile.
How can I prepare the stuffing mixture ahead of time?
You can prepare all components, including sautéing the aromatics and mixing them with the bread and herbs, up to 24 hours in advance; cover and refrigerate this dry mix. However, only add the eggs and stock immediately before transferring the mixture to the baking dish, as adding liquids too early will result in the bread cubes dissolving into a dense, wet mass.
Is it possible to add sausage to this Sourdough and Sage Stuffing?
Absolutely. Brown half a pound of quality Italian or breakfast sausage (casings removed) in a skillet until fully cooked, then drain off any excess fat. Add the crumbled sausage to the sautéed vegetables alongside the herbs before mixing this rich combination with the bread cubes.
How long can I safely store leftover baked stuffing?
Leftover baked stuffing should be cooled rapidly within two hours of coming out of the oven, then stored in an airtight container in the refrigerator. It can be safely stored for up to 3 to 4 days. Always ensure it reaches an internal temperature of 165°F (74°C) when reheating.
Can I make this recipe suitable for vegan or dairy-free diets?
Yes, this stuffing is highly adaptable. Replace the specified butter with a high-quality vegan butter substitute or use olive oil when sautéing the vegetables. Ensure you substitute the chicken or turkey stock with a robust vegetable stock to maintain the necessary moisture and savoury depth.
Ultimate Homemade Stuffing Recipe
Ingredients:
Instructions:
Nutrition Facts:
| Calories | 400 kcal |
|---|---|
| Fat | 18 g |
| Fiber | 4 g |
