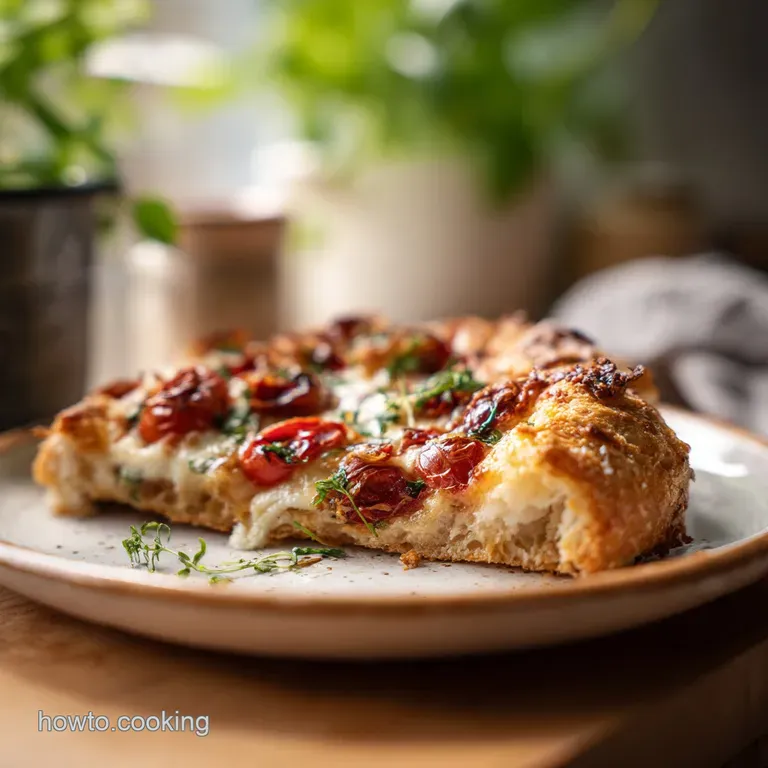
Italian Pizza Dough Recipe: Crispy Chewy

- Time: Active 15 minutes, Passive 1 hours 30 mins, Total 1 hours 45 mins
- Flavor/Texture Hook: Shatter crisp bottom with a soft, chewy interior
- Perfect for: Family dinner night or meal prepping freezer friendly bases
- Understanding the Biological Architecture of the Perfect Yeast Rise
- Essential Metrics and Yields for Your Baking Success
- Selecting the Highest Quality Ingredients for Optimal Crust Texture
- Preparing Your Kitchen Tools for a Seamless Baking Session
- Stepping Through the Systematic Process of Hand Kneading Dough
- Avoiding Common Pitfalls to Ensure a Consistent Golden Finish
- Exploring Flavorful Variations and Nutritious Flour Alternative Options
- Effective Methods for Preserving Freshness and Reducing Food Waste
- Creative Presentation Strategies to Showcase Your Homemade Pizza Creations
- Dispelling Common Misunderstandings About Yeast and Dough
- Pizza Dough Recipe FAQs
- 📝 Recipe Card
There is a specific, heady aroma that fills a kitchen when yeast first hits warm water and sugar. It’s a nostalgic scent, one that reminds me of Saturday afternoons spent dusting flour off my apron while waiting for that first "poof" of fermentation.
I remember the frustration of my early attempts, where I’d end up with a sticky mess or a crust so tough it felt like chewing through a gym mat. Those mistakes were my best teachers, showing me that great dough isn't about expensive equipment, it's about patience and understanding how simple ingredients interact.
We’re going to focus on building your confidence with this pizza dough recipe, because once you realize that a few cups of flour and a splash of olive oil can produce something better than any delivery service, your kitchen becomes the best pizzeria in town.
This isn't just about mixing things in a bowl, it’s about the tactile joy of feeling the dough transform from a shaggy clump into a silky, elastic ball under your palms. Let’s get stuck into the details so you can skip the trial and error I went through.
The beauty of a solid dough recipe is its ability to adapt. Whether you want a thin, cracker like base or a thicker, more wholesome crust, the principles remain the same. We aren't looking for shortcuts here, but rather for smart, efficient techniques that yield a high-quality result without unnecessary complexity.
You’ll find that by managing the temperature of your water and giving the gluten time to relax, you’ll achieve a professional grade finish every single time.
Understanding the Biological Architecture of the Perfect Yeast Rise
The Physics of the Proof: Carbon dioxide bubbles trapped by a strong gluten web create the necessary lift for an airy texture. This expansion stretches the dough from within, ensuring the final crust isn't dense or heavy.
| Method | Time | Texture | Best For |
|---|---|---|---|
| Fast Track Proof | 45 minutes | Soft, bread like | Last minute weeknight dinners |
| Standard Rise | 1 hours 30 mins | Balanced chew | Traditional family pizza night |
| Cold Ferment | 24 hours | Complex, bubbly | Deep flavor and charred edges |
Selecting the right method depends on your schedule, but even the standard rise provides a fantastic result. If you find yourself in a rush, a slightly warmer environment can speed things up, though you lose some of the depth that comes with a slower fermentation. For those looking for a different texture, you might find that this How to Make recipe offers a more pillowy alternative for specific pan pizzas.
The magic happens when the yeast consumes the sugar and releases gas. This process, known as fermentation, is what gives the dough its characteristic "yeasty" smell and light structure. If your kitchen is particularly cold, don't worry, the rise will still happen, it just takes a bit longer.
I've often tucked my bowl into the oven (with the light on, but the heat off) to give the yeast a cozy place to work its magic.
Essential Metrics and Yields for Your Baking Success
Precision in baking isn't just for professionals, it’s the secret to consistency. When we talk about 1.5 cups of warm water, we are aiming for that 100°F to 110°F range. If the water is too cold, the yeast stays dormant.
Too hot, and you’ll kill the living organisms before they can even start their job. It’s a small detail that makes a massive difference in whether your dough reaches its full potential.
| Ingredient | Science Role | Pro Secret |
|---|---|---|
| All Purpose Flour | Provides starch and protein | Sift it first to avoid lumps and ensure even hydration. |
| Active Dry Yeast | Leavening agent | Always bloom in sugar water to check if it's still alive. |
| Sea Salt | Strengthens gluten | Add salt after the flour to prevent it from slowing the yeast too much. |
By keeping these roles in mind, you can troubleshoot as you go. If your dough feels too tight and snaps back when you try to stretch it, the gluten is likely overworked or hasn't rested enough. A simple 10 minute break under a kitchen towel can solve almost any structural issue.
This is the part where you build that kitchen intuition that separates a good cook from a great one.
Remember that humidity affects flour. On a damp day, you might find the dough needs an extra tablespoon or two of flour to lose its stickiness. On a dry day, you might need a tiny splash more water. Trust your hands more than the clock, as the feel of the dough is the ultimate indicator of readiness.
Selecting the Highest Quality Ingredients for Optimal Crust Texture
While this is a cost effective pizza dough recipe, the quality of your staples matters. I always reach for a high-quality extra virgin olive oil because it adds a subtle, nutty richness to the crust that standard vegetable oils just can't match. It also helps the dough stretch more easily without tearing.
- 1.5 cups warm water (100°F–110°F): The hydration source. Why this? Critical for activating yeast and hydrating flour proteins into gluten.
- 2.25 tsp active dry yeast: The primary leavening agent. Why this? Standard packet size that provides a reliable, steady rise.
- 1 tsp granulated sugar: The fuel for the yeast. Why this? Speeds up the "blooming" process and aids in crust browning.
- 3.75 cups all purpose flour: The structural foundation. Why this? Accessible and provides a perfect balance of chew and tenderness.
- 2 tbsp extra virgin olive oil: Fat for flavor and elasticity. Why this? Prevents the crust from becoming overly tough or dry.
- 2 tsp fine sea salt: The flavor enhancer. Why this? Tightens gluten strands for a better "snap" in the dough.
- 1 tbsp cornmeal: The textural barrier. Why this? Prevents sticking and adds a professional, sandy crunch to the bottom.
| Original Ingredient | Substitute | Why It Works |
|---|---|---|
| Granulated Sugar | Honey (1 tsp) | Provides the same glucose for yeast. Note: Adds a floral sweetness. |
| Extra Virgin Olive Oil | Avocado Oil | High smoke point and neutral fat content. |
| All Purpose Flour | Bread Flour | Higher protein content. Note: Results in a much chewier, tougher crust. |
Using honey instead of sugar is a great way to add a wholesome touch to the recipe. It doesn't change the chemistry much, but it does help the crust caramelize beautifully in the oven.
If you ever run out of cornmeal, a light dusting of flour on your baking sheet works, but you'll miss out on that classic "pizzeria" texture that cornmeal provides.
Preparing Your Kitchen Tools for a Seamless Baking Session
You don't need a high tech kitchen to master a homemade pizza dough recipe. In fact, some of my best loaves and crusts were made with nothing more than a sturdy wooden spoon and a large glass bowl. However, a few specific tools can make the process more efficient and help you achieve that elusive crispy bottom.
A heavy duty baking sheet or a pizza stone is essential. If you're using a stone, remember to preheat it for at least 30 minutes before the pizza goes on. This stores thermal energy that transfers directly to the dough, causing a "shatter" effect on the bottom crust rather than leaving it soggy.
If you’re working with a standard baking sheet, flipping it upside down can actually create a flat, hot surface that mimics a pizza steel.
You'll also want a clean, flat surface for kneading. A marble countertop is lovely because it stays cool, but a simple wooden cutting board or even a clean kitchen table works perfectly.
Just make sure you have enough space to really get your shoulders into the kneading process, as that mechanical action is what builds the nutritious gluten network we're after.
Stepping Through the Systematic Process of Hand Kneading Dough
- Combine warm water, sugar, and yeast in a small bowl. Note: Wait 5 minutes until the mixture is foamy and smells like bread.
- Pour the yeast mixture into a large bowl and add the olive oil.
- Stir in the sea salt and 1 cup of all purpose flour.
- Gradually add the remaining 2.75 cups of flour. Note: Stop when the dough pulls away from the sides of the bowl.
- Turn the dough onto a floured surface and knead for 8 minutes. Note: Knead until the surface is smooth, elastic, and bounces back when poked.
- Lightly grease a clean bowl with olive oil and place the dough inside.
- Cover with a damp cloth and let rise in a warm spot for 1 hour 30 mins. Note: Wait until it has doubled in size and looks airy.
- Punch the dough down gently to release large air bubbles.
- Divide the dough into two equal portions and shape them into rounds.
- Dust your pan with cornmeal before stretching the dough over it. Note: Aim for an even thickness to ensure uniform baking.
Chef's Tip: If the dough keeps shrinking back while you try to stretch it, walk away for 5 minutes. This allows the gluten to relax, making it much more cooperative for the final shaping.
The kneading stage is where the magic happens. You’ll start with a shaggy, lumpy mass that feels a bit frustrating to handle. But as you push, fold, and turn, you’re literally aligning protein strands. By the end of those 8 minutes, the dough should feel velvety and look slightly matte.
If you’re unsure, try the "windowpane test": pull a small piece of dough apart; if it stretches thin enough to see light through without breaking, your gluten is ready.
Avoiding Common Pitfalls to Ensure a Consistent Golden Finish
One of the most frequent issues bakers face with a pizza dough recipe is the dreaded "snap back." This happens when the gluten is too tight. Think of it like a rubber band that has been pulled too many times. The solution is simple: patience.
Giving the dough a second rest after shaping it into balls will make your life significantly easier when it's time to assemble your pizza.
Overcoming the "Snap Back"
When you try to roll out your dough and it immediately shrinks back to its original size, it's telling you it needs a break. This often happens if the dough is cold or if it was kneaded very aggressively. Cover it back up and let it sit for 10-15 minutes at room temperature.
This brief pause allows the tension to dissipate, and you'll find it stretches like a dream afterward.
Fixing Sticky or Dry Dough
Stickiness is usually a sign of high hydration, which isn't necessarily a bad thing, but it makes handling difficult. If you can't touch the dough without it clinging to your fingers, add flour one tablespoon at a time. Conversely, if the dough is crumbly and won't form a ball, it’s too dry.
Add warm water by the teaspoon until it just comes together.
| Problem | Root Cause | Solution |
|---|---|---|
| Dough won't rise | Dead yeast or cold water | Check yeast expiration; use 100°F–110°F water next time. |
| Crust is tough/chewy | Over kneaded or too much flour | Knead only until smooth; measure flour by spooning into cup. |
| Soggy middle | Too many wet toppings | Pre cook watery veggies; don't over sauce the center. |
A common mistake I once made was piling on every vegetable in the fridge. The moisture from the raw peppers and mushrooms seeped into the crust, turning my beautiful work into a soggy mess. Now, I always sauté high moisture toppings first or slice them paper thin so the heat can evaporate the liquid quickly.
Common Mistakes Checklist: ✓ Always bloom yeast in warm water before adding flour (ensures activity). ✓ Don't skip the 1.5 hour rise time (develops flavor and texture). ✓ Preheat your oven for a full 20 minutes before baking (crucial for a crisp crust).
✓ Use cornmeal on the pan (prevents sticking better than oil alone). ✓ Avoid cold dough - let it come to room temperature before stretching.
Exploring Flavorful Variations and Nutritious Flour Alternative Options
While all purpose flour is the standard for a reason, you can easily shift this into a more nutritious whole grain version. Swapping out half of the all purpose flour for whole wheat adds a lovely rustic flavor and extra fiber.
Just be aware that whole wheat flour absorbs more liquid, so you might need an extra tablespoon of water to keep the dough supple.
If you are looking for a completely different meal profile, this dough can actually be repurposed. For instance, I’ve used leftovers to make a Cheesy Bread Recipe that works perfectly as a side dish. The fermentation in the dough makes it much more flavorful than store-bought options.
- For a crispy thin crust
- Roll the dough out very thin and bake at 230°C.
- For a chewy deep dish
- Use a cake pan greased with plenty of olive oil and let the dough rise in the pan for 20 minutes before topping.
- For an herb infused base
- Add 1 tbsp of dried oregano and garlic powder directly into the flour mixture before adding liquids.
Scaling this recipe is straightforward. If you want to double it for a large gathering, simply double the ingredients, but keep the yeast at around 1.5x (roughly 3.5 tsp) to prevent an overly fermented taste.
For a smaller batch, you can halve the recipe, though it’s often easier to make the full amount and freeze the second half for later.
Effective Methods for Preserving Freshness and Reducing Food Waste
Proper storage is the key to making this a sustainable part of your weekly routine. This dough actually improves with age! A 24 hour stay in the refrigerator allows the enzymes to break down starches into simpler sugars, leading to a much more flavorful and charred crust when baked.
- Fridge Storage: Place the dough in an airtight container twice its size (it will continue to expand slightly). It stays fresh for up to 3 days.
- Freezer Instructions: Wrap individual dough balls tightly in plastic wrap and place in a freezer bag. They last for 3 months. To use, thaw in the fridge overnight.
- Zero Waste Tip: Don't toss the small scraps left over from trimming your pizza. Roll them into small balls, toss in melted butter and garlic, and bake them alongside your pizza for instant garlic knots.
When reheating pizza, avoid the microwave at all costs it turns the crust into rubber. Instead, use a dry frying pan over medium heat. Place the slice in the pan, cover it with a lid for 2 minutes, and the bottom will return to its original "shatter" crispness while the cheese remelts perfectly.
Creative Presentation Strategies to Showcase Your Homemade Pizza Creations
A great pizza dough recipe deserves a beautiful finish. Once the pizza comes out of the oven, a quick brush of garlic infused olive oil around the edges of the crust gives it a professional sheen and a boost of flavor. It also prevents the edges from feeling too dry as they cool.
I love serving pizza on a large wooden board in the center of the table. It invites everyone to dig in and keeps the atmosphere casual and fun. Adding a handful of fresh basil or a dusting of parmesan cheese right before serving adds a pop of color and freshness that balances the rich, savory notes of the baked dough.
Remember, the best pizza is the one shared with people you care about. Don't worry if your circles aren't perfectly round or if the toppings aren't symmetrical. The imperfections are what make it homemade.
That first bite, where you hear the crunch of the cornmeal dusted bottom and feel the airy "pull" of the dough, is proof that your hard work and patience paid off. You’ve built something wholesome from scratch, and that’s something to be truly proud of.
Dispelling Common Misunderstandings About Yeast and Dough
Many people believe that yeast is incredibly fragile and will fail if you even look at it wrong. This isn't true. Yeast is quite hardy. While boiling water will kill it, "warm" is a broad range. If the water feels comfortable to the touch (like a baby’s bath), it’s perfectly fine.
You don't need a thermometer to be successful, though it does help with consistency while you're learning.
Another myth is that you must use bread flour for a "real" pizza. While bread flour has more protein and creates a chewier result, all purpose flour is more than capable of producing a high-quality crust. In fact, many people prefer the lighter, more tender bite that all purpose flour provides.
It’s all about personal preference and using what you have in your pantry to create a nutritious meal for your family.
Finally, don't buy into the idea that you need a fancy wood fired oven to get a great result. By using a preheated baking surface and a high temperature (around 220°C to 230°C), your home oven can produce a crust that rivals many commercial pizzerias.
It’s all about heat management and giving your dough the structural integrity it needs to stand up to the heat.

Pizza Dough Recipe FAQs
What is the secret to making truly good pizza dough?
Time and temperature control. Good dough requires developing a strong gluten network through thorough kneading followed by a slow, cool fermentation. This process builds complex flavor and superior chewiness.
What is the 55 rule for pizza dough?
There is no universal "55 rule" for pizza dough. This term is often confused with hydration percentages or specific kneading times; always rely on the dough's texture instead of arbitrary numbers for success.
What are common pizza making mistakes I should avoid?
Overworking the dough and using cold ingredients. Overworking tightens the gluten too quickly, causing snap back, while cold water deactivates the yeast, preventing proper rise.
Should I par bake pizza crust before adding toppings?
No, generally skip the par-bake for standard doughs. Par-baking often results in a dry, cracker like crust; instead, use a very hot oven and preheated baking surface to cook quickly.
How do I fix dough that keeps shrinking when I try to stretch it?
Cover the dough and let it rest for 10 to 15 minutes. This allows the gluten strands to relax from the tension caused by kneading or shaping, making it pliable again.
Can I use something other than all-purpose flour in this recipe?
Yes, you can substitute up to half with whole wheat flour. Whole wheat requires slightly more hydration to manage the bran, but if you master the feel here, you'll see similar textural control when using higher protein flours like in our Chicago Deep Dish recipe.
What is the ideal water temperature range for activating dry yeast?
Aim for 100°F to 110°F. Water cooler than this will slow the yeast down significantly, and water above 125°F risks killing the yeast entirely, resulting in a flat crust.
Artisan Pizza Dough Recipe
Ingredients:
Instructions:
Nutrition Facts:
| Calories | 127 kcal |
|---|---|
| Protein | 3.2 g |
| Fat | 2.1 g |
| Carbs | 23.4 g |
| Fiber | 0.8 g |
| Sugar | 0.3 g |
| Sodium | 291 mg |
