Crispy Baked Chicken Tenders with a Flavorful Crunch
- Let’s Talk Chicken Tenders
- Why Are Chicken Tenders So Special?
- Chicken Tenders Are the Real MVP
- Let’s Get Cooking!
- Essential Ingredients Guide
- The Lowdown on Professional Cooking: Your Guide to Bake Chicken Tenders: Crispy & Delicious
- Pro Tips & Secrets for the Best Crispy Baked Chicken Tenders
- Perfect Presentation of Your Crispy Chicken Tenders
- Storage & Make-Ahead Tips
- Creative Variations to Spice Up Your Tenders
- Complete Nutrition Guide
- Frequently Asked Questions
- 📝 Recipe Card
Let’s Talk Chicken Tenders
Have you ever been hit by a craving so intense that you just had to satisfy it? i still remember the first time i made my own bake chicken tenders: crispy & delicious .
I was hanging out with friends, and someone mentioned chicken fingers, and man, did my stomach growl! i mean, who doesn’t love a good crispy chicken strip, right?
Fast forward a few hours, and i was in the kitchen experimenting with a blend of spices and breadcrumbs. the aroma was heavenly, and honestly, nothing beats the satisfaction of creating something that wows your taste buds.
Plus, these are not just any chicken strips; they’re baked, which means you get airy crunch and juicy inside without the guilt of frying.
Trust me, you'll be asking for seconds!
Why Are Chicken Tenders So Special?
Those little strips of deliciousness have a history that’s surprisingly rich. originating from classic southern comfort food, chicken tenders have evolved from greasy diners to gourmet restaurants.
They’re everywhere! but what makes them a go-to meal today? well, they’re crazy versatile. you can throw them on a salad, toss them in a wrap, or simply dip ‘em in your favorite sauce (hello, honey mustard!).
Now, let’s break it down a bit. when it comes to cooking, this easy chicken tenders recipe is perfect for weeknight dinners.
Prep takes about 15 minutes , and while these bad boys chill in the fridge for 30 minutes, you can watch your favorite show.
After just 20- 25 minutes in the oven , boom! dinner is served. not to mention, it costs way less than takeout.
High five for saving those bucks!
Chicken Tenders Are the Real MVP
So, why should you whip up these healthy chicken tenders tonight? one word: flexibility. you can serve these crispy chicken beauties at pretty much any occasion.
Family dinner? check. game day snacks? you bet. kid-friendly meals? absolutely! kids love the crunchy texture, and you can sneak in some veggies on the side without any arguments.
Health wise, the nutrition is pretty solid here too. using panko breadcrumbs means you still get that crunchy outer layer without the added grease.
Plus, what’s not to love about juicy baked chicken recipes ? at around 300 calories per serving, they fit nicely into most meal plans without feeling like a diet.
Let’s Get Cooking!
I know you're itching to see how to put these together, so here’s a little preview: you’ll need some chicken breast strips , a few spices, and your choice of dipping sauces to take it up a notch.
I've learned over time that chilling the breaded chicken in the fridge is a game changer it leads to that perfect, crispy coating when baked.
Seriously, it’s like a secret weapon!
Now, for those who love variations, you can get creative! try adding parmesan cheese for that gourmet touch, or toss them in your favorite hot sauce post bake for a spicy kick.
The sky’s the limit with tender oven baked chicken .
Get your ingredients ready, and let’s dive into the goodness of chicken tenders. you're gonna love it! up next, i'll lay down the exact ingredients you need for these amazing baked chicken strips .
Get ready for a crispy, crunchy adventure!
Essential Ingredients Guide
Alright, folks. let’s dive into the essentials of whipping up some crispy baked chicken tenders that are not just delicious but also healthier than your average fried tenders.
Seriously, these bad boys are going to be your family’s new favorite, especially with that easy chicken tenders recipe that guarantees juicy, tender goodness.
Premium Core Components
First things first, when you're cooking, you wanna know what you're working with. Let's talk premium core components . Here’s a rundown of what you’ll need along with the nitty gritty details.
Boneless, skinless chicken breasts : you’ll want about 1 pound (450g) of chicken. cut it into strips chicken breasts make the best chicken tenders.
A good quality chicken breast should be pink and firm, with no unpleasant smell.
Panko Breadcrumbs : This is what gives your tenders that extra crispy outer layer . Use 1 cup (100g) of panko, and look for those that are light and airy.
Eggs and Milk : Two large eggs combined with 2 tablespoons (30ml) of milk form the classic binding for the breadcrumbs.
Flour : A simple 1 cup (120g) of all-purpose flour sets the stage for your breading.
Storage tips : store your chicken in the fridge, tightly wrapped, if you're not cooking it right away. just don’t let it sit too long; it’s best used within 2 days.
And for those breadcrumbs? they’re shelf stable as long as you keep them in a cool, dry place!
Signature Seasoning Blend
Now, let’s jazz it up. The signature seasoning blend is what takes your easy chicken tenders recipe from good to omg-delicious!
Garlic powder, paprika, and onion powder : these guys are must haves. a teaspoon of each will add depth and flavor.
And if you want some heat, toss in ¼ teaspoon of cayenne pepper .
Salt and Pepper are, of course, essential. You can’t go wrong with ½ teaspoon of each .
Use these combinations however you like; tailor it to capture that family flavor!
Smart Substitutions
Alright, I know what you’re thinking. "What if I don’t have this or that?" No worries! Let’s chat smart substitutions .
gluten-free Options : Swap out the panko for a gluten-free breadcrumb option. Easy peasy!
dairy-free : If you want those healthy chicken tenders without the milk, nut-based milks work great, and that’s a win for us.
If you find yourself in a bind, don’t be afraid to get creative; sometimes, the best flavors come from experimenting!
Kitchen Equipment Essentials
You don’t need a fancy kitchen to create magic. Here’s your list of kitchen equipment essentials :
Baking Sheet and Wire Rack : A must have for even baking trust me, you want these for those juicy baked chicken recipes!
Three Shallow Bowls : For your flour, egg mixture, and breadcrumb station.
Cooking Spray or Olive Oil : For that golden, crispy finish. Just a light drizzle or spray, alright?
Use what you've got; even a dinner plate can stand in for a mixing bowl in a pinch!
Ready to dive into the deliciousness? You now have a stash of essential ingredients locked and loaded. You've got a killer recipe up your sleeve, so let’s jump into step-by-step instructions on how to bake chicken tenders that are crispy & delicious !
Trust me, when you serve up these tender oven baked chicken fingers, your family is going to be asking for seconds.
Plus, they’re perfect for dipping sauces like honey mustard or ranch. so, roll up those sleeves; dinner is about to get awesome!
The Lowdown on Professional Cooking: Your Guide to Bake Chicken Tenders: Crispy & Delicious
Alright y'all, let’s talk about the professional cooking method, and how it can totally uplevel your game in the kitchen.
You might not be looking to become the next top chef , but a few tricks of the trade can truly elevate your culinary skills.
Today, i’m gonna focus on one of the ultimate family friendly recipes: bake chicken tenders: crispy & delicious . it's not just about filling up plates; it’s about serving quality food that makes everyone at the table happy!
Essential Preparation Steps
So, before we dive in, let’s get our ducks in a row. the secret to rocking any recipe lies in mise en place which is just fancy talk for having everything in its place.
Grab your ingredients, measure them out, and set that cooking station up right. less chaos equals better food. trust me, i’ve burnt a chicken breast in a frenzied mess more times than i can count!
Time management is key here. you want to spend your time wisely. for the chicken tenders, you’ll need about 15 minutes for prep , but don't forget that extra 30 minutes chilling while you sip your coffee (or if you’re more like me, a little glass of wine!).
And, don’t forget safety! always wash your hands after handling raw chicken, and make sure your cutting boards are clean to avoid cross contamination.
step-by-step Process
Ready for the fun part? Here’s how to make these heavenly chicken tenders step-by-step.
Prepare the Chicken:
- If your chicken breasts aren’t cut yet, trim them into strips . Your goal is about a pound of boneless, skinless goodness.
Set Up the Breading Station:
- Get three bowls ready one for seasoned flour, another for the egg-milk mix, and the last for panko breadcrumbs . Trust me, panko is where it’s at for that crispy outer layer.
Bread the Chicken:
- Dredge those chicken strips in flour first, dip ‘em in egg, and then give them a good press in the breadcrumbs.
Chill:
- Pop these bad boys in the fridge for 30 minutes . This trick helps the coating stay put.
Bake:
- Preheat your oven to 400° F ( 200° C) . Lay the chicken on a baking sheet, spray lightly with oil, and bake for 20- 25 minutes . Check for that golden brown color (and an internal temp of 165° F ( 75° C) ) to tell you it’s ready.
Serve:
- Pair with your favorite dipping sauces —honey mustard, ranch, or even spicy buffalo sauce, if you're feeling adventurous!
Expert Techniques
Here’s some pro tips for when you’re crafting these chicken tenders. make sure to control your oven temperature . if it’s too high, you risk burning, and too low won’t give you that glorious crunch.
Keep an eye on them during the last few minutes; that’s when the magic happens!
While you’re baking, check for quality checkpoints . If the tenders look golden and crispy but you’re still nervous, use a meat thermometer! Always handy for juicy baked chicken recipes .
Success Strategies
We’ve all made mistakes in the kitchen, right? one of the most common is skipping that chilling time . it seems harmless, but trust me, without it, you might end up with breaded chicken strips that look sad and fall apart.
If you want to hit the jackpot with your crispy chicken strip recipe , don’t skip that step!
For perfect results every time, keep an eye on the chicken towards the end of baking. Visual cues like color and texture matter a lot.
Oh, and if you make extra, freeze ‘em! They’re perfect for quick weeknight chicken meals another time.
Additional Information
Now that you’re armed with all this knowledge, you’re just a few steps away from mastering this easy chicken tenders recipe .
Whether you're cooking for your fam or impressing friends, these baked chicken strips will have everyone raving about your culinary prowess.
And let's be honest, who doesn’t love a good plate of oven baked chicken fingers drizzled in some flavor packed sauce?
So, don’t be shy give this a whirl and see how fun and delicious homemade chicken tenders can be.
Pro Tips & Secrets for the Best Crispy Baked Chicken Tenders
When it comes to making baked chicken strips , i like to think i’ve done my fair share of experimenting.
Trust me, nobody wants to bite into a soggy chicken tender. here are some personal nuggets of wisdom i’ve picked up along the way:
Time saving techniques
if you're crunched for time (who isn’t, right?), make sure to prep your chicken the night before.
You can coat those juicy chicken breast strips and pop them in the fridge, ready to bake when you're home from work.
This cuts about 30 minutes off your cooking time, so it’s a win-win!
Flavor enhancement tips
want to jazz things up? add spices to your breadcrumb coating! mix in some montreal steak seasoning for a nice kick or italian herbs for that more savory vibe.
Feel free to play around, because, honestly, who doesn’t want their chicken tenders bursting with flavor?
Presentation advice
first impressions matter, folks! once your chicken is out of the oven and screaming “eat me!”, arrange your tenders artfully on a plate.
Feel free to tuck in some lettuce, cherry tomatoes, or even a colorful pepper for pop. a sprinkle of fresh herbs, like parsley, takes it up a notch!
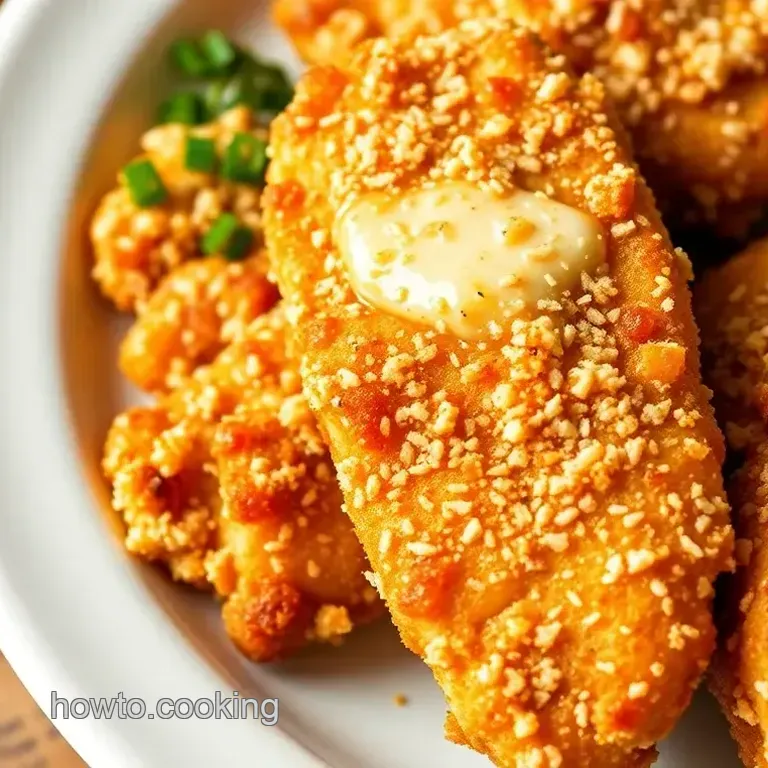
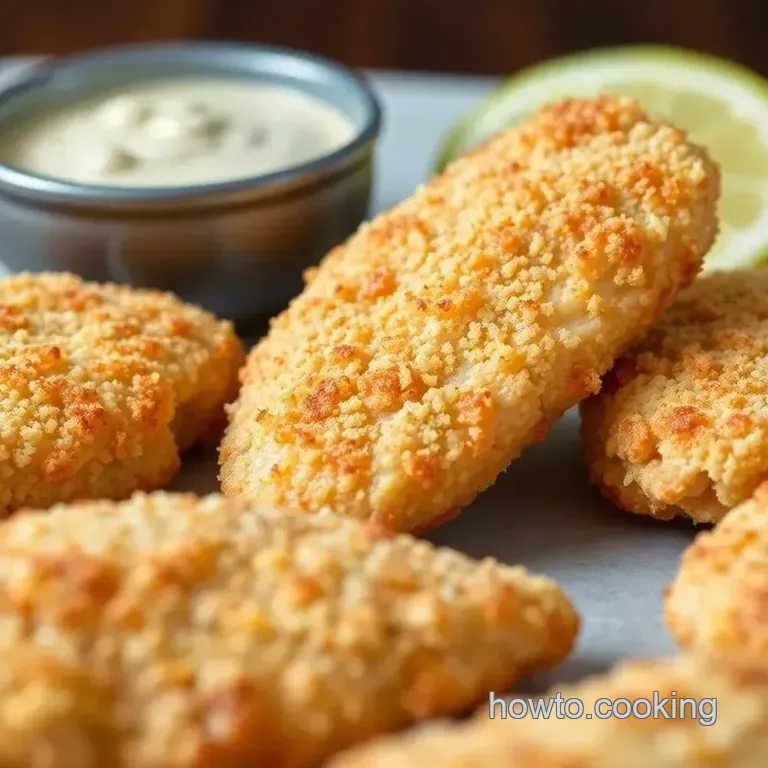
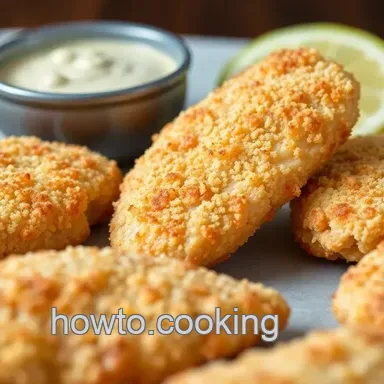
Perfect Presentation of Your Crispy Chicken Tenders
Ah, plating it’s the design world in cooking! You’ll want your homemade chicken tenders to look as good as they taste.
Plating Techniques
Use a large, shallow bowl for a more casual vibe. stack those crispy chicken strips right in the middle and create a tiered look with your dipping sauces surrounding the chicken.
It’s like an edible centerpiece!
Garnish Ideas
A simple lemon wedge or lime adds a splash of color and freshness. Sometimes, I even zest a bit of that citrus right over the tenders before serving talk about levelin’ up the flavor!
Visual Appeal
Do you ever eat with your eyes first? color combos matter! reds, greens, and even a splash of yellow from a dipping sauce can make your plate sing.
Think about why restaurant food looks so good they understand the art of food presentation !
Storage & make-ahead Tips
Alright, I know some of you might have leftovers (or baked chicken for dinner on the brain!). Here's how to handle those tender beauties:
Storage Guidelines
Let those tenders cool completely before placing them in an airtight container. You don’t want moisture stealing away their crunch ain’t nobody got time for that!
Reheating Instructions
When the craving hits, preheat your oven to 350° f ( 175° c). pop those lovelies on a baking sheet for about 10- 15 minutes to warm up.
This gets them crispy again, almost as if they were just baked!
Freshness Duration
If stored properly, these tenders can last in the fridge for 3-4 days. You can also freeze them, but let’s be real making fresh oven baked chicken fingers is so much better!
Creative Variations to Spice Up Your Tenders
Dietary Modifications
You can totally make these tenders gluten-free by swapping regular breadcrumbs for gluten-free alternatives. You can also play with seasoning to suit different dietary needs.
Seasonal Twists
Feeling festive? Try out a pumpkin spice coating for a fall inspired twist or a lemon herb seasoning for a springtime kick.
Regional Variations
Go global, people! For a taste of the South, try adding some Cajun seasoning . For an Italian vibe, grate some Parmesan into that breadcrumb mix — yum !
Complete Nutrition Guide
I know many folks are conscious about what they’re eating. Our crispy chicken strip recipe is packed with protein and relatively low in carbs, making it a pretty wholesome meal.
Health Benefits
With lean chicken breast and baked goodness, it’s a guilty pleasure without the guilt! You’ll feel full and satisfied without unnecessary grease.
Portion Guidance
Typically, aim for about 4-6 tenders per serving. You know your friends and fam best adjust amounts for your crew!
Dietary Considerations
Whether you’re looking for healthy chicken tenders or just a comforting meal, these fit in great. Pair with a salad or some sweet potato fries for a balanced plate.
So there you have it! whether you whip up a batch of these bake chicken tenders: crispy & delicious for a family dinner or meal prep for the week, i promise they’ll be a hit.
Give 'em a try, and you'll wonder how you ever survived without them. happy cooking! 🌟
Frequently Asked Questions
How do I make my Bake Chicken Tenders: Crispy & Delicious?
To achieve crispy and delicious baked chicken tenders, it's essential to coat them properly. Use panko breadcrumbs for added crunch, and consider chilling the breaded chicken for about 30 minutes before baking. This helps the coating stick better and achieve that perfect golden crisp when baked.
Can I use chicken thighs instead of breasts for this recipe?
Absolutely! Chicken thighs can add extra juiciness and flavor to your tenders. Just be mindful of the cooking time, as thighs may take a bit longer to reach the safe internal temperature of 165°F (75°C). Make sure to slice them into similar sized strips for even cooking.
What are some variations I can try for these chicken tenders?
There are many ways to customize your baked chicken tenders! You can add herbs and cheese to the breadcrumb mixture for an Italian twist or toss the cooked tenders in buffalo sauce for a spicy kick. Additionally, for a gluten-free option, use gluten-free breadcrumbs and flour to keep the dish delicious and inclusive!
How do I store leftovers of Bake Chicken Tenders: Crispy & Delicious?
To store leftover chicken tenders, let them cool completely before placing them in an airtight container. They can be refrigerated for 3-4 days. If you want to keep them longer, consider freezing them wrapped tightly in plastic for up to three months. Reheat in the oven for best results to retain the crispiness!
Can I make these chicken tenders in an air fryer?
Yes, using an air fryer is a fantastic way to make crispy chicken tenders! Preheat your air fryer and cook the breaded chicken for 10-15 minutes at 400°F (200°C), flipping halfway through. The air fryer circulates hot air, resulting in a crispy exterior without the need for as much oil.
What dipping sauces go well with baked chicken tenders?
There are many delicious options for dipping sauces! Popular choices include classic honey mustard, tangy BBQ sauce, or creamy ranch dressing. For a twist, consider serving with a homemade sriracha mayo or sweet chili sauce to elevate the flavors of your crispy baked tenders.
Bake Chicken Tenders Crispy Delicious
Ingredients:
Instructions:
Nutrition Facts:
| Calories | 300 calories |
|---|---|
| Protein | 30g |
| Fat | 10g |
| Carbs | 25g |
| Fiber | 1g |
| Sodium | 400mg |
