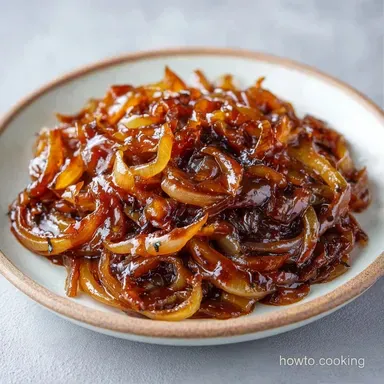
Caramelized Onion Appetizer: Jammy and Rich
- Time: 10 min active + 20 min cook
- Flavor/Texture Hook: Velvety goat cheese with shatter crisp crostini
- Perfect for: Last minute party guests or a budget-friendly date night
- Easy Caramelized Onion Appetizer Guide
- Secrets for Faster Browning
- Cooking Times and Yield
- Budget-friendly Ingredient Guide
- Tools for the Job
- Step-by-Step Assembly Guide
- Fixing Common Topping Issues
- Twists on the Topping
- Scaling the Batch
- Debunking Onion Myths
- Storage and Scrap Tips
- Best Sides and Drinks
- Recipe FAQs
- 📝 Recipe Card
Easy Caramelized Onion Appetizer Guide
The smell of butter hitting a hot pan and onions starting to sizzle is one of my favorite things in the kitchen. I remember a few years ago when I tried to make these for a small get together, but I followed a traditional recipe that called for 45 minutes of slow simmering.
I was still stirring the pot while my guests were already finishing their first round of drinks. I felt like a failure for missing the actual party because I was obsessed with "doing it the right way."
That's when I discovered the shortcut. I realized you don't need to spend your entire evening hovering over a skillet to get that deep, nutty flavor. By tweaking the pH of the onions, you can get those rich brown colors in about ten minutes.
It's a total win for anyone who loves the taste of slow cooked onions but actually has a life outside the kitchen.
This Fast Caramelized Onion Appetizer is my go to because it looks expensive but costs almost nothing. You're basically using pantry staples - onions, sugar, and vinegar - to create something that tastes complex and layered.
Whether you're hosting a fancy holiday bash or just want something a bit more special than chips and salsa, this recipe hits the mark every time.
Secrets for Faster Browning
Most people think you can't rush caramelization. While it's true that slow cooking develops a certain depth, we can cheat the system by using a few simple tricks.
The Baking Soda Shortcut: A pinch of baking soda increases the pH level of the onions. According to Serious Eats, this speeds up the breakdown of pectin in the cell walls, allowing the sugars to release and brown much faster.
The Brown Sugar Bridge: Adding a small amount of sugar doesn't just make it sweet. It provides an immediate source of caramelizable sugars that "bridge" the gap while the natural onion sugars are still developing.
The Deglazing Secret: Balsamic vinegar does more than add tang. The liquid lifts the browned bits (the fond) off the pan and forces them back into the onions, intensifying the color and flavor instantly.
Temperature Control: Medium high heat is the sweet spot. Too low and you're back to waiting an hour; too high and you'll burn the edges before the centers soften.
| Method | Time | Texture | Best For |
|---|---|---|---|
| Fast (Baking Soda) | 20 mins | Jammy & Glazed | Quick parties, weeknights |
| Classic (Slow) | 45-60 mins | Soft & Melted | Traditional French style |
| Microwave | 10 mins | Steamed Brown | Absolute emergencies |
This approach lets you get that deep mahogany color without the tedious waiting. It’s the difference between spending your night at the stove or actually talking to your friends.
Cooking Times and Yield
This recipe is designed for efficiency. You aren't spending hours on prep or cleanup. Since we're using a single skillet and a baking sheet, the mess is minimal.
- Prep time: 10 minutes
- Cook time: 20 minutes
- Total time: 30 minutes
- Yield: 13 servings (crostini)
If you're making this for a larger crowd, I recommend doubling the onions but keeping the pan size large. If you crowd the pan too much, the onions will steam instead of brown, and you'll lose that signature sizzle.
Budget friendly Ingredient Guide
You don't need fancy organic produce to make this work. Yellow onions are the workhorse here because they have a great balance of sulfur and sugar. If you can't find yellow, white onions work too, though they're slightly milder.
| Ingredient | Science Role | Pro Secret |
|---|---|---|
| Yellow Onion | Primary sugar source | Slice thinly for even browning |
| Baking Soda | pH Modifier | Use exactly 1/2 tsp; too much tastes soapy |
| Balsamic Vinegar | Acid/Deglazer | Use a thick, syrupy brand for better glaze |
| Goat Cheese | Creamy contrast | Let it sit at room temp for 30 mins |
The goat cheese provides a sharp, tangy contrast to the sweet onions. According to USDA FoodData, goat cheese is naturally creamy and pairs well with acidic glazes. If you're on a tight budget, store brand goat cheese is usually just as good as the name brands.
Ingredient List and Swaps
- 2 large yellow onions (600g), thinly sliced Why this? Best balance of sweetness and pungency
- Substitute: Red onions (will be sweeter but the color will be darker/purplish)
- 2 tbsp (30g) unsalted butterWhy this? Adds richness and helps with browning
- Substitute: Vegan butter or margarine (works fine, slightly less nutty)
- 1 tbsp (15ml) olive oilWhy this? Prevents butter from burning at high heat
- Substitute: Any neutral oil like canola or vegetable oil
- ½ tsp (3g) baking sodaWhy this? Speeds up caramelization significantly
- Substitute: None (essential for the "fast" version)
- 1 tbsp (12g) brown sugarWhy this? Adds deep molasses notes
- Substitute: Honey or maple syrup (adds a different floral sweetness)
- 2 tbsp (30ml) balsamic vinegarWhy this? Cuts through the fat and sugar
- Substitute: Red wine vinegar + a pinch of sugar
- ½ tsp (3g) saltWhy this? Draws out moisture from the onions
- Substitute: Kosher salt or sea salt
- ¼ tsp (1g) black pepperWhy this? Adds a subtle back end heat
- Substitute: White pepper for a cleaner look
- 1 French baguette (250g), ½ inch rounds Why this? Sturdy enough to hold the toppings
- Substitute: Sourdough baguette (adds a nice tang)
- 4 oz (115g) goat cheese, softened Why this? Tangy and velvety texture
- Substitute: Cream cheese or Boursin (creamier, less sharp)
- 2 tbsp (30ml) olive oil (for brushing) Why this? Ensures the bread gets crispy
- Substitute: Melted butter (tastes better, but can burn faster)
- Fresh thyme or parsleyWhy this? Freshness to balance the richness
- Substitute: Dried thyme (use 1/3 the amount)
Tools for the Job
You don't need a professional kitchen to pull this off. A few basic tools will do the trick.
- Large Skillet: I prefer a 12 inch stainless steel or cast iron pan. Non stick works, but you won't get as much of that tasty brown fond on the bottom.
- Chef's Knife: For slicing the onions thinly. If you have a mandoline, use it, but be careful with your fingers.
- Baking Sheet: For toasting the baguette slices.
- Pastry Brush: To get the olive oil evenly on the bread.
- Spatula: A silicone or wooden one is best for scraping the pan during the deglazing step.
Step-by-step Assembly Guide
Now let's put it all together. The goal here is to move quickly but stay mindful of the heat.
- Heat the butter and 1 tbsp olive oil over medium high heat in a large skillet. Add the sliced onions and stir until they begin to soften. Note: Don't let the butter brown too quickly; keep the onions moving.
- Stir in the salt, pepper, and baking soda. Note: You might see some foaming; that's the baking soda reacting with the onion acids.
- Stir in the brown sugar. Continue to cook, stirring occasionally, for 8–10 minutes until the onions transition from translucent to a deep, golden brown and smell nutty.
- Pour in the balsamic vinegar, scraping the bottom of the pan to release the fond. Simmer for 2 minutes until the liquid reduces to a thick glaze that coats the onions. Remove from heat.
- Preheat your oven to 400°F (200°C).
- Brush baguette slices with 2 tbsp olive oil.
- Toast in the oven for 5–7 minutes until edges are golden and the centers are slightly crisp.
- While baguette slices are warm, spread a generous dollop of softened goat cheese on each slice.
- Top with a spoonful of the onion mixture.
- Garnish with fresh thyme or parsley.
Chef's Note: If you're using a very thin baguette, watch the oven closely. They can go from "golden" to "burnt" in about 30 seconds.
Fixing Common Topping Issues
Even with a shortcut, things can go sideways. Most issues come down to heat management or ingredient ratios.
Onions are burning instead of browning
If the onions look black and smell acrid, the heat is too high. This happens often in thin bottomed pans. Lower the heat and add a splash of water to bring the temperature down instantly.
The topping is sliding off the bread
This usually happens if the goat cheese is too warm or the onions are too watery. Make sure the balsamic has reduced to a thick glaze, and use a thick, softened goat cheese as a "glue" for the onions.
Onions taste too "soapy"
This is the classic sign of too much baking soda. Since it's a strong base, overusing it leaves a chemical aftertaste. Always measure your ½ tsp precisely.
| Problem | Root Cause | Solution |
|---|---|---|
| Bitter taste | Burnt sugars | Deglaze with extra balsamic or a pinch of sugar |
| Soggy bread | Too much onion | Use a smaller spoonful of topping per slice |
| Bland flavor | Low salt/acid | Add a drop of lemon juice or a pinch of salt at the end |
Common Mistakes Checklist
- ✓ Use a large pan to avoid steaming the onions.
- ✓ Measure baking soda with a level measuring spoon.
- ✓ Toast the bread before adding the cheese.
- ✓ Deglaze the pan thoroughly to capture all the flavor.
- ✓ Let the goat cheese soften at room temperature for easier spreading.
Twists on the Topping
Once you've mastered the basic Caramelized Onion Appetizer, you can start playing with the flavors.
The Savory Twist: Skip the brown sugar and add a teaspoon of soy sauce or Worcestershire sauce during the deglazing step. This gives it a more "umami" profile that pairs great with a sharp cheddar instead of goat cheese.
The Sweet & Salty Duo: Add a drizzle of honey or a few dried cranberries to the onion mix. This version is fantastic during the holidays and works well with a brie cheese base.
The Dip Conversion: If you're not in the mood for crostini, you can turn this into a dip. Mix the finished onions into a base of sour cream and cream cheese. If you love this style, you might also enjoy my French onion soup dip for a similar flavor profile in a scoopable format.
The Microwave Method: In a pinch, you can microwave sliced onions with butter and a pinch of baking soda for 5-7 minutes, stirring every 2 minutes. It won't have the same depth as the skillet, but it's the fastest way to get the job done.
Scaling the Batch
If you're moving from a small gathering to a full party, you'll need to adjust.
Scaling Down (½ Batch) Use a smaller 8 inch skillet. Reduce the cooking time by about 20% because there's less moisture to evaporate. Since you can't really use half an egg here (not applicable), just divide the spices and butter exactly in half.
Scaling Up (2x-4x Batch) Don't just put four times the onions in one pan; they'll boil in their own juice. Work in batches or use two separate skillets. Increase salt and pepper to about 1.5x rather than double to avoid over seasoning.
Baking Adjustments If you're toasting 40 slices of bread instead of 13, lower your oven temp to 375°F (190°C) and extend the time by 2-3 minutes. This ensures the middle of the tray gets as crisp as the edges.
Debunking Onion Myths
There are a few things people tell you about onions that just aren't true.
The "Hour Long Rule": You'll hear that you must cook onions for an hour to get true caramelization. While slow cooking is great, the baking soda method achieves a similar chemical result (breaking down the cell walls) in a fraction of the time.
The "Baking Soda Ruin": Some claim baking soda ruins the flavor. It only does this if you use too much. A small amount is virtually tasteless once the balsamic vinegar (an acid) neutralizes it.
Searing "Seals In" Flavor: People think searing the onions locks in the taste. In reality, searing creates new flavors through browning. The flavor isn't "locked in"; it's created on the surface.
Storage and Scrap Tips
Don't let the leftovers go to waste. This mix is incredibly versatile.
Fridge and Freezer The onion mixture stays good in an airtight container in the fridge for up to 5 days. You can even freeze it for 2 months. Just thaw it in the fridge overnight and reheat it in a small pan with a tiny bit of butter.
Zero Waste Tips Don't throw away your onion skins! Collect them in a freezer bag along with carrot peels and celery ends. When the bag is full, simmer them with water to make a quick, golden vegetable stock.
Leftover Bread If you have leftover toasted crostini, toss them in a bag and freeze. They'll stay crisp for a few weeks. To revive them, pop them in a 350°F (180°C) oven for 3 minutes. They're great as a base for other toppings, similar to how I use toasted bread in my Sourdough Stuffing recipe.
Best Sides and Drinks
Serving this Caramelized Onion Appetizer requires the right pairings to balance the sweetness and creaminess.
Drink Pairings A crisp, acidic white wine like a Sauvignon Blanc or a Pinot Grigio cuts through the richness of the goat cheese. If you prefer beer, a light pilsner or a wheat beer works best. For a non alcoholic option, a sparkling apple cider provides a nice fruity contrast.
Side Pairings Keep the rest of your spread light. A simple arugula salad with a lemon vinaigrette or some chilled olives and cornichons provide the acidity needed to cleanse the palate between bites of these rich crostini.
The Presentation Arrange the crostini on a wooden board in a circular pattern. Sprinkle extra fresh thyme over the whole platter and add a few pomegranate seeds for a pop of color. This makes the dish look like it came from a high end catering service rather than a quick 30 minute home cook project.
Now that you have the secrets to a fast and budget friendly version, you can enjoy your Caramelized Onion Appetizer without the stress of a long cook time. Just remember to keep the heat steady and don't overdo the baking soda, and you'll have a hit on your hands.
Recipe FAQs
How to make caramelized onion dip?
Sauté sliced onions in butter and oil, then stir in baking soda, salt, pepper, and brown sugar. Cook for 8 10 minutes before deglazing the pan with balsamic vinegar.
Is there a fast way to make caramelized onions?
Yes, add a pinch of baking soda. This increases the pH level, which breaks down the onion's pectin faster and accelerates the browning process.
Can you make an onion dip with regular onions?
Yes, yellow onions are the ideal choice. They provide the best balance of sugar and acidity, making them a great companion to a main like lamb shepherds pie.
How to make a quick onion dip?
Cook sliced onions over medium high heat with brown sugar and baking soda. This method allows the onions to reach a deep golden brown in about 10 minutes.
What is the secret ingredient for a tasty onion dip?
Baking soda is the secret. It triggers the Maillard reaction more quickly, resulting in a richer, nuttier flavor and a deeper color.
Why is the dip too runny?
The balsamic vinegar was not reduced enough. Simmer the mixture for a full 2 minutes until the liquid thickens into a glaze that coats the onions.
Can this dip be frozen?
Yes, for up to 2 months. Store the onion mixture in an airtight container, thaw it in the fridge overnight, and reheat in a pan with a bit of butter.
Caramelized Onion Appetizer