Chocolate Dream: How to Make an Oreo Pie Crust
Chocolate Dream: How to Make an Oreo Pie Crust
A Sweet Memory to Hook You In
Oh my gosh, can we take a minute to talk about desserts that just hit different ? when i was a kid, my mom would whip up this magical pie crust using good ol' oreos.
I remember diving into that first slice, the chocolate filling melting in my mouth, and the crunch of the oreo crust beneath it just hit me with pure bliss.
Spoiler alert: learning how to make oreo pie crust has become my secret weapon for parties and family gatherings! seriously, who doesn’t love a good, easy treat that’s more than just a slice of heaven?
Why Do We Love This Oreo Crust?
Historically, oreos have been one of america’s favorites since they hit the shelves in 1912. fast forward a century later, and the magic of oreos is still alive and well.
You’ll find themselves in all kinds of sweet creations, from classic milkshakes to stunning _ oreo desserts _ . this oreo pie crust fits right into that delicious history, making every party just a tad sweeter.
Plus, here’s the lowdown: making this crust is super easy! prep time? only 15 minutes! and it’s just about as simple as squeezing ice cream into a cone on a hot summer day, right? the chilling time is about 30 minutes, just enough for a quick break (or a few extra nibbles of cookies).
The best part? it serves 8, so no one leaves dessert hungry!
Benefits That’ll Make You Want to Bake
Now let’s talk real benefits, shall we? first off, this crust has some great health benefits too. not that you’re exactly expecting it from oreos, but consider the fact that you can control how much sweetness and richness you’re packing into your pie.
You make it custom! and if you’re feeling adventurous, you can even swap the regular oreos for mint oreos or peanut butter oreos! i mean, yes please!
Here’s something to note: this pie crust shines for any special occasion. whether it's a birthday bash, bbq dessert, or a cozy night in, this treat is always a crowd pleaser.
It stands tall against other pies, thanks to its unique crunch that’s just like little kisses of chocolate happiness in every bite.
Time to Transition to Ingredients
Ready to dive in? grab your apron and let’s get those ingredients lined up for this fantastic no-bake oreo pie that's bound to impress.
Here’s what you’ll need to get that crust kickin’! just think of it as your ticket to a stress free dessert that’ll have everyone asking for seconds!
Stay tuned; the fun is just getting started!
Essential Ingredients Guide for Your Perfect Pie
Let’s dive into the world of essential ingredients for baking that shows your love for pie. we’re talking everything from that rich oreo crust to luscious fillings.
Trust me, having the right components makes all the difference!
Premium Core Components
Starting with the basics, you'll want to get familiar with detailed measurements. for instance, when creating that delightful oreo pie crust , you'll use 24 oreo cookies (about 300g) and 5 tablespoons (70g) of melted butter.
Now, let’s talk quality. when you’re selecting ingredients, look for freshness and reputable brands. for instance, choose a butter that’s labeled unsalted for better flavor control.
And remember, storage guidelines matter! keep your cookies in a sealed container to maintain their crunch no one wants a soggy crust! generally, oreos last for about 1-2 months in the pantry, so use ‘em or lose ‘em.
Signature Seasoning Blend
This is where the magic starts! besides the delicious crust, think about what flavors you want to enhance. essential spice combinations are crucial.
You can elevate your dessert by adding a dash of cinnamon or a pinch of sea salt.
When it comes to herbs and pairing , vanilla goes wonderfully with chocolate. you could even add a splash of almond extract for an unexpected twist.
And hey, don’t feel tied down by what’s traditional. love chocolate? go wild and see how different flavors meld together!
Smart Substitutions
Life happens, and sometimes you don't have everything on hand. let’s talk common alternatives. if you find yourself out of oreos, any chocolate wafer cookie will do.
Want a dairy-free crust? coconut oil can easily swap out butter. quick tip: always have some cocoa powder around; it can help bring that chocolate flavor if you need it.
Emergency replacements are a lifesaver too! got some random cookies lying around? crush them up and toss them in. just remember to adjust your measurements based on what you have.
Flexibility is key! this is your kitchen make it work for you.
Kitchen Equipment Essentials
Now, let’s not overlook the kitchen tools. you don’t need a fancy setup, but a few must have tools will make your life easier.
A food processor is a game changer, speeding up the process of turning oreos into fine crumbs. don’t stress if you don’t have one; just grab a zip-top bag and a rolling pin!
Say you need storage solutions —storing that butter or cookie crumbs in airtight containers will keep everything fresh as can be.
The Transition to Your Oreo Dream
So, are you ready to create that no bake oreo pie ? it all starts with mastering the crust and understanding those essential ingredients.
With your newfound knowledge, you’ll be the hero of dessert night, whipping up everything from oreo dessert recipes to delicious oreo fluff !
Now, let’s jump right into how to make the perfect oreo pie crust! you’ll amaze everyone with this simple, yet tasty foundation for your favorite fillings.
Whether it’s a minty twist or a classic chocolate mousse, your pie will definitely be the star of the show.
Happy baking, friend!
Mastering the Art of Professional Cooking: Your Go-To Guide
If you’ve ever tuned in to a cooking show, you know those pro chefs are rockstars in the kitchen, right? they whip up culinary masterpieces like it’s no big deal.
But guess what? you can totally channel your inner chef with some simple strategies and a dash of practice. let's dive into the nitty gritty of professional cooking methods , focusing on essential preparation steps, a step-by-step process, expert techniques, and success strategies that’ll have you cooking like a pro in no time!
Essential Preparation Steps
First things first: mise en place . fancy term, huh? it simply means having everything in its place before you start cooking.
Chop, measure, and organize your ingredients. i learned the hard way that trying to slice veggies while the pot’s boiling leads to chaos and burnt onions.
Yikes!
Time management tips are super crucial, too. Set a timer for everything. Whether it’s 30 minutes for that No Bake Oreo Pie or 15 minutes for prep, knowing your timeline is key.
And let’s not forget about organization strategies. keep your workspace clutter free. i usually wipe down my counters and make sure everything’s within reach.
It’s kinda like making a taco nobody wants toppings sliding off the table, right?
Lastly, you gotta think safety! Always have a plan in case you burn yourself, and make sure to use cutting boards to avoid cross contamination. Get those rules down, and you're golden!
Step-by-step Process
Now, onto the meat (or tofu) of the meal! Here's a handy step-by-step.
Prep Your Ingredients : Make sure you’ve got all your goodies prepped and measured.
Control the temperature : whether you’re frying, baking, or chilling, keeping an eye on the temp is vital! for instance, when baking an oreo pie crust, preheating your oven to 350° f ( 175° c) is non-negotiable.
Time it right : be strict with your cooking times. that 10-minute bake for your crust? don’t wander off or you may end up with a burnt offering that even your dog won’t touch.
Look for Visual Cues : Trust your eyes! Whether it's a bubbling sauce or golden brown cookies, that’s your signal things are going well.
Expert Techniques
Want to take it to the next level? Here are some expert techniques to keep in your back pocket.
- Always taste as you go. Seriously, your taste buds are the best quality checkpoint.
- If something feels off, it probably is. Whether it’s texture or flavor, trust your instincts. Don’t be shy about troubleshooting if something isn’t working.
- Depending on what you're making, tweaking can be a winner. Like trying different types of Oreos for your Oreo Dessert Recipes can totally change the game!
Success Strategies
Okay, so you've got your method down, but don’t forget about avoiding common traps. Here’s what I’ve learned:
- Mistakes to avoid : Overmixing can ruin that fluffy texture in cakes and desserts less is more sometimes!
- For quality assurance, look for that perfect shine or crust. Everything should scream, “I’m delicious!”
- If you’re planning for ahead, many pie fillings can be prepped, so never lose sight of those make-ahead options. Who doesn’t love a quick dessert brought together in a snap?
Now that you're armed with all these success strategies , you're all set to wow your next dinner crowd or satisfy that sweet tooth with a No Bake Oreo Pie that’s sure to impress!
As we wrap this up, remember: cooking is like a dance. sometimes you’ll step on toes, but with practice, you’ll be twirling around the kitchen like a pro.
In our next section, we’ll dive deeper into additional information that’ll help you whip up more delicious treats like that irresistible chocolate dream how to make an oreo pie crust ! get ready to unlock your culinary potential!
Savoring Secrets: Tips for Your Oreo Pie Crust Adventure
Ah, the oreo pie crust ! honestly, if you’re looking for a delicious twist on your dessert game, this is where you need to be.
Each time i whip up this crust, it reminds me just how easy baking can be. so, let's dig into some pro tips and secrets that will make your next no bake oreo pie even better!
Pro Tips & Secrets
You won’t believe how simple it is to make an amazing oreo crust! one of my favorite insights is to mix well ! when combining the crushed oreos with melted butter, make sure every crumb is coated.
This helps your crust stick together, giving it that perfect crunch when you slice into it.
Want to save some time? get a food processor ! i can’t even tell you how many times i’ve struggled with a rolling pin and a zip-top bag when i could have just blended the cookies in a minute flat.
For flavor enhancement , let’s get creative! A pinch of sea salt in the mixture adds a depth that really elevates the flavor without overpowering all those chocolatey goodness.
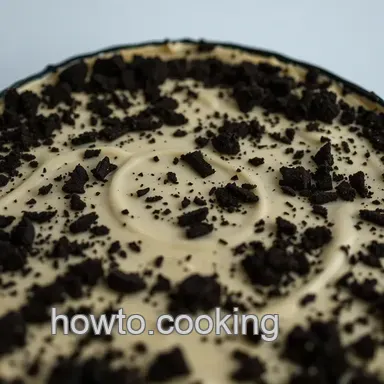
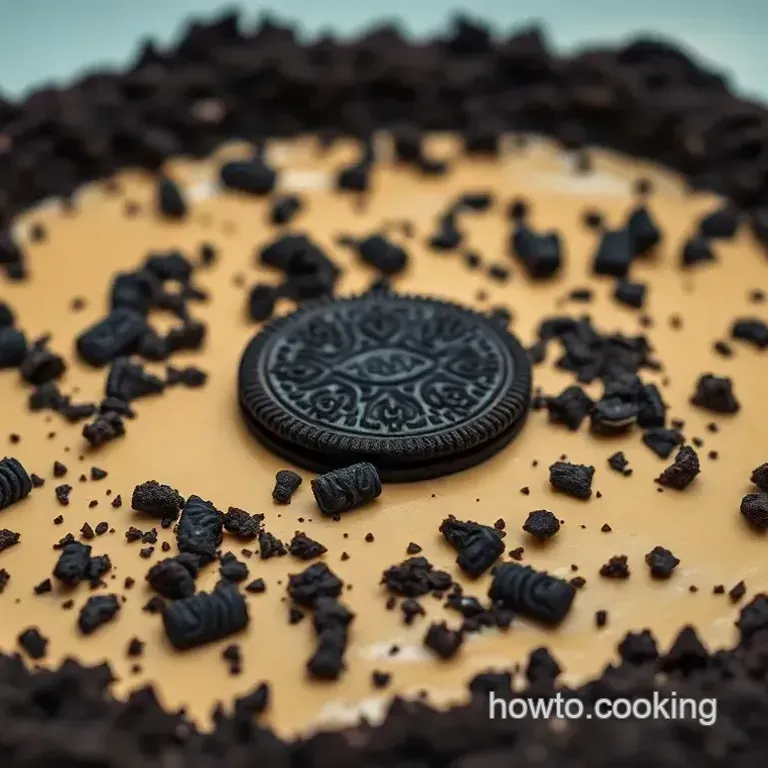
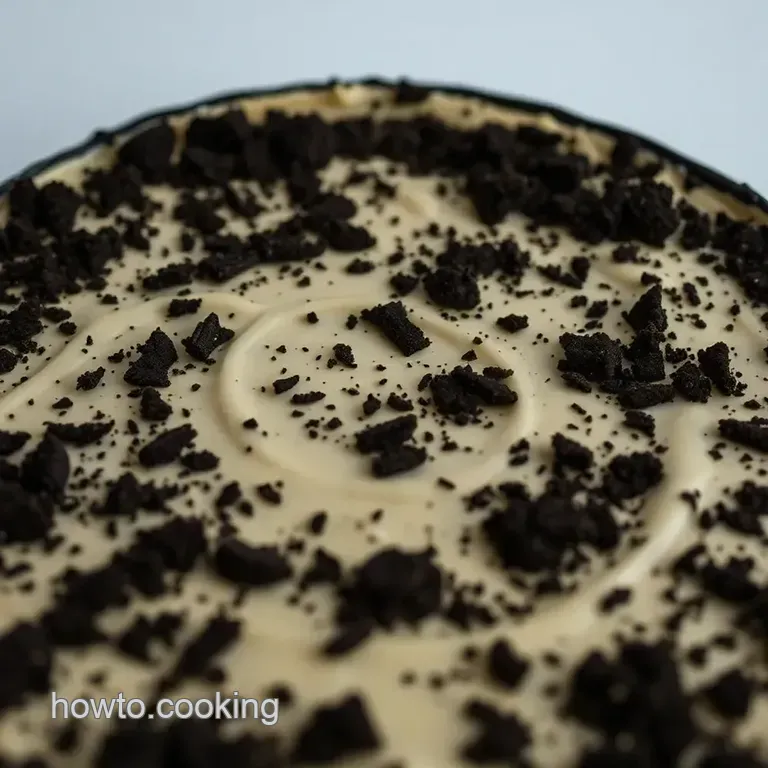
Lastly, presentation is key , folks! When you’re done chilling your crust, don’t just plop your filling in. Use a spatula to smooth out the filling and make it look like something that belongs in a magazine!
Perfect Presentation
Let’s face it, a beautiful dessert makes the meal. to plate your pie like a pro, you can use a knife to create clean slices.
Just rinse it in hot water between cuts for that nice, clean edge. and don’t skip on the garnish! a handful of crushed oreos on top of your filling gives that extra wow factor.
When choosing color combinations , think about what fills your pie is going to be. creamy fillings go beautifully with a dark crust.
You might even toss in some colorful berries for a pop of freshness. talk about visual appeal!
Storage & make-ahead Magic
So, you made a no bake oreo pie and have leftovers? lucky you! store that bad boy in the fridge, well covered, for about 3-5 days .
If you want to get ahead of the game, you can prepare the crust a day in advance. just make sure it’s chilled, and it’ll be ready when you are!
For reheating, a microwave is your best friend just a quick 10-15 seconds to warm up, and you’re good to go.
Creative Variations
Now for the fun part! you can totally customize this crust to match your mood. mint oreo crust? yes, please! or if you’re feeling a bit nutty, try peanut butter oreos for a unique twist .
Gluten-free? swap in some gluten-free oreos, and everyone can join the party!
And if you're in the mood for some seasonal fun, toss in pumpkin spice for a fall vibe, or zest up your crust with a hint of orange for summer.
Complete Nutrition Guide
Let’s get real for a second: dessert is meant to be enjoyed! but it’s also good to know what you’re working with.
This oreo crust is about 210 calories per slice , packed with enough sweet joy to satisfy without being over the top.
Consider this: if you’re planning to serve this with a decadent chocolate mousse , the chocolatey sweetness really rounds it out nicely without being too heavy.
Conclusion: Let’s Do This!
So, there you have it! making an oreo pie crust isn’t just about throwing a bunch of cookies and butter together.
It’s about finding your groove, experimenting with flavors, and presenting something truly delightful to your family and friends. this crust is a canvas for your creativity, and i promise, once you nail it, you’ll have folks asking for your secret!
Get in that kitchen, and let this crust be your new best friend. Happy (and delicious) baking!
Frequently Asked Questions
How do I make a perfect Oreo pie crust?
To make a perfect Oreo pie crust, start by crushing the cookies into fine crumbs, mixing them with melted butter until it resembles wet sand. Press the mixture firmly into your pie dish to avoid a crumbly crust when serving, and remember to chill it to help it set.
Can I use gluten-free cookies to make an Oreo pie crust?
Absolutely! You can substitute regular Oreos with gluten-free Oreos to make a delicious gluten-free crust. Just ensure the butter is also dairy-free if you’re accommodating further dietary restrictions.
How long should I chill the crust before adding the filling?
Letting your crust chill for at least 30 minutes is highly recommended. This will help it firm up, providing a sturdy base for any decadent fillings you choose to pile on top.
What’s the best way to store an Oreo pie crust?
If you have leftover crust or want to prepare it in advance, cover it well with plastic wrap or foil and store it in the refrigerator for up to a week. For longer storage, you can freeze it for up to a month; just let it defrost in the fridge overnight before using.
Can I bake the Oreo pie crust for a firmer texture?
Yes, and it’s a great tip! Pre-baking the crust at 350°F (175°C) for 10 minutes will create a firmer base, especially for fillings that require cooking. Just keep an eye on it to avoid burning!
What variations can I try when making an Oreo pie crust?
There are plenty of fun variations! You can make a Mint Oreo crust for a refreshing twist, or even a Peanut Butter Oreo crust for a nutty flavor explosion. Just think of what filling you'll use, and let your creativity shine!
Chocolate Dream How To Make An Oreo Pie Crust