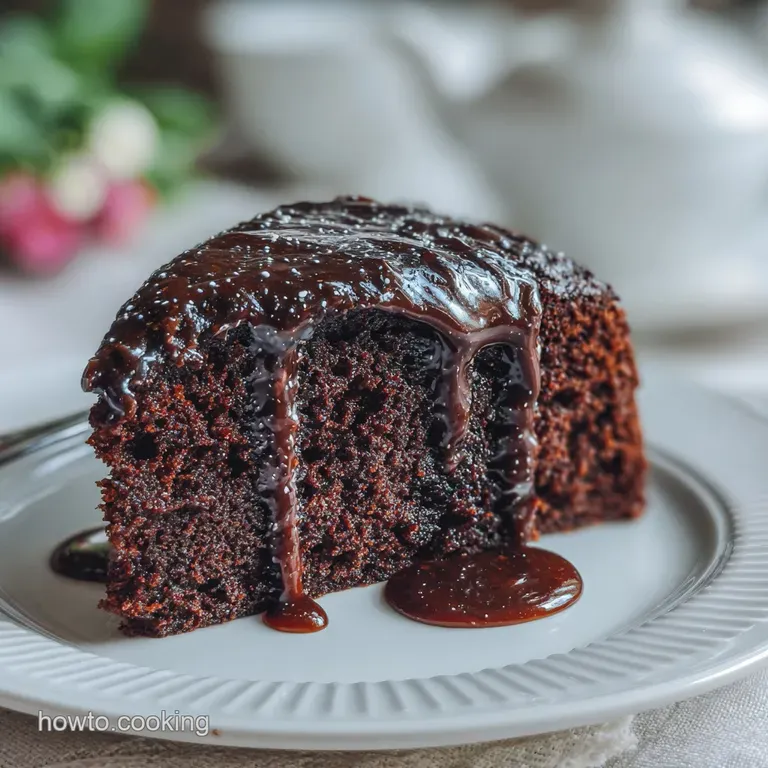
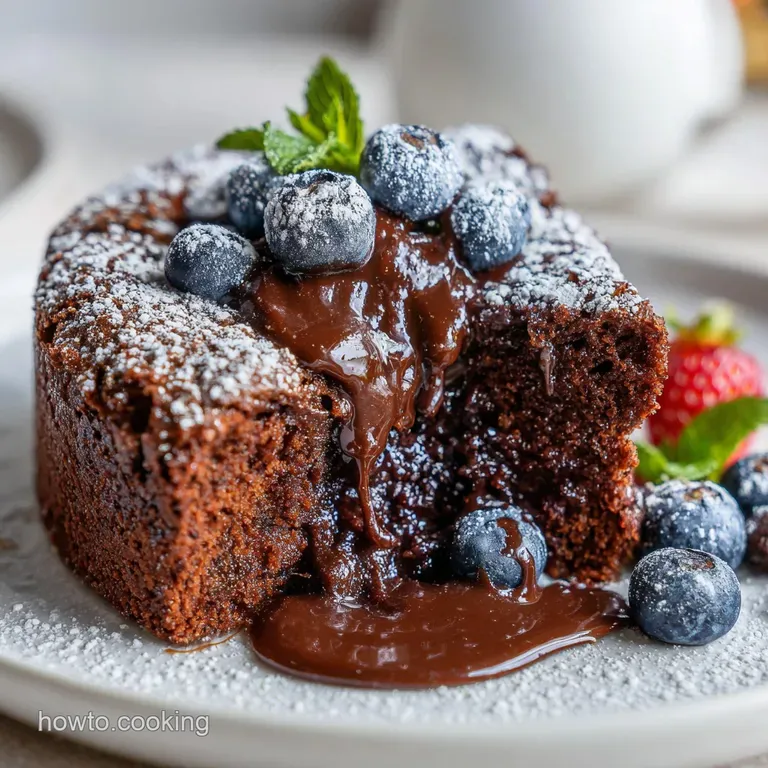
Depression Cake: Rich and Moist
- Time: Active 10 mins, Passive 35 mins, Total 45 mins
- Flavor/Texture Hook: Intensely fudgy with a moist, open crumb
- Perfect for: Last minute cravings, vegan friendly hosting, or pantry clearing days
- The Magic of Old-Fashioned Depression Cake
- The Chemistry of the Rise
- Component Analysis
- Reliable Recipe Performance Metrics
- Wholesome Elements for Your Pantry
- Minimal Essential Baking Tools
- Reliable Step-by-Step Baking Guide
- Solving Common Baking Obstacles
- Nutritious and Flavorful Recipe Variations
- Keeping Your Cake Fresh Longer
- Finishing Touches and Presentation
- Kitchen Myths Debunked
- Recipe FAQs
- 📝 Recipe Card
The Magic of Old-Fashioned Depression Cake
I still remember the first time I ran out of eggs mid afternoon with a serious chocolate craving hitting hard. I stared at my pantry, feeling defeated, until I remembered my grandmother talking about a "Crazy Cake" she used to make during leaner times.
I was skeptical how could flour, water, and oil turn into anything other than a dense brick? I whisked the dry ingredients together, made three little wells for the liquids, and poured in the boiling water.
The aroma of blooming cocoa hit me instantly, filling the kitchen with a scent so deep and dark it felt like a hug.
Watching it bubble up in the oven was a lesson in kitchen confidence. When I finally pulled it out, the top had that slight crackle, and the center was springy. One bite of that velvety, moist crumb and I was a convert. It didn't need butter or expensive cream to be indulgent.
It just needed a little bit of science and a lot of heart. Since that day, this has become my go to when I want a wholesome, reliable treat that doesn't require a trip to the store. It’s the ultimate proof that minimal tools and simple elements can create something truly spectacular.
You don't need to be a professional pastry chef to master this. Whether you're dealing with a half empty fridge or just want a dairy-free dessert that actually tastes like chocolate, this recipe has your back.
We’re going to focus on the technique of "blooming" the cocoa and the precise timing that keeps this cake from becoming dry. Trust me, once you see how easy it is to whip this up in a single pan, you'll never look at a box mix again.
The Chemistry of the Rise
Acidic Activation: The combination of white vinegar and baking soda creates an immediate release of carbon dioxide bubbles, which provides the lift usually handled by eggs.
Cocoa Blooming: Using boiling water instead of room temperature liquid dissolves the cocoa solids and releases trapped flavor compounds for a more intense chocolate profile.
| Method | Time | Texture | Best For |
|---|---|---|---|
| Traditional Stovetop Whisk | 45 mins | Fine, tight crumb | Reliable every day baking |
| Stand Mixer Aeration | 40 mins | Slightly loftier | Large parties or events |
| Hand Mixed One Bowl | 45 mins | Fudgy and rustic | Minimal cleanup and speed |
The beauty of this method is the lack of gluten over development. Because we aren't creaming butter and sugar for ten minutes, the structure stays tender. Just be sure to work efficiently once the liquid hits the dry base to trap those precious bubbles.
Component Analysis
| Ingredient | Science Role | Pro Secret |
|---|---|---|
| Baking Soda | Primary Leavener | Sift it twice to avoid bitter, soapy clumps in the crumb |
| White Vinegar | Acidic Catalyst | Sub with apple cider vinegar for a subtle fruity undertone |
| Boiling Water | Flavor Extractor | Use hot coffee to double the perceived chocolate intensity |
Choosing a high-quality cocoa powder is the most impactful decision you'll make here. Since there is no butter to provide flavor, the cocoa carries the entire weight of the dish. I prefer a natural cocoa powder over Dutch processed for this specific recipe because the extra acidity interacts better with the baking soda.
Reliable Recipe Performance Metrics
To achieve a consistent result every time, we need to focus on the specifics of the bake. This recipe is designed for a standard 20cm square pan (8x8 inch), which provides the ideal surface area for the chemical leavening to support the weight of the flour.
If you scale this up, keep in mind that the center might take longer to set than the edges.
A key checkpoint is the temperature of your water. It must be at a rolling boil. Tepid water won't bloom the cocoa effectively, leaving you with a pale, lackluster cake. When you pour the water over the mixture, you should see the cocoa darken immediately and smell that intense chocolate aroma.
This is a sign that the fats in the cocoa are melting and spreading through the batter.
Wholesome Elements for Your Pantry
- 1.5 cups All Purpose Flour (190g):Why this? Provides the structural foundation without being too heavy.
- Substitute: 1:1 gluten-free flour blend with xantham gum.
- 1 cup Granulated Sugar (200g):Why this? Sweetens and assists in the browning process.
- Substitute: Coconut sugar for a deeper, caramel like flavor.
- 0.25 cup Unsweetened Cocoa Powder (25g):Why this? Delivers the intense chocolate flavor profile.
- Substitute: Carob powder if you are avoiding caffeine.
- 1 tsp Baking Soda:Why this? Reacts with vinegar to make the cake rise.
- Substitute: 3 tsp Baking powder (omit vinegar if using this).
- 0.5 tsp Fine Sea Salt:Why this? Sharpens the cocoa notes and balances the sweetness.
- Substitute: Kosher salt (increase to 0.75 tsp).
- 1 tsp White Vinegar:Why this? The essential acid for the leavening reaction.
- Substitute: Lemon juice for a slightly brighter finish.
- 1 tsp Pure Vanilla Extract:Why this? Rounds out the flavors and adds aromatic depth.
- Substitute: Almond extract for a cherry chocolate vibe.
- 0.33 cup Neutral Vegetable Oil (80ml):Why this? Keeps the cake moist and provides a silky mouthfeel.
- Substitute: Melted coconut oil for a subtle tropical hint.
- 1 cup Boiling Water (240ml):Why this? Blooms the cocoa and hydrates the flour instantly.
- Substitute: Boiling decaf coffee for extra richness.
For those looking to explore other nutritious options, you might find my Healthy Cheesecake recipe quite interesting as it also focuses on clever swaps. Both recipes prove you don't need standard ingredients to get a flavorful result.
Minimal Essential Baking Tools
One of the reasons I love this recipe is that it honors the "minimal tools" philosophy. You don't need a stand mixer or even a hand mixer. In fact, over mixing with power tools can actually make this cake tough. A simple, sturdy whisk is your best friend here.
It allows you to break up the cocoa clumps while keeping the air bubbles intact.
You will also need a 20cm square baking tin. I prefer metal over glass for this because metal conducts heat more rapidly, giving the edges a slight, pleasant chewiness. If you only have a glass dish, you may need to add 5 minutes to the total bake time.
A sifter or a fine mesh strainer is the final "must have" to ensure your dry ingredients are perfectly incorporated without any lumps.
Reliable step-by-step Baking Guide
- Preheat your oven to 175°C (350°F) and lightly grease your 20cm square pan with oil.
- Sift the flour, sugar, cocoa powder, baking soda, and salt directly into the pan or a large bowl. Note: Sifting prevents "cocoa pockets" which are bitter to bite into.
- Level the dry ingredients and create three distinct wells two small ones and one larger one.
- Pour the vinegar into one small well, the vanilla extract into the second, and the oil into the large well.
- Boil your water and measure exactly 1 cup (240ml).
- Flood the entire pan by pouring the boiling water over all the ingredients. Watch for the cocoa to darken and sizzle slightly.
- Whisk the mixture quickly and gently until the streaks of flour disappear. Don't over mix; 30 seconds of stirring is usually plenty.
- Bake for 35 minutes until the center springs back and a toothpick comes out clean.
- Cool completely in the pan before slicing. Note: This cake is fragile while warm and needs time to set its structure.
Solving Common Baking Obstacles
The Texture is Rubbery
This usually happens if you’ve been a bit too enthusiastic with the whisking. When you mix flour with liquid, gluten begins to form. In a recipe without eggs to provide structure, over developed gluten turns from "cakey" to "bready" very fast.
Mix just until the white streaks of flour are gone, and then stop immediately.
The Cake Sank in the Middle
If your cake looks like a crater, it’s often because the baking soda reacted too early or the oven door was opened too soon. Ensure your oven is fully preheated before you even start mixing the wet and dry ingredients.
The reaction between vinegar and soda starts the second they touch; you want that cake in the heat while those bubbles are at their peak.
| Problem | Root Cause | Solution |
|---|---|---|
| Bitter Aftertaste | Clumpy baking soda | Always sift dry ingredients twice |
| Dry/Crumbly | Overbaked | Check at 30 mins; pull when crumbs are "moist" |
| Pale Color | Water was too cold | Ensure water is at a rolling boil before adding |
Common Mistakes Checklist
- ✓ Using cold or room temperature water (prevents cocoa blooming)
- ✓ Skipping the sifting step (leads to lumps of soda or cocoa)
- ✓ Opening the oven door in the first 20 minutes (causes temperature drops)
- ✓ Forgetting to grease the corners of the pan thoroughly
- ✓ Using "old" baking soda that has lost its potency
Nutritious and Flavorful Recipe Variations
If you're making this for a special someone, consider the "Mocha Boost." Swap the boiling water for a strong cup of hot coffee. The caffeine doesn't make the cake taste like coffee; instead, it acts as a flavor amplifier for the chocolate. It's a trick I often use in my Rich Chocolate Cherry recipe to create that "bakery style" depth.
For a fruitier twist, fold in half a cup of fresh raspberries before baking. The tartness of the berries cuts through the sugar perfectly. If you want something more indulgent, a handful of dark chocolate chips scattered on top before it goes into the oven creates a "lava" effect on the surface.
- If you want a fudgier center, reduce the flour by 2 tablespoons.
- If you want a festive look, dust with powdered sugar and top with orange zest.
- If you want a protein boost, replace 1/4 cup of flour with chocolate protein powder.
Keeping Your Cake Fresh Longer
Because this cake contains oil rather than butter, it actually stays moist for longer than a traditional sponge. Butter solidifies at room temperature, which can make cakes feel "stale" faster. This bake remains soft and velvety for days. Store it in an airtight container at room temperature for up to 4 days.
If you live in a very humid climate, the fridge is safer, though it might firm up the texture slightly.
For long term storage, this cake freezes beautifully. Wrap individual slices in parchment paper and then foil. They will stay fresh for up to 3 months. To reheat, just pop a slice in the microwave for 15 seconds. It will taste like it just came out of the oven. Don't throw away any crumbs!
Leftover pieces can be crumbled over vanilla yogurt or used as a base for a quick trifle.
Finishing Touches and Presentation
While this cake is magnificent on its own, a simple dusting of powdered sugar makes it look elegant without any extra tools. If you want to go the extra mile, a quick glaze made of cocoa, powdered sugar, and a splash of boiling water can be poured over the top while the cake is still slightly warm.
It creates a shiny, professional finish that hides any cracks.
If you’re looking for a romantic presentation, similar to what you might see in a Valentines Cake for recipe, try serving a square of this cake with a dollop of coconut whipped cream and a single mint leaf. The contrast between the dark cake and the white cream is stunning. It’s a confident way to end any meal, proving that you don't need a pantry full of expensive ingredients to create a moment of pure joy.
Kitchen Myths Debunked
"You must have eggs for a cake to rise." This is simply false. While eggs provide protein structure, the chemical reaction between an acid (vinegar) and a base (baking soda) creates plenty of lift. As long as you don't over mix and collapse those bubbles, your cake will be light and airy.
"Boiling water will cook the flour." In reality, the hot water gelatinizes the starches in the flour more quickly, which actually helps lock in moisture. This is why Depression cakes often have a superior shelf life compared to traditional cakes.
The hot water also "blooms" the cocoa, which is a non negotiable step for a flavorful chocolate dessert.

Recipe FAQs
Why is it called a Depression Cake?
Yes. It was developed during times of economic hardship, like the Great Depression and World War II, when ingredients like eggs, butter, and milk were scarce or rationed. Bakers had to get creative with pantry staples.
What is another name for a Depression Cake?
Yes, it has several nicknames. It's commonly known as "Crazy Cake," "Wacky Cake," "Joe Cake," or "Eggless Cake" due to its unusual ingredient list or the era it originated from.
What was the Depression Cake in WW2?
It was a cake made with limited ingredients due to rationing. During WW2, sugar, butter, and eggs were often unavailable or strictly rationed, forcing home bakers to create cakes using water, oil, vinegar, and baking soda for leavening.
What is the 1234 cake rule?
The 1-2-3-4 cake rule is an old-fashioned cake recipe guideline, not directly related to Depression cakes. It typically uses 1 cup butter, 2 cups sugar, 3 cups flour, and 4 eggs, plus liquid and leavening. Depression cakes, conversely, omit many of these key ingredients like butter and eggs.
Can I use oil instead of butter in this Depression Cake?
Yes, this recipe is designed specifically for oil. Using oil instead of butter is a hallmark of Depression cake recipes because it was a more readily available and affordable fat during times of scarcity, and it contributes to the cake's moist texture.
Does a Depression Cake contain eggs?
No, this version does not contain eggs. The leavening power comes from the chemical reaction between baking soda and vinegar, which makes it an eggless cake. This was essential during times when eggs were scarce.
What is the role of vinegar in a Depression Cake?
Vinegar acts as the acid to react with baking soda. This reaction creates carbon dioxide gas, which makes the cake rise and achieve a light, fluffy texture, effectively replacing the leavening typically provided by eggs.
Depression Cake Recipe
Ingredients:
Instructions:
Nutrition Facts:
| Calories | 182 kcal |
|---|---|
| Protein | 2g |
| Fat | 6.5g |
| Carbs | 30g |
| Fiber | 1g |
| Sugar | 17g |
| Sodium | 135mg |
