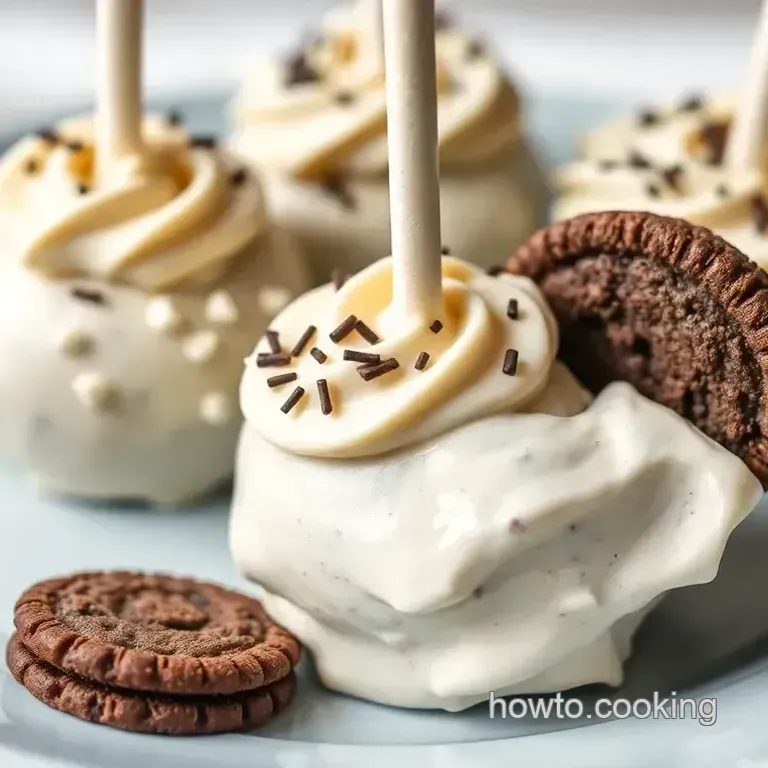
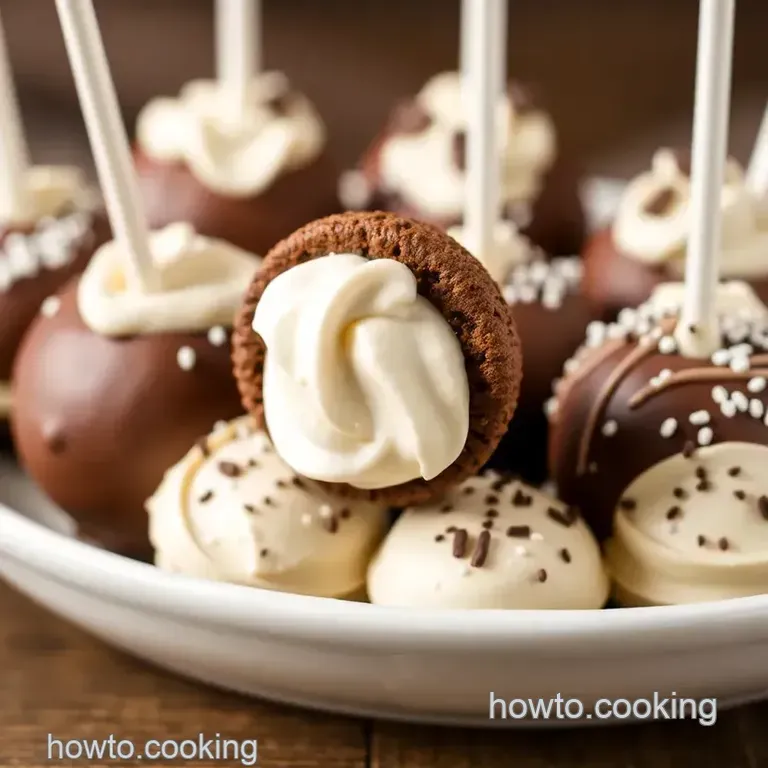
Dip Chocolate Cookies and Cream Cake Pops
- Look into into Deliciousness: The Scoop on Dip Chocolate Cookies and Cream Cake Pops
- Let's Talk About Cake Pops!
- Why You Should Make These Cake Pops
- The Sweet Transition
- Essential Ingredients Guide for Dip Chocolate Cookies and Cream Cake Pops
- Mastering Professional Cooking: Your Guide to Cake Pops
- Tips and Tricks for Your Dip Chocolate Cookies and Cream Cake Pops
- Perfect Presentation Tips
- Storage & Make-Ahead Advice
- Creative Variations for Every Occasion
- Complete Nutrition Guide
- Wrapping it Up
- Frequently Asked Questions
- 📝 Recipe Card
Look into into Deliciousness: The Scoop on Dip Chocolate Cookies and Cream Cake Pops
Oh my gosh! i can still remember the first time i created dip chocolate cookies and cream cake pops . it was one of those cozy weekends, you know? the kind where you're just itching to make something sweet but don’t want to break a sweat over a complicated recipe.
I had some leftover chocolate cookie crumbs from a previous baking spree. so, why not roll them into irresistible little pops? that’s how the magic started!
These cake pops are not just tasty. they’re bite sized bliss that everyone loves especially at parties. you know how it goes.
The moment my friends saw them, they couldn't resist diving in. cookies and cream desserts are always a crowd pleaser, but when you can pop them in your mouth just like that? even better!
Let's Talk About Cake Pops!
Cake pops have been around for a while, but their rise to fame really skyrocketed over the past decade. they took the dessert world by storm, becoming a staple at birthday parties, baby showers, and everything in between.
Honestly, who wouldn’t want a cute little treat that’s both fun to eat and easy to make? with no-bake cake pops , you get all the joy without the oven heat.
And let’s face it everyone loves a good, easy chocolate dessert!
Time wise, this recipe is a breeze. you’re looking at about 15 minutes of active prep, 30 minutes of chilling , and boom a total of just 45 minutes until deliciousness ! plus, this recipe yields 12 cake pops , which makes it perfect for sharing (or not!).
Now, on to costs: you might be surprised that everything you need like chocolate cookie recipes and cream cheese is pretty budget friendly.
Trust me, if you’re throwing a party or just want to treat the family, these pops are a win-win.
Why You Should Make These Cake Pops
You might be wondering, why go for Dip Chocolate Cookies and Cream Cake Pops ? Well, let me hit you with some serious perks :
First up, they’re a great source of joy who can resist the rich chocolate cookie crumbs mixed with creamy goodness? plus, they’re akin to chocolate coated heaven.
We’re talking about a sweet treat recipe that easily caters to kids and adults alike. perfect for school parties or even cozy movie nights.
Also, if you’re aiming for something more than your average dessert, look no further. these cake pops can fit into any occasion, from casual gatherings to fancy shindigs.
You can even experiment with cake pop variations . think about mint chocolate or peanut butter cookies. the options are endless!
Nutritionally speaking, they do offer some satisfaction without going overboard. with about 150 calories per serving , they are indulgent but not crazy excessive.
Plus, thanks to the cream cheese , you’re getting a touch of protein, too!
The Sweet Transition
So, whether it's an upcoming birthday bash, a last minute gathering, or just an "I need something sweet" kind of day, these Dip Chocolate Cookies and Cream Cake Pops are your jam.
Get ready to dive into the fun ingredient list and let's whip these up together! trust me; your friends are gonna think you have some professional cake decorator skills with these cute little pops.
Let's get our baking game on!
Essential Ingredients Guide for Dip Chocolate Cookies and Cream Cake Pops
Let’s talk about the essential ingredients you need for those delightful dip chocolate cookies and cream cake pops . honestly, this is where the fun begins! these tiny, bite sized desserts pack a punch of flavor and creativity, making them perfect for any gathering.
Premium Core Components
First off, you gotta know what you’re working with. Here's the scoop on the core ingredients you'll need:
Chocolate cookie crumbs : you’re looking at about 1 ½ cups (150g) . crushed oreo cookies are a top-notch choice! make sure they're fresh if they break apart easily, they're perfect.
Quality tip : check the date on the package fresh cookies make a world of difference.
Cream cheese : you’ll need ½ cup (120ml) , softened. i swear this is your secret weapon to that creamy goodness.
Go for the real stuff; the block variety beats the spreadable kind. storage warning : keep it sealed and refrigerated to maintain freshness; it lasts about 2 weeks.
Dark chocolate melts : use 1 ½ cups (255g) for coating. these melt like a dream and give that rich flavor everyone loves! make sure they’re a good quality brand.
If they feel grainy after melting, toss ‘em and start fresh!
Vegetable oil : a tablespoon of this bad boy helps thin your chocolate. shelf life tip : oil lasts ages, like a good bottle of wine! just keep it in a cool, dry place.
Signature Seasoning Blend
When it comes to cake pops, seasoning is key. We’re keeping it simple here. For our signature blend , think about these essentials:
Vanilla Extract : This is your hero! A teaspoon boosts the flavor of the cream cheese without being overpowering. Just don’t skimp; pure vanilla extract wins the flavor game.
Optional Garnishes : Get creative! Use crushed cookies for sprinkles on top. A little crunch never hurt anyone, right?
Smart Substitutions
Life happens, and we all need smart substitutions sometimes. Here are some easy swaps:
Cookies : No Oreos? No problem! Use any chocolate cookie you like chocolate graham crackers or even those store brands work just fine.
Cream Cheese : If dairy's not your thing, go for a plant based option or Mascarpone for a fancy twist.
Dark Chocolate : Milk chocolate if you’re feeling sweet, or even white chocolate chips if you’re craving something different.
Kitchen Equipment Essentials
Every cook needs the right tools. Here’s what you’ll need:
Mixing Bowl : Preferably the big ones they hold all the magic!
Baking Sheet & Parchment Paper : Line that sheet! It saves clean-up and keeps your pops from sticking.
Cake Pop Sticks : These are crucial for serving! You can snag them from craft stores or online.
Chilling and Melting Gear : A microwave safe bowl or double boiler works wonders for melting chocolate. And for chilling, a Styrofoam block is your best friend for keeping those pops upright.
Remember, these are just the basics! You can substitute tools based on what you have. Heck, I’ve used a spoon to shape treats in a pinch!
Wrapping it Up
Now that you know about the premium ingredients, classic flavor components, smart swaps, and essential tools, it’s time to dive into the fun part making your dip chocolate cookies and cream cake pops ! get ready to enchant your friends with these easy chocolate desserts .
With just a bit of practice, you’ll master your cake pop recipe and wow everyone at your next get-together.
So let’s roll up those sleeves and get started with the step-by-step instructions on how to whip up these heavenly bites!
Mastering Professional Cooking: Your Guide to Cake Pops
Oh my gosh, if you're looking to impress friends at the next party, let me tell you about the delight of dip chocolate cookies and cream cake pops ! seriously, these little bites of joy are perfect as party treats or a fun dessert for the kiddos.
But before we dive into these delicious creations, let’s talk about getting organized in the kitchen with some essential professional cooking methods.
Essential Preparation Steps
You might have heard of mise en place , right? it's a fancy french term that just means having everything ready before you start cooking.
Grab all your ingredients: 1 ½ cups of chocolate cookie crumbs (think crushed oreos), ½ cup of softened cream cheese , and other goodies too.
Trust me, it makes your cooking flow so much smoother.
Next up, let’s break down some time management tips. set a timer, folks! timing is everything when cooking these cake pops.
You’ll want to chill your pops for about 30 minutes . this helps them firm up before dipping seriously, no one enjoys gooey pops!
Organization strategies are key too. Use bowls for different ingredients and keep your workspace tidy. And don’t forget safety always keep those knives and hot chocolate melts away from little hands.
Step-by-step Process
Alright, let’s get into the nitty gritty of the cake pop making process.
- Prepare the Baking Sheet: Line it with parchment paper so your pops don’t stick.
- Make the Cake Pop Mixture: Mix those cookie crumbs with the cream cheese and vanilla until it’s like a thick dough.
- Shape the Cake Pops: Roll them into 1 inch balls and place them on your baking sheet.
- Chill the Cake Pops: Pop them in the fridge for 30 minutes this step is critical!
- Melt the Chocolate Coating: Combine your chocolate melts with a bit of vegetable oil. Microwave in 30-second intervals until it’s silky smooth.
- Dip the Cake Pops: Dip the stick into the chocolate first, then into each cake pop. This helps keep ‘em stable.
- Decorate and Set: Feel free to sprinkle crushed cookies on top for that extra flair!
Expert Techniques
Now that you’ve got those steps down, let’s level up. dipping can be tricky. here’s a pro tip: make sure your chocolate is at the right temperature too hot, and it’ll burn; too cool, and it won’t coat nicely.
I like to check if it’s around 90- 95° f for that sweet spot.
Also, troubleshooting is essential. if your chocolate isn’t coating well, it could be too thick. just add a touch more oil and stir; boom problem solved.
And hey, quality checkpoints like checking the consistency of that pop mix can save you from potential disaster. you want a just right dough that sticks together without crumbling.
Success Strategies
Now we know cake pops can be a joy, but they’ve got some common hiccups too. One big mistake? Skipping the chill step. Remember to truly let them chill!
Quality assurance is key. before serving, always test one (or two, who’s counting?) to ensure they are deliciously up to par.
If you want to make-ahead options, you can prepare the pops in advance and freeze them. just make sure to let them thaw before dipping!
Wrapping It Up
Making dip chocolate cookies and cream cake pops isn’t just about the steps; it’s about fun and creativity! from variations like adding mint extract for a twist to choosing the right chocolate, there’s so much room to experiment.
So the next time you're planning a gathering, keep these little bite sized desserts in mind. they’re a hit with kids and adults alike and add a sweet touch to your dessert table.
Just imagine serving those alongside some fresh fruit or a little marshmallow dip. pure bliss!
Feeling inspired? Well, stay tuned as we dive deeper into Additional Information that will help you unlock even more joy in the kitchen!
Tips and Tricks for Your Dip Chocolate Cookies and Cream Cake Pops
Alright, friends! let’s dive into some pro tips and secrets i’ve picked up from making dip chocolate cookies and cream cake pops that’ll help make your treats even more fabulous.
Trust me, these little bites of heaven aren’t just great for parties; they’re also super fun to make!
Insider Insights and Time Saving Techniques
First off, when you’re mixing your cake pop dough, use room temperature cream cheese . this magical little trick makes mixing way easier and gives you a smooth consistency.
No one wants clumpy cake pops, right? if you're in a rush or just feeling lazy ( we’ve all been there ), opt for store-bought chocolate cookie crumbs.
Bam! instant time saver!
Also, chill the mixture before rolling it into balls. It helps keep those shapes right when you’re dipping. Seriously, chilling is your secret weapon here.
Flavor Enhancement and Presentation Hacks
Now, if you want to jazz up those flavors, try adding a little peppermint extract to your chocolate crumbs for a refreshing twist or some peanut butter for that glorious interplay.
You can also play with your toppings! instead of just crushed cookies, think colorful sprinkles, or even some drizzled white chocolate for that pop of color.
It’s all about presentation , you know?
Speaking of presentation, use a nice platter or decorative stand to show off your cake pops. if you’re entertaining, a well presented dessert can literally steal the show.
Who doesn't love a feast for the eyes?
Perfect Presentation Tips
Let’s talk plating techniques. use a simple styrofoam block or a cake pop stand to keep those beauties upright while they set.
You can even jazz up your setup with cute garnishes. think fresh mint leaves or colorful fruit slices it adds a lovely touch.
While you’re at it, remember that the eye eats first! play around with color combinations that pop. dark chocolate pops look divine alongside bright sprinkles or a light background.
Seriously, it’s like creating art!
Storage & make-ahead Advice
Now that you’ve made some homemade cake pops , let’s chat about storing these delectable treats. keep them in an airtight container in the fridge, and they’ll stay fresh for about 5 7 days .
If you wanna keep them longer, pop them in the freezer for up to a month. just remember to wrap each pop gently so the chocolate doesn’t get all crazy!
When you’re ready to enjoy those frozen little gems, just let them chill in the fridge for a bit before serving. They’ll taste just as good!
Creative Variations for Every Occasion
Oh, and have fun with cake pop variations ! want a fall themed treat? try adding pumpkin spice to your dough! celebrate the holidays with peppermint or egg nog flavors.
The possibilities are endless!
You can even cater to different dietary needs. Swap out the cream cheese for a vegan alternative, or use gluten-free cookies to make it friendly for everyone.
Complete Nutrition Guide
Now, let's peek at the nutrition side of things. each of these wonderful cake pops packs about 150 calories . you get a nice little treat without going overboard.
They’ve got a bit of protein and a decent amount of sugar, so they hit that sweet spot just right for family gatherings or a fun night in with friends.
Just keep your portions sensible!
Wrapping it Up
So, there you have it! with my tips and tricks for dip chocolate cookies and cream cake pops , you’re all set for a delicious dessert experience.
Trust me, these bad boys will have everyone raving about your sweet skills. just gather up those ingredients, play around with flavors, and most importantly, have fun!
These cake pops are not just a dessert; they’re an experience. whether it’s a birthday bash, a cozy movie night, or just because, these tasty bites are bound to put a smile on anyone’s face.
Happy baking, and enjoy every delicious bite!
Frequently Asked Questions
What are Dip Chocolate Cookies and Cream Cake Pops?
Dip Chocolate Cookies and Cream Cake Pops are bite sized treats made from crushed chocolate cookies mixed with cream cheese, shaped into balls, and coated in melted chocolate. They're a fun dessert option that combines rich chocolate flavor with a creamy filling, perfect for parties and gatherings.
Can I make these cake pops ahead of time?
Yes, you can prepare Dip Chocolate Cookies and Cream Cake Pops ahead of time! After shaping the pops, you can refrigerate them for up to 2 days before dipping. Once dipped, they can be stored in the fridge for about a week, making them great for advance party preparations.
What is the best way to store Dip Chocolate Cookies and Cream Cake Pops?
Store the cake pops in an airtight container in the refrigerator to keep them fresh. You can also freeze them if you want to save them for a longer period. Just ensure they are individually wrapped or placed in a single layer to prevent sticking.
Can I customize the flavors of my cake pops?
Absolutely! You can customize Dip Chocolate Cookies and Cream Cake Pops by adding different extracts, such as mint or almond, or by mixing in various toppings like sprinkles, crushed nuts, or colored chocolate. Feel free to experiment with using different cookie bases or fillings for a unique twist!
What are some common mistakes to avoid when making cake pops?
One common mistake is not chilling the cake pops long enough before dipping, which can lead to messy results. Also, ensure your chocolate coating is not too thick; adding a bit of vegetable oil can help achieve a smoother, thinner consistency.
Finally, practice your dipping technique to avoid pulling the cake pops off the stick.
Are there any healthier alternatives for the ingredients in Dip Chocolate Cookies and Cream Cake Pops?
Yes, you can make some substitutions to create a healthier version! Use reduced fat cream cheese or Greek yogurt instead of regular cream cheese, and consider using dark chocolate with a higher cocoa content for the coating.
For a lower sugar option, look for sugar-free cookies or adjust the amount of chocolate to suit your dietary needs.
Dip Chocolate Cookies And Cream Cake Pops

