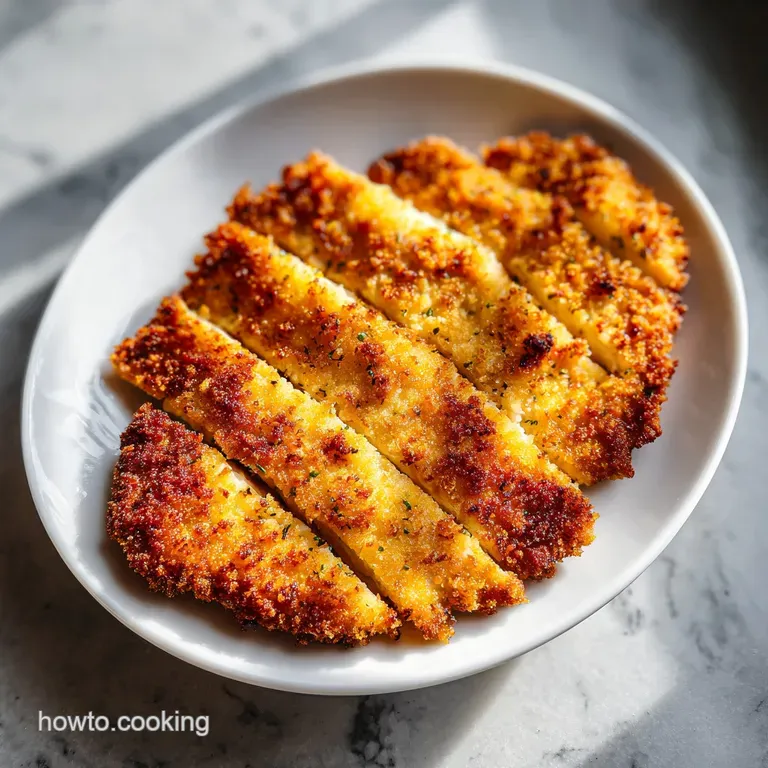
Chicken Milanese: Golden & Shatter Crisp
- Time: Active 15 minutes, Passive 10 minutes, Total 25 minutes
- Flavor/Texture Hook: Golden shatter crisp crust with a zesty arugula bite
- Perfect for: Busy weeknight dinners or a light weekend lunch
- Master the Ultimate Golden Crispy Chicken Milanese
- The Core Elements Behind This Flavor Profile
- Breaking Down the Functional Role of Ingredients
- Choosing Your Ingredients and Smart Pantry Substitutions
- Essential Kitchen Tools for a Perfect Result
- A Detailed Guide to Executing Every Step
- Identifying and Fixing Common Preparation Errors
- Modifying the Dish for Various Dietary Needs
- Best Practices for Storage and Future Reheating
- Creative Serving Ideas and Perfect Side Pairings
- Kitchen Myths and Reality
- High in Sodium
- Recipe FAQs
- 📝 Recipe Card
Master the Ultimate Golden Crispy Chicken Milanese
I still remember the first time I tried to make this at home. I was craving that specific crunch you get at Italian bistros, but I ended up with a soggy, oil soaked pile of breading that slid right off the meat. It was frustrating because the flavors were there, but the texture was a total disaster.
I realized then that the secret isn't just in the breading, it's in the preparation of the chicken itself and the temperature of the pan.
Since then, I have tinkered with every variable. I have tried different oils, varied the thickness of the meat, and experimented with several types of crumbs. This version is exactly what I make for my family when we want something nutritious that actually satisfies that deep fried craving without the heavy feeling.
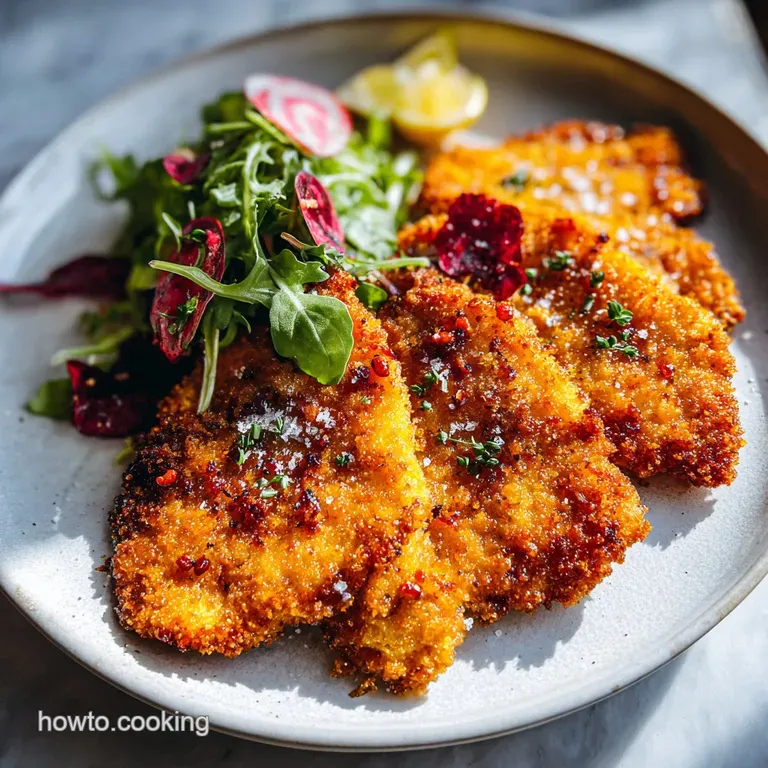
Trust me, once you hear that first shatter of the crust as your knife hits it, you will never go back to basic breaded chicken.
The beauty of this dish lies in the contrast. You have the hot, savory, salty chicken sitting right next to a pile of cold, peppery arugula dressed in sharp lemon. It is a balance of temperatures and textures that makes every bite feel fresh.
We are going to walk through the steps to ensure your breading stays glued to the meat and stays crispy until the very last forkful.
The Core Elements Behind This Flavor Profile
The Physics of the Crunch: Panko breadcrumbs have a larger surface area than traditional crumbs, allowing them to create tiny air pockets that stay crisp rather than absorbing excess oil.
The addition of parmesan cheese creates a protein rich lattice that browns beautifully while providing a savory, salty kick that seasons the meat from the outside in.
- Mechanical Tenderizing: Pounding the chicken to a uniform 6mm thickness breaks down tough muscle fibers for a tender bite.
- Starch Anchor: The initial flour coating absorbs surface moisture, creating a dry "bridge" for the egg wash to grip.
- Temperature Management: Using a mix of neutral oil and butter allows for a high smoke point while adding the rich flavor of dairy.
- Protein Bond: The parmesan in the breading melts slightly during frying, acting as a secondary adhesive for the crumbs.
| Thickness | Internal Temp | Rest Time | Visual Cue |
|---|---|---|---|
| 6mm (1/4 inch) | 74°C (165°F) | 3 mins | Coating is mahogany gold and firm |
| 12mm (1/2 inch) | 74°C (165°F) | 5 mins | Juices run clear when pierced |
| 18mm (3/4 inch) | 74°C (165°F) | 7 mins | Requires lower heat to prevent burning |
Getting the thickness right is the most important part of the prep work. If the chicken is uneven, you will end up with dry edges and a raw center, which is exactly what we want to avoid for a confident cooking experience.
Breaking Down the Functional Role of Ingredients
| Ingredient | Science Role | Pro Secret |
|---|---|---|
| Panko (90g) | Texture Agent | Press them firmly into the meat to maximize contact and crunch. |
| Parmesan (50g) | Flavor & Binding | Use freshly grated for better melting and a more intense umami profile. |
| Large Eggs (2) | Protein Glue | Whisk with a splash of water to thin the proteins for a lighter coat. |
| Flour (65g) | Moisture Barrier | Season the flour directly to build layers of flavor from the base up. |
Adding a small amount of water to your eggs, exactly 15ml as called for, helps break up the viscous proteins. This ensures the egg wash covers the flour evenly without becoming too thick or "gloppy," which is a common reason breading peels off in the pan.
Choosing Your Ingredients and Smart Pantry Substitutions
To keep this recipe wholesome and accessible, I have selected items that offer the best results for a reasonable effort. If you don't have everything on hand, these swaps will keep the integrity of the dish intact while using what you already have in the kitchen. For a different spin on poultry, you might also enjoy the flavor profile of this Rosemary Chicken Sauce recipe.
- Chicken Breasts (500g): The lean, protein packed star of the show. Why this? Pounding breasts ensures rapid, even cooking without drying out.
- Substitute: Pork loin cutlets work brilliantly for a "Schnitzel" style variation.
- Panko Breadcrumbs (90g): These provide the signature airy crunch. Why this? They stay crispier than standard crumbs due to their jagged shape.
- Substitute: Crushed saltine crackers or cornflakes offer a similar texture.
- Parmesan Cheese (50g): Adds depth and helps the crust brown. Why this? Its low moisture content prevents the breading from becoming soggy.
- Substitute: Pecorino Romano provides a saltier, tangier profile.
- Neutral Oil (42g): Used for frying without adding unwanted flavor. Why this? High smoke point prevents the chicken from tasting burnt.
- Substitute: Refined olive oil or sunflower oil are great alternatives.
- Baby Arugula (140g): The peppery base for the salad. Why this? Its sharpness cuts through the richness of the fried chicken.
- Substitute: Baby spinach or a spring mix works if you prefer a milder taste.
- Lemon Juice (15ml): Provides the essential acid hit. Why this? Brightens the entire dish and balances the fats.
- Substitute: White wine vinegar can work in a pinch for the salad dressing.
Essential Kitchen Tools for a Perfect Result
You don't need fancy equipment, but a few specific tools make the process much smoother. A heavy bottomed skillet, like a cast iron or a heavy stainless steel pan, is non negotiable for maintaining steady heat. If the pan drops in temperature when the chicken hits it, the meat will steam instead of sear.
I also highly recommend using a meat mallet. If you don't have one, a heavy rolling pin or even the bottom of a small saucepan works just as well. The goal is a uniform thickness so you aren't guessing if the middle is cooked while the outside is already dark brown.
| Fresh Method | Shortcut Method | Result Difference |
|---|---|---|
| Pounding whole breasts | Using pre cut "tenders" | Whole breasts are juicier and more uniform. |
| Freshly grated Parmesan | Pre shaken bottled cheese | Fresh cheese melts and bonds; bottled cheese often clumps. |
| Hand whisked dressing | Bottled vinaigrette | Fresh lemon provides a much brighter, cleaner acidity. |
Having a wire rack set over a baking sheet is another small trick that makes a big difference. Placing the finished chicken on a rack instead of a paper towel allows air to circulate underneath, preventing steam from softening that beautiful bottom crust.
A Detailed Guide to Executing Every Step
- Prepare the chicken. Butterfly the 500g of chicken breasts then place them between sheets of plastic wrap. Pound until they are an even 6mm thick.Note: This ensures the meat cooks as fast as the breading browns.
- Set up the stations. Place 65g flour in one shallow bowl, 2 whisked eggs with 15ml water in the second, and a mix of 90g Panko, 50g grated Parmesan, garlic powder, oregano, salt, and pepper in the third.
- Dredge in flour. Coat each piece of chicken in flour, shaking off every bit of excess. Look for a thin, dusty coating.
- Dip in egg. Submerge the floured chicken into the egg wash until fully coated. Note: Let the excess drip off for a few seconds before moving to the next bowl.
- Press into crumbs. Lay the chicken in the Panko mixture and firmly press the crumbs into the meat with the heel of your hand. Ensure no bald spots remain.
- Heat the pan. Add 42g neutral oil and 14g butter to your skillet over medium high heat. Wait for the butter to stop foaming and start sizzling.
- Sear the cutlets. Carefully lay the chicken in the pan, working in batches to avoid crowding. Cook for 3-4 minutes per side until deep mahogany gold.
- Rest the meat. Transfer the chicken to a wire rack for 3 minutes. Note: Resting allows the internal juices to redistribute so they don't leak out and soak the crust.
- Mix the salad. Toss 140g baby arugula with 14g extra virgin olive oil, 15ml lemon juice, and 25g shaved Parmesan.
- Plate and serve. Place the crispy chicken on a plate and pile the arugula salad directly on top. Serve immediately with fresh lemon wedges.
Chef's Tip: If you have 10 extra minutes, pop the breaded cutlets into the fridge before frying. This "sets" the breading, ensuring it stays firmly attached to the meat during the heat of the sear.
Identifying and Fixing Common Preparation Errors
One of the most common issues is the "bubble" where the breading lifts off the meat like a balloon. This usually happens if the chicken was too damp before the flouring stage or if you moved the chicken too much in the pan. Patience is your best friend here; let that crust form before you even think about flipping it. If you are looking for more quick meal inspiration, my Velvety Chicken Cabbage recipe uses a different technique to keep meat tender that is worth checking out.
Why Your Breading Is Peeling
This happens when moisture gets trapped between the meat and the flour. If the chicken isn't patted bone dry with paper towels before you start, the flour turns into a slick paste rather than a dry anchor.
As the chicken cooks and releases steam, that paste prevents the egg from bonding, and the whole crust just slides away.
Why the Crust Is Burning
If your panko is turning black before the chicken is cooked through, your heat is too high or your oil is dirty. Panko has a high sugar content compared to regular bread, so it browns very quickly. If you see it darkening too fast, turn the heat down slightly and add a touch more oil to buffer the temperature.
| Problem | Root Cause | Solution |
|---|---|---|
| Soggy crust | Oil wasn't hot enough | Wait for the sizzle before adding meat. |
| Breading falling off | Meat was too wet | Pat chicken dry with paper towels before flouring. |
| Dry, tough meat | Chicken was overcooked | Use a meat thermometer to hit exactly 74°C. |
Common Mistakes Checklist
- ✓ Always pat the chicken completely dry before the flour stage.
- ✓ Press the breadcrumbs into the meat with firm pressure.
- ✓ Don't overcrowd the pan; fry only two pieces at a time.
- ✓ Use a combination of oil and butter for the best flavor and color.
- ✓ Let the chicken rest on a wire rack, never directly on a flat plate.
Modifying the Dish for Various Dietary Needs
This recipe is quite flexible if you need to adjust for guests with specific requirements. The core technique of pounding and shallow frying remains the same regardless of the coating you choose.
- For gluten-free: Swap the all purpose flour for cornstarch and use gluten-free panko or crushed pork rinds. The cornstarch actually creates an even crispier barrier than flour does.
- For dairy-free: Omit the parmesan cheese in the breading and increase the garlic powder and salt slightly. Use all neutral oil for frying instead of the oil and butter mix.
- For Lower Carb: Use almond flour for the initial dredge and crushed pork rinds mixed with parmesan for the outer coating.
If you want a different result, try these tweaks: If you want a thicker crust, do a double dip: Flour, egg, flour, egg, then breadcrumbs. If you want more spice, add half a teaspoon of cayenne pepper to the flour mixture.
If you want a "sandwich" version, serve the cutlet on a toasted brioche bun with spicy mayo and pickles.
Best Practices for Storage and Future Reheating
Storage: You can keep leftover chicken in an airtight container in the fridge for up to 3 days. However, the salad should always be dressed right before serving, as arugula wilts within minutes of touching acid and oil.
Freezing: This dish freezes surprisingly well. Freeze the breaded, un fried cutlets between layers of parchment paper in a freezer bag for up to 2 months. You can fry them directly from frozen, just add 2 minutes to the cooking time per side.
Reheating: Avoid the microwave at all costs! It will turn your beautiful crust into a rubbery mess. Instead, place the chicken on a wire rack in a 180°C (350°F) oven for about 8-10 minutes.
This recrisps the panko and warms the meat through without drying it out.
Zero Waste Tip: Don't throw away the lemon rinds after squeezing the juice. Toss them into a jar of white vinegar for a week to make a fragrant, natural kitchen cleaner, or zest them into your next batch of pasta.
| Method | Time | Texture | Best For |
|---|---|---|---|
| Skillet (As written) | 10 mins | Maximum crunch | The authentic experience |
| Air Fryer | 12 mins | Very crispy | Cutting back on added fats |
| Oven Baked | 20 mins | Moderately crunchy | Cooking for a large crowd at once |
Creative Serving Ideas and Perfect Side Pairings
While the arugula salad is the traditional accompaniment, there are so many ways to serve this. The crispy texture of the chicken makes it a perfect partner for something creamy or saucy.
I often serve this alongside a simple pasta tossed in garlic and olive oil (Aglio e Olio) or even a side of roasted potatoes. The acidity of the lemon in the recipe is key, so whatever you pair it with, make sure there is a bright element involved.
If you are in the mood for a heartier Italian vibe, you could even top the fried cutlets with a bit of marinara and melted mozzarella for a quick "cheat" chicken parm.
Kitchen Myths and Reality
A common misconception is that you need a deep vat of oil to get a crispy result. In reality, shallow frying is more effective for Milanese because the contact with the bottom of the pan helps "toast" the crumbs more evenly. You only need enough oil to come halfway up the side of the chicken.
Another myth is that you should season the chicken directly with salt before flouring. While this seems logical, it can actually draw moisture out of the meat, making the surface wet and causing the breading to slip.
It is much better to season the flour and the breadcrumb mixture itself to ensure the seasoning stays trapped within the crust. Finally, don't believe that "more egg is better." A thick layer of egg creates a cakey interface that separates from the meat.
A thin, well drained egg wash is the secret to a professional, tight clinging crust.

High in Sodium
875 mg mg of sodium per serving (38% of daily value)
The American Heart Association recommends limiting sodium intake to no more than 2,300mg per day for most adults.
Tips to Reduce Sodium in Your Chicken Recipe
-
Reduce Parmesan Cheese-15%
Parmesan cheese is a significant source of sodium. Reduce the amount of Parmesan used both in the breading and as a garnish by half. Consider using 25g in breading and 12.5g for garnish.
-
Cut Back on Added Salt-12%
Reduce the amount of kosher salt added to the breading mixture by half. Taste as you cook and add more if needed, but start with less.
-
Low Sodium Breadcrumbs-8%
While Panko isn't particularly high in sodium, check the label and choose a low-sodium or unsalted version. If unavailable, consider making your own to control the sodium content.
-
Embrace Lemon & Herbs-5%
Increase the amount of fresh lemon juice and black pepper to enhance the flavor. More lemon juice will add acidity and reduce the need for salt.
-
Flavor with Herbs & Spices
Enhance the dish's flavor by using a variety of sodium free herbs and spices. Experiment with different combinations like smoked paprika, onion powder, or Italian seasoning to add depth and complexity.
Recipe FAQs
What is a chicken milanese?
It is a thin, breaded, and pan-fried chicken cutlet. The chicken is pounded very thin, coated in seasoned flour, egg wash, and breadcrumbs (usually Panko mixed with Parmesan), and quickly fried until golden brown and crispy.
What is the difference between chicken parm and chicken milanese?
Chicken Milanese is served plain or simply with lemon and arugula. Chicken Parmigiana (or Parm) takes the Milanese base, tops it with tomato sauce, and then bakes it with mozzarella and Parmesan cheese until melted and bubbly.
Why is it called chicken milanese?
It is named after Milan, Italy, where the dish originated. The classic preparation is known there as cotoletta alla milanese, which traditionally uses veal, but chicken is a common modern adaptation globally.
What sauce is used in chicken milanese?
Typically, no sauce is poured over the chicken itself. It is classically finished with a squeeze of fresh lemon juice and served alongside a simple, peppery salad, like arugula. If you want a red sauce pairing, consider making The Nonnas Secret recipe to serve on the side.
How thin should I pound the chicken breast for the best texture?
Pound the chicken uniformly to about 6 millimeters (1/4 inch) thick. This thinness ensures the chicken cooks through rapidly, matching the speed required to achieve a perfectly golden, shatter crisp crust without overcooking the meat.
Can I prepare the breading ahead of time?
Yes, but only the dry crumb mixture. You can mix your Panko, Parmesan, and seasonings days in advance and store it in an airtight container. For best results, bread the cutlets right before frying or, ideally, chill the fully breaded cutlets for 15 minutes to set the coating.
Is it true that frying the chicken in only butter makes the crust soggy?
Yes, using only butter is risky for this preparation. Butter solids burn easily and lower the effective smoking point of the oil, leading to a brown crust before the chicken is cooked. Use a high smoke point oil mixed with a small amount of butter for flavor, as detailed in the recipe technique.
Easy Chicken Milanese Recipe

Ingredients:
Instructions:
Nutrition Facts:
| Calories | 627 kcal |
|---|---|
| Protein | 54g |
| Fat | 30g |
| Carbs | 32g |
| Fiber | 2g |
| Sugar | 1.5g |
| Sodium | 875mg |
