Homemade Apple Pie: the Flakiest Classic with an All-Butter Crust
- The Ultimate Homemade Apple Pie: Achieving the Perfect All and Butter Flake
- The Science of the Flaky Crust: Why This Recipe Is Foolproof
- Essential Ingredients for the Best Homemade Apple Pie
- Ingredient Substitutions and Preparation Notes
- Phase 1: Crafting the All and Butter Flaky Pastry Dough
- Phase 2: Assembling and Baking Your Classic Apple Pie
- Troubleshooting Common Apple Pie Mistakes
- Storage, Serving, and Reheating Your Baked Apple Pie
- Recipe FAQs
- 📝 Recipe Card
The Ultimate Homemade Apple Pie: Achieving the Perfect All and Butter Flake
Do you know the smell? That warm, heady mix of cinnamon, brown sugar, and caramelized apples wafting out of the oven. It's the scent of total contentment, especially when you pair it with the sound of a perfectly golden, all and butter crust shattering under the pressure of a fork.
Forget those weird, pale, store and bought pies; we're aiming for a deep, rich, deeply satisfying slice of heaven.
Making pie seems intimidating, I get it. I’ve had my share of dense, grey crusts and bottoms so wet they could float a boat. But once you understand the simple relationship between cold butter and flour, this whole process becomes straightforward, affordable, and surprisingly therapeutic.
This is comfort food at its absolute peak, and it’s something you can master tonight.
I've stripped away the fuss and hyperbole to give you the honest, working version the best homemade apple pie recipe that reliably delivers flaky pastry and a perfectly set, spiced filling every single time. Grab your apron and let’s crack on.
The Science of the Flaky Crust: Why This Recipe Is Foolproof
We are chasing flake, not toughness. The goal isn't just to mix ingredients; it’s about controlling temperature and gluten development. If you understand these three quick concepts, you'll never fear pastry again.
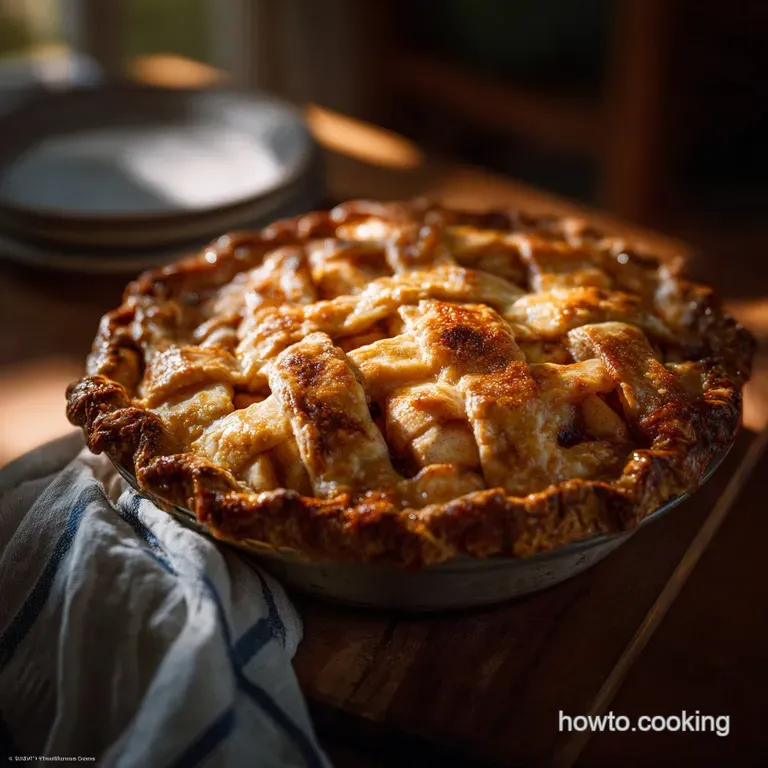
Why An All and Butter Crust Wins Every Time
While shortening (like Crisco) gives you maximum height and flake, it tastes, well, neutral. We use 100% cold unsalted butter because we want that incredible dairy flavor alongside the structural integrity.
The butter solids melt, releasing steam that forces the layers of dough apart, creating those beautiful air pockets that define a great homemade apple pie crust .
Understanding the Sweet and Tart Apple Balance
The key to a complex filling isn't just sugar; it's contrast. I always use a mix of tart Granny Smiths and a slightly sweeter, firmer apple like Honeycrisp or Braeburn. The tart apples stop the pie from becoming cloyingly sweet, and the firm structure ensures the slices hold their shape instead of melting into an applesauce sludge.
Preparing Your Mise en Place for Baking Success
Mise en place is just fancy French for "getting your stuff together." When making pie, this is non and negotiable. If your apples are sliced, your spices are measured, and your butter is already cubed and freezing , you reduce handling time dramatically.
Less handling means less warming, and less warming means better flakiness.
The Role of Cold Butter and Ice Water
This is the central dogma of good pastry: Cold, cold, cold. When we "cut" the frozen butter into the flour, we are intentionally leaving tiny, distinct chunks. These chunks are the crucial fat barriers that prevent water from binding all the flour’s gluten strands together.
When those cold chunks hit the hot oven, they melt and release steam, pushing the flour layers up and out.
Controlling Gluten Development for Tenderness
Gluten develops when flour meets liquid and is agitated (kneaded). We want minimal gluten here because tough, chewy pie is a crime. That’s why we only add enough ice water for the dough to just hold together, and why we never knead it we just press it into discs.
The chilling time then allows the tiny amount of developed gluten to relax, resulting in a perfectly tender bite.
The Maillard Reaction: Achieving Deep Golden Flavor
If your pie is pale, it means it hasn't properly caramelized. That deep golden and brown color you want on the crust comes from the Maillard reaction (the browning of sugars and proteins) which adds depth of flavor, not just color.
Baking at a high temperature first (425°F/220°C) gets the reaction started, and the egg wash provides the protein boost needed for maximum browning.
Essential Ingredients for the Best Homemade Apple Pie
For the best results, use high and quality unsalted butter and firm, crisp apples. Don’t skimp on the salt in the crust; it balances the sweetness perfectly.
Ingredient Substitutions and Preparation Notes
I’m all about using what you have, especially if a last and minute craving hits. Here are my favorite swaps.
Choosing the Right Apple Blend (Sweet vs. Tart)
As I mentioned, a 50/50 blend of tart (Granny Smith) and slightly sweeter/firmer apples (Honeycrisp, Fuji, Gala) is ideal. If you only have one type, lean toward the firmer ones. If you use a softer apple (like McIntosh), you must use cornstarch as your thickener, not flour, because it holds up better against all that moisture.
Pastry Essentials: Flour, Salt, and Sugar Ratios
Standard all and purpose flour is perfect for this dough. We keep the sugar in the crust low (just 1 tablespoon) to allow the buttery flavor to shine. Don't skip the salt! It makes a massive difference in preventing the crust from tasting flat.
The Ultimate Pie Spice Mix: Cinnamon, Nutmeg, and Cardamom Notes
Cinnamon is the star of this classic apple pie recipe , but a little fresh nutmeg adds warmth. If you want to get truly next and level, add a tiny pinch (about 1/4 tsp) of ground cardamom to your filling mix.
It gives an unexpected floral depth that makes people say, "What is that amazing flavor?"
Measuring Accuracy: Weight vs. Volume
Always measure your flour by weight (grams) if you can. I once tried to rush the crust using the scoop and level method, and I ended up with a tough, sad dough because I had added 40g too much flour! If you use cups, spoon the flour into the cup gently, then level it off.
Vegan Butter Alternatives for the Crust
If you need a dairy and free homemade apple pie crust recipe , swap the unsalted dairy butter for high and quality, cold vegan butter sticks (Miyoko's or Earth Balance sticks work well). You may need slightly less ice water, as vegan butters often have a higher water content.
Preparing Apples: Peeling, Coring, and Slicing Techniques
Slice your apples consistently, about 1/4 inch thick. Thick slices don't soften fully; thin slices turn to mush. Consistency is key for even cooking. Also, once sliced, coat them immediately with lemon juice to stop them from oxidizing while you’re prepping the pastry.
| Ingredient | My Recommendation | Substitution Notes |
|---|---|---|
| Butter | Unsalted Dairy, frozen | Swap up to half for vegetable shortening (flakier, less flavor) or use high and quality vegan sticks. |
| Thickener | All and Purpose Flour | Use Cornstarch (2 Tbsp) for a clearer filling, especially if using watery apples. |
| Apples | Granny Smith + Honeycrisp | Use firm baking apples like Braeburn or Gala. Avoid McIntosh or Red Delicious. |
Phase 1: Crafting the All and Butter Flaky Pastry Dough
We are not making bread. This dough should look shaggy, messy, and totally unappetizing before it chills. That’s how you know you did it right.
Cutting the Cold Butter Into the Dry Mix
Whisk the cold flour, salt, and sugar together first. Then, add your frozen butter cubes. I use a pastry blender, but two forks or even a food processor (pulsing 10 times max!) works. Stop when the largest pieces of butter are about the size of large peas, and the smaller pieces look like coarse cornmeal.
Do not let the butter fully blend.
Hydrating the Dough: The Critical Ice Water Rule
Start with the recommended half and cup of ice water. Drizzle it over the flour mixture, a tablespoon at a time, tossing everything gently with a fork. The instant the dough just starts to cling together, stop adding water. You want it to look shaggy, not wet.
If you over and hydrate, say goodbye to flake.
Chef’s Note: If your kitchen is hot, keep a small bowl of ice water next to you. If your hands start warming the dough while you check its texture, stop and return the bowl to the fridge for five minutes.
Chilling and Resting the Dough (A Non and Negotiable Step)
Divide the dough into two discs (one slightly larger for the bottom crust), wrap them tightly in plastic, and smash them gently into discs. They must chill for at least two hours. This step is non and negotiable! The chilling solidifies the butter chunks and allows the small amount of gluten to relax. This is why my Garlic Butter Bread Rolls: Soft, Fluffy, Easy Homemade Dinner Rolls are so soft it’s all about the dough rest.
Phase 2: Assembling and Baking Your Classic Apple Pie
Rolling the dough is where people panic. Use plenty of cold flour on your counter and rolling pin, and work quickly.
Rolling and Fitting the Bottom Crust for Maximum Stability
Take the larger dough disc out of the fridge and let it sit for about 10 minutes (it needs to soften just enough not to crack). Roll it out to about 1/8 inch thickness, rotating it frequently to prevent sticking. Carefully transfer it to your pie plate and gently press it into the corners.
Trim, leaving about an inch of overhang. Put the plate back in the fridge while you do the top.
Mixing and Mounding the Apple Filling High
Toss your prepared apples with the sugar, spices, and thickener until every slice is coated. As the mixture sits, it will release some juices that’s fine! Spoon the apples into the chilled bottom crust, mounding them slightly higher in the center because they will cook down dramatically.
Make sure to scrape in all those yummy, spiced juices ( homemade apple pie filling gold!).
Sealing, Venting, and Egg Washing the Top Crust
Place the top crust over the filling (or assemble your lattice). Crimp the bottom and top edges together using your thumb and forefinger to create a firm seal. If you don't seal it well, the crust will pull away during baking.
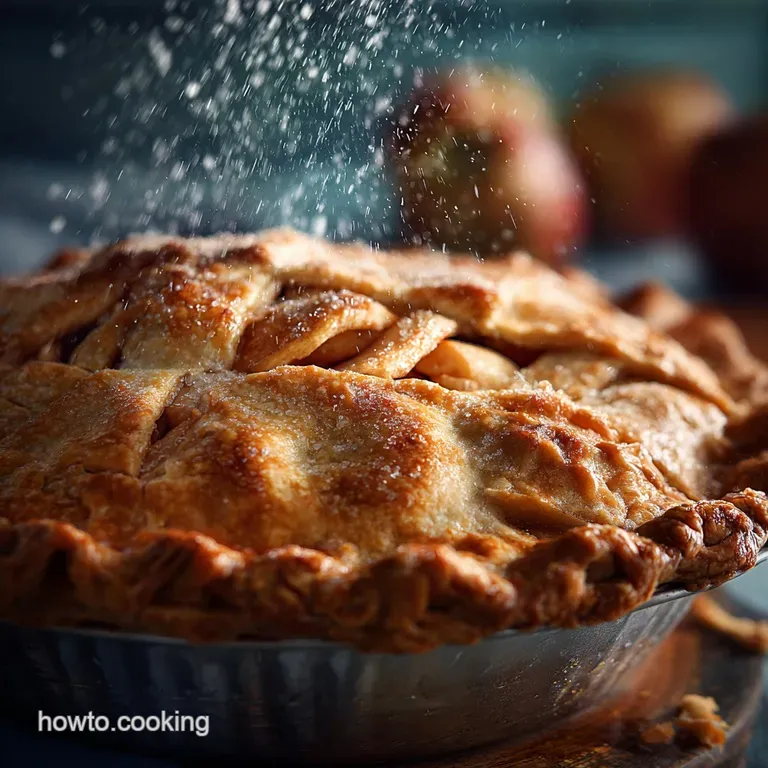
Cut 4 5 vents in the top for steam (otherwise, the steam will find the weakest spot and blow out your seal!). Brush liberally with egg wash and sprinkle with coarse sugar for texture and sparkle.
Troubleshooting Common Apple Pie Mistakes
We all mess up. I once tried to use olive oil in my crust. Spoiler alert: terrible idea. Here are the three most common failures and how we prevent them.
Preventing the Dreaded Soggy Bottom
This happens when the wet filling steams the bottom crust before the starch can set. Fix: Use a hot start (425°F/220°C) for the first 15– 20 minutes to "shock" the bottom crust into cooking quickly.
Also, always place the pie on the lowest rack possible (or better yet, on a preheated baking steel or pizza stone) to transfer maximum heat to the bottom.
Handling Cracks and Tears in the Pastry
If your dough cracks while rolling, it was too cold or you didn't allow it to rest long enough. If you get a tear, patch it immediately with a small piece of reserved dough, brush with cold water, and press gently. It will disappear when baked.
Why Your Filling Is Watery (And How to Fix It)
A runny filling is usually a result of not using enough thickener or slicing the apples too thickly. If you have particularly juicy apples, add an extra tablespoon of thickener. If you cut the pie too soon, it will also appear watery because the starches haven’t fully gelatinized— remember that mandatory 3 hour cooling time!
Storage, Serving, and Reheating Your Baked Apple Pie
Once your kitchen smells divine, the hard part is waiting. Be patient!
Safe Storage Guidelines (Room Temp vs. Fridge)
Since this pie is high in sugar and has a cooked fruit filling, it can safely sit at room temperature (covered loosely) for up to two days. After that, transfer any leftovers to an airtight container and store them in the fridge for up to 5 days.
Freezing Unbaked and Baked Pie Options
Unbaked Pie: Assemble the pie completely, egg wash and all. Wrap it tightly in two layers of plastic wrap, then foil. Freeze for up to 3 months. When ready to bake, place it directly in the preheated oven (do not thaw) and add about 20 minutes to the total baking time.
Baked Pie: You can freeze a fully baked, cooled pie in the same way. Thaw overnight in the fridge and reheat gently in a 350°F (175°C) oven for about 20 minutes to re and crisp the crust.
Perfect Pairings: What to Serve With Your Homemade Apple Pie
While vanilla ice cream is mandatory, don’t forget other amazing options. A rich, homemade custard is incredible poured over a hot slice. For a holiday spread, this pie pairs wonderfully with the spice and texture of my Apple Crisp Mini Cheesecakes: Creamy, Crispy Autumn Dessert Recipe for variety, or you could offer individual servings like my Mini Pumpkin Pies: Flaky Crust Individual Desserts for Fall for guests who want their own little slice of perfection.

Recipe FAQs
Why is my all-butter pie crust tough instead of flaky?
A tough crust usually results from overworking the dough, which develops the gluten too much. Ensure your butter is extremely cold it should remain visible in pea-sized pieces and handle the dough only until it just comes together, minimizing kneading or rolling pressure.
How can I prevent the bottom of my apple pie from becoming soggy?
A “soggy bottom” is prevented by ensuring the recipe uses sufficient thickener, like cornstarch or flour, mixed thoroughly into the filling. Baking the pie on the bottom rack for the first 15 minutes helps the bottom crust set quickly, and always ensure the pie is cooled completely before slicing.
What types of apples work best for a balanced pie filling?
A successful apple pie uses a mixture of sweet and tart apples to provide the best flavor complexity and texture. Firm varieties like Granny Smith, Honeycrisp, or Braeburn are recommended because they hold their shape well and do not turn to mush under heat.
Can I freeze this apple pie, and if so, how?
Yes, freezing the pie unbaked is highly recommended for the best texture. Prepare the pie fully, wrap it tightly in plastic wrap and then foil, and bake it directly from frozen adding about 20-30 minutes to the total oven time.
The crust edges are browning too fast, but the filling isn't cooked. What should I do?
This common issue is easily solved by shielding the edges of the crust. Create a loose ring out of aluminum foil or use a dedicated silicone crust protector to cover the perimeter of the pie once it reaches your desired shade of golden brown, usually halfway through the bake.
Is it possible to make this All-Butter recipe suitable for a vegan diet?
Yes, you can substitute the dairy butter with a high-quality, cold vegan butter stick or solid vegetable shortening. Be sure to use a plant based milk wash, mixed with a little maple syrup, instead of an egg wash for browning the top crust.
How long can I prepare the pie dough or filling ahead of time?
The pie dough is best made ahead and must be chilled for at least 2 hours or can be stored for up to 3 days in the refrigerator. While the apples can be peeled and sliced ahead, mix the filling ingredients no more than 1 hour before baking, as the sugar and salt will draw out excess moisture and thin the juices.
Flakiest Homemade Apple Pie Recipe

Ingredients:
Instructions:
Nutrition Facts:
| Calories | 420 kcal |
|---|---|
| Protein | 4.0 g |
| Fat | 18.0 g |
| Carbs | 63.0 g |
