Grandma's Timeless Apple Pie
- A Slice of Nostalgia: Your Ultimate Apple Pie Recipe
- Essential Ingredients Guide for Your Best Homemade Apple Pie
- Professional Cooking Method: Your Guide to the Perfect Apple Pie
- Pro Tips & Secrets
- Perfect Presentation
- Storage & Make-Ahead
- Creative Variations
- Complete Nutrition Guide
- Bringing It All Together
- Frequently Asked Questions
- 📝 Recipe Card
A Slice of Nostalgia: Your Ultimate Apple Pie Recipe
Got a minute? let me take you back to my childhood, where the sweet smell of cinnamon and baked apples filled my grandma’s kitchen.
Oh, you know that smell! it’s like a warm hug. as soon as you stepped inside, it wrapped around you, making everything feel just right.
That, my friends, is the magic of a classic apple pie recipe . if you're looking to recreate that cozy feeling, keep reading because i’m about to share my favorite best homemade apple pie recipe that’s been passed down through generations.
A Brief Look at Apple Pie
So, where did this love affair with apple pie even come from? well, the history of pie goes way back to the romans, who wrapped fruits in a crust.
But the american apple pie, as we know it, really took off in the 19th century. since then, it’s become a staple in many households coast to coast.
Isn’t it funny how one dessert can mean so many different things to different people? whether at thanksgiving or a lazy sunday afternoon, an old-fashioned apple pie seems to perfect the moment.
Now, about the recipe itself. believe me, it’s not just easy; it’s also a bit of a labor of love.
You’re looking at about 1 hour and 40 minutes total , from prep to table. sure, it requires some patience, especially if you’re aiming for that flaky, golden crust.
But trust me, the reward is oh so worth it! and when it comes to costs? aside from a few apples and common pantry items, you’ll find it’s super budget friendly and yields about 8 servings .
That’s enough to share... or not!
Why You’ll Love This Apple Pie Recipe
First off, let’s talk about health benefits. apples are a fantastic source of dietary fiber, vitamin c, and antioxidants. so, when you dive into a slice of homemade apple pie , you can feel a little less guilty indulging.
Plus, there’s nothing quite like the warm cinnamon spiced filling, which not only enchants your taste buds but also offers some anti inflammatory perks.
Perfect for those chilly nights when you want a little comfort food magic!
Now, if you’re searching for a dish to bring to gatherings, this apple pie is always a showstopper. potlucks? check! family reunions? check! holiday dinners? you know it! everyone has a place in their heart for homemade apple pies .
There’s this unique charm about serving up something that feels so familiar yet always welcomes new faces to the table.
Plus, let’s not forget how versatile this pie is compared to other desserts. while chocolate cakes might steal the show, a well baked apple pie satisfies all ages.
It’s classic, simple, and oh-so-delicious. craving something a bit extra? you can easily toss in your own twists, like caramel or dried fruits, to make it your own.
So, are you ready to roll with this comforting classic? i promise you won't regret making this classic pie a centerpiece of your gatherings especially when you top it off with a scoop of vanilla ice cream or a dollop of whipped cream.
Just thinking about it makes my heart smile!
Let’s dive into the delicious details and get your ingredients rolling… Trust me, you’ll want to keep this easy pie recipe in your back pocket for whenever a craving strikes!
Let me gather my ingredients, and I’ll meet you at the mixing bowl!
Essential Ingredients Guide for Your Best Homemade Apple Pie
Oh my gosh, if you want to make the best homemade apple pie , knowing what goes into it is key! let’s break it down step by step, focusing on what really makes this pie so classic and comforting.
Premium Core Components
First off, let’s talk about the dough. getting it just right is crucial. you’ll need 2 ½ cups of all-purpose flour make sure it’s fresh! this adds the structure our pie needs.
Honestly, if the flour smells off, toss it.
Next, 1 cup of chilled and cubed unsalted butter gives that flaky goodness. don’t even think about using margarine, because, let’s face it, there’s no competition.
Salt, oh sweet salt; you want about 1 teaspoon for flavoring. for a hint of sweetness, throw in 1 tablespoon of sugar.
And remember to chill some ice water; about 6-8 tablespoons should do the trick.
The filling wow, let's get into this! grab around 6-8 medium apples granny smith and braeburn work wonders together. you want that tartness! throw in ¾ cup of sugar, a sprinkle of 1 teaspoon of cinnamon , and just a pinch of ¼ teaspoon of nutmeg for warmth.
Life’s too short for bland pies, am i right?
Signature Seasoning Blend
Speaking of warm spices, let’s not forget about our signature seasoning blend . add that cinnamon and nutmeg to bring life to and highlight those apple flavors.
You could even get adventurous and try some crystallized ginger if you're feeling a little spicy. there’s something special about the aroma of baked apples that wraps you in a hug from the inside out.
Smart Substitutions
So, what if you're out of some ingredients? no worries! need a simple replacement? if you're out of sugar, honey can do the trick too! want to make it dairy-free ? swap that butter for coconut oil.
Oh, and if you find yourself with a surplus of apples , you can always make some homemade applesauce or freeze them for later.
Kitchen Equipment Essentials
Now, let’s talk tools because, let me tell you, having the right equipment makes all the difference. you’re gonna need a 9 inch pie dish and a good rolling pin ; if you don’t have one, a wine bottle does the job in a pinch (don’t judge me!).
A mixing bowl and a cutting board are non-negotiables. and one trick i learned the hard way? put a baking sheet under your pie dish while it bakes to catch any drips.
Trust me; it’s a game changer.
Storage Guidelines and Shelf Life
Once you’ve baked your old fashioned apple pie , you’ll want to know how to store it properly. let it cool completely give it at least a couple of hours.
Then, cover it up, and it’ll last in the fridge for around 3-4 days . for those moments you just can’t wait, consider freezing slices just be sure to wrap them tightly in plastic wrap and foil.
Let’s not skip over the freshness tips ! buy your apples in season; you'll taste the difference, trust me! and when selecting, go for firm apples with a bit of shine.
If they feel soft, they’ve seen better days.
So now that we’ve got our apple pie recipe homemade down pat, you’re ready to dive into the next part actually creating this magical dessert!
Stay tuned for the step-by-step instructions coming up next, and let’s make this the best apple pie experience you’ve ever had!
Professional Cooking Method: Your Guide to the Perfect Apple Pie
When it comes to baking, few things warm the heart quite like a slice of homemade apple pie . seriously, every bite takes you down memory lane grandma's kitchen, the sweet smell wafting through the air, and that unmistakable golden crust.
Let's dive into the professional cooking method behind crafting the best homemade apple pie so you can impress family and friends at your next gathering!
Essential Preparation Steps
Mise en Place: The Name of the Game
Before you even think about putting that pie in the oven, get your ingredients ready. this “mise en place” thing? it’s super important.
Measure out 2 ½ cups of flour , 1 cup of butter , and those apples. trust me nothing is worse than being halfway through and realizing you've left out a key ingredient, like that sweet apple pie filling !
Time Management Tips
Set a timer! baking can get stressful, but a quick timer on your phone or oven helps keep peace of mind.
You’ll want to chill the dough for 30 minutes use this time to prep your apple filling.
Organization Strategies
Clean as you go! Keep your counters uncluttered, and wash those bowls and spatulas while your pie bakes. You don’t want to be scrubbing sticky messes when you could be indulging in your old fashioned apple pie !
Safety Considerations
Oven safety is crucial. use mitts. make sure your hands are dry, and always double check that it’s actually on when you preheat to 425° f ( 220° c) .
You don’t want to be that person waiting for a pie in an ice-cold oven!
Step-by-step Process
Make the Dough
- Mix 2 ½ cups flour , 1 tsp salt , and 1 tbsp sugar in a bowl.
- Cut in 1 cup chilled butter until it’s crumbly. Want flaky? Keep that butter cold!
- Add ice water —start with 6 tbsp and add more if needed. Chill for 30 minutes .
Prepare the Filling
- Peel and slice 6-8 apples . Mix with ¾ cup sugar , 1 tsp cinnamon , and a splash of lemon juice . Let them sit for 15- 20 minutes to release juices. That’s your flavor explosion!
Assemble the Pie
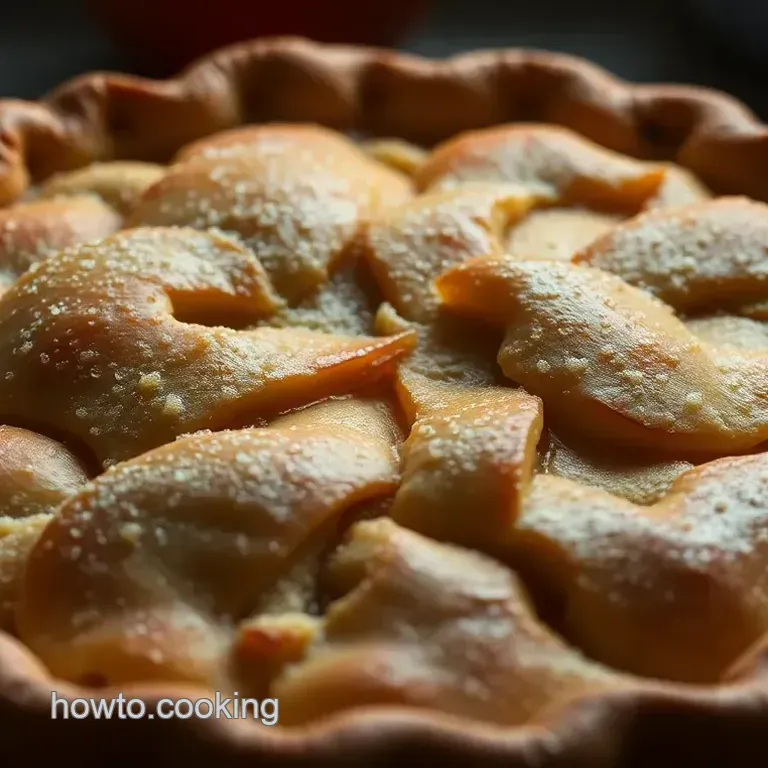
- Roll out dough, fit it into a 9 inch pie dish , and fill with that amazing apple mixture. Roll out your second dough piece, cover the apples, and seal those edges pinch it like you mean it!
- Cut some slits for steam (important!), then brush with an egg wash . This gives that beautiful brown crust we all crave!
Bake the Magic
- Stick that pie in your preheated oven for 15 minutes , then reduce to 350° F ( 175° C) and continue to bake for 30- 35 minutes until the crust is golden and bubbly.
Cool and Serve
- This is the hard part. Let it cool for at least 2 hours , even though you want to dig in right away. The filling needs to set. Serve it warm with a scoop of vanilla ice cream or a dollop of clotted cream!
Expert Techniques
Professional Methods
Here’s the kicker: use a mix of apple varieties! Combining tart Granny Smiths with sweet Braeburns gives a complexity that’ll knock their socks off. And don’t forget to taste as you go.
Quality Checkpoints
After baking, check if the apples look bubbly and the crust is a nice golden brown. If it’s not there yet, give it a few extra minutes, but keep an eye on that crust!
Troubleshooting Tips
Burnt edges? Just wrap them with a bit of foil while baking. Filling bubbling over? Baking sheet underneath can save the day!
Success Strategies
Common Mistakes to Avoid
Don’t skip the chilling step. It's crucial for flaky crusts! Also, don’t drown your apples in sugar balance is key.
Quality Assurance Tips
Trust your instincts! Use your favorite recipe as a base, but feel free to play. More cinnamon? Go for it!
Perfect Results Guide
Patience is everything. Allow that pie to cool and let flavors meld! The better the waiting, the sweeter the reward.
Make-ahead Options
You can make the crust and apples a day in advance. Just keep them in the fridge until you're ready to roll.
So there you have it, your ultimate guide to achieving the best apple pie ever! and remember, baking is all about having fun.
Each pie tells a story, so get in that kitchen and let your creativity flow.
Next up, we’ll dive into some additional information that will enhance your baking adventures even further! Stay tuned!
Pro Tips & Secrets
When it comes to your apple pie recipe , a little help never hurts! here’s where you can add an extra sprinkle of love and wisdom from my own kitchen adventures.
Don’t skip chilling your butter and ice water trust me ! that’s the key to a flaky, dreamy crust. when i first started, i thought the extra effort was unnecessary, but i was so wrong!
Another insider tip? mix up your apple game! granny smith is a classic, but adding a couple of braeburn apples will make your pie sing.
The sweet tart combo is to die for! oh, and if you have the time, let your filling sit for about 15- 20 minutes.
It helps to meld those flavors and gives a nice saucey vibe rather than if you just dump it in there.
Your taste buds will thank you!
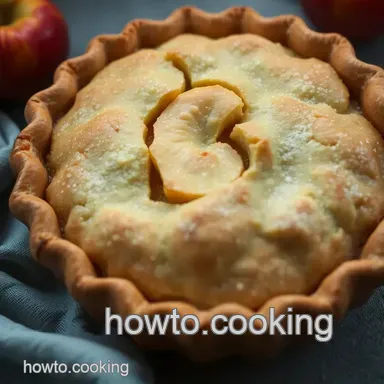
Perfect Presentation
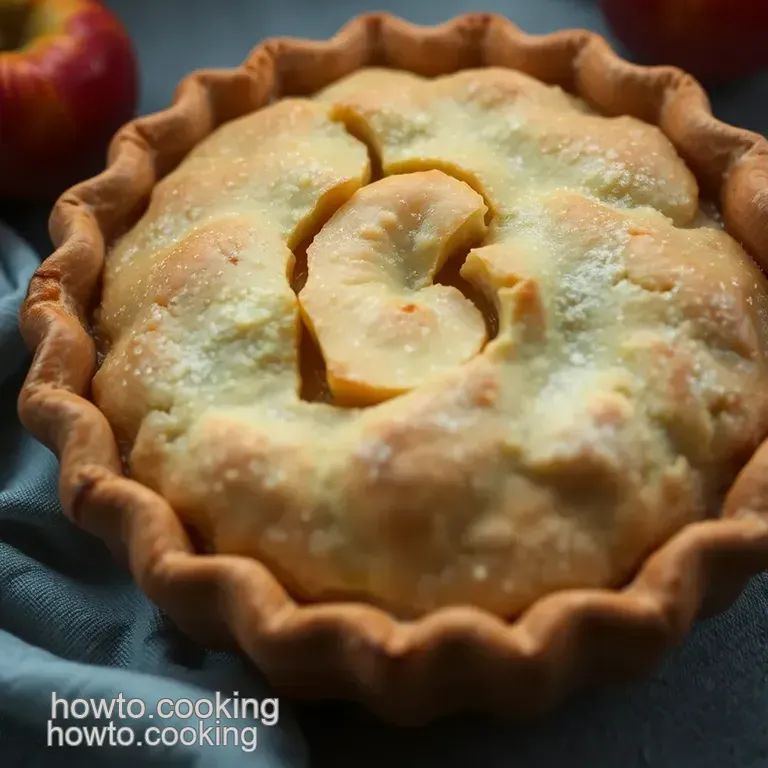
Plating can elevate your homemade apple pie from good to downright fabulous. first, once you’ve baked that golden brown beauty, let it cool.
Seriously, nobody wants a mushy pie! as for presentation, i like to sprinkle a touch of powdered sugar on top after it cools.
It gives that fancy bakery vibe without breaking a sweat!
For garnishes, you can’t go wrong with a sprig of mint or a dollop of whipped cream on the side.
And when it comes to serving, a scoop of vanilla ice cream never disappoints! the contrast of warm pie with cold ice cream is a classic combo, just like peanut butter and jelly.
Storage & make-ahead
Want to make life easier? you can prepare elements ahead of time. the dough can chill in the fridge for up to three days , so don’t hesitate to whip that up in advance.
As for the baked pie, keep it at room temperature for up to two days . if you want to save it longer, cover it and pop it in the fridge for a week or freeze it for a couple of months.
Just remember to double wrap it if freezing nobody wants freezer burn ruining their deliciousness!
When you're ready to dive back into that pie, reheat it for about 15- 20 minutes in a 350° f oven.
You just want to warm it through and make that crust crispy again.
Creative Variations
How about switching this classic up a bit? You could go wild with flavors. Consider adding caramel to your filling for those sweet tooth moments oh, baby! A little drizzle of caramel sauce on top? Yes, please!
If you're feeling adventurous, why not toss in some spices like ground ginger or allspice for a nice kick? And for those of you counting carbs or being gluten conscious, just swap the all-purpose flour for a gluten-free blend voila!
The beauty of this best homemade apple pie is its versatility. You can turn this into whatever pie vibe you’re feeling.
Complete Nutrition Guide
Let’s get real for a sec. this pie is delicious but it’s also a treat! just as a heads up, one slice lands around 320 calories , but it’s about more than just numbers.
Each slice gives you a bit of fiber thanks to the apples and some warmth through those spices. if you use less sugar or swap for brown sugar, you can even tweak those math vibes a bit.
Keep in mind, if you're serving a crowd, offering smaller portions could really balance things out, especially if you have other desserts around.
The last thing you want is a sugar crash halfway through the party!
Bringing It All Together
Making your apple pie recipe doesn’t have to be a daunting task. Sure, mastering that flaky crust takes a bit of practice, but it's so rewarding once you get the hang of it! Just remember to take your time, add a slice of love with those variations, and don’t stress too much about how it looks you’ll still be offering up one of the best apple pies around!
So gather your loved ones, warm up that oven, and dive headfirst into making your very own Grandma's Timeless Apple Pie . You’ve got this!
Frequently Asked Questions
What type of apples should I use in this apple pie recipe?
For the best flavor and texture, combine tart apples, like Granny Smith, with sweeter varieties, such as Braeburn or Honeycrisp. This mix creates a balanced, complex filling that bursts with flavor. Remember, different apples can yield different results, so feel free to experiment!
How can I achieve a flaky crust for my apple pie?
To get that perfect flaky crust, ensure your butter is very cold and cut it into the flour until it resembles coarse crumbs. Also, avoid overworking the dough; mix just until combined. Letting the dough chill for at least 30 minutes before rolling it out is essential for that lovely texture!
Can I make this apple pie recipe ahead of time?
Absolutely! You can prepare the pie ahead of time and store it unbaked in the refrigerator for up to 24 hours. Alternatively, bake it and then refrigerate. Just reheat it in the oven before serving for that fresh out-of-the-oven taste. It’s perfect for prepping before a Sunday roast or a festive gathering!
What are some delicious serving suggestions for my apple pie?
Warm apple pie is delightful on its own, but pairing it with a scoop of clotted cream or vanilla ice cream takes it to the next level! For a cozy touch, serve it with a cup of English breakfast tea or a comforting spiced chai latte. Don’t forget the classic pairing of custard for a lovely texture contrast!
How should I store leftover apple pie?
To keep your apple pie fresh, cover it loosely with foil or plastic wrap and store it in the fridge. It should be good for about 3-4 days. For longer storage, you can freeze slices in an airtight container, and just reheat in the oven when you fancy a slice of that homemade goodness!
Can I make a gluten-free version of this apple pie recipe?
Yes, you can easily adapt this recipe by using a gluten-free flour blend instead of all-purpose flour for the crust. Make sure to include a binding agent, like xanthan gum, if your blend doesn’t already contain one. This way, you’ll get all the delicious apple flavor without the gluten!
Grandma S Timeless Apple Pie