Heavenly Homemade Garlic Bread
- A Slice of Heaven: Homemade Garlic Bread
- Your Essential Ingredients Guide to Heavenly Homemade Garlic Bread
- Get Ready to Cook: How to Make Garlic Bread Like a Pro
- Pro Tips & Secrets for Garlic Bread Mastery
- Perfect Presentation: Make Your Garlic Bread Stunning
- Storage & Make-Ahead Tips: Keep It Fresh!
- Creative Variations: Let Your Imagination Run Wild!
- Complete Nutrition Guide: Know What You’re Eating
- Conclusion: Get Cooking!
- Frequently Asked Questions
- 📝 Recipe Card
A Slice of Heaven: Homemade Garlic Bread
Do you remember the first time you caught a whiff of garlic bread baking in the oven? oh my gosh, it’s a total game changer! just picture yourself coming home after a long day, and the delicious aroma fills your house like a warm hug.
It feels like love at first sniff. that’s why today i’m sharing with you my go-to recipe on how to make garlic bread .
Trust me, you’ll want to make this a staple in your kitchen!
The Roots of This Irresistible Dish
Garlic bread has roots that trace back to italy, where it first served as a way to enhance the flavors of bread.
Over the years, it transformed from simple toasted bread with garlic and oil into the delightful treat we know today, typically loaded with creamy butter and fresh herbs.
Now, it’s a staple at italian restaurants and family dinners alike. you can whip up this best garlic bread recipe in no time, making it the perfect addition to a quick weeknight meal, or even to impress your friends at fancy dinner parties.
And guess what? it’s easy peasy! it takes just about 20- 25 minutes to prepare and cook this magical creation.
Why Garlic Bread Is a Must Have
Let’s be real there’s something undeniably comforting about digging into warm, buttery garlic bread. and it’s not just about the flavor! this dish is packed with health benefits, provided you don’t drown it in butter (though, can you blame me?).
Garlic is known for its potential heart healthy properties and adds a delightful flavor boost. plus, making homemade garlic bread is way better than those frozen varieties.
Not just in taste but also in customization! you can jazz it up with herbs, cheese, or even a hint of spice for those who love a kick.
When you nail down how to make garlic bread, you’ve got the perfect side for almost any occasion whether it’s a family dinner, a game day snack, or an impromptu movie night.
And let’s face it, who doesn’t love a good garlic toast with their pasta?
Quick side dishes like garlic bread can elevate even the simplest meals. i mean, pairing it with a fresh caesar salad or a bowl of zesty tomato soup could totally transform a regular meal into something special.
Plus, it’s an instant crowd pleaser. you’ll be the rockstar of the dinner table, hands down!
The beauty of this recipe is also in its adaptability. so maybe you're on the keto diet and looking for something different? enter keto mug bread ! you can still enjoy that garlic bread flavor without the carbs.
Or, if you want to impress your friends, go crazy with a cheesy garlic bread version topped with gooey mozzarella.
The Best Part? So Simple!
Now, here’s the real kicker it’s ridiculously simple, even if you’re a beginner in the kitchen. with just a handful of ingredients and minimal equipment, you can channel your inner chef.
The end result? an aromatic, flavorful loaf that feels homemade from a gourmet italian kitchen.
The sweet smell wafting through your home will have everyone asking, “What’s cooking?” Just make sure you keep some handy for dipping into that sauce trust me on this one!
Ready to gather those ingredients and get cooking? Let's jump into the ingredients section , where I'll lay everything out for you. It’s time to make this feast come alive!
Your Essential Ingredients Guide to Heavenly Homemade Garlic Bread
When you think of comfort food, garlic bread often comes to mind, right? the kind that’s perfectly crispy on the outside, warm and buttery on the inside oh my gosh, it’s just divine!
whether you're diving into a big bowl of pasta or just enjoying a cozy evening at home, knowing how to whip up the best garlic bread recipe is essential.
So let’s kick off this guide like a fun chat over coffee!
Premium Core Components
First things first, let’s talk about the basics . A couple of key ingredients and some special touches can make all the difference.
Measurements : for the garlic butter, you'll need 1/2 cup (113g) unsalted butter, softened , and about 4-6 cloves of minced garlic don't be shy with the garlic! it’s the star of this dish.
If you're international, that's roughly 113 grams and around 4-6 cloves , just to keep it close to home for everyone.
Quality Indicators : You wanna know if your garlic is fresh? Look for firm bulbs without any soft spots. As for butter, the fresher, the better. Go for the brands you trust.
Storage : Butter lasts pretty long in the fridge. Garlic keeps well too, in a cool, dry place. Try not to let it sprout super gross and not so tasty.
Freshness Tips : Always check the expiration dates and don't hesitate to smell things. Fresh parsley should be vibrant green with a fragrant, earthy aroma.
Signature Seasoning Blend
Let’s jazz things up with some flavors ! Garlic bread is simple, but it packs a punch when done right.
Essential Spice Combinations : Think of throwing in some black pepper, a little salt, and of course, fresh herbs. I love using parsley for a classic taste.
Flavor Enhancers : Ever tried mixing in parmesan cheese? It takes your garlic bread to new heights! Just 1/4 cup (25g) will do, sprinkled on the top just before baking.
Regional Variations : Feeling adventurous? Try adding some Italian herbs like basil or oregano. Southern US-style garlic toast might even call for some cayenne spice it up!
Smart Substitutions
Listen, cooking is all about what you have on hand. Here’s how to save the day with some quick swaps.
Common Alternatives : No butter? Use olive oil instead! It creates a fabulous vegan version without sacrificing flavor.
Dietary Modifications : For a healthier take, spread avocado instead of butter. Trust me, it’s delicious!
Emergency Replacements : If you don’t have garlic, garlic powder can step in, but go light!
Seasonal Options : Fresh herbs can change with the seasons. Consider using fresh thyme in spring or warm, spicy oregano in the fall.
Kitchen Equipment Essentials
Now, let’s gear up with some essential tools . You don’t need a fancy kitchen for this.
Must Have Tools : A good knife, mixing bowl, and a baking sheet are all you really need. If you’re feeling posh, grab a pastry brush for the butter.
Alternative Options : Don’t have a mixing bowl? A large plate will do. Just make sure it’s sturdy enough for mixing!
Preparation Tips : Remember to preheat the oven to 375° F ( 190° C) . This step is crucial for that perfect golden finish!
Storage Solutions : If you have leftovers (which is rare!), wrap them tightly in foil or plastic wrap and store at room temperature. They’ll still be good for a day or two.
Transitioning into the Recipe
So now that you have your essentials squared away, let’s dive into how to make the heavenly homemade garlic bread that you’ve been dreaming of! this recipe will guide you every step of the way so you can enjoy those tasty slices alongside your favorite meals or even as a quick snack.
Trust me, once you make this best garlic bread , there’s no turning back. get ready to tantalize your taste buds!
Get Ready to Cook: How to Make Garlic Bread Like a Pro
Alright, folks! let’s dive into one of the greatest comfort foods known to man: homemade garlic bread . picture this: crispy, buttery, garlicky slices of goodness that are perfect alongside your favorite pasta or even just for snacking.
No wonder it’s a hit! so, let's break down the essentials of cooking it like a pro, shall we?
Essential Preparation Steps
Before we even think about baking, we’ve got some prep work to do. if you’ve ever watched a cooking show, you may have heard of mise en place , which is just fancy french for “everything in its place.
” trust me; it makes cooking way easier when you have all your ingredients prepped and ready to go.
Gather Your Ingredients : You’ll want your butter softened, garlic minced, and herbs chopped before you start. It’s all about speed, baby!
Time Management : Keep your eye on the clock. You’re looking at about 20- 25 minutes from start to finish, so don’t get distracted by TikTok too much!
Organization : Lay everything out like you’re prepping for a dinner party. A clean workspace goes a long way. You want to feel like the kitchen is your stage!
Safety First : Stay sharp with those knives when mincing garlic. Trust me; you don’t want to spend more time in the kitchen than necessary.
step-by-step Process to Perfection
Now, let me lay out how to make garlic bread in a way that would impress even your Italian grandmother!
Preheat Your Oven : First, set that oven to 375° F ( 190° C) . This is where the magic happens!
Mix the good stuff : in a mixing bowl, blend 1/2 cup unsalted butter , 4-6 cloves of minced garlic , 1 tablespoon fresh parsley , and season with salt and pepper .
Look for a creamy, spreadable consistency.
Slice the bread : grab a loaf of crusty italian or french bread (we're talking about 12-15 inches here). slice it in half horizontally but don’t cut all the way through.
We want a hinge like a book!
Slather it On : Spread that garlic butter all over both halves. Feel free to sprinkle some Parmesan cheese on top if you’re feeling fancy.
Wrap It Up : For softer garlic bread, wrap it in aluminum foil . If you prefer a crunch, skip this step.
Into the oven it goes : place it on a baking sheet and pop it into the oven for about 10- 15 minutes .
Keep your nose ready; when you start smelling garlic wafting through the house, you’re close!
Check for Doneness : Look for a nice golden color, and when it’s hot, it’s ready to come out.
Master Professional Techniques
You might want to step your game up a notch. Here’s where expert techniques come in handy.
Stay Focused : Remember to keep an eye on the time! A burnt garlic bread is quite the disaster.
Taste Test : Don't shy away from tasting your garlic butter mixture add a bit more garlic if you love it.
Quality Checkpoints : Use fresh ingredients as they make a world of difference. Dried out garlic or old bread? No thanks!
Troubleshooting Know How : If the bread isn’t as garlicky as you hoped, remember that you can always add minced garlic on top after baking.
Success Strategies for Your Garlic Bliss
Alright, let’s wrap this up with some tips so you can avoid common pitfalls.
Avoid Overcooking : It’s a quick bake; don’t step away too long!
Quality Assurance Tips : Always taste as you go. You’ll know if it needs more salt or garlic.
Perfect Results Guide : Using fresh bread is key to achieving that delectable crunch.
make-ahead Magic : You can whip up the garlic butter in advance and keep it in the fridge till you need it.
So next time you’re thinking about how to make garlic bread, remember these steps. it’s an easy yet delightful side that can elevate even the simplest meal into a feast.
Stay tuned for more deliciousness ahead in our additional information section! happy cooking!
Pro Tips & Secrets for Garlic Bread Mastery
Alright, my friends, let’s dive into the secrets that’ll transform your humble loaf into unforgettable heavenly homemade garlic bread . first off, i always say fresh is best ! use fresh garlic, folks.
Seriously, the garlic powder just ain’t gonna cut it when you're trying to make the best garlic bread . and don’t skimp on the butter it’s the magic sauce!
Now, if you're tight on time (i mean, who isn’t?), cut that prep time by using a food processor. seriously, just whack your garlic in there, toss in your herbs, and you’ll have a leafy, garlicky paste in seconds.
And for flavor? add a splash of lemon juice to perk up those buttery vibes oh wow! your taste buds will thank you.
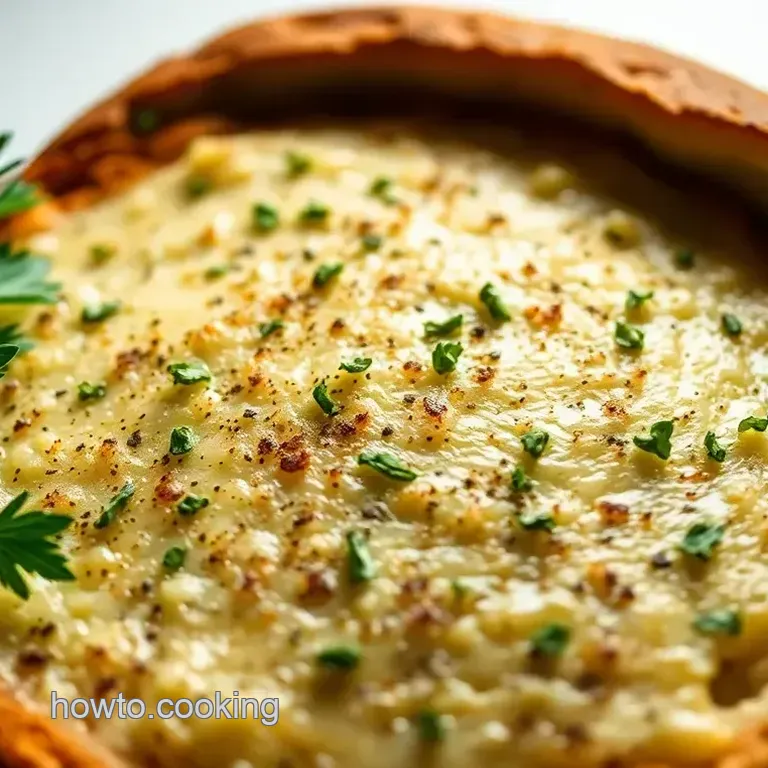
When it comes to presentation you want your garlic bread to look as good as it tastes! use a sharp knife to slice those bread halves perfectly.
Then, drizzle a bit of that garlic butter all over like you’re painting a masterpiece. for garnish, toss on some fresh parsley or even a sprinkle of grated parmesan.
Trust me, it’s all about the eye candy!
Perfect Presentation: Make Your Garlic Bread Stunning
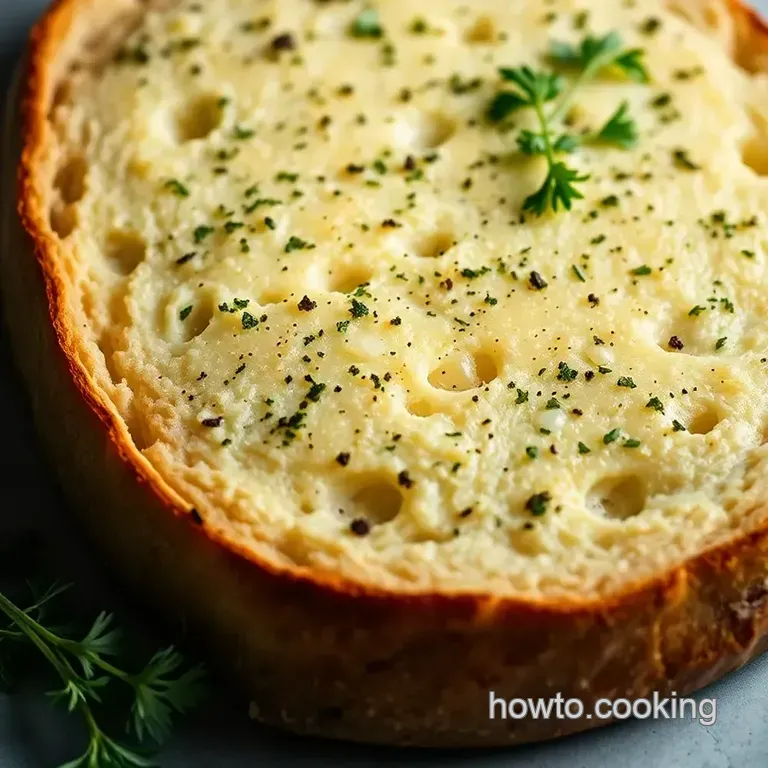
Imagine it: a beautiful plate of golden brown garlic toast , hot from the oven, that makes your dinner guests swoon. That’s the goal, my friends. Here’s how you can achieve it.
First, plating techniques can be as simple as stacking your slices beautifully on a rustic cutting board. you could fan them out to show off those buttery layers.
For a bit of pizzazz, consider a colorful backdrop maybe some fresh basil leaves or a bright red tomato slice.
Now, regarding garnish ideas , sprinkle some coarse sea salt over the top. not only does it look fancy, but it’ll highlight that melted buttery goodness.
You could even drizzle a tiny bit of balsamic glaze across the plate for that “wow” factor. color combinations matter, too! that green parsley really brings life to that golden bread it’s all about contrast .
Storage & make-ahead Tips: Keep It Fresh!
Let’s chat about storage , because nobody wants their garlic bread going stale before the party. if you’ve got leftovers (which can be a miracle!), wrap that bad boy up in foil and keep it in the fridge.
It’ll last about 3-4 days.
For preservation , go ahead and freeze it! just wrap your unbaked garlic bread in plastic wrap and stick it in the freezer.
You can bake directly from frozen; just add a few extra minutes to the baking time.
When you're ready to enjoy your frozen treat, reheat in a preheated oven at 375° f ( 190° c) for about 15 minutes.
You want it hot, but not dried out. keep an eye on it like a hawk!
Creative Variations: Let Your Imagination Run Wild!
The beauty of how to make garlic bread is just how adaptable it is. want to go keto ? try making keto mug bread and then slather it with that irresistible garlic butter.
Or, if you’re feeling adventurous, throw in some fiery red pepper flakes for a spicy twist.
Seasonal variations are fun, too! during the summer, toss in some fresh garden herbs. basil or rosemary would be divine! and if you’re looking for something a little more regional, think about adding a sprinkle of cajun seasoning if you’re feeling that southern vibe.
Complete Nutrition Guide: Know What You’re Eating
Let’s not pretend that garlic bread is a health food. but, hey, it’s all about balance, right? a typical serving has about 210 calories with some decent fat content.
If you’re counting portions, this recipe yields 4-6 servings, but be real it’s hard to stop at just one slice!
For those looking to keep it on the healthier side, consider whole grain bread or even gluten-free options. It’s all about finding that sweet spot between indulgence and nourishment.
Conclusion: Get Cooking!
So there you have it, friends! whether you’re gearing up for a cozy dinner at home or looking to impress at a potluck, knowing how to make garlic bread is a total game changer.
With just a few quick tips and some flavorful variations, your garlic bread could be the star of the show!
Go ahead and experiment add those personal touches and make this recipe truly yours. Happy cooking! You’ve got this!
Frequently Asked Questions
What is the best bread to use for garlic bread?
The classic options for garlic bread are crusty Italian or French bread. Their chewy texture and airy interior soak up the garlic butter beautifully. However, feel free to get creative; ciabatta and sourdough can also bring delightful flavors to the table!
How to make garlic bread without butter?
If you're looking for a dairy-free option, simply swap the butter for olive oil or a vegan butter substitute. You can achieve rich flavor by mixing in minced garlic, herbs, and a dash of salt into the oil before spreading it on the bread. It's just as tasty, and your vegan friends will thank you!
How to make garlic bread crispy?
For a crunchier garlic bread, skip wrapping the bread in aluminum foil while baking. This will allow the edges to crisp up nicely. Cook it a bit longer, and keep an eye on it to avoid burning. You'll have a deliciously crispy exterior while still enjoying a soft, buttery inside!
How to make garlic bread using a toaster oven?
Making garlic bread in a toaster oven is quite simple! Preheat it, spread your garlic butter mixture on the bread, and place it in the oven for about 5-10 minutes, or until golden and crispy. It's perfect for small batches and makes clean-up a breeze!
Can I store and reheat garlic bread?
Absolutely! Store any leftover garlic bread in an airtight container for up to 2 days at room temperature, or freeze it for up to 3 months. To reheat, simply pop it in the oven at 350°F (175°C) for about 10 minutes. This helps maintain its original texture!
What can I serve with garlic bread?
Garlic bread makes a fantastic sidekick for many dishes! Pair it with classic Italian meals like spaghetti, fettuccine alfredo, or lasagna for the full Italian experience. It's also great alongside soups or salads, as it adds that comforting touch we all crave.
Heavenly Homemade Garlic Bread
Ingredients:
Instructions:
Nutrition Facts:
| Calories | 210 |
|---|---|
| Fat | 14g |
| Fiber | 1g |
