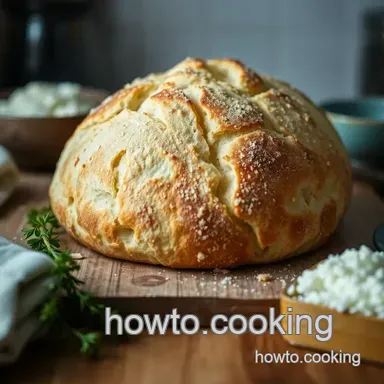
Classic Ciabatta Bread: Light, Crisp, and Oh-So Delicious!
- The Heart and Soul of Ciabatta Bread
- Essential Ingredients Guide to Make the Perfect Ciabatta
- Mastering the Art of Ciabatta: A Professional Cooking Method
- Pro Tips & Secrets for the Perfect Ciabatta
- Perfect Presentation: Plating Ideas for Your Ciabatta
- Storage & Make-Ahead Advice
- Creative Variations
- Complete Nutrition Guide
- Frequently Asked Questions
- 📝 Recipe Card
The Heart and Soul of Ciabatta Bread
Oh my gosh, let me tell you about my first encounter with ciabatta ! picture this: a cozy café in a tiny italian town, the smell of fresh bread wafting through the air.
I ordered a sandwich, and as i took a bite, the crust crackled just right, and the airy interior was like a soft cloud.
I had never tasted anything that changed my perspective on bread this was it! that day, my heart was stolen by ciabatta, and i’ve wanted to make it ever since.
Has something ever just hooked you like that?
Ciabatta , which translates to “slipper” in italian, became popular in the 1980s. this rustic loaf is adored for its chewy, crispy crust and open, airy crumb.
Honestly, in today's world of artisanal bread, ciabatta stands out as an easy-to-make staple and a perfect companion to all sorts of meals.
From sandwiches to soups, this bread knows no bounds!
Getting into the nitty gritty, a no knead ciabatta bread recipe is surprisingly straightforward. yes, it involves a bit of waiting, so it’s not a “whip-it-up-in-30-minutes” deal.
But trust me, once you get the hang of it, making your own homemade ciabatta will become your weekend project! you’ll need about 15 minutes of hands-on time , but factor in about 12- 18 hours for the cold proof to unleash all that incredible flavor.
Don’t let the wait scare you; great things take time!
What about costs? making ciabatta at home is actually pretty affordable. you’re looking at spending around $2-$3 for two loaves, which is way better than buying those artisan loaves at the store that can run you $5-$10.
Plus, you get double the loaves around 12 slices per loaf ! it’s like getting that italian café experience without the plane ticket.
Now let’s get into why you should try this ciabatta recipe ! first off, it’s nutritionally friendly . with ingredients like all-purpose flour, olive oil, and a minimal amount of salt, you can enjoy a slice without too much guilt.
The big, airy structure not only makes for the perfect sandwich but also means you’re not consuming tons of heavy bread.
Who wouldn’t love that?
Then there’s the versatility. serving dinner guests? they’ll be wowed if you pull out a rustic bread like homemade ciabatta .
You can serve it simply with olive oil and balsamic vinegar for a weekend lunch , or stack it high for those epic sandwiches think italian meats, fresh mozzarella, and basil.
And let’s talk advantages! unlike some heavy bread recipes, ciabatta has that beautiful crust that adds a satisfying crunch without feeling like you’re biting into a brick.
Plus, the long fermentation process gives it a wonderful depth that, quite frankly, pre-made versions can’t touch.
Ready to dive in? before we grab the flour, let’s run through our ingredient list. the simple pantry staples you really need are ready to take your taste buds on a trip to italy.
Up next, i’ve got everything you need lined up to get baking!
Essential Ingredients Guide to Make the Perfect Ciabatta
When it comes to bread making, there’s just something magical about ciabatta . this italian delight isn’t just "bread" it’s like a warm hug on a plate.
Let’s dive into the essential ingredients , tips, and tricks, so you can whip up an incredible no knead ciabatta bread recipe that’ll make you the star of the next weekend lunch!
Premium Core Components
Starting with the basics , you’ll need a few key players for your ciabatta:
- 4 cups (480g) all-purpose flour : Look for flour with a high protein content for that awesome chewy texture.
- 1 ½ cups (360ml) lukewarm water : Aim for about 110° F ; too hot and you’ll kill the yeast. Too cold, and it’ll take forever to rise.
- 1 ¼ teaspoons (7g) instant yeast : Always check the expiration date! Fresh yeast is crucial.
- 2 teaspoons (10g) salt : Essential for flavor.
- 2 tablespoons (30ml) extra virgin olive oil : This adds richness and gives ciabatta that distinctive nutty flavor.
Signature Seasoning Blend
Let’s spice things up! while ciabatta doesn’t need too many bells and whistles, adding a blend of spices can elevate it to a whole new level.
You can mix in dried oregano or basil for that italian touch. and don’t forget a good sprinkle of sea salt on top before baking for that extra crunch!
Smart Substitutions
Think you're missing an ingredient? No worries! This is the beauty of cooking at home. If you're in a pinch:
- All-purpose flour ? Use bread flour for an even more delightful chew.
- Olive oil ? Canola oil will do in a rush, but olive oil gives a flavor that’s hard to beat.
- Instant yeast ? Swap it for active dry yeast; just proof it in warm water first.
Kitchen Equipment Essentials
Now let’s talk tools! You don’t need a fancy kitchen setup, but a few key pieces make life so much easier:
- Large mixing bowl : For mixing and letting your dough rise.
- Wooden spoon or dough whisk : Perfect for bringing your ingredients together without too much hassle.
- Plastic wrap : Keep that dough covered and happy while it rises.
- Baking sheet or stone : The right surface makes all the difference when baking.
The Importance of Freshness
Okay, let's get real. nothing ruins a bread recipe faster than old ingredients. check your flour and yeast those are heroes in this tale! properly stored (like in a cool, dry place), your flour can last for months.
Yeast should be used up within a few months for best results.
Embrace the Dough
One of the best parts about making ciabatta is the process . you'll measure, mix, and knead a little. and if you commit to that long cold proofing time, you’ll develop more flavor than you can imagine! i mean, waiting for the dough to rise always feels like a test of patience, but the outcome? totally worth it.
Cultivate the Perfect Ciabatta
The beauty of making homemade ciabatta is in its simplicity. sure, there’s a bit of technical stuff to learn, but once you nail those steps, you’ll always have the perfect sandwich ready to go.
So, are you ready to roll up your sleeves? we've laid out everything you need to know, and now we can jump into the instructions for crafting those gorgeous loaves.
Let’s mix it up!
Mastering the Art of Ciabatta: A Professional Cooking Method
Alright, friends! let’s dive into the world of professional cooking methods, and we’re going to make it extra fun with a focus on the classic ciabatta .
Honestly, who doesn’t love the aroma of fresh, artisan bread wafting through the kitchen? making ciabatta is like bringing a little slice of italy into your home, and i promise you, it’s totally worth the effort.
So, ready to become the bread maestro in your kitchen? here we go!
Essential Preparation Steps
Mise en place is a fancy way of saying, “get everything ready beforehand.” seriously, you don’t want to be scrambling for flour or yeast when your dough is begging for attention! have your ingredients measured out, your baking sheet prepped, and a clean workspace ready.
Now, let’s talk time management . making ciabatta is a sacred ritual of patience. you need to know when to prep, when to wait, and when to bake.
Mark your calendar or better yet, set a countdown on your phone!
Organization is key here. Place all your tools where you can see them and keep your workspace clutter free. It’ll help you focus on making that perfect ciabatta bread recipe .
And please, let’s not forget about safety . when using sharp knives or hot ovens, keep your mind in the game.
You wanna impress with your skills, not end up with a bandage!
Step-by-step Process
Let’s break this down, shall we? Here’s your roadmap to ciabatta perfection:
Mix ingredients : combine 4 cups of flour , 1 ½ cups of lukewarm water (aim for about 110° f ), 1 ¼ teaspoons of instant yeast , and 2 teaspoons of salt in a big bowl.
Gradually mix in 2 tablespoons of olive oil . you’re aiming for a shaggy dough.
Knead : Don't panic! Just transfer that dough onto a floured surface and go for it. Knead it gently for about 3- 5 minutes until it forms a rough ball.
First rise : cover it up with plastic wrap, place it in a warm spot, and let it rise for about 1 hour , until it doubles in size.
Go do a little happy dance while you wait.
Cold Proof : Now here’s the fun part. Pop it in the fridge for 12- 18 hours . Yep, this is where the real flavor magic happens, so hang tight!
Shape the dough : after the cold proof, turn it out onto a floured surface and cut it into two portions.
Gently stretch each portion into a loaf shape. don't squash that air out!
Second Rise : Let those beauties rise on a floured towel for 45 minutes while your oven preheats to a blistering 450° F .
Bake : time to transfer your loaves onto a baking sheet lined with parchment. bake for 25 minutes until they’re golden brown and crisp.
Ahh, that sound is music to the ears!
Cool : Resist the urge to slice right away allow the loaves to cool on a wire rack. This step lets the texture settle!
Expert Techniques
Now we’re getting into the nitty gritty! Here are some professional tips for getting that perfect ciabatta:
Always check your dough’s hydration —a wetter dough gives that classic ciabatta texture. Don’t overdo it with the flour!
Use fresh yeast . Trust me, expired yeast is a no-go if you want those fluffy interiors.
For a crispy crust , add a little steam to your oven while baking. Just toss in a tray of water and watch those crusts thrive!
Success Strategies
Wanna avoid common mistakes? Here’s the scoop:
Don’t rush the cold proof . Your future self will thank you for the depth of flavor.
Check your loaves for doneness by tapping them on the bottom. If they sound hollow, it's time to take them out.
If you want to make it ahead, prepare the dough and keep it in the fridge for up to 3 days before shaping.
At the end of the day, making homemade ciabatta is about passion and patience, not just technique. so, grab your apron and get started.
There’s nothing quite like walking into your kitchen to the smell of fresh baked bread. and hey, it’s perfect for a weekend lunch whether you’re slapping on some jam or crafting the perfect sandwich.
Additional Information
Feeling inspired? i hope so! stay tuned, because we’re just getting started on this bread making journey. there's always more to learn when it comes to artisan bread recipes .
Let's keep rolling and dive deeper into the art of baking!
Pro Tips & Secrets for the Perfect Ciabatta
When it comes to baking this Classic Ciabatta Bread , I like to think of it as a labor of love, ya know? Here’s a little highlight reel of my personal tips to up your ciabatta game!
Chef's Insights
First off, water temperature matters. aim for that sweet spot around 110° f (that’s lukewarm, not boiling!); this will keep your yeast happy and bubbling.
You called the yeast your favorite cooking buddy, right? keep it fresh! i mean, old yeast can be a total party pooper.
Time Saving Techniques
Rushing usually leads to regrettable results (trust me, i learned that the hard way!). so, plan your first rise ahead.
You can mix your dough before hitting the sack and let it rise overnight in the fridge. think of it as the perfect excuse for a lazy morning while your dough works its magic.
Flavor Enhancements
Want your ciabatta to pack more flavor? try incorporating a tablespoon of high-quality olive oil right into the dough. it'll bake up to give you that nutty, aromatic flavor that makes you savor every bite.
Presentation Tips
Let’s get real first impressions count, especially when it comes to food! once your ciabatta comes out of the oven, let it cool on a wire rack.
This step is key! cutting it too soon leads to a gummy mess instead of that gorgeous, airy interior we want.
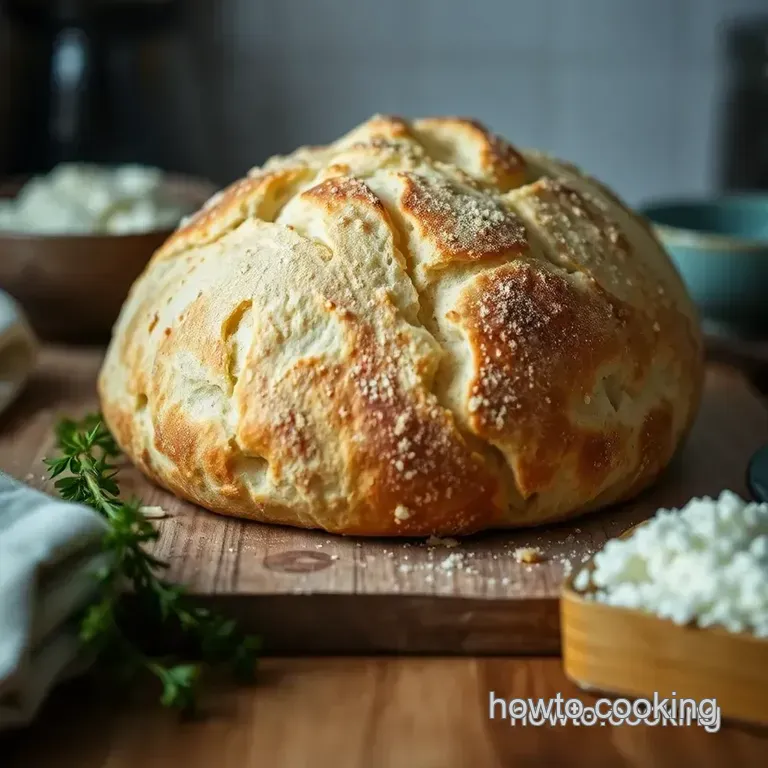
For a pop of color, sprinkle some fresh herbs on top before serving. it’s all about that visual flair, baby!
Perfect Presentation: Plating Ideas for Your Ciabatta
When you’re ready to show off your homemade ciabatta , here’s how to make it shine!
Plating Techniques
Slice into that golden crust with care. Arrange the pieces on a stylish platter; think rustic wooden boards or even a simple white plate. Presentation matters.
Garnish Ideas
Don’t forget to sprinkle some flaky sea salt or fresh herbs on top for a pop of color and flavor.
Maybe even add a small bowl of olive oil and balsamic vinegar for dipping. it's like a mini italian feast waiting to happen!
Color Combinations
Mix different foods for a fun visual treat! A sliced ciabatta with vibrant tomatoes, bright green basil, and creamy mozzarella will seriously make people drool.
Visual Appeal Tips
Layer those sandwiches high! The perfect sandwich is a mountain of deliciousness that looks appetizing. Seriously, the higher, the better!
Storage & make-ahead Advice
Now, what do you do with any leftovers (because who doesn’t want to binge on ciabatta)?
Storage Guidelines
Wrap any leftover ciabatta in a kitchen towel or plastic wrap. This keeps it fresh without turning it stale and sad.
Preservation Methods
You can also slice and freeze it! Just pop the slices in a freezer bag. Next time you’re craving the perfect sandwich , you simply pull some out and heat it up.
Reheating Instructions
To bring it back to life, preheat your oven to 350° F . Bake for about 10 minutes.
Freshness Duration
Homemade ciabatta is best enjoyed fresh, but it can sit in the fridge for about 3 days (if it lasts that long!).
Freezing stretches that to about 3 months , so don’t be shy about making a double batch!
Creative Variations
If you're feeling adventurous, let’s talk about some fun twists!
Flavor Adaptations
Want garlic ciabatta? Simply smash some garlic cloves into that olive oil. Use it for dipping, and your taste buds will thank you.
Dietary Modifications
Need a gluten-free ciabatta ? Swap out regular flour for your favorite gluten-free blend. Still delicious, just a little different!
Seasonal Twists
Pumpkin spice season? Add some cinnamon and nutmeg to your dough for a holiday feel. Sweet and savory? Why not!
Regional Variations
Think about mixing in things like roasted peppers, olives, or sun-dried tomatoes for a Mediterranean flair. Your ciabatta can travel the world without leaving your kitchen!
Complete Nutrition Guide
Now, let’s talk turkey...or ciabatta.
Detailed Breakdown
One slice (that’s about 90 calories ) holds 5g of protein and 2g of fat. Not too shabby for the perfect sandwich foundation!
Health Benefits
Homemade ciabatta is made with simple ingredients and no additives. Plus, the olive oil means you get some healthy fats.
Dietary Considerations
If you watch your sodium intake, be cautious with salt. You might want to play around with the recipe to suit your needs.
Portion Guidance
Two loaves yield about 24 slices . This is perfect for your weekend lunch or hosting a game day!
Wrapping it all up, making ciabatta is such a rewarding experience. yes, it takes some time, but trust me, it's worth every minute.
You’ll be baking like a pro in no time, and your family and friends will thank you. so, put on that apron and let the dough work its magic! let’s get baking!
Frequently Asked Questions
What’s the best way to get that signature ciabatta crust?
For that crispy, golden crust, ensure your oven is preheated to a blistering 450°F (230°C). Adding a tray of hot water during baking creates steam, which is essential for a lovely crust. Just like a British roast, it's all about getting that perfect balance of heat and moisture!
How should I store leftover ciabatta?
To keep your ciabatta fresh, wrap it in a clean kitchen towel and store it at room temperature for up to 2 days. For longer storage, slice it up and freeze it in an airtight bag just like you'd do with a good old Bake Off sponge! When ready to enjoy, pop it directly into the oven to re-crisp.
Can I make ciabatta ahead of time?
Absolutely! You can enhance the flavor by allowing the dough to cold proof in the fridge for up to 18 hours. This long fermentation is where the magic happens think of it as a slow cooked stew that gets better with time.
Why is my ciabatta dough so sticky?
Ciabatta is known for its high hydration dough, which tends to be stickier than your typical bread. Resist the urge to add too much flour; it’s this moisture that gives ciabatta its open crumb (that airy texture!). A sprinkle of flour on your hands and work surface should help manage the stickiness.
What can I serve with ciabatta?
Ciabatta is incredibly versatile think of it as your trusty friend at a pub! Serve it alongside a warm bowl of tomato basil soup, use it for a classic Italian sandwich loaded with prosciutto and mozzarella, or simply dip it in olive oil and balsamic vinegar for a delicious starter.
Is ciabatta healthy?
While ciabatta does contain carbohydrates, it can fit into a balanced diet when enjoyed in moderation. Pair it with proteins or healthy fats for a well rounded meal. Plus, using whole wheat flour can boost its nutritional value, adding fiber and nutrients just a bit of British wisdom for keeping things healthy!
Classic Ciabatta Bread Light Crisp And Oh So Del