Nobake Peanut Butter Pie: the Ultimate Creamy, Fluffy Dream Dessert
- Unveiling The Velveteen Dream: The Ultimate NoBake Peanut Butter Pie
- The Science of Satisfaction: Achieving the Perfect Filling Texture
- Essential Components for Your No-Bake Peanut Butter Pie
- Step-by-Step Guide: Assembling Your Ultimate Peanut Butter Pie
- Troubleshooting and Expert Chef’s Tips for Success
- Preparation Planning: Storing and Freezing Guidelines
- Pairing Perfection: Serving Suggestions for This Dessert
- Recipe FAQs
- 📝 Recipe Card
Unveiling The Velveteen Dream: The Ultimate NoBake Peanut Butter Pie
That first bite of No Bake Peanut Butter Pie is pure velvet, isn’t it? Imagine a deep, dark chocolate crust that provides the perfect, salty crunch, holding a filling so light it practically dissolves on your tongue.
Forget dense, gluey peanut butter fillings; this is an airy cloud of utter, salty sweet happiness.
Look, life is busy, and sometimes the oven is just too much hassle especially when it's summer. This easy No Bake Peanut Butter Pie Recipe is your new superpower.
It’s incredibly cheap, relies almost entirely on pantry staples, and demands virtually no technical skill to put together. It delivers maximum flavour for minimum effort, every single time.
I spent years struggling to get the filling light enough, ending up with something too stiff or too runny. I finally nailed the exact ratio between cream cheese and whipped cream, and I’m sharing all my secrets today. Ready to make the best, fluffiest Peanut Butter Pie Recipe No Bake: Ultra Creamy Easy you’ve ever tasted? Let’s crack on.
The Science of Satisfaction: Achieving the Perfect Filling Texture
This recipe isn’t magic; it’s just simple dairy chemistry. We rely heavily on cold fat both the butter binding the crust and the heavy cream setting the filling to provide all the structure without any actual baking time. You need to respect the cold.
Why We Banned the Oven: The Appeal of No-Bake Desserts
The appeal here is twofold: speed and texture. Baking a peanut butter pie usually involves eggs and cornstarch, resulting in a firm, often gelatinous texture. By going No Bake , we avoid that structural stiffness entirely, letting the heavy cream do the heavy lifting.
This is how we achieve that signature, cloud like lightness.
Pie vs. Cake: Defining the Ideal Texture Profile
We are aiming for a mousse texture, not a custard or a cake. The best Creamy Peanut Butter Pie should hold its shape when sliced but immediately yield when pressure is applied. It should feel rich without being heavy in your stomach.
That delicate balance is achieved by incorporating maximum air into the filling base.
Balancing Sweet and Salty: The Peanut Butter/Cream Cheese Ratio
The secret weapon here is the full block of cream cheese, which provides necessary tang and structure. Without it, the filling would taste flat and overly sweet. The cream cheese, when beaten properly with smooth peanut butter, creates a stable emulsion ready to hold all that whipped cream.
This ratio prevents the final product from becoming overly greasy or too runny.
Emulsification Magic: Creating the Cloud Like Mouthfeel
The core of this recipe is folding stable, stiff peaked whipped cream into the peanut butter base. That air is everything. This process, called emulsification, traps the fat particles from the cream cheese and the cream, locking in the structure.
Never use a whisk attachment for the folding step , or you will deflate all the air we worked so hard to build.
Essential Components for Your No-Bake Peanut Butter Pie
Always start with room temperature cream cheese and absolutely freezing cold heavy cream. Consistency is everything in a recipe this simple.
Crust Essentials: Selecting the Best Chocolate Wafer Cookies
I am a purist, and I insist on a dark, chocolate sandwich cookie crust (like Oreos). The cocoa powder provides a wonderful, bitter counterpoint to the sweet filling. You need enough melted butter to make the crumbs resemble wet sand; otherwise, your crust will crumble when sliced.
Filling Deep Dive: Choosing Creamy vs. Natural Peanut Butter
This is crucial: Use processed, stable, creamy peanut butter. Think Jif or Skippy. Natural peanut butter, the kind that separates oil at the top, has too much oil and not enough emulsifiers. It will destabilize the entire filling, leaving you with a soft, messy disappointment.
If you want the old-fashioned taste, look at my recipe for the Old Fashioned Peanut Butter Pie: The Best Creamy No-Bake Recipe . (Integrated link 2)
Dairy Quality Matters: Sweetened Condensed Milk and Whipped Cream Notes
We are using heavy whipping cream, whipped stiff, instead of canned condensed milk. Why? Because whipping your own cream makes the filling exponentially lighter and fluffier. If you use canned condensed milk, the pie will be dense and sticky tasty, but definitely not fluffy.
Ingredient Swaps: Making the Pie dairy-free or gluten-free
You don’t have to skip dessert just because of dietary needs. There are excellent substitutions available that maintain the texture.
| Ingredient | Substitute Recommendation | Notes on Texture |
|---|---|---|
| Cream Cheese | Vegan/dairy-free Cream Cheese Block | Must be a block, not a tub; texture might be slightly softer. |
| Heavy Cream | Refrigerated Coconut Cream (Thickened part only) | Chill a can of full fat coconut milk overnight and scoop the thick cream off the top. |
| Chocolate Cookies | gluten-free Chocolate Wafers or Pretzels | Pretzels add a marvelous salty complexity to the crust. |
step-by-step Guide: Assembling Your Ultimate Peanut Butter Pie

Remember: we are moving quickly to keep everything cold and maximize volume in the filling.
Phase I: Pressing and Setting the Robust Chocolate Crust
- Crumb Time: Process your chocolate cookies until they are very fine crumbs; no large chunks allowed. Mix these with the melted butter and salt until uniformly moist.
- Press Hard: Press the mixture very firmly into your 9 inch pie plate. Use the flat bottom of a drinking glass or measuring cup to compact the base and sides.
- Flash Chill: Pop that crust into the freezer for at least 15 minutes. This quick chill sets the butter, preventing a soggy bottom later.
Phase II: Whipping the Base Achieving Soft Peaks and Stiffness
- Stiff Peaks: Whip your ice-cold heavy cream until stiff peaks form. Stiff peaks mean the cream holds its shape when you lift the whisk and doesn't droop at all. Put this bowl in the fridge immediately.
- Cream Cheese Power: In a separate, large bowl, beat the softened cream cheese alone until it’s perfectly smooth and velvety. Do this step correctly, or your pie will have lumps.
- Peanut Butter Integration: Add the smooth peanut butter, powdered sugar, and vanilla. Beat until the mixture is completely uniform, scraping down the sides often.
Phase III: Folding Techniques for an Airy, Light Filling
This is the most critical step for a truly Fluffy Peanut Butter Pie .
Chef’s Note: When folding, treat the whipped cream gently. We are integrating, not mixing. Cut down the middle with your spatula and scoop up and over, turning the bowl as you go, until just combined.
- Three Additions: Fold in one-third of the whipped cream first; this lightens the peanut butter base. Then, add the remaining two-thirds.
- Stop Now: Fold until just no streaks of white remain. Over folding destroys the air bubbles and results in a dense filling, which is the opposite of what we want.
The Final Chill: Setting Time Requirements for Stability
Spoon the light, airy filling into the chilled crust. Smooth the top gently. Cover loosely don't let the plastic wrap touch the filling and refrigerate for a minimum of 4 hours. Better yet, let it chill overnight. This is non-negotiable for a clean, sliceable wedge.
Troubleshooting and Expert Chef’s Tips for Success
Preventing a Soggy Bottom: Crust Sealing Techniques
The secret to preventing a soggy crust is twofold: using enough melted butter, and giving the crust time to set in the freezer before filling it. A good, hard crust forms a barrier against the moisture in the filling.
If you are extremely paranoid, you can paint a very thin layer of melted white chocolate inside the crust before filling, sealing it completely.
Why Did My Filling Sink? Identifying Mixing Errors
If your filling sinks or seems too soft after chilling, you made one of two errors: you used separating natural peanut butter, or you overmixed the whipped cream. Overmixing (or beating, rather than folding) causes the cream to lose volume and weep moisture, collapsing the structure. Go gentle next time!
Preparation Planning: Storing and Freezing Guidelines
This pie holds up remarkably well, making it a fantastic make-ahead dessert.
Refrigerator Longevity: How Long Will the Pie Last?
Stored loosely covered in the refrigerator, this Quick Peanut Butter Dessert is best within 3 to 4 days. After that, the crust begins to absorb too much moisture, and the edges will soften. The texture remains good, but the crispness fades.
Freezing the Pie: Best Practices for Thaw and Serve
But does it freeze well? You bet! If you want a truly sensational, almost ice-cream like texture, you can freeze the whole pie for up to 3 weeks. Wrap the chilled pie tightly in two layers of plastic wrap and one layer of foil. To serve, simply thaw it in the refrigerator overnight. It tastes just as good as the day you made it. If you need more tips on freezing desserts, check out my NoBake Peanut Butter Pie: Ultra Creamy, Easy Dream Dessert . (Integrated link 3)
Pairing Perfection: Serving Suggestions for This Dessert
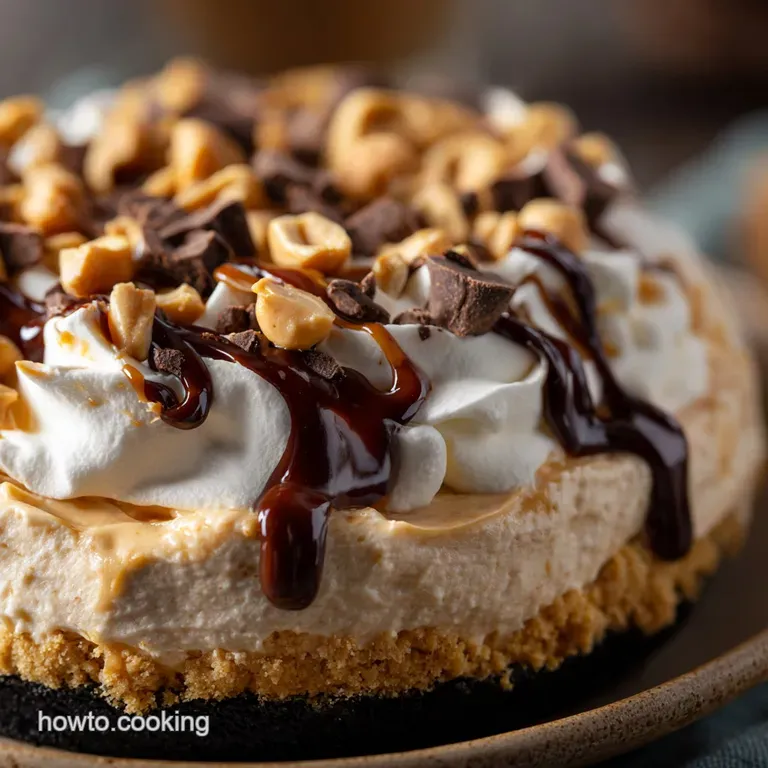
Garnish Ideas: Elevating Your Homemade NoBake Peanut Butter Pie
The garnish is where you inject personality and textural contrast.
- A light dusting of high-quality, flaky sea salt (Maldon is the best) is mandatory for that sophisticated salty sweet finish.
- A drizzle of melted dark chocolate or chocolate syrup looks stunning.
- Sprinkle generously with mini peanut butter cups or chopped, dry-roasted peanuts.
Beverage Pairings: Coffee, Milk, and Dessert Wines
This is a rich dessert, so you need a beverage that cuts through the creaminess. Nothing beats a cold glass of milk, a true classic pairing. Alternatively, serve with a strong, freshly brewed cup of black coffee or espresso.
If you want a wine pairing, look for a non-oaky, slightly acidic dessert wine like a Moscato d’Asti.

Recipe FAQs
Why is my peanut butter filling dense or grainy instead of light and fluffy?
This usually happens if the cream cheese or peanut butter was not softened properly before mixing. Ensure both ingredients are at true room temperature and creamed together thoroughly until completely smooth before folding in the whipped topping.
Over mixing the stabilizer can also deflate the air, resulting in a heavier, denser texture.
Can I make this No-Bake Peanut Butter Pie completely vegan?
Yes, you can substitute the dairy components with plant based alternatives. Use a firm vegan cream cheese block, swap the chocolate crust cookies for vegan certified ones, and replace the whipped cream with stabilized coconut cream or a commercial non-dairy whipped topping. The result will still be rich and creamy.
How long will this pie keep, and can I freeze leftovers?
The pie stores well covered tightly in the refrigerator for 3 to 5 days. This pie freezes exceptionally well; wrap the whole pie tightly in plastic wrap followed by aluminum foil to prevent freezer burn, and it will last up to 2 months. Thaw the frozen pie overnight in the refrigerator before serving.
I don't like chocolate. Can I use a traditional graham cracker crust instead?
Definitely. A standard graham cracker crust or a vanilla wafer crust pairs beautifully with peanut butter and offers a slightly lighter flavor profile than the chocolate cookie crust. If you prefer a salty contrast, you can even use crushed salted pretzels mixed with butter and sugar for the base.
My pie isn't setting up properly after the recommended chill time. What went wrong?
The most common cause is insufficient stabilizer or not enough chilling time. Ensure you used a binding agent, like properly stiffened heavy cream or a cool whip product, to hold the mixture. Always chill the pie for a minimum of 6 hours, or preferably overnight, to allow the fats in the filling to fully solidify.
Can I use natural, oily peanut butter for this recipe?
It is strongly recommended that you avoid using natural, oil-separated peanut butter, as the high oil content can prevent the filling from setting correctly and may result in a greasy mouthfeel.
For maximum stability and the best texture, use a commercial creamy peanut butter that contains stabilizers, like Jif or Skippy.
What are the best ways to garnish or decorate this pie before serving?
Classic garnishes include a generous dusting of cocoa powder, a drizzle of melted chocolate or caramel sauce, or a scattering of chopped roasted peanuts. For a polished look, pipe extra stabilized whipped cream or cool whip around the edge right before serving, or top with miniature peanut butter cups.
Ultimate No Bake Peanut Butter Pie

Ingredients:
Instructions:
Nutrition Facts:
| Calories | 650 kcal |
|---|---|
| Fat | 45 g |
| Fiber | 2 g |
