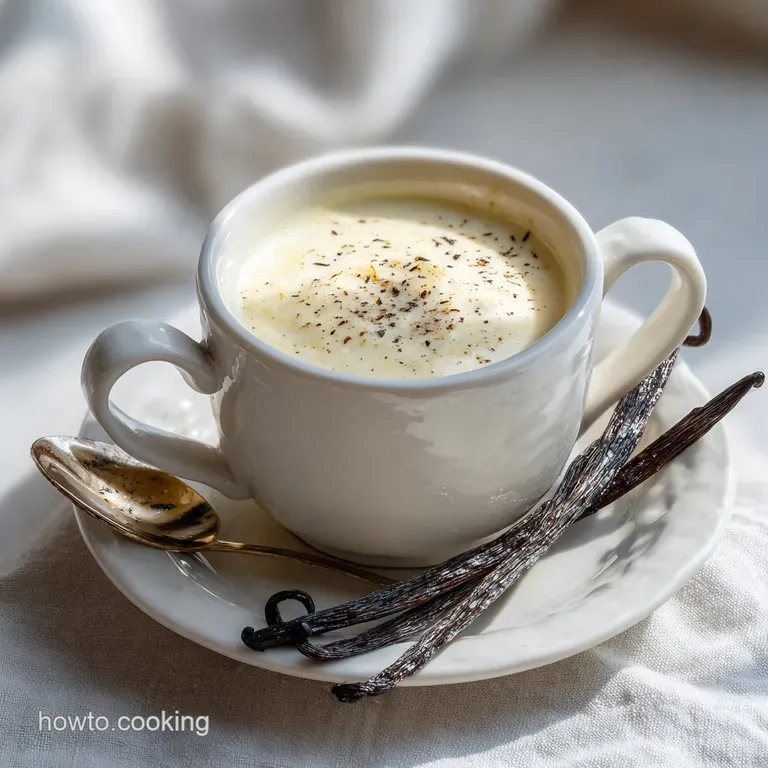
Ninja Creami Recipe with Vanilla Bean Base
- Time: Active 10 minutes, Passive 24 hours, Total 24 hours 10 minutes
- Flavor/Texture Hook: Velvety, flecked, and intensely floral
- Perfect for: Wholesome family dessert, dinner parties, or high protein meal prep
- Reliving the Classic Memory of the Speckled Scoop
- Capturing Pure Essence in Every Scoop
- The Structural Integrity of High Fat Dairy Emulsions
- Essential Performance Metrics for Your Frozen Treats
- Sourcing the Fine Elements for a Speckled Finish
- The Mechanical Toolkit for High Pressure Ice Shaving
- Orchestrating the 24 Hour Transformation from Liquid to Solid
- Resolving Textural Irregularities in Your Frozen Creations
- Adapting the Foundation for Various Dietary Preferences
- Preserving the Silky Consistency During Long-Term Storage
- Selecting Wholesome Pairings for Your Finished Scoop
- Dispelling Common Myths About Frozen Bases
- Recipe FAQs
- 📝 Recipe Card
Reliving the Classic Memory of the Speckled Scoop
You know that specific sound when the machine starts its cycle? That low hum that ramps up into a mechanical whir? Every time I lock the pint into place, I’m reminded of the first time I pulled a batch of this out of the freezer.
I had spent years trying to get that specific, dense yet-soft texture you only find in high end gelato shops, usually ending up with something either too icy or too airy. But then, I saw those tiny, beautiful black vanilla specks swirling through the base, and I knew this was different.
The aroma hits you even before the first bite real, floral vanilla that smells like a warm kitchen rather than a lab. It’s a sensory trigger that takes me back to making custard with my grandmother, except now we’ve swapped the copper pot for a high tech blade.
We’re going for that wholesome, real food feel here. No stabilizers you can't pronounce, just the good stuff. Trust me, once you see that velvety surface after the first spin, you won't want to go back to the store-bought tubs.
Capturing Pure Essence in Every Scoop
This isn't just another frozen dessert; it's a foundational masterclass in flavor. We are leaning heavily into the "Vanilla Bean" aspect because, let’s be honest, vanilla extract alone can sometimes feel a bit flat.
By using vanilla bean paste, we’re getting the oils and the seeds, which provide a visual elegance that makes even a simple bowl look like a five star dessert. It’s about building confidence in your kitchen by focusing on the quality of the raw ingredients.
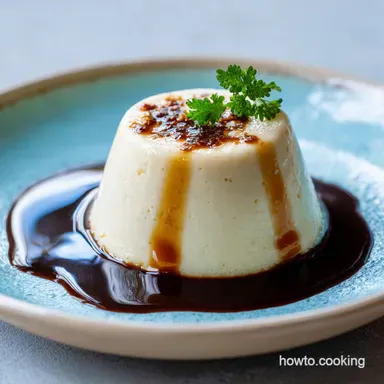
When you scoop into this, you'll notice it doesn't shatter like an ice cube. Instead, it yields. That’s the result of the specific fat to sugar ratio we’ve dialed in. It's a nourishing way to treat the family, knowing exactly what went into the pint.
We’re aiming for a consistency that coats the spoon silky, rich, and undeniably authentic. Whether you're serving this alongside a warm fruit crumble or eating it straight from the pint at 10 PM, it delivers a consistent, high-quality experience every single time.
The Structural Integrity of High Fat Dairy Emulsions
The Cryo Crystallization Secret
Mechanism: The Ninja Creami blade shaves microscopic layers off a solid frozen block, essentially creating an emulsion out of ice. By keeping the fat content high, we ensure these micro flakes stay lubricated, preventing them from re bonding into a gritty texture.
- Freezing Point Depression: The 0.5 cup granulated white sugar doesn't just sweeten; it lowers the freezing point of the water in the milk, ensuring the final result remains scoopable rather than a solid brick.
- Fat Globule Stability: Using 1 cup heavy cream with at least 36% milkfat provides the structural "cushion" needed to achieve that velvety mouthfeel during the high speed spin.
- Aromatic Binding: Vanilla bean paste contains natural oils that bind to the fat molecules in the cream, which carries the flavor across your palate more effectively than water based extracts alone.
- Salt Ionization: The 0.0625 tsp fine sea salt essentially a tiny pinch is vital; it sharpens the perception of sweetness and rounds out the floral notes of the vanilla.
Essential Performance Metrics for Your Frozen Treats
| Servings | Ingredient Adjustments | Pint Size | Spin Mode |
|---|---|---|---|
| 2 People | Halve all ingredients exactly | 16 oz (Pint) | Use "Ice Cream" |
| 4 People | Follow recipe as written | 16 oz (Pint) | Use "Ice Cream" |
| 6-8 People | Double base; use two pints | 2x 16 oz Pints | Spin separately |
While we are focusing on this classic method, I've found that getting the "doneness" right is all about the freeze. You need a solid 24 hours at 0°F to ensure the blade can shave the ice correctly.
If the center is still soft, the blade will just push the liquid around, and you'll end up with a soupy mess instead of that luxurious finish we’re after.
Sourcing the Fine Elements for a Speckled Finish
Selecting the right components is where your confidence as a cook really shines. I always tell my friends to look for the "heavy" in heavy cream check the label for that 36% or higher fat content. It makes a world of difference.
- 1 cup heavy cream: This is your primary fat source. Ensure it's fresh and cold.
- 0.75 cup whole milk: Provides the liquid base to balance the richness of the cream.
- 0.5 cup granulated white sugar: The "antifreeze" of our operation.
- 1.5 tsp vanilla bean paste: Why this? Provides the iconic black specks and deep, concentrated floral aroma.
- 0.5 tsp pure vanilla extract: Adds a bright, top note fragrance that complements the paste.
- 0.0625 tsp fine sea salt: A tiny pinch to enhance the other flavors.
Substitution Options
| Original Ingredient | Substitute | Why It Works |
|---|---|---|
| Heavy Cream | Half & Half | Note: Will be less creamy and slightly icier in texture. |
| Granulated Sugar | Allulose | Keeps the mixture soft; great for lower calorie versions. |
| Vanilla Bean Paste | Scraped Vanilla Bean | Provides the same visual specks and intense flavor. |
The Mechanical Toolkit for High Pressure Ice Shaving

You don't need a pantry full of gadgets, but a few specific items will make your life much easier. I always use a handheld milk frother to mix my base it’s a trick I learned after too many times of finding a layer of undissolved sugar at the bottom of the pint.
It’s also important to have the official Ninja Creami pint containers; don't try to freeze this in a random Tupperware and expect the machine to play nice.
A digital scale is helpful if you want to be precise, but standard measuring cups work fine here as long as you're level with your scoops. Make sure your freezer is set to its coldest setting. If you’re a fan of making this a full dessert experience, you might want to have a high-quality cake ready. This ice cream pairs beautifully with a Vanilla Cake Recipe for those special Sunday dinners.
Orchestrating the 24 Hour Transformation from Liquid to Solid
1. Dissolving the Sugar
Combine the 0.5 cup sugar and 0.75 cup milk in a small bowl or directly in your pint. Use a whisk or frother until the grains are completely dissolved. Note: This prevents a gritty texture after freezing.
2. Incorporating the Aromatics
Stir in the 1 cup heavy cream, 1.5 tsp vanilla bean paste, 0.5 tsp extract, and that tiny pinch of salt. Mix gently until the vanilla specks are evenly distributed. Don't over whisk the cream into a foam; we want a liquid base, not whipped cream.
3. The 24 Hour Deep Freeze
Place the lid on the pint and set it on a flat surface in your freezer. Freeze for a full 24 hours until the mixture is rock solid. Note: Freezing on a flat surface prevents the "tilted top" that can damage your machine's blade.
4. The Magic Spin
Remove the pint from the freezer and take off the lid. If there is a small hump in the center, scrape it flat with a spoon. Place the pint in the outer bowl, lock it into the machine, and select the "Ice Cream" function.
5. The Final Polish
Once the cycle ends, check the texture. It might look a bit crumbly this is normal! If it's not velvety yet, add a splash (about 1 tablespoon) of milk and hit the "Re spin" button. Spin until the surface is smooth and glossy.
Resolving Textural Irregularities in Your Frozen Creations
Why Your Ice Cream Is Powdery
If your pint comes out looking like snow or sand, don't panic. This usually means your freezer is very cold (which is good!) or the fat content isn't quite emulsified yet. This is the most common hurdle for beginners. You're essentially looking at "dry" ice crystals that haven't been forced into a cream state yet.
Avoiding the "Center Hump"
When liquids freeze, they expand, often pushing upward in the center. If you spin a pint with a big bump in the middle, it can put uneven pressure on the Creami blade. I always take ten seconds to scrape that little hill flat before I lock the pint into the machine. It saves your motor and ensures an even shave.
| Problem | Root Cause | Solution |
|---|---|---|
| Crumbly Texture | Base is too cold | Add 1 tbsp milk and select "Re spin". |
| Too Soft/Soupy | Too much sugar or not frozen | Ensure 24hr freeze and exact sugar measurements. |
| Greyish Color | Low quality vanilla | Use premium vanilla bean paste for bright specks. |
Common Mistakes Checklist
- ✓ Skipping the 24 hour freeze (patience is the main ingredient here!).
- ✓ Not dissolving the sugar fully before freezing (leads to a sandy mouthfeel).
- ✓ Forgetting to level the top of the frozen base before spinning.
- ✓ Using low-fat milk replacements without adjusting the "spin" setting.
- ✓ Leaving the pint out on the counter too long before spinning.
Adapting the Foundation for Various Dietary Preferences
When I'm making this for my dairy-free friends, I've found that a mix of coconut cream and almond milk works wonders. The key is to maintain that fat ratio. If you want to lean into the "Vanilla Bean" theme even further, you can actually use the leftover base to create a Vanilla Bean Dream recipe topping by whisking it until stiff peaks form it’s an incredible texture contrast.
Making it Vegan/dairy-free
Swap the 1 cup heavy cream for full fat coconut cream (the thick stuff at the top of the can) and the milk for extra creamy oat milk. Because plant fats freeze harder, you will almost always need two "Re spins" to get it silky.
The flavor will have a slight nutty undertone, but the vanilla bean still takes center stage.
Lowering the Fat Content
If you want something lighter, you can use 1.75 cups of half and half instead of the cream/milk combo. Just be aware that the "Ice Cream" setting might make this a bit icy. I recommend using the "Lite Ice Cream" setting for lower fat bases, as it spins faster and generates more friction to smooth out the smaller fat globules.
Preserving the Silky Consistency During Long Term Storage
Storing Ninja Creami creations is a bit different from store-bought tubs. Because we aren't using industrial stabilizers like guar gum or carrageenan, the ice cream will freeze quite hard again once it goes back into the freezer.
When you're ready for round two, simply flatten the surface of the leftovers and run the "Re spin" cycle again. It will come back to life perfectly.
For a zero waste approach, if you have just a little bit of base left that isn't worth a full spin, let it melt in the fridge. It makes the most incredible "creamer" for your morning coffee. The vanilla bean specks will settle at the bottom, so give your mug a little swirl to get all that floral goodness in every sip.
You can store the un spun base in the fridge for up to 3 days if you aren't ready to freeze it yet.
Selecting Wholesome Pairings for Your Finished Scoop
To really let this Ninja Creami Recipe with Vanilla Bean shine, I love to keep the toppings simple and wholesome. A handful of fresh raspberries or a drizzle of warm honey can highlight the floral notes of the bean.
If you're feeling adventurous, a tiny sprinkle of flaky sea salt on top of the scoop can transform the flavor profile into something truly sophisticated.
Decision Shortcuts for the Perfect Finish
- If you want a "Soft Serve" vibe, add 2 tablespoons of milk and re spin twice.
- If you want a "Mix in" like chocolate chips, add them after the initial spin and use the "Mix in" button to avoid pulverizing them.
- If you're serving this for a party, chill your glass bowls in the freezer for 10 minutes beforehand to prevent the edges from melting too fast.
Dispelling Common Myths About Frozen Bases
One of the biggest misconceptions I hear is that you can "quick freeze" the pint in 4 or 6 hours if you have a powerful freezer. The reality is that while the outside might be solid, the core often remains at a higher temperature.
This creates an uneven texture and can actually cause the machine to vibrate excessively. Stick to the 24 hour rule; it’s the secret to that professional, wholesome finish.
Another myth is that "Vanilla is boring." In this Ninja Creami Recipe with Vanilla Bean, vanilla is the star, not the backup singer. When you use real bean paste, you’re tasting the complexity of the orchid it comes from notes of wood, smoke, and caramel.
It's a sophisticated flavor that holds its own against any "fancy" chocolate or fruit based dessert. Trust your ingredients, follow the steps, and you'll have a pint that you're proud to share with anyone who walks through your kitchen.

Recipe FAQs
How much vanilla bean paste to use in Ninja Creami?
Use 1.5 teaspoons of vanilla bean paste. This amount provides intense floral aroma and delivers the signature black specks without overwhelming the base.
What not to mix in Ninja Creami?
Do not add chunky mix-ins before the initial spin. Ingredients like chocolate chips or nuts should only be added after the first spin using the "Mix In" function.
Can I substitute vanilla bean paste for extract?
Yes, but adjust ratios for flavor intensity. You can substitute the extract for paste or vice versa, but the paste offers visual appeal and richer oil content, similar to the quality you achieve in a Homemade Vanilla Extract Recipe.
What are the downsides of the Ninja Creami?
The primary downside is the mandatory 24-hour freezing time. It requires significant advance planning because the base must be rock solid before processing.
Why does my Creami ice cream come out crumbly?
This usually means the base was too cold or dense. Add one tablespoon of milk or cream and immediately select the "Re spin" button to smooth the texture.
Is it true I must freeze the base for a full 24 hours?
No, this is a common misconception, but highly recommended. While you might get away with 18 hours in a very cold freezer, 24 hours guarantees the core is solid for optimal shaving and texture control.
How do I ensure the sugar dissolves completely before freezing?
Gently heat a portion of the milk and whisk the sugar in until clear. This prevents undissolved granules which cause a gritty mouthfeel; mastering this technique is similar to creating the smooth texture in a Green Bean Casserole Recipe.
Vanilla Bean Ninja Creami
Ingredients:
Instructions:
Nutrition Facts:
| Calories | 329 kcal |
|---|---|
| Protein | 2.8 g |
| Fat | 23.5 g |
| Carbs | 29 g |
| Fiber | 0 g |
| Sugar | 27.5 g |
| Sodium | 88 mg |
