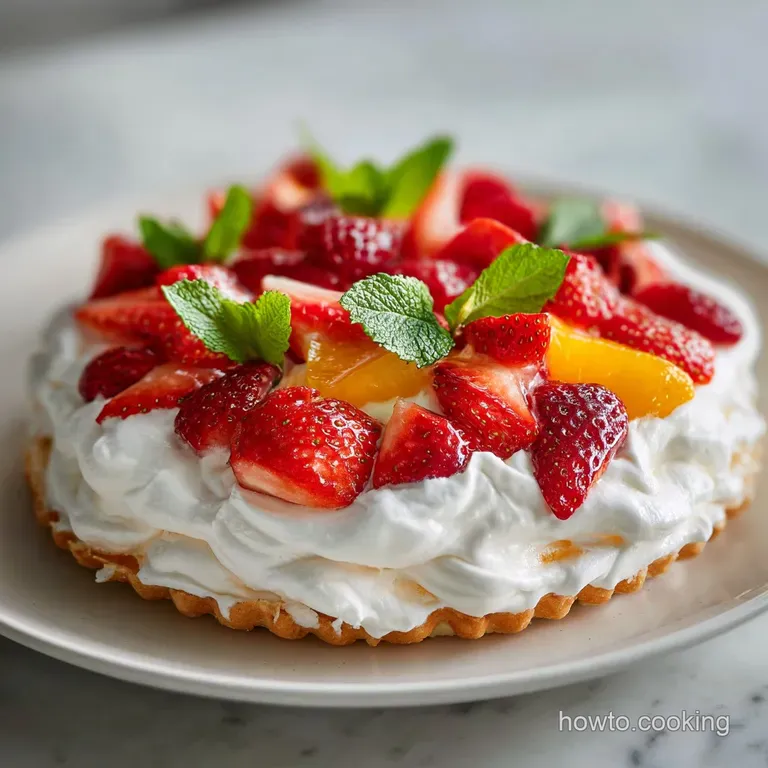
Cream Pie: Velvety Custard Filling
- Time: Active 30 minutes, Passive 6 hours 15 mins, Total 6 hours 45 mins
- Flavor/Texture Hook: Velvety smooth filling with a flaky, buttery crust
- Perfect for: Family gatherings, holiday dinners, or weekend projects
Mastering the Classic Cream Pie
The smell of toasted flour hitting the air while the crust blind bakes is something I never get tired of. It's that warm, nutty aroma that signals something special is happening in the kitchen. I remember the first time I tried to make a homemade Cream Pie for a family reunion.
I was so confident, but I didn't let the custard set long enough. When I sliced into it, the filling didn't hold its shape. It just slumped across the plate like a vanilla flavored puddle. My aunt laughed, called it "pudding with a side of crust," and we ate it with spoons anyway.
That "pudding soup" disaster taught me that patience is actually an ingredient. You can't rush the chill time or the thickening process. Now, when I pull a slice of this pie out, it stands tall and proud with a clean edge that looks like it came from a high end bakery.
We're going for a texture that's soft enough to melt on your tongue but firm enough to hold its own under a mountain of whipped cream.
This recipe is about building confidence in the basics. We're talking about real milk, fresh egg yolks, and a crust that actually tastes like butter instead of cardboard. Once you nail this foundation, you'll see why store-bought versions just can't compete.
It’s nutritious in the sense that we’re using whole, real ingredients without the stabilizers and artificial fillers found in the frozen aisle. Trust me, the extra effort is worth every single bite.
Essential Texture Specs
Making a Cream Pie is a game of thermodynamics and timing. You need to know exactly when to pull the custard off the heat and how long to let the dough rest. If the crust is too warm when it hits the oven, the butter melts out and you lose those flaky layers.
If the custard doesn't reach the right temperature, it won't set. These checkpoints will keep you on the right track.
| Thickness | Internal Temp | Rest Time | Visual Cue |
|---|---|---|---|
| 1/4 inch crust | 350°F (180°C) oven | 30 mins (dough) | Golden brown edges |
| Thick custard | 175°F (80°C) | 6 hours (chill) | Large bubbles popping |
| Stiff peak cream | Cold bowl | 5 mins (whip) | Holds shape on whisk |
Getting the temperature right is the difference between a dessert that's "okay" and one that's truly flavorful and professional. We use standard oven settings here because accuracy matters when you're working with delicate pastry.
While this version takes some time to chill, it's the classic way to get that dense, rich mouthfeel. If you're used to the lighter, aerated feel of a Healthy Cheesecake recipe, you'll find this custard much more indulgent and traditional. It’s a deep dive into old school comfort baking.
Component Science Breakdown
The Starch Protein Bond
Gelatinization: Cornstarch molecules swell when heated in milk, creating a thick lattice that traps liquid to prevent running. This happens most effectively right as the mixture reaches a slow boil.
Emulsification: Egg yolks contain lecithin, which acts as a bridge between the fats in the milk and the water content, resulting in a silky, unified texture. This is what gives the pie its signature velvety mouthfeel.
Fat Suspension: Whisking in cold butter at the very end creates a glossy finish and prevents a skin from forming too quickly. It adds a layer of richness that coats the palate and carries the vanilla flavor.
Steam Expansion: The frozen, grated butter in the crust creates tiny pockets of steam as it hits the hot oven. This forces the flour layers apart, creating the "shatter" effect we want in a perfect pastry.
| Ingredient | Science Role | Pro Secret |
|---|---|---|
| Cornstarch | Thickening agent | Mix with sugar first to prevent clumps |
| Egg Yolks | Emulsifier | Temper slowly to avoid scrambled eggs |
| Frozen Butter | Leavening | Grate it for even distribution in dough |
| Whole Milk | Liquid base | Use full fat for the most stable structure |
Understanding these roles helps you troubleshoot on the fly. For instance, if you notice your custard isn't thickening, you know the cornstarch hasn't reached its activation temperature yet. It’s all about the chemistry of the heat.
Required Kitchen Gear
You don't need a professional kitchen to make a world class Cream Pie, but having the right tools makes the process much smoother. A heavy bottomed saucepan is non negotiable here.
Thin pans have hot spots that will scorch your milk before the starch has a chance to thicken, leaving you with a burnt taste that's impossible to hide.
A fine mesh sieve is my "secret" tool for a flawless finish. Even the best cooks sometimes end up with a tiny bit of cooked egg in their custard. Straining the hot mixture through a sieve ensures that the final pie is completely smooth.
You'll also want a sturdy whisk and a glass pie plate, which helps the crust bake more evenly than metal.
Chef Tip: Freeze your butter for at least 30 minutes before grating it into the flour. This keeps the fat solid longer, ensuring those flaky layers actually form instead of just melting into the dough.
The Building Blocks
For the Shattering Blind Baked Crust
- 1.5 cups (190g) All purpose flour Why this? Provides the structure needed for a crisp, flaky base.
- 0.5 tsp (3g) Fine sea salt Why this? Sharpens the buttery flavors in the pastry.
- 1 tbsp (12g) Granulated sugar Why this? Aids in browning and adds a hint of sweetness.
- 0.5 cup (113g) Unsalted butter, frozen and grated Why this? Creates the steam pockets for a flaky texture.
- 4 tbsp (60ml) Ice water Why this? Binds the dough without melting the butter fats.
For the Silk Texture Filling
- 3 cups (710ml) Whole milk Why this? The fat content is vital for a stable, rich custard.
- 0.75 cup (150g) Granulated sugar Why this? Sweetens and helps tenderize the protein in the eggs.
- 0.25 cup (32g) Cornstarch Why this? The primary thickening agent for a sliceable pie.
- 0.25 tsp (1.5g) Salt Why this? Balances the sugar and enhances the vanilla.
- 4 Large egg yolks Why this? Adds richness, color, and essential emulsifying properties.
- 3 tbsp (42g) Unsalted butter, chilled and cubed Why this? Provides a glossy finish and extra creaminess.
- 2 tsp (10ml) Pure vanilla bean paste Why this? Offers deep flavor and beautiful visual flecks.
For the Cloud Topping
- 1.5 cups (355ml) Heavy whipping cream, very cold Why this? High fat content allows it to hold stiff peaks.
- 3 tbsp (24g) Powdered sugar Why this? Dissolves quickly and stabilizes the whipped cream.
- 1 tsp (5ml) Vanilla extract Why this? Adds a final layer of floral aroma.
| Original Ingredient | Substitute | Why It Works |
|---|---|---|
| Whole Milk | Evaporated Milk | Adds a caramelized note and even more richness. |
| Vanilla Bean Paste | Vanilla Extract | Same flavor profile, though you'll miss the black specks. |
| Cornstarch | Arrowroot Powder | Provides a similar thicken but with a shinier finish. |
Using evaporated milk is a great trick if you want a slightly deeper, more "cooked" flavor in your custard. It has less water than regular milk, which can actually make the filling even more stable. It’s one of those smart swaps that doesn't compromise the wholesome nature of the dessert.
step-by-step Execution

1. The Foundation: Blind Baking the Crust
Whisk the flour, salt, and sugar in a large bowl. Grate the frozen butter directly into the mixture and toss with a fork until it looks like coarse crumbs. Add the ice water one tablespoon at a time until the dough just holds together when squeezed.
Wrap it in plastic and chill for 30 minutes. Once chilled, roll it out, fit it into your pie plate, and bake at 350°F (180°C) with pie weights for 15 minutes, then another 10-15 minutes without weights until the bottom is dry and golden.
2. The Heart: Crafting the Custard
In a medium bowl, whisk the egg yolks until smooth. In a separate heavy bottomed saucepan, whisk together the sugar, cornstarch, and salt. Slowly pour in the whole milk, whisking constantly to ensure no cornstarch clumps remain.
3. The Technique: Tempering and Thickening
Place the saucepan over medium heat. Cook, whisking frequently, until the mixture begins to thicken and bubble. Once it bubbles, cook for 1 more minute. Remove from heat. Slowly drizzle about half of the hot milk mixture into the egg yolks while whisking vigorously.
Note: This prevents the eggs from scrambling by gradually raising their temperature.
4. The Finish: The Emulsion
Pour the tempered egg mixture back into the saucepan. Cook over medium heat for another 2 minutes until it reaches a thick, pudding like consistency. Remove from heat and immediately stir in the cubed butter and vanilla bean paste.
5. Straining for Silkiness
Press the hot custard through a fine mesh sieve into a clean bowl. This removes any tiny bits of cooked egg. Immediately pour the filling into the cooled pie crust. Press a piece of plastic wrap directly onto the surface of the custard. Note: This prevents a tough skin from forming as it cools.
6. The Long Chill
Place the pie in the refrigerator. Let it chill for at least 6 hours, though overnight is even better. This time is essential for the cornstarch to fully set into a sliceable structure.
7. The Crowning: Whipped Topping
In a chilled bowl, combine the heavy cream, powdered sugar, and vanilla extract. Beat with a whisk or electric mixer until stiff peaks form. The cream should stand up straight when you lift the beaters.
8. Final Assembly
Spread the whipped cream over the chilled custard. You can use a spatula for a rustic look or pipe it on for something more formal. Slice and serve immediately.
Fixing Common Blunders
Custard Stability Issues
If your pie is runny, it usually means the cornstarch wasn't cooked long enough. The mixture needs to reach a full boil to activate the starch's thickening power. On the flip side, if it's grainy, you likely scrambled the eggs by adding the hot milk too fast. Always use a slow drizzle and keep those eggs moving.
Crust Sogginess Prevention
A soggy bottom is the enemy of any Cream Pie. To avoid this, make sure your crust is fully baked and cooled before adding the hot filling. You can also brush the inside of the baked crust with a thin layer of melted white chocolate or beaten egg white and bake for 2 more minutes to create a moisture barrier.
| Problem | Root Cause | Solution |
|---|---|---|
| Lumpy custard | Cornstarch clumped | Sift starch with sugar before adding liquid. |
| Shrunken crust | Dough wasn't rested | Chill dough for 30 mins before rolling and 15 mins after. |
| Weeping cream | Over beating cream | Stop as soon as stiff peaks form; use powdered sugar to stabilize. |
Common Mistakes Checklist
- ✓ Use ice cold water for the dough to keep the butter from melting.
- ✓ Don't skip the straining step; it's the only way to guarantee a velvety texture.
- ✓ Ensure the plastic wrap touches the custard surface to prevent a thick skin.
- ✓ Let the pie chill for the full 6 hours; shortcuts lead to messy slices.
- ✓ Use a heavy bottomed pan to prevent scorching the delicate milk proteins.
Creative Flavor Swaps
This base is incredibly flexible. If you want to lean into different Cream Pie Recipes, you can easily adapt the flavor profile without changing the core science. For a Banana Cream Pie Recipe twist, simply layer sliced bananas in the bottom of the crust before pouring in the vanilla custard.
The fruit adds a natural sweetness and a great texture contrast.
If you are craving a Chocolate Cream Pie, whisk 1/2 cup of high-quality cocoa powder into the sugar and cornstarch mixture before adding the milk. You can also stir in 4 ounces of chopped semi sweet chocolate at the end when you add the butter.
For a Coconut Cream Pie variation, swap 1 cup of the whole milk for full fat coconut milk and stir in a cup of toasted shredded coconut to the finished custard.
| Premium | Budget | Flavor Impact | Savings |
|---|---|---|---|
| Vanilla Bean Paste | Imitation Vanilla | Less floral depth | Save $15-20 |
| European Butter | Store Brand Butter | Slightly less rich | Save $3-5 |
| Heavy Cream | Whipped Topping (Tub) | Sweeter, less creamy | Save $2-4 |
If you're looking for something with a similar tangy profile but a different texture, my Silken Amish Buttermilk recipe is a fantastic alternative that uses household staples effectively.
Scaling the Recipe
Cutting it in half: If you only need 4 servings, you can halve the ingredients and use a 6 inch pie tin or small ramekins for individual portions. Reduce the blind baking time by about 5 minutes. For the half egg yolk, whisk one yolk and use half the volume.
Doubling for a crowd: When making two pies, don't double the salt or vanilla exactly. Use 1.5x the amount for spices and extracts to avoid overpowering the dish. Work in batches for the custard to ensure you can whisk effectively and prevent burning on the bottom of a larger pot.
Chef Tip: If you’re doubling the recipe, use a stand mixer to whip the cream. It’s much more efficient than doing it by hand when you’re dealing with 3 cups of heavy cream!
Flavor Logic Myths
One common myth is that you must use room temperature eggs for custard. In reality, cold eggs are easier to separate, and since you’re tempering them with hot milk anyway, their starting temperature doesn't affect the final emulsion. Another misconception is that adding more cornstarch will make a better pie.
Too much starch results in a rubbery, "bouncy" texture that lacks that signature velvety feel. Stick to the measurements for the best results.
Searing or "cooking out" the flour in the crust doesn't just happen in the oven; it starts with that initial bake. Some people think you can just under bake the crust and it will finish with the filling, but since this is a cold set pie, that crust must be 100% done before the custard ever touches it.
Smart Storage Tips
Storage: This pie is best eaten within 2 days. Store it in the refrigerator loosely covered with foil or plastic wrap. After 48 hours, the crust may begin to soften as it absorbs moisture from the filling.
Freezing: I don't recommend freezing a fully assembled Cream Pie. The custard can break and become watery upon thawing, and the whipped cream will lose its structure. However, you can freeze the unbaked dough for up to 3 months.
Zero Waste: Don't toss those leftover egg whites! Use them to make a small batch of meringues or a healthy egg white omelet for breakfast the next day. Any leftover crust scraps can be tossed in cinnamon sugar and baked for 10 minutes for a quick "pie fry" snack.
If you have extra whipped cream, dollop it onto your morning coffee for a flavorful treat.
Finishing and Serving
Presentation is where you can really show off your confidence as a cook. For a clean slice, dip your knife in hot water and wipe it dry between every single cut. This prevents the custard from sticking to the blade and dragging through the whipped cream.
I love topping the pie with a few white chocolate curls or a dusting of crushed graham crackers for an extra bit of crunch.
If you’re serving this at a party, keep it chilled until the very last second. Cream based desserts lose their structural integrity quickly in a warm room. Pair this with a sharp, acidic coffee or a tart berry coulis to cut through the richness of the milk and eggs.
It’s a wholesome, flavorful way to end any meal, and once you see the look on your friends' faces when they take that first bite, you'll know exactly why this is the best version of a classic.

Recipe FAQs
What is Gordon Ramsay's favorite pie?
Not publicly confirmed. While Chef Ramsay often emphasizes technique over specific dessert preferences, he respects classic American baking.
What is George Clooney's favorite coconut cream pie?
Unlisted in public records. There is no widely reported favorite coconut cream pie linked to George Clooney.
Does Obama have a documented favorite coconut cream pie?
No definitive public statement exists. While Michelle Obama has shared favorite recipes, a specific preference for coconut cream pie by Barack Obama remains private.
How to prevent my cream pie filling from forming a skin while cooling?
Press plastic wrap directly onto the custard surface. This physically blocks air from drying out the top layer of the filling.
Is it true that I must temper the egg yolks slowly or they will scramble?
Yes, this is critically important. Slowly incorporating the hot liquid tempers the yolks, raising their temperature gradually so they emulsify instead of coagulating into lumps.
How to ensure the pie crust is perfectly crisp before adding the wet custard?
Blind bake the crust until it is fully golden brown and dry. For extra moisture protection, brush the baked shell with melted white chocolate before filling.
If I substitute cornstarch with another thickener, will the texture change?
Yes, the texture will shift significantly. Arrowroot powder, a common substitute, provides a shinier, sometimes slicker finish than cornstarch, which yields a softer, velvety mouthfeel.
Velvety Cream Pie Recipe
Ingredients:
Instructions:
Nutrition Facts:
| Calories | 574 calories |
|---|---|
| Protein | 8.1 g |
| Fat | 37.8 g |
| Carbs | 51.1 g |
| Fiber | 0.8 g |
| Sugar | 27.2 g |
| Sodium | 295 mg |
