The Scarlet Crunch Quick Pickled Red Onions Ready in 30 Minutes
- Why Quick Pickling Is Your Culinary Cheat Code
- The Magic of Instant Tang: Understanding the Quick Pickle Method
- Sourcing Your Scarlet Staples: Essential Ingredients
- Gathering Your Quick Pickled Red Onions Toolkit
- Mastering the Process: Step-by-Step Quick Pickled Red Onions
- From Raw Rings to Ready Relish in Minutes
- Troubleshooting and Storing Your Homemade Quick Pickled Red Onions
- Recipe FAQs
- 📝 Recipe Card
Why Quick Pickling Is Your Culinary Cheat Code
If there is one simple addition you can make to your pantry that instantly elevates 90% of your savory meals, it is a jar of homemade quick pickled red onions. This technique is often called a "culinary cheat code" because it requires only 15 minutes of active effort yet delivers the Bright Red Pickled Onions that add a vital pop of color and acidic crunch to everything they touch.
Forget buying pre-made condiments; learning this quick pickled red onions recipe empowers you to create fresh, zesty flavor that is infinitely better than anything store-bought. These vibrant rings offer a perfect foil for fatty meats, rich cheese, or heavy sauces, making them indispensable in my kitchen.
The Magic of Instant Tang: Understanding the Quick Pickle Method
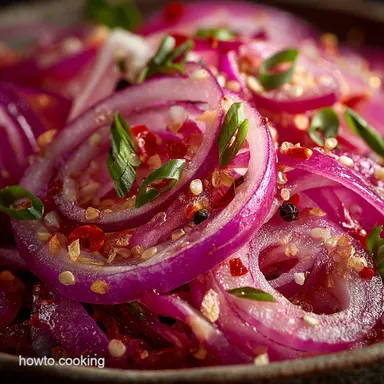
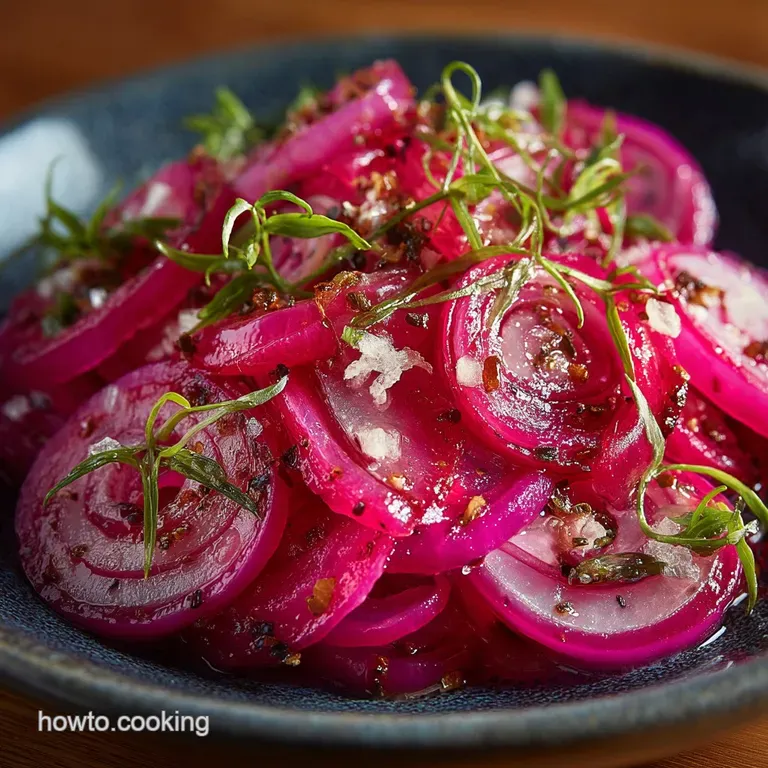
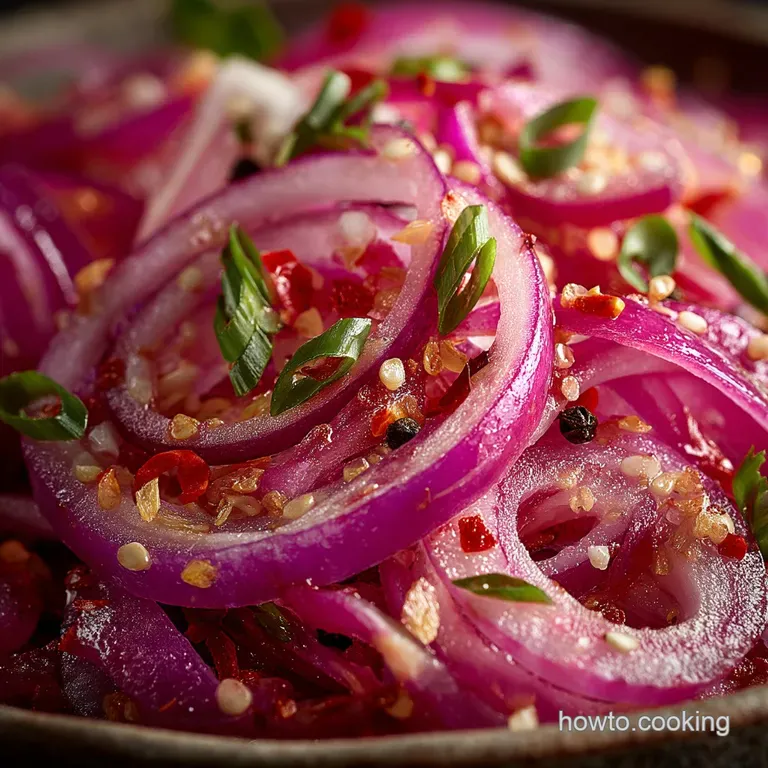
The essence of the quick pickle method lies in rapid infusion. Unlike processes that rely on months or weeks of sitting, we use heat and acid to force flavor absorption almost instantly. This process softens the aggressive bite of the raw onion while turning the rings a magnificent, Instagram worthy shade of pink.
The result is a jar of ready-to-eat relish in under an hour.
The Difference Between Quick Pickling and Fermentation
The distinction is crucial. Traditional fermentation, such as that used for classic sauerkraut or dill pickles, relies on time and naturally occurring lactic acid bacteria to preserve and flavor vegetables. This process is time intensive and requires careful monitoring.
Quick pickling, conversely, is preservation via acidification. We use a hot brine composed of vinegar, water, salt, and sugar to introduce stability and flavor immediately. This means you can enjoy fresh tasting, quick pickled red onions without any technical canning skills or lengthy waiting periods.
Elevating Everyday Meals with a Zesty Finish
These aren't just for decoration; they are a necessary flavour component. A modest serving of this brightly acidic condiment cuts through the richness of heavy meals, providing balance. Think of the intense savory notes in a pulled pork sandwich or a hearty beef chilli.
A handful of Pink Pickled Onions Close-up lifts those heavy flavors, ensuring every bite remains dynamic and fresh. This is particularly true for dishes that lack natural acidity.
How Hot Brine Tames Raw Onion Bite
The secret to why this works so quickly lies in the brine temperature. When the steaming hot liquid is poured over the thinly sliced red onions, the heat causes a slight thermal shock.
This shock, combined with the high acidity of the vinegar (in our case, often quick pickled red onions apple cider vinegar), begins the process of rapidly breaking down the cell walls.
This action is essential for transforming the harsh, sulfuric compounds that give raw onions their fiery bite into the mellow, slightly sweet, and tangy rings we crave.
Dispelling Myths About Homemade Condiments
Many home cooks assume that making preserves or condiments requires specialized equipment or sterilization knowledge. This is simply not true for the quick pickle method. This is essentially a quick pickled red onions no cook preparation since the brine is merely heated to dissolve the solids, not boiled for sterilization making it one of the easiest ways to produce homemade condiments.
You are not canning for shelf stability; you are preparing a refrigerated garnish, which removes all the complexity traditionally associated with pickling.
Sourcing Your Scarlet Staples: Essential Ingredients
The beauty of this quick pickled red onions recipe is its minimal ingredient list. You only need five core items to create the perfect base brine. We start with one large red onion, which should yield enough thinly sliced rings to fill a standard pint sized (500 ml) jar.
The brine relies on a simple 1:1 ratio, calling for one cup of water and one cup of vinegar. To balance the acidity and enhance the flavor profile, we incorporate two tablespoons of granulated sugar and one teaspoon of kosher or flaky sea salt.
The quality of these basic components ensures the final product is crisp, clean, and perfectly balanced.
Related Recipes Worth Trying
- Proper Beefy Mexican Rice Soup Hearty Quick and Easy Weeknight Comfort — This deeply flavourful Beefy Mexican Rice Soup is the ultimate quick and easy soup for busy evenings Rich ground beef and tender rice make it incredibly...
- The Sunday Best Chicken Pot Pie Rice Bake with Quick Cheddar Scone Topping — This Chicken Pot Pie Rice Bake delivers creamy comfort without the pastry faff Its a splendid tidy onepot creamy chicken and rice casserole topped with...
- Authentic Smothered Chicken and Rice with Rich Gravy — Ditch the slow cooker This recipe delivers truly tender chicken smothered in a deeply savoury brown gravy perfect over fluffy rice Get the foolproof guide here
Gathering Your Quick Pickled Red Onions Toolkit
While the ingredient list is short, the method benefits greatly from preparing your equipment and understanding key preparatory steps before you even heat the brine.
Selecting the Perfect Vinegar Blend for Brightness
Our recipe calls primarily for quick pickled red onions apple cider vinegar, which offers a slightly fruitier, mellower tang than standard white vinegar. However, depending on your final application, you can experiment.
Using white wine vinegar yields a very mild, pure flavor, while swapping in quick pickled red onions red wine vinegar can deepen the pink hue and add a subtle, complex fruitiness. The crucial thing is maintaining the 5% acidity level found in most standard cooking vinegars.
The Importance of Thin and Uniform Onion Slices
Consistency is paramount for ensuring every ring pickles at the same speed and achieves that satisfying crisp tender texture. I strongly recommend using a mandoline slicer to achieve perfectly uniform ⅛-inch slices.
If slicing by hand, use a very sharp chef’s knife and aim for half moon shapes of consistent thickness. If the slices are too thick, the hot brine will not fully penetrate the center, leaving a residual raw crunch.
Sweeteners and Seasonings: Adjusting the Brine Flavor Profile
The two tablespoons of sugar in the brine do not make the onions overtly sweet; rather, they mitigate the harshness of the vinegar and salt, achieving a crucial flavor harmony. For those seeking a quick pickled red onions no sugar option, the granulated sugar can be substituted with about one teaspoon of a concentrated calorie free sweetener like Stevia or Monk Fruit, though the balance should always be tasted and adjusted.
Beyond the base brine, we recommend adding two lightly smashed garlic cloves, one teaspoon of whole black peppercorns, and ½ teaspoon of red pepper flakes for depth and a gentle background heat.
Recommended Jars and Non-Reactive Equipment
Because we are pouring very hot liquid over raw vegetables, the container must be heat safe. A clean, one-pint (500 ml) glass jar with a tight fitting, non-reactive lid is ideal. For preparing the brine, always use a small-to-medium saucepan made of stainless steel or enamel.
Avoid aluminum, as it can react poorly with the high acidity of the vinegar.
Mastering the Process: step-by-step Quick Pickled Red Onions
The entire process, from slicing to pouring, takes less than 15 minutes of focused effort. This rapid turnaround is why the quick pickled red onions for tacos topping will soon become a permanent fixture in your fridge.
From Raw Rings to Ready Relish in Minutes
Following these steps precisely ensures maximum flavor infusion and optimal texture, transitioning the raw onion from pungent vegetable to zesty relish rapidly.
Preparing and Packing the Red Onion Base
Begin by peeling the red onion and slicing it uniformly, ideally into thin half moons. Place the optional aromatics the smashed garlic, peppercorns, and chilli flakes into the bottom of your heat safe pint jar.
Next, tightly pack the thin onion slices on top of the spices, pushing them down gently until the jar is filled right up to the rim. Tightly packing prevents the onions from floating and ensures even pickling once the brine is added.
Boiling the Brine: Achieving Peak Dissolution
In your small saucepan, combine the one cup of water, one cup of apple cider vinegar, the salt, and the sugar. Place the mixture over medium high heat. Stir constantly for about three to five minutes.
The goal is not a rolling boil, but heating the liquid until it is steaming hot and both the salt and sugar have completely dissolved, resulting in a perfectly clear liquid. Immediately remove the saucepan from the heat source once this is achieved.
The Critical Pour: Submerging the Onions Completely
This is the moment the magic happens. Carefully and slowly pour the steaming hot brine over the packed onions. The liquid should cover the onions entirely and reach the lip of the jar. Once poured, use the handle of a wooden spoon or a chopstick to gently press down on the onions and poke around the edges.
This releases any stubborn air bubbles that might be trapped underneath the layers. If the brine level drops after releasing the air, top it up slightly.
Cooling and Sealing for Maximum Flavor Infusion
Place the lid loosely on the jar do not seal it tightly yet. Allow the jar to sit undisturbed on the counter until it cools completely to room temperature, which generally takes about 30 minutes. This cooling period is vital, as the onions continue to pickle in the retained heat.
Once fully cooled, tighten the lid securely and transfer the jar to the refrigerator. While they are technically ready to eat after 30 minutes, the flavor truly deepens and mellows after two to three hours of chilling.
Troubleshooting and Storing Your Homemade Quick Pickled Red Onions
These quick pickles require no extensive maintenance, but a few simple guidelines ensure they maintain their crisp texture and vibrant flavor throughout their stored life.
Storage Duration and Achieving Optimal Chill
These are designed for short term, refrigerated storage, making them a perfect staple. When properly stored in their sealed glass jar, your homemade quick pickled red onions will retain their excellent flavor and texture for up to three weeks in the refrigerator.
Always ensure the onions remain fully submerged in the brine, as any pieces sticking out may dry out or lose their optimal flavor. The coldest part of your fridge is best for maintaining their sharp crunch.
Flavor Variations: Adding Spice or Herbs to the Jar
While the base quick pickled red onions recipe is robust, customization is half the fun. For an Asian inspired twist that pairs wonderfully with stir fries or ramen, substitute the apple cider vinegar with rice vinegar and add a slice of fresh ginger and one star anise pod to the jar before pouring the brine.
If you're planning a Mediterranean spread, try adding a bay leaf, a pinch of dried oregano, and a strip of lemon rind to the brine mix.
The Best Dishes That Require a Pop of Pink Acid
The most classic application is as Mexican Pickled Red Onions. They are simply indispensable as quick pickled red onions for tacos especially rich pork carnitas or spicy barbacoa. However, their uses extend far beyond Mexican cuisine.
Layer them onto cheeseburgers, use them to brighten a savory charcuterie and cheese board, or chop them finely and mix into tuna or chicken salad for an extra dimension of tang.
Quick Nutritional Overview (For Dietary Planning)
Since this condiment is primarily vinegar, water, and onion, it remains incredibly light. Based on a standard condiment serving (approximately one-twelfth of the jar yield), the estimated nutritional impact is very low. Each serving contains approximately 20 25 kilocalories and is virtually fat and protein free.
They contribute minimal carbohydrates (around 5 grams per serving), mainly derived from the small amount of granulated sugar used to balance the brine. They offer a flavorful punch without the caloric load often associated with traditional sauces or spreads.
Recipe FAQs
How long will these glorious pink pickles actually last in the fridge?
These are 'refrigerator pickles,' meaning they haven't been processed for shelf stability, so treat them with respect! Properly stored in a clean, airtight glass jar, they will keep brilliantly for up to three weeks.
After that, they may lose their desired crunch, but honestly, if they last that long in your house, you’re missing a trick.
Are these Quick Pickled Red Onions actually safe to store in the fridge for weeks, or should I be canning them?
You’re spot on to ask! This recipe is strictly for cold storage. Because we rely on the hot brine simply to soften the onions quickly, rather than following rigorous sterilisation methods, they are not suitable for traditional long term canning or keeping in the cupboard.
For the recipe’s stated shelf life (three weeks max), refrigeration is absolutely safe, but if you want shelf stable pickles, you would need a proper canning procedure, which is a whole different kettle of fish!
My onions still taste quite sharp and aggressive after 30 minutes. What’s the catch?
If they are still cutting the mustard a bit too sharply, don’t fret it means they just need a little more time to marinade. Ensure your brine was genuinely steaming hot when you poured it over; this heat is crucial for taming the raw onion bite quickly.
For the best flavour balance, allow them to chill overnight, if you can resist. The sugar and vinegar will fully penetrate the slices, resulting in that mellow, perfect sweet and-sour crunch.
I fancy trying something a bit different. Can I swap the vinegar or add extra flavourings?
Absolutely, that’s the beauty of quick pickling! For a change, swap the Apple Cider Vinegar for Rice Vinegar and add a slice of fresh ginger and a star anise perfect for serving with a proper curry or homemade ramen.
Alternatively, for a more Mediterranean vibe, throw in a sprig of fresh rosemary and a few fennel seeds to the jar before pouring the brine. Experimenting is half the fun; just keep the essential water-to-vinegar-to-salt ratio the same.
What on earth do I do with the leftover pink brine once all the pickles are gone?
Don't chuck that ruby red liquid! It’s affectionately known as "pickleback brine" and it’s liquid gold in the kitchen. It makes a cracking base for a sharp vinaigrette for salads just whisk it with a touch of olive oil and Dijon mustard.
If you're feeling adventurous, you can use a few tablespoons to deglaze a pan after cooking pork chops, or even add a splash to mayonnaise for a shocking pink condiment. Bob's your uncle.
30minute Quick Pickled Red Onions Recipe