Hauntingly Delicious Spooky Sugar Cookies
- Halloween Fun with Spooky Sugar Cookies
- A Slice of Cookie History
- Sweet Benefits of Spooky Delights
- Regular Cookie Vs. Spooky Cookie: The Easy Win
- Essential Ingredients Guide
- Baking Your Way to Spooky Sugar Cookies: A Ghostly Delight!
- Pro Tips & Secrets for Your Spooky Sugar Cookies
- Frequently Asked Questions
- 📝 Recipe Card
Halloween Fun with Spooky Sugar Cookies
Have you ever had that magical moment in the kitchen where simple ingredients turn into something extraordinary? i remember the first time i made cookies with my little cousins.
Flour flying everywhere, laughter echoing off the walls, and the scents of vanilla dancing in the air. honestly, it felt like a scene from a classic family movie.
That’s exactly what making these spooky sugar cookies is all about. it's all fun and games until you bite into one of these bad boys! the best part? you can whip them up in under an hour yes, you can bake spooky sugar cookies in 42 minutes !
These cookies are not only about taste; they’re about creating memories. halloween is the perfect time for baking with the fam, crafting fun shapes like ghosts, pumpkins, and bats.
You get to decorate them with colorful icing and sprinkles that sparkle like the stars on a crisp fall night.
Who wouldn’t want to dive into a little bit of that?
A Slice of Cookie History
Did you know sugar cookies date back to the 1700s? yup! they started in nazareth, pennsylvania, where the first recipe for sugar cookies was developed by german settlers.
Fast forward to today, and they’ve become a staple for any holiday. but let’s be real halloween? it’s the most exciting time to make these treats.
With their soft texture and buttery flavor, they’ve got flexibility that screams “add frosting!” whether you’re a pro or a total newbie in the kitchen, this easy halloween cookie recipe has you covered.
You won’t need a ph.d. in baking to tackle this recipe. it’s simple enough for kids, making it a fantastic family friendly baking project.
Perfect for seasonal celebrations, they’ll impress your friends at any spooky gathering. plus, they’re cost effective and yield about 24 cookies , meaning plenty for everybody (or just for you if you plan to hide them)!
Sweet Benefits of Spooky Delights
Now let’s talk about why these cookies are a must bake. first off, they’re customizable! want to add chocolate chips for an irresistible twist? go for it! feel like getting spicy? toss in some pumpkin spice for that fall flavor.
These cookies also shine in the health department. okay, okay, i know they’re still cookies, but using ingredients like all-purpose flour and unsalted butter in moderation gives you some balance.
Crave a calcium boost? make that butter a bit healthier with some options like vegan substitutes!
These treats are perfect for any party halloween-themed birthdays, school events, or cozy nights at home with a movie marathon. pair them with some cider or hot cocoa, and you’ve got yourself a cozy evening.
Plus, they make for great gifts if you package them beautifully. who doesn’t love sweet treats for halloween?
Regular Cookie Vs. Spooky Cookie: The Easy Win
So why choose these spooky treats over simple sugar cookies? well, the unique shapes and decorating possibilities make them extra special.
You can smile knowing you created adorable ghost shaped cookies that look as good as they taste. and honestly, these cookies are perfect for those last minute dessert ideas when you’re short on time, but still, want to bring something fun to the table.
So, if you’ve got a mixer and a little patience, you’re ready to embark on this cookie journey! trust me, you’ll want to stick around for the killer ingredient list that follows.
Can’t wait to see what spooky designs you come up with. happy baking!
Essential Ingredients Guide
When it comes to whipping up the perfect halloween cookie recipe , having the right ingredients is half the battle.
If you're gearing up to bake spooky sugar cookies in 42 minutes , let’s break it down into essential bits and pieces to make it both simple and fun.
Premium Core Components
First off, let’s talk about the premium core components that should always be on hand in your kitchen:
Flour: You need about 2 ¾ cups (345 g) of all-purpose flour. Look for a finely milled flour that’s silky to the touch.
Sugar: Granulated sugar is your best friend here. You’ll need 1 ½ cups (300 g) for that sweet, melt-in-your mouth appeal. A quick tip? Organic granulated sugar is often less processed.
Butter: Only the best for these cookies! Use 1 cup (227 g) of unsalted butter, softened to room temperature. This makes the cookie batter rich and delicious.
Eggs: One large egg helps bind everything together.
Next, when we talk about storage guidelines , store flour and sugar in cool, dry places to keep them fresh.
Generally, they last for about 6 months when stored well. a tip for freshness? do the smell test! if something smells “off,” it’s time to toss it.
Signature Seasoning Blend
Now onto the flavors that make these cookies stand out!
For a classic sugar cookie recipe , you'll need:
- Baking Powder: 1 tsp (5 g) gives them a nice rise.
- Salt: A pinch of ½ tsp (3 g) balances the sweetness.
- Vanilla Extract: One of my absolute favorites! Use 1 tsp (5 ml) for that warm and cozy flavor. For an extra kick, consider ½ tsp (2 ml) of almond extract (totally optional but yum!).
When mixing these ingredients, remember to cream together the butter and sugar first until it's light and fluffy. Trust me; the texture will make or break your cookies!
Smart Substitutions
If you’re in a pinch, here are some handy smart substitutions to keep in your back pocket:
- Butter: Running low? Coconut oil or margarine works too!
- Eggs: One tablespoon of ground flaxseed mixed with 2.5 tablespoons of water does wonders.
- Flour: You can go gluten-free using a 1:1 blend or even almond flour for a nutty twist.
Seasonal options like pumpkin spice can kick your cookies into a whole new flavor stratosphere when autumn rolls around.
Kitchen Equipment Essentials
Now, let’s not forget about the kitchen gadgets that make this all possible!
You’ll need:
- Mixing Bowls: A few large ones should do.
- Electric Mixer or Wooden Spoon: Get the job done with either, but an electric mixer is a real time saver!
- Rolling Pin: This will help you roll out the dough nicely.
- Cookie Cutters: Get into the spooky spirit with Halloween shapes, like bats and ghosts!
- Baking Sheets and Parchment Paper: The key to non-stick cookies and easy cleanup.
A quick tip: Store your cookie cutters in a marked container. Makes it super easy to grab them when you're ready to go!
Final Thoughts
There you have it your go-to guide to essential ingredients, seasonings, and tools for baking spooky sugar cookies . as you get ready to dive into the delicious world of spooky treats , these tips will set you on the right path.
Remember, baking is all about having fun! whether you’re creating simple cookie recipes with your kids or trying out new cookie variations , enjoy every moment.
You're just a few steps away from creating those soft sugar cookies everyone will love.
Now that we’re all pumped about the festive Halloween desserts ahead, let's take these ingredients and get to the fun part those delicious spooky sugar cookies that are sure to steal the show!
Baking Your Way to Spooky Sugar Cookies: A Ghostly Delight!
Oh my gosh! halloween is just around the corner, and you know what that means spooky treats galore! i mean, who doesn’t love a sweet treat that fits right into the eerie vibe of the season? let’s dive into how to bake spooky sugar cookies in 42 minutes .
Yup, that’s right just 42 minutes from mixing to munching!
Essential Preparation Steps
Before you even think about putting on that apron, let’s chat about a few things. first off, we gotta get our act together with mise en place a fancy way of saying, "have everything ready before you start.
" it sounds super professional, but really it just means having your ingredients measured and tools within arm's reach. it saves you from running around like a headless chicken!
Time management is key here, too. aim for simplicity. give yourself 15 minutes for prep and 10 minutes to chill the dough.
It’s like a power nap for your cookies! trust me; a well rested dough rolls out way nicer.
Next up, let’s keep things organized. like, seriously, grab a few bowls one for dry ingredients, one for wet, and maybe one for “i can’t stop eating the dough” antics.
And never forget safety! always watch those hands when you’re mixing and cutting no one wants to end up at the er for a cut finger, am i right?
step-by-step Process
Time for the fun part! Once you've prepped, here's how to make these easy sugar cookies featuring ghostly shapes that'll make your Halloween bash a hit.
- Preheat Oven to 350° F ( 175° C) . Start by heating things up!
- Prepare Baking Sheets . Line two sheets with parchment paper. This means fewer dishes later woohoo!
- Mix Dry Stuff . Whisk together 2 ¾ cups flour , 1 tsp baking powder , ½ tsp baking soda , and ½ tsp salt in a bowl. Easy peasy!
- Cream the Goodies . In another bowl, beat 1 cup unsalted butter with 1 ½ cups sugar until fluffy (about 2- 3 minutes ). This is where the magic starts!
- Add Egg and Flavor . Mix in 1 egg , 1 tsp vanilla , and 1/2 tsp almond extract if you’re feeling sassy.
- Combine Everything . Gradually add the flour mix into the wet bowl. Don’t overdo it; just mix until combined.
- Chill the Dough . Cover and stick it in the fridge for 10 minutes . This step is a game changer for the cookie's texture.
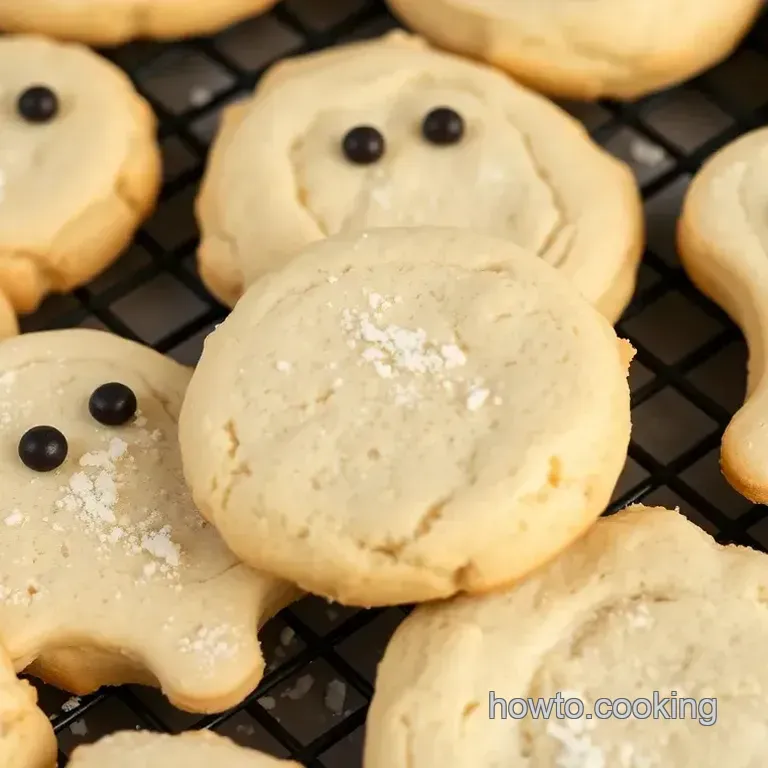
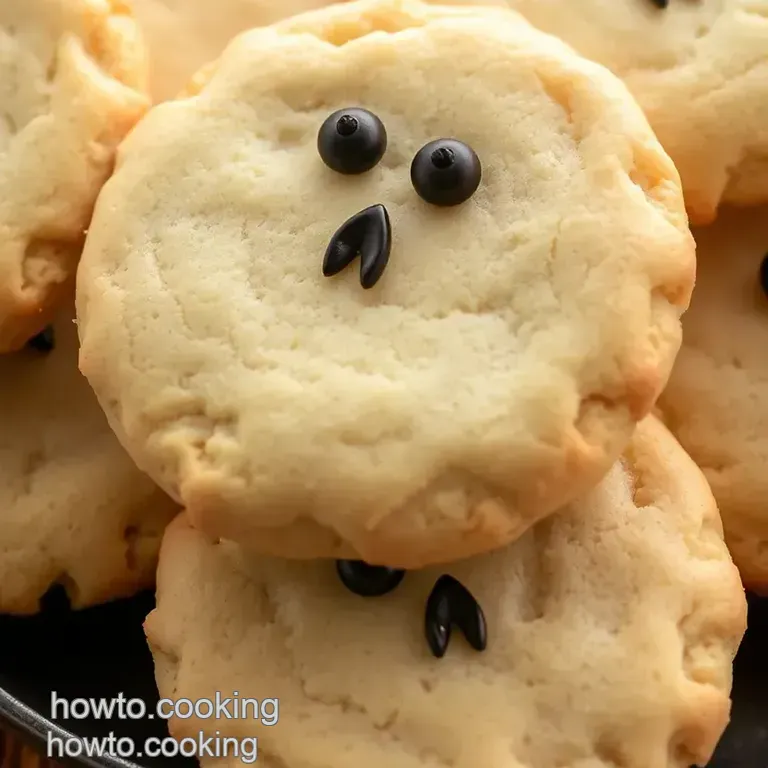
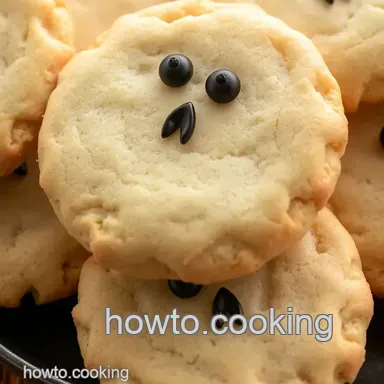
- Roll and Cut! Roll out to about ¼ inch thickness and cut spooky shapes using your favorite cookie cutters. I mean, who doesn't love a good bat or ghost shaped cookie?
- Bake the Beauties! Place them on the baking sheets and bake for 10- 12 minutes . Check that golden edge for doneness. You want them just lightly crisp.
- Cool and Decorate . Let cool, then unleash the icing! Use colorful sprinkles to create your own ghostly designs.
Expert Techniques
Now, here’s where you channel your inner baking pro. a big tip? always ensure your butter is at room temperature that's vital for a soft texture.
And when you’re rolling and cutting, keep the dough thickness consistent. we don’t want cookie mountains, right?
When you’ve got them baking away, watch that timer. Seriously. Pull them out when the edges are slightly golden it’s where that chewy center comes from.
Oh, and if things go awry, don't freak out. use a bit of extra flour if your dough is too sticky.
If they spread way too much? well, colder dough next time will fix that!
Success Strategies
Alright, before you dive in, let’s talk common mishaps to avoid. A huge one? Skipping the chilling step! If you want soft sugar cookies with some puff, don’t rush it.
For quality assurance, do a little taste test (or a few!). and seriously, these cookies make great make-ahead options. they chill nicely in the fridge, or you can freeze them before baking.
You could be the cookie hero of the neighborhood with minimal effort!
One last pro tip: mix up your decorating! Use royal icing or fun sprinkles sorry, not sorry for those colorful sprinkles on my cookies! They make everything better!
And before you start gathering up your halloween cookie recipe, remember to enjoy the process! baking is all about having fun, especially when you can get the kids involved in the kitchen.
Nothing says “family bonding” like cookie cutting and decorating.
Additional Information
Looking for more ideas? check out seasonal baking recipes or festive halloween desserts to make your spooky bash the best one yet! with unique cookie styles like ghost shaped cookies or my personal favorite, the pumpkin cookie recipe , you’ll surely have a table full of sweet treats that’ll wow all your guests.
Happy baking and enjoy every gooey bite!
Pro Tips & Secrets for Your Spooky Sugar Cookies
Okay, folks, let’s talk about turning homemade sugar cookies into masterpieces. first off, when you decide to bake spooky sugar cookies in 42 minutes , remember this: room temperature butter is your best friend! seriously, don’t skimp on letting that butter soften.
It makes for a light and airy dough, which is what we want for those soft sugar cookies .
Wanna save some time? try mixing your dry ingredients in advance. sure, it might sound boring, but think of it as your little baking hack.
You’ll thank yourself later when you’re zipping through the recipe. oh, and don’t skip the chill time. chilling the dough for just 10 minutes makes a huge difference it helps with that perfect dough thickness and prevents spreading.
You’ll end up with cookies that are not only spook tacular but also beautifully shaped.
Flavor enhancement tips? Add a pinch of cinnamon to the dough or try a splash of almond extract if you’re feeling fancy. Each bite is like Halloween in your mouth!
Perfect Presentation
Now that your cookies are baked and cooled, let’s talk aesthetics because presentation matters! grab those spooky cookie cutters to make fun shapes.
Bats, ghosts, pumpkins pick your poison. for the ultimate cookie baking tips , roll the dough out evenly, about 1/4 inch thick.
Uneven thickness can lead to some sad-looking cookies, trust me.
When it comes to decorating, it’s all about those colorful sprinkles. go wild, use buttercream frosting or royal icing and create your own designs.
You can even combine colors for a ghostly gradient . try using different combos of icing for cookies to give each one its own spooky character.
And don’t forget about adding some edible glitter for that extra flair.
Storage & make-ahead
Thinking about making these cookies ahead of time? you totally can! pop the dough in the fridge for up to 3 days before you bake.
If you’re already late to the party, just freeze those baked cookies in an airtight container, and they’ll stay fresh for up to a month.
When you’re ready to devour them, let them thaw at room temperature. easy peasy!
If you end up with leftover cookies (like that ever happens, right?), store them in an airtight container at room temp for up to a week.
To reheat, just toss them in the microwave for about 10 seconds. you’ll get that just baked taste, and your family will think you’re a kitchen magician!
Creative Variations
Let’s get creative with some variations! if you’re in the mood for a little twist, try adding some chocolate chips.
I swear, they transform these already delightful cookies into something extra special. or how about a pumpkin cookie recipe? just add pumpkin puree and spice them up with some cinnamon for those cozy fall vibes.
You can even swap out half of the granulated sugar for brown sugar for a chewier texture. it’s all about what you and your family enjoy most.
Got kids? let them help you frost and decorate! it’s one of those family friendly baking projects that creates memories.
Complete Nutrition Guide
Okay, let's keep it real. these cookies are definitely a sugary snack, but they can fit into a balanced diet! each cookie packs around 130 calories great for a little treat, but if you're looking for detailed nutritional information for cookies , don’t forget to consider portion size.
Sugar cookies give you a dose of quick energy from those carbs, plus a sneaky side of happiness from all that sweetness.
If you’re looking out for specific dietary needs like gluten-free or vegan options, you can swap regular flour for almond or oats and use a flax egg instead of regular egg.
Conclusion
So there you have it your complete guide to bake spooky sugar cookies in 42 minutes . with these tips, you’ll whip up festive halloween desserts that will wow your friends and family.
Don’t be afraid to experiment with flavors and styling. the best part about baking is the fun and creativity behind it!
Now roll up those sleeves and get baking! Your hauntingly delicious cookies are waiting. Happy baking and have a magical Halloween!
Frequently Asked Questions
How can I Bake Spooky Sugar Cookies in 42 Minutes if I'm short on time?
If you're pressed for time, consider skipping the chilling step altogether or rolling the dough thinner to reduce bake time. You can also make the dough ahead of time and refrigerate it for a day or two, allowing for quicker baking when you're ready.
Just remember to keep an eye on the cookies as they bake to avoid overcooking!
What kind of decorations work best for my spooky sugar cookies?
Using royal icing is a great option for detailed designs, while colored sprinkles can add a fun and festive touch. You might also consider using edible glitter to give your cookies a magical sparkle. Don't be afraid to get creative with different colors and patterns to bring your spooky designs to life!
Can I make modifications to the recipe for dietary restrictions?
Absolutely! You can substitute unsalted butter with coconut oil or vegan butter for a dairy-free version. For an egg replacement, try using flaxseed meal mixed with water. Additionally, using gluten-free flour can accommodate those who are gluten intolerant, making these cookies accessible to everyone!
What should I do with leftover spooky sugar cookies?
Leftover cookies can be stored in an airtight container at room temperature for up to a week. If you'd like to keep them longer, consider freezing them. Place the cookies in a single layer in a freezer safe container, separating layers with parchment paper, and they can last for up to three months!
What are some fun variations I can try with the spooky sugar cookie recipe?
There are plenty of delicious variations to try! You can add mini chocolate chips to the dough for a chocolatey twist, or incorporate pumpkin spice for a seasonal flavor. For something bright and zesty, add lemon zest to the batter. These variations can make your spooky cookies even more unique!
How can I ensure my spooky sugar cookies turn out perfectly every time?
For best results, make sure your butter is at room temperature to achieve a light and airy mixture. Additionally, chilling the dough is key to preventing the cookies from spreading too much during baking.
Lastly, watch the baking time closely; pulling the cookies when the edges are lightly golden will give you perfectly textured cookies.
Bake Spooky Sugar Cookies In 42 Minutes
Ingredients:
Instructions:
Nutrition Facts:
| Calories | 130 |
|---|---|
| Protein | 1 g |
| Fat | 6 g |
| Carbs | 19 g |
| Fiber | 0 g |
| Sugar | 8 g |
| Sodium | 50 mg |
