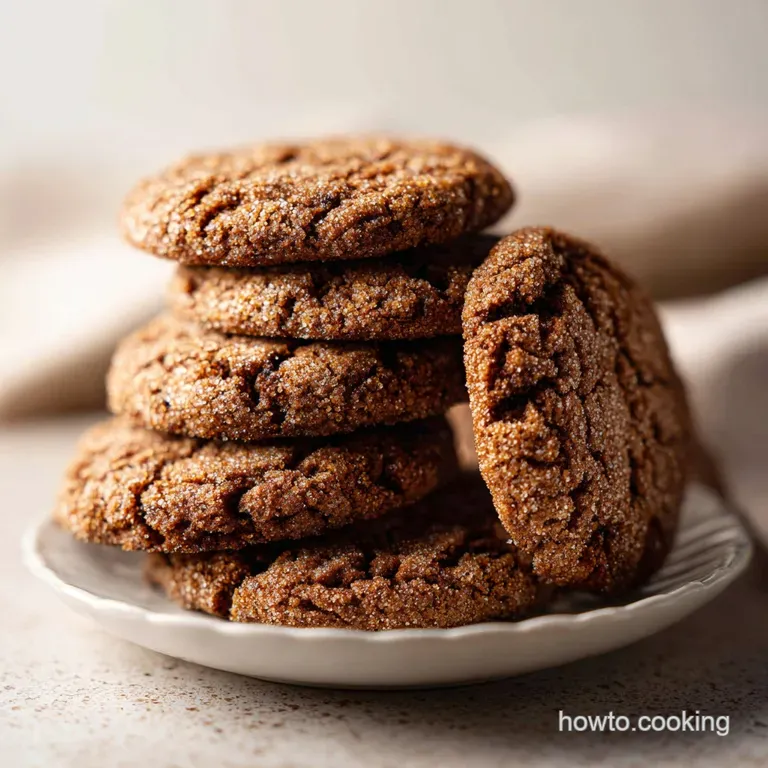
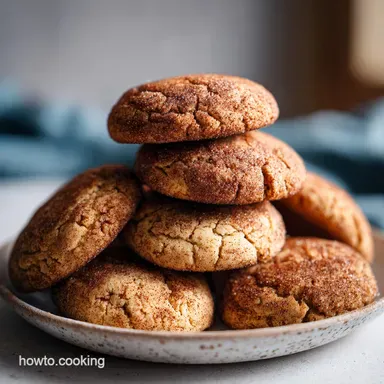
Buttery Brown Sugar Cinnamon Cookies
- Time:15 minutes active + 40 minutes (chilling/baking) = 55 minutes total
- Flavor/Texture Hook: A velvety, melt in-your mouth interior with a crackling cinnamon exterior.
- Perfect for: Cozy rainy days, lunchbox surprises, or holiday cookie swaps.
- Secrets to Buttery Brown Sugar Cinnamon Cookies 3
- Why This Chewy Texture Works
- Essential Stats and Precise Timing
- The Pantry Staples You Need
- Tools for the Best Batch
- Step-By-Step Baking Guide
- Troubleshooting Common Baking Issues
- Easy Swaps and Creative Add ins
- Keeping Every Cookie Fresh Longer
- Best Ways to Serve These
- Recipe FAQs
- 📝 Recipe Card
Secrets to Buttery Brown Sugar Cinnamon Cookies 3
Ever wondered why some cookies stay soft for days while others turn into hockey pucks by Tuesday morning? The secret isn't a fancy ingredient or a magic oven; it’s all about the moisture balance in your sugars. When I first started baking these, I used too much white sugar, and they shattered like glass.
It took a few messy pans to realize that light brown sugar is the real hero here. It brings that molasses heavy moisture that keeps the crumb tender even after they've cooled.
When you pull these out of the oven, the house smells like a warm hug. The cinnamon doesn't just sit on top; it’s baked into the very soul of the dough. It’s the kind of cookie that makes you want to pour a cold glass of milk and ignore your phone for twenty minutes.
We aren't going for a thin, crispy wafer here. We want something with enough "heft" to feel satisfying but enough "give" that it practically dissolves when it hits your tongue.
Getting that texture right requires a little bit of patience, especially when it comes to the butter temperature. I used to be the person who microwaved butter until it was a puddle because I was too impatient to wait. Big mistake. That leads to greasy, flat cookies.
Now, I wait for that perfect 65°F window where the butter is cool but pliable. Trust me, that ten minute wait changes everything about how the sugar and fat emulsify.
Why This Chewy Texture Works
There is a bit of kitchen logic behind why these turn out so much better than a standard store-bought mix. It comes down to how we handle the fats and the leavening agents.
- Acidity Response: The light brown sugar contains molasses, which is acidic. This reacts with the baking soda to create immediate lift, preventing the cookie from being too dense.
- Gluten Control: By mixing the dry ingredients only until the flour streaks disappear, we avoid overworking the dough. This keeps the structure "short" and tender rather than bread like.
- Sugar Hybridization: Using a 3:1 ratio of light brown sugar to white sugar ensures a soft, chewy center while providing just enough structural support to prevent the cookie from collapsing.
- Temperature Stabilization: Chilling the dough for 30 minutes solidifies the butter. This means the cookies spread slowly in the oven, allowing the edges to set before the middle melts completely.
Actually, if you want to see how much of a difference the fat state makes, you should check out my brown butter guide. While we use softened butter here for a classic lift, understanding how butter behaves at different temperatures is a total game changer for any home baker.
| Method | Time | Texture | Best For |
|---|---|---|---|
| Standard Oven | 10 minutes | Soft center, crisp edges | The classic, foolproof batch |
| Cast Iron Skillet | 18 minutes | Fudgy, dense, and gooey | Sharing with spoons and ice cream |
| Toaster Oven | 12 minutes | More pronounced browning | Quick 2 person snack cravings |
Choosing the right method depends entirely on your mood. The skillet method is fantastic for a "deep dish" feel, but the traditional oven route is what gives you those iconic, uniform bakery style rounds.
Most days, the 10 minute oven bake is the way to go because it balances the "snap" of the coating with the "pillowy" heart of the dough.
Essential Stats and Precise Timing
Before you reach for the mixing bowl, let’s look at the logistics. Precision is your best friend when you're working with a dough that relies on a specific fat to flour ratio. If you have a kitchen scale, I highly recommend you measure the flour by weight (345g) rather than volume. It’s the easiest way to ensure you don't accidentally end up with a dry, crumbly mess.
| Component | Science Role | Pro Secret |
|---|---|---|
| Cream of Tartar | Adds a mild tang and stabilizes air bubbles | This is what gives it that "snickerdoodle" signature chew |
| Light Brown Sugar | Provides moisture via molasses | Always pack it tight in the cup for accuracy |
| Saigon Cinnamon | High oil content for intense aroma | Bloom it in the dough to wake up the flavor |
The cream of tartar is often skipped by beginners, but don't do it! It provides a very subtle acidity that breaks down the protein in the flour just enough to make the texture velvety. Without it, you’re just making a basic sugar cookie.
The Pantry Staples You Need
Most of these ingredients are likely sitting in your kitchen right now. I always tell people to check the expiration date on their baking soda before starting. If it’s been open for more than six months, your cookies won't get that beautiful rise.
- Unsalted Butter (1 cup/226g): Softened to exactly 65°F. Why this? Allows for maximum aeration during the creaming stage.
- Light Brown Sugar (1.5 cups/330g): Packed firmly. Why this? Essential for the chewy, molasses infused texture.
- White Sugar (0.5 cup/100g): For the dough. Why this? Helps the edges get that slight "shatter" crunch.
- Large Egg (1): Must be at room temperature. Why this? Prevents the butter from curdling when mixed.
- Vanilla Extract (1 tbsp): Use pure extract if possible. Why this? Rounds out the spice and adds aromatic depth.
- All Purpose Flour (2.75 cups/345g): Sifted for a lighter crumb. Why this? Provides the structural backbone of the cookie.
- Saigon Cinnamon (2 tsp + 1 tbsp): Divided. Why this? Saigon variety has a higher oil content than regular cinnamon.
- Cream of Tartar (1 tsp): Don't substitute with lemon juice. Why this? Provides the unique chew and prevents sugar crystals.
- Baking Soda (1 tsp): Freshness is key. Why this? Reacts with the acids for a perfect rise.
- Sea Salt (0.5 tsp): Fine grain. Why this? Cuts through the sweetness and enhances the butter.
- Coating Sugar (0.25 cup/50g): White granulated. Why this? Creates the sparkly, sweet exterior.
For the coating, you’ll just need that extra 1/4 cup of sugar mixed with a tablespoon of cinnamon. If you're feeling adventurous, you can even look into a brown sugar pop tart recipe to see how these same flavor profiles work in a pastry crust!
Tools for the Best Batch

You don't need a professional kitchen, but a few specific items make the process much smoother. A stand mixer is the gold standard here because it has the power to cream the butter and sugar for the full four minutes without your arm falling off.
A 1.5 tablespoon cookie scoop is another "must" for me. Uniform size isn't just about looking pretty; it’s about making sure every cookie in the oven finishes at the exact same time. If you have some small and some large, the small ones will burn while the large ones stay raw.
Also, parchment paper or a silicone mat is non negotiable. Brown sugar has a high sugar content, and it will stick to a bare metal pan like glue.
step-by-step Baking Guide
- Cream the foundation. Place the 1 cup of softened butter and both sugars (1.5 cups brown, 0.5 cup white) into your mixer. Beat on medium high for 3-4 minutes until the mixture is pale, fluffy, and voluminous. Note: This creates the air pockets needed for a light texture.
- Add the liquids. Drop in the room temperature egg and 1 tablespoon of vanilla. Beat for 1 minute until the batter looks silky and emulsified.
- Prep the dry mix. In a medium bowl, whisk the 2.75 cups of flour, 2 teaspoons of cinnamon, cream of tartar, baking soda, and sea salt.
- Combine carefully. Turn the mixer to the lowest speed and gradually add the flour mixture. Mix until no white streaks remain, then stop immediately.
- Stabilize the dough. Cover the bowl and put it in the fridge for 30 minutes. until the dough feels firm to the touch. Note: This prevents the cookies from spreading into flat pancakes.
- Set the stage. Preheat your oven to 350°F (175°C) and line two large baking sheets with parchment paper.
- Create the coating. In a small bowl, whisk together the remaining 0.25 cup of white sugar and 1 tablespoon of cinnamon.
- Scoop and roll. Use a 1.5 tablespoon scoop to form balls. Roll them in the cinnamon sugar until they are completely encrusted and sparkling.
- Bake to perfection. Place balls 2 inches apart on the sheets. Bake for 10 minutes until the edges are golden but the centers still look slightly soft.
- The carryover cook. Let the cookies sit on the hot pan for 5 minutes until they firm up enough to move, then transfer to a wire rack.
Troubleshooting Common Baking Issues
Even the best bakers have "off" days where the cookies just don't behave. Usually, it's a matter of temperature either the oven or the butter.
Why Your Cookies Spread Too Much
If your cookies come out looking like thin lace instead of thick rounds, your butter was likely too warm. When butter is near its melting point before it hits the oven, it can't hold onto the air bubbles you whipped in during the creaming stage.
Why Your Cookies Are Hard or Cakey
A cakey cookie is often the result of too much flour. This happens if you "scoop" the flour directly with the measuring cup, which packs it down. Always spoon the flour into the cup and level it off, or better yet, use a scale.
| Problem | Root Cause | Solution |
|---|---|---|
| Greasiness | Butter was too soft/melted | Chill the dough for an extra 20 minutes |
| No Rise | Expired baking soda | Test soda in vinegar; it should bubble violently |
| Burnt Bottoms | Dark colored baking sheet | Lower oven temp by 25°F or use a silicone mat |
Common Mistakes Checklist
- ✓ Ensure the egg is room temperature to avoid breaking the butter emulsion.
- ✓ Do not skip the 30 minute chill time; it’s vital for the molasses to hydrate the flour.
- ✓ Use a cool baking sheet for the second batch never put dough on a hot pan.
- ✓ Measure your cinnamon carefully; too much can actually make the dough dry.
- ✓ Check your oven temperature with a thermometer to ensure it's truly 350°F.
Easy Swaps and Creative Add ins
If you want to put a personal spin on this batch, there are plenty of ways to tweak the flavor without ruining the chemistry.
- For a Toasted Crunch: Fold in 1/2 cup of toasted, chopped pecans. The earthiness of the nuts pairs perfectly with the Saigon cinnamon.
- Boosting the Spice: Add a 1/4 teaspoon of ground nutmeg or ginger to the dough for a more "chai inspired" profile.
- gluten-free Version: Use a high-quality 1:1 gluten-free flour blend (like King Arthur or Cup4Cup). Note: The texture will be slightly grainier but still delicious.
- dairy-free: Replace the butter with a vegan butter stick (avoid the tubs, they have too much water). The cookies will be slightly flatter but very crisp.
When scaling this recipe, keep in mind that spices shouldn't always be doubled. If you are making a double batch (48 cookies), only increase the salt and cinnamon to 1.5x the original amount to keep the flavors balanced.
For the liquids, you can stick to the direct double, but always work in batches if your mixer is on the smaller side.
Keeping Every Cookie Fresh Longer
Because of the high brown sugar content, these cookies stay soft longer than your average sugar cookie. You can keep them in an airtight container at room temperature for up to 5 days. To keep them extra "bakery fresh," put a single slice of white bread in the container.
The cookies will pull moisture from the bread, staying soft for even longer.
For long term storage, these freeze beautifully. You can freeze the baked cookies for up to 3 months. Just make sure they are completely cool before bagging them to prevent ice crystals. If you have leftover cinnamon sugar from the coating, don't throw it away!
Sprinkle it over your morning oatmeal or use it to top some buttered toast. It’s a zero waste win that makes breakfast feel like a treat.
Best Ways to Serve These
These cookies are a powerhouse on their own, but they really shine when paired with the right drink. A hot cup of Earl Grey tea or a dark roast coffee cuts through the buttery sweetness perfectly. If you're feeling indulgent, try making an ice cream sandwich.
Take two cookies and sandwich a big scoop of vanilla bean or salted caramel ice cream in the middle. Since the cookies stay soft even when cold, they won't break your teeth!
Another fun idea is to serve them warm with a little drizzle of melted white chocolate. The creaminess of the chocolate highlights the spice of the Saigon cinnamon. No matter how you serve them, just make sure you have enough to go around they tend to disappear the second they hit the cooling rack.
Happy baking!

Recipe FAQs
How to ensure the cookies stay soft and pillowy?
Beat the butter and sugars for the full 4 minutes. This aeration creates the volume needed for a light texture, while stopping the mixer immediately once the flour is incorporated prevents the gluten from toughening the dough.
Is it true that room temperature ingredients are optional?
No, this is a common misconception. Using 65°F butter and room temperature eggs is essential for achieving a stable, silky emulsion that holds air during the creaming process.
How to keep the cookies from spreading too much on the tray?
Chill the dough for the full 30 minutes before baking. This rest period stabilizes the fat content, ensuring the cookies maintain their intended shape in the oven. If you enjoyed learning this fat-control technique, see how we apply the same principle to our sugar cookie recipe.
How to tell when the cookies are finished baking?
Remove them from the oven at the 10-minute mark while the centers still look soft. The edges should be set, but the residual heat from the pan will finish cooking the centers as they rest for 5 minutes.
Can I prepare the dough in advance for later baking?
Yes, you can refrigerate the dough for up to 24 hours. Ensure the bowl is covered tightly to prevent the dough from drying out or absorbing other scents in the refrigerator.
What is the purpose of adding cream of tartar?
It provides the essential acidic component needed to activate the baking soda. This chemical reaction creates the specific lift and chewiness that defines the classic soft texture of these cookies.
How to get the most intense cinnamon flavor?
Use fresh Saigon cinnamon and ensure you coat the dough balls thoroughly. Combining 1 tablespoon of cinnamon with the 0.25 cup of white sugar provides an aromatic, intense crust that balances the richness of the brown sugar base.
Buttery Brown Sugar Cinnamon Cookies
Ingredients:
Instructions:
Nutrition Facts:
| Calories | 201 kcal |
|---|---|
| Protein | 1.8 g |
| Fat | 8.0 g |
| Carbs | 31.3 g |
| Fiber | 0.6 g |
| Sugar | 20.1 g |
| Sodium | 102 mg |
