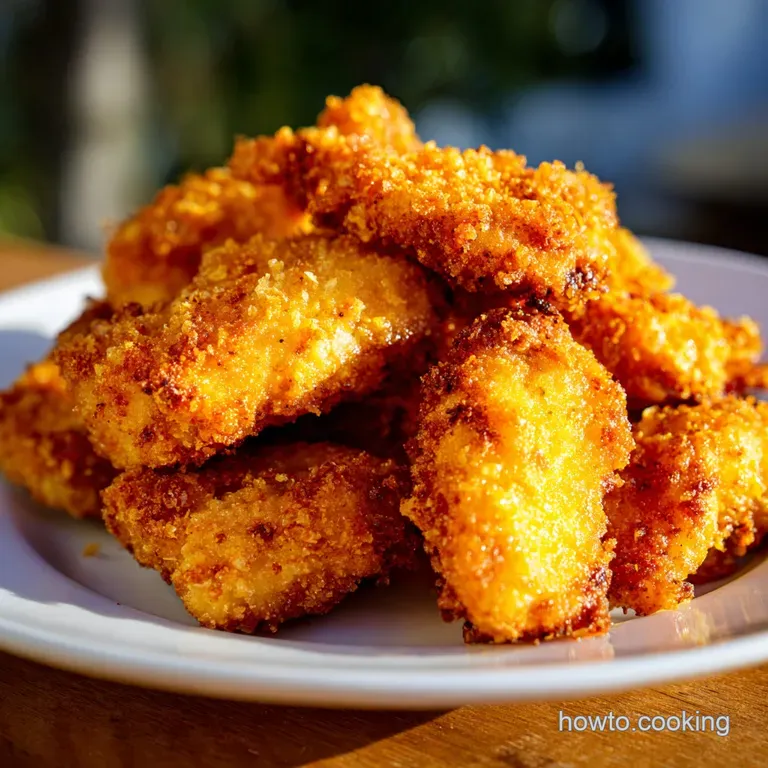
Air Fryer Chicken Thighs with Crisp Skin
- Time: Active 10 minutes, Passive 22 minutes, Total 32 minutes
- Flavor/Texture Hook: Shatter crisp skin with smoky garlic undertones
- Perfect for: Wholesome family dinners and low stress meal prep
- Mastering Crispy Bone In Air Fryer Chicken Thighs
- The Physics of the Ultimate Crunch
- Component Analysis
- Essential Elements for Success
- Necessary Tools for Air Frying
- Step-By-Step Frying Instructions
- Solving Common Frying Problems
- Making Recipe Adjustments
- Storage and Food Waste
- Presentation and Pairing Ideas
- Common Cooking Misconceptions
- Recipe FAQs
- 📝 Recipe Card
Mastering Crispy Bone In Air Fryer Chicken Thighs
The first time I pulled a batch of these out of the basket, I actually stopped and stared. There was no pool of grease, no soggy underside just the rhythmic, heavy sizzle of rendered fat hitting the bottom tray and an aroma of toasted garlic that filled the whole kitchen.
I tapped the skin with a knife, and it sounded like a hollow wooden board. It was the kind of culinary win that makes you feel like you've finally cracked a secret code.
We've all had that disappointing "fried" chicken that turns out limp and sad, but this method is different. It's about working with the air fryer instead of against it. I’ve made every mistake in the book, from overcrowding the basket to using too much oil, but those failures led me to this specific technique.
It’s a reliable, wholesome way to get dinner on the table that feels much more indulgent than it actually is.
You’re going to love how the smoked paprika blooms in the heat, giving the meat a deep, sun kissed color without needing any artificial additives. It’s become my Tuesday night ritual because it’s hands off enough that I can help with homework while the convection magic happens.
Let's get into how you can replicate this at home with total confidence.
The Physics of the Ultimate Crunch
Alkaline Surface Reaction: Adding baking powder raises the skin's pH level, which accelerates the Maillard reaction for a darker, more brittle crust. This chemical shift breaks down protein bonds in the skin, allowing it to stretch and crisp rather than remain rubbery.
| Thickness | Internal Temp | Rest Time | Visual Cue |
|---|---|---|---|
| 1 inch (standard) | 165°F (74°C) | 5 minutes | Skin is rigid and golden |
| 1.5 inches (large) | 165°F (74°C) | 7 minutes | Juices run clear when pierced |
| 0.5 inches (small) | 165°F (74°C) | 3 minutes | Deep amber color achieved |
Understanding these visual cues is just as important as the timer. While the air fryer is excellent at consistency, every machine's fan speed varies slightly. I always tell people to trust their eyes and ears when that sizzle starts to quiet down and the skin looks like parchment paper, you're in the "shatter zone."
Component Analysis
| Ingredient | Science Role | Pro Secret |
|---|---|---|
| Baking Powder | Texture Catalyst | Use aluminum free to avoid a metallic aftertaste on the skin. |
| Avocado Oil | Heat Conductor | Its high smoke point prevents the chicken from tasting burnt at high temps. |
| Smoked Paprika | Color & Flavor | The oil soluble pigments provide that "rotisserie" look without a grill. |
| Kosher Salt | Moisture Retention | The coarse grains draw out surface moisture for a faster, harder sear. |
I honestly recommend keeping a dedicated jar of this dry rub mixed up in your pantry. It saves so much time when you're rushing after work. If you find yourself out of avocado oil, don't panic any neutral oil with a high smoke point will do the job just as well.
Essential Elements for Success
For this recipe, we are focusing on maximizing flavor while keeping the process straightforward. Using bone in cuts is non negotiable if you want that juicy interior; the bone acts as an insulator, preventing the meat from drying out during the intense convection cycle.
- 4 Bone In, Skin On Chicken Thighs (approx. 1.5 lbs): Why this? The bone keeps meat succulent; the skin provides the necessary crunch.
- 1 tbsp Avocado Oil: Why this? High smoke point ensures the skin crisps without smoking up your kitchen.
- 1 tsp Kosher Salt: Why this? Essential for seasoning the meat through to the bone.
- ½ tsp Black Pepper: Why this? Adds a subtle, sharp bite to balance the fat.
- 1 tsp Smoked Paprika: Why this? Provides an earthy depth and beautiful reddish gold hue.
- 1 tsp Garlic Powder: Why this? Distributes flavor more evenly than fresh garlic in over high heat air frying.
- ½ tsp Onion Powder: Why this? Adds savory "umami" notes to the spice crust.
- 1 tsp Aluminum Free Baking Powder: Why this? The secret weapon for creating that brittle, bubbly skin texture.
| Original Ingredient | Substitute | Why It Works |
|---|---|---|
| Avocado Oil | Ghee (melted) | High smoke point with a rich, buttery finish. |
| Smoked Paprika | Chipotle Powder | Adds a similar smokiness but with significantly more heat. |
| Kosher Salt | Fine Sea Salt | Use 25% less as the grains are smaller and saltier by volume. |
| Garlic Powder | Granulated Garlic | Similar flavor profile but may require a slightly longer rub down. |
If you are looking for a more traditional oven approach for other parts of the bird, you might find my How to Cook recipe for chicken legs really helpful for those busy weeknights when the air fryer is occupied with sides.
Necessary Tools for Air Frying
You don't need a professional kitchen, but a few specific tools make this much easier. A basket style air fryer (like a Ninja or Cosori) usually provides better airflow than the toaster oven styles, though both work. I also highly recommend a pair of silicone tipped tongs.
Metal tongs can tear that delicate skin you worked so hard to crisp up, and we definitely want to avoid that.
An instant read meat thermometer is your best friend here. It’s the only way to be 100% sure the meat is safe without cutting into it and letting all those beautiful juices escape.
Since we are using bone in thighs, make sure you're probing the thickest part of the meat without hitting the bone itself, as the bone will give you a false high reading.
step-by-step Frying Instructions
- Dry the meat. Pat the 4 Bone In, Skin On Chicken Thighs with paper towels until the surface is matte. Note: Surface moisture is the enemy of crispiness; any water left on the skin will steam instead of fry.
- Oil the skin. Rub the 1 tbsp Avocado Oil over every inch of the chicken. Note: This acts as the glue for your spices and helps conduct the heat evenly.
- Mix the rub. Combine 1 tsp Kosher Salt, ½ tsp Black Pepper, 1 tsp Smoked Paprika, 1 tsp Garlic Powder, ½ tsp Onion Powder, and 1 tsp Aluminum Free Baking Powder in a small bowl.
- Coat thoroughly. Sprinkle the spice mixture over the thighs, pressing it firmly into the skin and the underside.
- Preheat the fryer. Set your air fryer to 200°C (400°F) and let it run empty for 5 minutes.
- Arrange the basket. Place the thighs skin side down in the basket, ensuring they do not touch. Note: Air must circulate around all sides to ensure even cooking.
- Initial fry. Cook for 12 minutes at 200°C (400°F) until the underside is lightly browned.
- The flip. Carefully turn the chicken over so it is skin side up.
- The final crisp. Cook for another 10 minutes until the skin is dark gold and crackling.
- Rest period. Remove the chicken and let it sit on a wire rack for 5 minutes. Note: This allows the juices to redistribute so they don't flood the plate when you bite in.
Chef's Tip: Freeze your dry spice rub for 10 minutes before applying it. I know it sounds wild, but the cold spices hitting the hot air prevents the garlic powder from scorched tasting bitterness.
Solving Common Frying Problems
Even with a great recipe, things happen. Most issues with this dish stem from temperature control or moisture. If your chicken looks pale after the full cook time, it's almost always a crowded basket. The air needs to "scrub" the surface of the meat to remove moisture and create that crust.
Why Skin Stays Rubbery
If you're pulling out chicken that looks cooked but feels chewy, the fat hasn't fully rendered. This often happens if the chicken was straight from the fridge and very cold. The exterior cooks before the fat underneath the skin has a chance to melt.
Next time, let the meat sit on the counter for 15 minutes to take the chill off.
| Problem | Root Cause | Solution |
|---|---|---|
| Smoke from fryer | Fat dripping onto heating element | Add 2 tablespoons of water to the bottom of the air fryer drawer. |
| Spices blowing off | Dry surface | Ensure you use enough oil to "anchor" the spices to the skin. |
| Soggy bottom | Lack of airflow | Use a wire rack insert or ensure you aren't using parchment paper that blocks holes. |
Common Mistakes Checklist
- ✓ Never skip the pat dry step; even a little moisture ruins the "shatter" effect.
- ✓ Ensure the baking powder is fresh; if it’s expired, the pH shift won't happen.
- ✓ Don't use aerosol sprays like Pam, as they can damage the non stick coating of your basket.
- ✓ Avoid checking the basket every two minutes; every time you open it, the temp drops significantly.
- ✓ Always place the chicken skin side down first to render the fat from the bottom up.
Making Recipe Adjustments
Adjusting the quantity of this recipe is quite simple because the thighs are individual units. However, you have to be careful about your air fryer's capacity. If you try to double this and cram eight thighs into a single basket, you'll end up with steamed chicken.
It’s better to work in batches than to sacrifice the texture.
- Scaling Up (8 servings): Double the ingredients, but cook in two separate batches. Keep the first batch warm in a 90°C (200°F) oven while the second cooks. Reduce the salt in the spice blend to 1.5 tsp to avoid over seasoning.
- Scaling Down (2 servings): Use 2 thighs and half the oil/spices. Use a smaller air fryer if available, but keep the cook time the same as the internal temp is what matters most.
- Boneless Variation: If using boneless, skinless thighs, reduce the total cook time to 12-15 minutes total, flipping halfway through.
Storage and Food Waste
Leftovers are actually a blessing with this recipe. I often chop up the cold meat the next day for a salad topper. The skin will naturally lose its "shatter" in the fridge, but you can bring it back to life easily. Store the cooked thighs in an airtight container for up to 4 days in the fridge.
For longer storage, they freeze beautifully for up to 3 months.
To reduce waste, don't toss the bones! Save the carcasses in a freezer bag. Once you have a few, you can simmer them with onion scraps and carrot ends to make a nutritious bone broth. It's a great way to respect the ingredient and get a second meal out of your budget friendly chicken.
When reheating, avoid the microwave at all costs it will turn the skin into a rubber band. Instead, pop the cold thighs back into the air fryer at 180°C (350°F) for 4-5 minutes. This wakes up the fats and recrisps the skin almost to its original glory.
Presentation and Pairing Ideas
I love serving these with a bright, acidic side to cut through the richness of the dark meat. A simple cucumber salad or a zesty slaw works wonders. If you want something more substantial, these are incredible next to roasted root vegetables or a fluffy quinoa pilaf.
For a bit of a "wow" factor, you can finish the chicken with a drizzle of something vibrant. If you have the time, you could even Sear Chicken with recipe for a spicy Amarillo sauce to serve on the side. The heat of the sauce against the smoky chicken skin is a combination that always gets cleaned plates at my house.
Common Cooking Misconceptions
One major myth is that you need to flip the chicken multiple times. In reality, flipping it once is the key to a consistent crust. Constant moving prevents the heat from building up on the skin surface, which is exactly where you want it. Trust the process and let the air do its job.
Another common belief is that the air fryer "dries out" meat. This only happens if you overcook it. Because the air fryer works so fast, the window between "perfect" and "dry" is smaller than a traditional oven.
This is why using a thermometer to hit that 165°F (74°C) mark is the difference between a wholesome meal and a tough one.
Finally,, many people think you shouldn't use oil in an air fryer. While it's true you don't need much, a thin coat of oil is essential for heat transfer. Without it, the spices will stay dry and "dusty" rather than blooming into a flavorful crust.
A little bit of healthy fat goes a long way in achieving that professional finish.

Recipe FAQs
How long do you cook chicken thighs in the air fryer?
22 to 24 minutes total. Cook bone-in thighs at 400°F (200°C) for 12 minutes skin side down, then flip and cook for 10-12 minutes more until the internal temperature reaches 165°F (74°C).
What temperature should I set the air fryer to for maximum crispiness?
Set the temperature to 400°F (200°C). This high heat is necessary to quickly render the fat beneath the skin and accelerate the Maillard reaction for a true crisp, similar to the high heat we use when learning the How to Make recipe for honey BBQ glaze.
Why is my air fryer chicken thigh skin still rubbery?
The skin was likely not dried thoroughly enough before seasoning. Surface moisture causes steaming rather than frying, resulting in a chewy texture; pat the skin completely dry with paper towels first.
Can I skip the baking powder, or will it affect the taste?
No, do not skip the baking powder if you want shatteringly crisp skin. It chemically raises the skin’s pH, promoting a brittle texture that you can't achieve with just oil and heat.
Is it true I should avoid overcrowding the basket to get a good crust?
Yes, overcrowding is the number one cause of soggy chicken in an air fryer. Air must circulate freely around every piece; if the thighs touch, the moisture they release gets trapped, causing them to steam instead of fry.
How do I know when the chicken thighs are done without cutting into them?
Use an instant read thermometer inserted into the thickest part, avoiding the bone, until it reads 165°F (74°C). Visually, the skin should look deep golden brown, rigid, and you should hear a quiet, steady sizzle when they are resting.
How should I reheat leftover air-fried chicken thighs?
Reheat them in the air fryer at 350°F (175°C) for 4 to 5 minutes. Avoid the microwave entirely, as this will destroy the crisp texture you worked hard to achieve; this quick blast of heat re-crisps the skin beautifully.
Crispy Air Fryer Chicken Thighs

Ingredients:
Instructions:
Nutrition Facts:
| Calories | 348 calories |
|---|---|
| Protein | 28.4 g |
| Fat | 25.2 g |
| Carbs | 1.2 g |
| Fiber | 0.3 g |
| Sugar | 0.1 g |
| Sodium | 615 mg |
