Skillet Wonders Nooven Foolproof Stovetop Flatbread
- Why This Stovetop Bread Recipe Is Your New Culinary Secret Weapon
- The Magic of Oven-Free Baking: Achieving Perfect Texture on the Hob
- Essential Components for Your Rustic Stovetop Bread
- Ingredient Integrity: Substitutions and Measuring Precision
- The Step-by-Step Assembly of Tender Dough
- Mastering the Cook: Transforming Raw Dough into Golden Stovetop Bread
- Elevating Your Experience: Serving Suggestions and Flavor Variations
- Recipe FAQs
- 📝 Recipe Card
Why This Stovetop Bread Recipe Is Your New Culinary Secret Weapon
There’s a specific kind of comfort that comes from the smell of freshly baked bread wafting through the house. However, that comforting aroma often comes with the commitment of preheating an oven, monitoring temperatures, and managing significant kitchen heat.
Enter the brilliant, surprisingly simple solution: this Stovetop Bread Recipe . This technique transforms everyday ingredients into gloriously soft, slightly chewy flatbreads cooked entirely on the hob.
Whether you're navigating a summer heatwave, dealing with a malfunctioning oven, or simply looking for one of the fastest Simple Bread Recipes Stove Top available, this method is genuinely revolutionary.
We are moving beyond complicated baking schedules and embracing the direct heat of the skillet to achieve fantastic results every single time.
The Magic of Oven Free Baking: Achieving Perfect Texture on the Hob
The core appeal of this method lies in its accessibility. Achieving a beautiful rise and perfectly speckled exterior doesn't require the consistent, surrounding heat of an oven. When executed correctly, cooking Bread On Stove Top creates steam pockets within the dough, forcing it to puff dramatically often resembling small balloons.
This process results in a tender interior texture that is miles away from standard, dense quick breads.
Perfecting the Quick Fix: When Ovens Aren't an Option
For those times when standard baking isn't feasible, this No Oven Bread Recipes approach is a lifesaver. It relies on yeast for that satisfying chew, yet drastically cuts down the overall timeline because you are only waiting for a single rise, not the long, slow bake required in an oven.
This focus on direct heat transfer makes it one of the best Easy Stovetop Bread solutions available when time is of the essence.
Setting Expectations for Your No-Fuss Flatbread
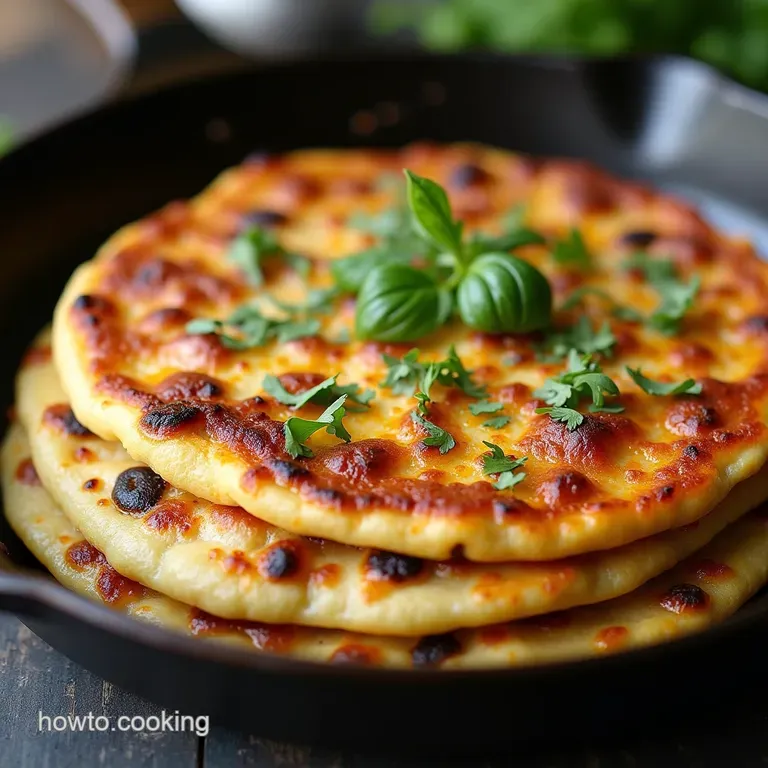
It is important to clarify that while this is yeast leavened bread, the final product is closer to a soft, thick flatbread than a traditional sandwich loaf. Expect a soft, yielding texture that is fantastic for dipping or wrapping.
We are aiming for a beautiful golden brown crust achieved through searing, rather than the deep, crackly exterior of an oven baked boule. This delicious result is why this Pan Bread Recipe Simple approach remains a staple in many kitchens.
A Deep Dive into Skillet Selection for Optimal Browning
The tool you choose is paramount to success when preparing Stove Top Bread . You absolutely need a heavy bottomed vessel. A thin aluminum pan will develop hot spots, leading to uneven cooking some parts will burn while others remain raw.
Your best friend here is cast iron or a very heavy stainless steel skillet. These materials retain and distribute heat evenly, which is critical for encouraging that signature puff and ensuring uniform browning across the entire surface of your flatbread.
For an even richer outcome, some enthusiasts use a Stovetop Dutch Oven Bread technique, though for this flatter style, a heavy skillet is generally preferred.
Essential Components for Your Rustic Stovetop Bread
This recipe champions simplicity, utilizing ingredients you likely already have in your pantry. We are looking for balance: enough structure from the flour, enough life from the yeast, and just enough fat to keep the dough supple.
The beauty of this Stovetop Bread is that it uses active dry yeast, meaning you don't have to worry about the specialized conditions that sourdough or instant yeast sometimes require.
Related Recipes Worth Trying
- Easy Amish Apple Fritter Bread Recipe for Weekend Brunch — Bake the ultimate Amish Apple Fritter Bread This recipe ditches the frying for a wonderfully moist loaf cake bursting with spiced apples Get the foolproof...
- Easy Almond Flour Bread Recipe Light Tender Loaf — Bake the ultimate low carb bread recipe This easy almond flour bread is light fluffy and perfect for sandwiches Forget dry glutenfree resultsthis loaf is a...
- Rich Buttery Sugar Plum Shortbread Cookies Recipe — Master these crumbly festive Sugar Plum Shortbread Cookies They perfectly blend classic buttery texture with spiced plum joy Easy Christmas baking awaits
Ingredient Integrity: Substitutions and Measuring Precision
While we embrace simplicity, precision in measurement especially for the leavening agents ensures success. Getting the ratio right between flour and water dictates whether you end up with a soft dough or a sticky mess.
Quantifying the Dry Goods: Flour, Salt, and Leavening Agents
For this yield of six medium flatbreads, you will start by combining approximately three cups (360g) of all-purpose flour with one teaspoon of fine sea salt. The salt is essential not just for flavor, but also for controlling the yeast activity.
We introduce 2 ¼ teaspoons of active dry yeast a standard packet alongside just one teaspoon of granulated sugar. That sugar is purely functional, serving as the initial food source to swiftly activate the yeast.
The Liquid Matrix: Water Temperature Matters
The water used to hydrate the yeast must be perfectly warm think about the temperature of a warm bath, around 105° F ( 40° C).
If the water is too cold, the yeast remains dormant; if it’s too hot, you will shock and kill the microorganisms, resulting in flat, lifeless bread. This step is the gateway to successful Stovetop Bread No Yeast flavor, even though we are using yeast!
Optional Enhancements: Flavor Boosters for Your Dough
While the basic dough is divine on its own, you can enrich it. Incorporating two tablespoons of olive oil or melted butter into the wet ingredients adds tenderness and a lovely, slightly rich flavor profile to the finished dough.
For those seeking immediate flavor gratification, consider adding dried herbs like rosemary or onion powder directly into the flour mixture.
The step-by-step Assembly of Tender Dough
Once your ingredients are gathered, the assembly process moves swiftly. Start by proving the yeast mix the warm water, yeast, and sugar together, allowing it to sit for 5 to 10 minutes until a frothy layer forms on top.
This visual confirmation assures you the biological engine driving the bread's rise is fully operational. Next, incorporate the salt and olive oil into this foamy liquid before gradually stirring in the three cups of flour until a shaggy mass forms.
This initial mixture needs minimal stirring; we rely on kneading to fully develop the gluten structure.
Mastering the Cook: Transforming Raw Dough into Golden Stovetop Bread
The cooking phase is where the visual transformation occurs, turning a simple disk of dough into a beautifully cooked flatbread. This requires patience and astute heat monitoring.
Waking Up the Yeast: Activating Your Leavening Agent
As noted, ensuring that beautiful, foamy layer appears on your yeast mixture is non-negotiable for a successful rise. If you skip this vital step, you might end up attempting to bake Stovetop Bread No Yeast results, simply yielding tough, dense unleavened bread instead of the soft texture you crave.
Kneading Techniques for the Smoothest Finish (Minimal Effort Required)
Turn the shaggy dough out onto a lightly floured surface. Kneading for 6 to 8 minutes develops the gluten strands, giving the bread its elasticity and trapping the gases produced by the yeast.
You are looking for a dough that feels smooth, springs back lightly when poked, and is no longer sticky. This physical work sets the foundation for the puffing action to come.
The Crucial Resting Phase: Allowing the Dough to Bloom
Place the kneaded dough ball into a lightly oiled bowl, turning it once to coat the surface. Covering this tightly plastic wrap works best and setting it in a warm spot for 45 minutes allows the dough to double in size.
This first proof is essential for flavor development and achieving that desirable airy crumb structure in your Stove Top Bread .
Heat Management: Achieving That Ideal Medium Low Simmer
Once risen, gently deflate the dough, divide it into six equal pieces, and roll each into a disc roughly ¼ inch thick. Now comes the heat management crucial for any Pan Bread Recipe Simple . Place your dry, heavy skillet over medium high heat.
Let it get truly hot about five minutes should do it. Lay a rolled out disc into the dry, hot pan. Cook for 2– 3 minutes until you see large bubbles forming on the surface and the underside has clear brown spots. Flip quickly; the second side often puffs up dramatically.
If the bread browns too quickly without puffing, your heat is too high. If it dries out without browning, the heat is too low. Finding that sweet spot ensures a perfectly cooked result.
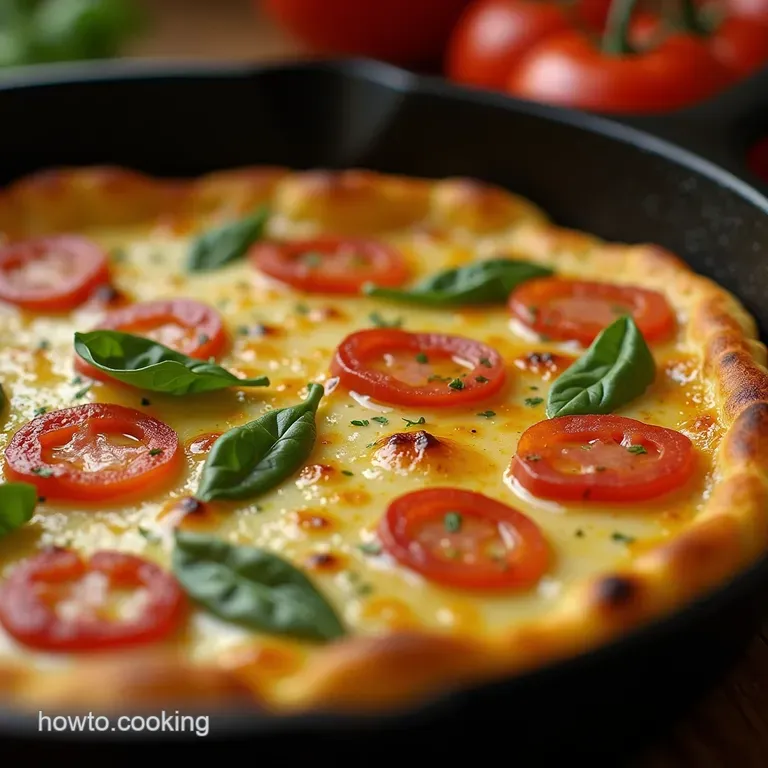
Elevating Your Experience: Serving Suggestions and Flavor Variations
The beauty of homemade flatbread is its versatility. These golden discs are phenomenal when eaten immediately, their warmth allowing butter to melt perfectly into the crevices.
Beyond Butter: Creative Ways to Top Your Freshly Made Flatbread
While a simple spread of salted butter is heaven, these work wonderfully as a vehicle for bolder flavors. Brush the hot bread with melted butter infused with finely minced garlic and fresh parsley for an immediate herbaceous lift. Alternatively, use them to scoop up homemade lentil dhal or a rich, slow cooked stew.
Long Term Storage Solutions for Leftover Loaves
While nothing beats freshly cooked Stovetop Bread , if you have leftovers, the best preservation method is to store them stacked and wrapped tightly in aluminum foil or a sealed bag at room temperature for up to two days.
To refresh them later, simply reheat them briefly in a dry, hot skillet for about 30 seconds per side until they regain their softness.
Fixing Flatness: Why Isn't My Stovetop Bread Puffing Up?
If your bread remains stubbornly flat, the issue usually lies in two areas: either the yeast was dead or inactive (water too hot/cold), or the pan wasn't hot enough when the dough was added. A lack of initial searing heat prevents the steam from building rapidly enough to force the dough upward.
Double check your water temperature and ensure your skillet is smoking slightly before adding the dough next time.
Scaling Up: Adjusting Ratios for Larger Batches
This recipe is easily scalable for feeding a crowd. For every doubling of the flour (six cups/720g), simply double the yeast, salt, water, and oil. Just remember that you will need to cook the flatbreads in batches; do not overcrowd your skillet, as this lowers the temperature dramatically and leads to steaming rather than searing.
Continue enjoying this simple, rewarding Stovetop Bread Recipe !
Recipe FAQs
My Stovetop Bread isn't puffing up like a balloon what gives?
Ah, the dreaded flatbread flop! This is usually down to two things: either your skillet isn't hot enough, or you've overworked the dough, knocking out too much of the trapped gas. Make sure your cast iron is properly scorching hot before placing the dough in. Also, handle the dough gently after the proofing stage!
Can I make this Stovetop Bread ahead of time, or how should I store leftovers?
Like most fresh breads, this is best eaten immediately, still warm from the pan! If you have leftovers, store them tightly wrapped in plastic wrap at room temperature for up to two days; they’ll lose a bit of their springiness but remain tasty.
To refresh them, give them a quick blast in a dry, hot skillet for about 30 seconds per side.
I don't have a cast iron pan; can I use a regular non-stick skillet?
You can, but results may vary a heavy pan is crucial for retaining that high, even heat needed for a good puff. If you must use a non-stick pan, ensure it’s the thickest one you own and give it a good five minutes over medium high heat to get properly seasoned with heat before cooking.
Low heat equals a dry, tough flatbread, so err on the side of hot!
I’m short on time; can I skip the yeast rising time for this Stovetop Bread?
Technically, you could, but the texture will be more like a thick cracker or chapati, rather than the soft, slightly chewy bread described. The rising time allows the yeast to create the flavour and structure needed for that glorious puff.
If you're in a real rush, substitute the yeast entirely with baking powder and soda, but you must skip the rising stage completely.
What sort of oil or fat is best to use both in the dough and for brushing afterwards?
We recommend a light olive oil in the dough for a lovely richness, similar to what you might use in a decent focaccia. After cooking, nothing beats brushing the hot bread with proper salted butter it just gives it that comforting, straight from-the-farmhouse taste.
Melted ghee is also a brilliant, flavourful alternative for brushing!
Easy Stovetop Flatbread

