Festive Easter Cookie Decorating: Unleash Your Inner Artist
- A Sweet Introduction to Easter Cookie Decorating
- Essential Ingredients Guide for Easter Cookie Decorating
- Professional Cooking Method: Mastering Easter Cookie Decorating
- Pro Tips & Secrets for Easter Cookie Decorating
- Perfect Presentation for Your Cookies
- Storage & Make-Ahead Tips
- Creative Variations for Easter Fun
- Complete Nutrition Guide
- Frequently Asked Questions
- 📝 Recipe Card
A Sweet Introduction to Easter Cookie Decorating
So, picture this: it’s easter weekend, and the sweet scent of cookies fills the air. it’s a family tradition for me, one that started when i was just a kid, standing on our kitchen counter, eager to splash vibrant colors all over sugar cookies.
This year, i’m totally channeling my inner artist with easter cookie decorating ! hope you’re ready to dig in ’cause we’re about to take a journey back in time and whip up some beautiful treats that are just as delicious as they are fun to decorate.
You know, cookie decorating isn’t just about satisfying your sweet tooth. it’s about creating memories laughing with your kids or friends as icing goes everywhere, sometimes ending up on our noses more than on the cookies! every icing squirt, every sprinkle added, is a little burst of joy.
That’s why these easter egg cutout cookies hold a special place in my heart. the tradition dates back ages, combining both culinary and artistic expression for families across generations.
Nowadays, they seem to be everywhere instagram, pinterest, and even grandma's kitchen!
Recipe Overview
Let’s dive into this creative endeavor! the origins of decorated cookies can be traced back to the early 15th century in europe, where cookie tastic bakers would craft treats during festive seasons, including easter.
Today, the historical roots have transformed into an exuberant family activity, and honestly, who doesn’t love a cookie that looks as good as it tastes?
Now, you might be wondering, “how long does it take?” well, making these delights is quite easy. you’re looking at about 1 hour of total time (plus some cooling and decorating time).
Don't worry; this isn’t a master chef challenge it’s an easy peasy project, perfect for all levels.
Oh, and let’s talk about cost. this recipe serves up to 24 cookies, and you can expect to spend around $10 on ingredients.
Seriously, entertaining a crowd with bunny head sugar cookies decorated and happy easter cookies decorated doesn’t have to wipe out your wallet!
Key Benefits
All right, let’s get real for a second. these cookies not only look fabulous, but they also offer a few benefits worth chatting about! first up you can control what goes into them.
By making your own, you can opt for healthier ingredients or substitute options to suit dietary needs. infuse your cookies with unique flavors, or go for a classic vanilla.
The choice is yours!
Plus, they’re perfect for special occasions! whether it’s easter brunch or a vibrant spring gathering, your easter iced sugar cookies become the star of the table.
They also make great gifts. who wouldn’t be delighted to receive a box of frosted easter cookies ?
Decorating them is an adventure. try your hand at easter egg cookie designs or get fancy with easter royal icing cookie ideas .
No matter how you style them, you’ve got a sweet treat that can showcase everyone’s creative flair.
Transition to Ingredients Section
Before we jump into mixing, let’s gather our supplies! it’s like gathering your gear for a fun day out; make sure you have all your ingredients and tools ready.
We need flour, sugar, butter, and more to create those delightful decorated egg cookies . get excited; the fun is just beginning!
Now, let’s get started on crafting those delicious Easter treats that are going to steal the show! Happy baking! 🐰🌷
Essential Ingredients Guide for Easter Cookie Decorating
Getting into the groove of holiday baking can be such a joy, especially when it’s time to whip up some easter cookies .
Trust me, there’s nothing quite like mixing in love, a dash of creativity, and a sprinkle of fun! today, we’ll dig deep into the essentials to make your easter egg cookie decorating experience not just tasty, but a total blast.
Premium Core Components
First, let’s talk about what you need. Here’s your go-to list of ingredients, with detailed measurements in both US and metric. For sugar cookies, you’re gonna need:
- 2 ¾ cups (340g) all-purpose flour
- 1 tsp baking powder
- ½ tsp salt
- ¾ cup (170g) unsalted butter, softened
- 1 cup (200g) granulated sugar
- 1 large egg
- 1 tsp vanilla extract
Quality indicators ? You want your butter to be soft but not melty. If your egg has a nice bright yolk, you know you’re in business! And don’t forget about storage : keep your flour in a cool, dry place, and your cookies can last up to a week in an airtight container!
I’ve had my fair share of cookie catastrophes by not storing them right, so trust me on this!
Signature Seasoning Blend
So you’ve got your base ingredients, but now it’s time to think about flavor. essential spice combinations can take you from “meh” to “wow!” adding a little lemon zest or a sprinkle of nutmeg to your dough can bring everything to life.
Don’t forget your herb selections ! simply using a bit of vanilla or almond extract can elevate your cookies into luxury territory! oh, and try pairing your icing with flavors like raspberry or mint for a twist.
Think regional variations : if you’re up north, consider a bit of maple a little flavor from home goes a long way!
Smart Substitutions
We all know life can throw curveballs. so, what if you run out of butter? common alternatives like coconut oil or melted margarine can save the day.
Dairy-free? swap milk for almond milk in your icing!
Got some friends with dietary restrictions? use gluten-free flour, or try aquafaba instead of eggs if you’re vegan. these seasonal options not only help you adapt but can make your cookies better than ever! i once threw in pumpkin puree and they turned out fabulous.
Kitchen Equipment Essentials
Now, don’t underestimate the tools of the trade ! Here’s what I consider must haves:
- Mixing bowls (grab a few! You’ll need them!)
- Rolling pin for that perfect dough thickness
- Cookie cutters —the Easter themed ones are a total must!
- Piping bags or squeeze bottles for the icing magic
And hey, if you don’t have a rolling pin, a wine bottle will do the trick. Just make sure it’s clean last thing you want is a surprise flavor in your cookies!
Tips on Preparation and Storage
Time to get your prep game down! with holiday baking, the secret is chilling your dough for at least 30 minutes; this helps avoid spreadage during baking.
Ah, the horror of flat cookies! plus, keep that icing covered while you work to prevent it from hardening!
Speaking of icing, test your consistency before decorating. you want it to be smooth, so you can drizzle and spread.
Oh, and let those decorated cookies dry completely before stacking them. i learned that the hard way half baked icing can be a real mess!
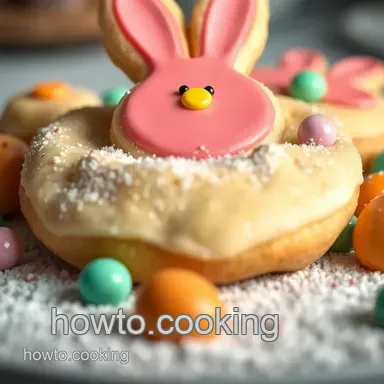
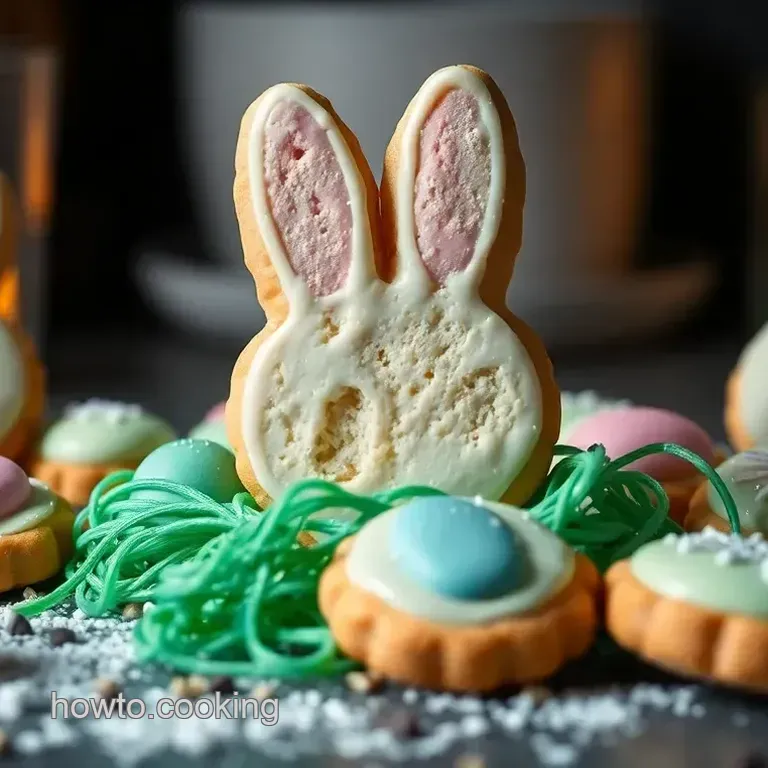
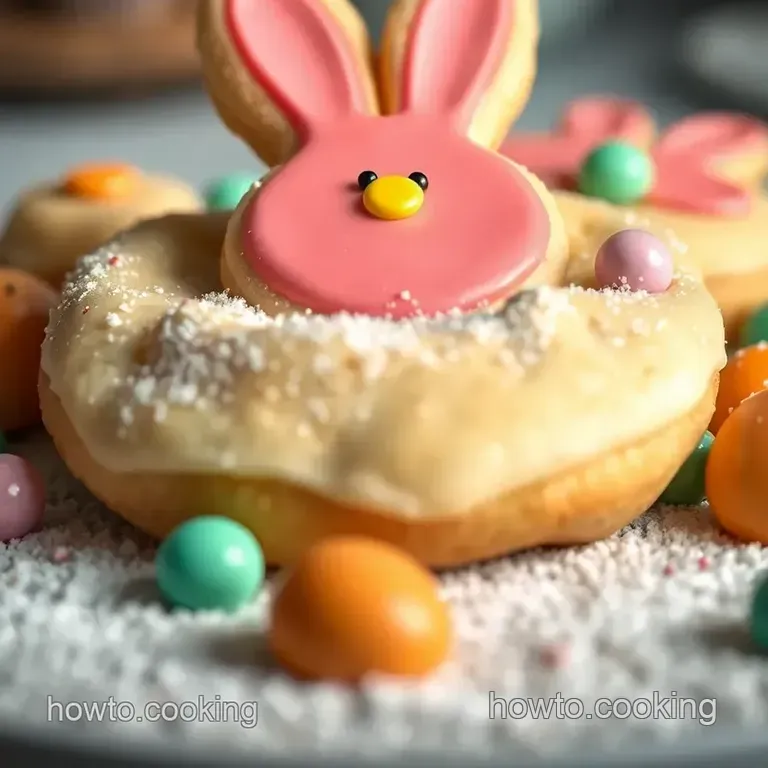
Looking to dress these babies up? think about mixing easter basket sugar cookies with colorful sprinkles and edible glitter for that magical touch.
And hey, don't forget to have fun with it! decorate some bunny head sugar cookies or kick it old school with traditional easter iced sugar cookies.
Get ready, because the next step is all about bringing your creative visions to life with step-by-step decorating instructions! So stay tuned! 🌟
Professional Cooking Method: Mastering Easter Cookie Decorating
Oh my gosh, folks! easter is just around the corner, and you know what that means? it’s time for some serious cookie decorating! and when it comes to christmas cookies, i’m all about that soft, buttery goodness topped with the kind of vibrant icing that even the easter bunny would be jealous of.
Let's dig into how to make the perfect easter cookies, with both tasty treats and killer decorating techniques!
Essential Preparation Steps
First things first, let’s talk about mise en place . it’s a fancy french term that just means getting everything ready before you start cooking.
Gather your ingredients: flour, sugar, butter, eggs, and maybe a sprinkle of fun toppings like edible glitter. it sounds basic, but trust me, having everything ready saves you from chaos when you dive into the decorating phase.
Time management is key too. set a timer! you’ll want to chill your dough for about 30 minutes . use that time to clean up your prep area or start thinking about your decorating game plan.
Maybe browse some cute easter cutout cookies decorating ideas online.
Now, organization isn’t just for your sock drawer, folks. keep your baking sheets, cookie cutters, and decorations all in one spot.
It’ll make your life so much easier as the sugary delight unfolds. and safety considerations? don’t forget to wash your hands and keep counters clean.
We want these cookies sweet, not contaminated!
Step-by-step Process
Let's break down the journey to cookie greatness. Here’s a simple, clear instruction list you can follow:
Prepare the Cookie Dough
- Whisk together 2 ¾ cups of flour , 1 tsp of baking powder , and ½ tsp of salt in one bowl.
- In a separate bowl, beat ¾ cup of softened butter with 1 cup of sugar until light and fluffy.
- Add in 1 large egg and 1 tsp of vanilla extract . Mix it all together!
- Gradually fold the dry ingredients into the wet mixture. Chill for 30 minutes .
Bake the Cookies
- Preheat your oven to 350° F . Roll out the dough to about ¼-inch thickness .
- Use your cookie cutters and make those adorable shapes, then pop them onto parchment lined baking sheets.
- We’re talking 10- 12 minutes baking time until they’re lightly golden around the edges.
Prepare the Royal Icing
- Combine 2 egg whites and 3 cups of powdered sugar in a mixing bowl. Mix until it’s smooth and glossy !
- You can separate the icing into bowls and tint them with food coloring. Pastel colors scream Easter, right?
Decorate Those Cookies
- Load up your piping bags with icing and get creative! Use outlining, flooding, and of course, sprinkle it up!
- Don’t forget to let the icing dry totally before you start stacking them for storage. Ensure complete hardening trust me, it's worth it!
Expert Techniques
Now let’s get to the nitty gritty. I call these critical steps because they’ll determine how fabulous your cookies will turn out.
Quality checkpoints during baking are to ensure that the cookies don’t puff up too much. if you're seeing a lot of rise, your oven might be too hot.
Test by dropping the temperature down a notch.
If your royal icing seems a bit too runny, don’t panic. simply add more powdered sugar until you achieve that dreamy consistency.
And for the best looking easter egg cookies decorated royal icing , make sure your piping tip is the right size.
Too big, and you'll have a super messy cookie!
Success Strategies
Here’s where I spill the secrets. Want to avoid common mistakes? Chill your dough well, so it doesn’t spread too much while baking. And don’t rush the decorating process; patience is key.
Quality assurance is crucial. before serving, ensure that your cookies look visually appealing and taste delicious. if you want a make-ahead option, these cookies freeze beautifully! just don’t ice them until you’re ready to serve.
So there you have it! whether you’re crafting bunny head sugar cookies decorated or diving into those easter egg cutout cookies , you’re in for a treat.
Gather your loved ones, roll up your sleeves, and bring a little festive sparkle into your life.
Believe me, decorating these cookies will evoke all sorts of happy memories. Watch out for my next section, where I’ll cover Additional Information that’ll make you and your cookies the stars of the Easter table! Happy baking! 🐣
Pro Tips & Secrets for Easter Cookie Decorating
Oh my gosh, let me tell you, decorating easter cookies can feel like a big project, but it doesn’t have to be! whether you’re going all-in with easter iced sugar cookies or just want some simple egg cookie decorating , i’ve got some nifty tricks up my sleeve.
Chef’s personal insights
first off, i learned the hard way that chilling the dough is huge. it keeps the cookies from spreading too much when they’re baking.
Trust me on this one; also, when it comes to royal icing, it should be glossy, kinda like a happy little mirror.
If it’s not smooth, you might end up with some lumpy designs instead of those adorable easter egg cookie designs you’re aiming for.
Time saving techniques
now, if you’re in a hurry, you can make the dough a day ahead. just wrap it tight and pop it in the fridge; you’ll save a ton of time! oh, and don’t forget to line those baking sheets with parchment paper.
Not only does it save you from scrubbing, but your cookies will slide right off like a dream.
Flavor enhancement tips
feeling adventurous? try adding a splash of almond extract to the dough. it gives a dreamy flavor and pairs so well with the sweetness of those decorated egg cookies .
Your friends and family will be like, “whoa, what’s your secret?”
Presentation advice
let’s talk presentation. use bright colors for your icing and think about how various spring themed cookies decorated can all come together.
You’d be surprised how a little thought can make your cookies look like they just popped out of a bakery!
Perfect Presentation for Your Cookies
Okay, so here’s where the fun really happens. when it comes to plating techniques , i recommend using a colorful cake stand.
It makes everything look a little fancier! stack those cookies high for an eye-catching effect people’ll be snapping pics left and right.
Garnish ideas
sprinkles? yes, please! edible glitter is my best friend during easter! pop on some festive sprinkles or even shredded coconut dyed green for a fun “grass” effect under your bunny sugar cookies royal icing .
It’s all about those little details that can make your treats look instagram worthy.
Color combinations
pastels are the vibe here. soft pinks, blues, and yellows scream springtime. mix those colors for your icing and watch your cookies come alive.
Each cookie could be like a mini piece of art!
Storage & make-ahead Tips
Storing these beauties is a cinch. If you keep them in an airtight container at room temp, they’ll last about a week. But honestly, they’re gone before you know it!
Preservation Methods
For the best freshness, layer your cookies with parchment paper in between each layer. That way, they won’t stick together or lose their cute decorations.
Reheating instructions
you probably won't need to reheat unless you're enjoying them with a warm beverage. if you do, just pop them in the microwave for about 5 seconds.
You want them soft, not melted messes!
Creative Variations for Easter Fun
The beauty of Easter cookie decorating is that you can totally switch it up. Want to go gluten-free? Use a 1:1 gluten-free flour blend —no problem!
Flavor adaptations
how about a spicy twist? add some cinnamon or nutmeg into your sugar cookie dough for a seasonal vibe.
If chocolate is your jam, swap out some flour for cocoa powder and make triple decker chocolate bunnies!
Dietary Modifications
You can easily make these cookies vegan just swap out butter for margarine and use aquafaba to replace egg whites in your royal icing. Totally simple, I swear!
Seasonal Twists
Consider adding lemon zest into the dough for a fresh spring taste. It’s a game changer and pairs perfectly with any
decorated egg cookies
.
Complete Nutrition Guide
Now, while these cookies are definitely a treat, it’s good to know what you’re munching on. A single cookie is around 120 calories, which isn’t too bad when they’re filled with love and creativity!
Health benefits
i mean, sugar cookies aren’t exactly health food, but hey, joy is part of a balanced diet, am i right? decorating cookies can be a fun way to spend quality time with loved ones, which we all need more of.
Portion guidance
moderation is key. maybe share a plate with friends or bring them to a potluck, so you’re not left alone with 24 cookies.
Trust me, those “happy easter cookies decorated” are way better shared!
In the end, just get in there and have fun with your easter cookie decorating this year! remember, it’s not about perfection; it’s about creating sweet memories with those you love.
Happy decorating, friends! 🐣✨
Frequently Asked Questions
What tools do I need for Easter cookie decorating?
For successful Easter cookie decorating, you’ll want to gather some essential tools: mixing bowls, an electric mixer or whisk, a rolling pin, baking sheets, and parchment paper. Don't forget cookie cutters in various Easter shapes and piping bags or squeeze bottles for icing to bring your designs to life!
How can I make my royal icing more vivid for Easter cookie decorating?
To achieve vibrant colours in your royal icing, make sure to use high-quality gel food coloring rather than liquid ones, as they won't dilute your icing's consistency. Start with a small amount and gradually add more until you reach your desired shade. A little goes a long way!
Can I prepare the cookie dough ahead of time?
Absolutely! You can prepare the cookie dough in advance and freeze it for up to three months. Just wrap it tightly in cling film and place it in an airtight container. When you're ready to bake, simply thaw it in the fridge overnight before rolling out and cutting your cookies.
What if my cookies spread too much during baking?
If your cookies spread during baking, it generally means that the dough was too warm or not chilled enough. Make sure to chill the dough for at least 30 minutes before baking to keep their shape. If you're still having issues, you might consider adding a bit more flour to the dough next time!
How should I store my decorated cookies?
To keep your decorated cookies fresh, store them in an airtight container at room temperature. If you’ve used royal icing, make sure it’s completely dry before stacking the cookies to avoid smudging the decorations. They can typically last for 1-2 weeks, so enjoy those sweet Easter treats!
Are there any gluten-free options for Easter cookie decorating?
Yes, you can certainly enjoy Easter cookie decorating with gluten-free cookies! Simply substitute regular all-purpose flour with a 1:1 gluten-free flour blend. Just keep in mind that the texture may vary slightly, but you’ll still have a delightful treat to decorate!
Festive Easter Cookie Decorating Unleash Your In