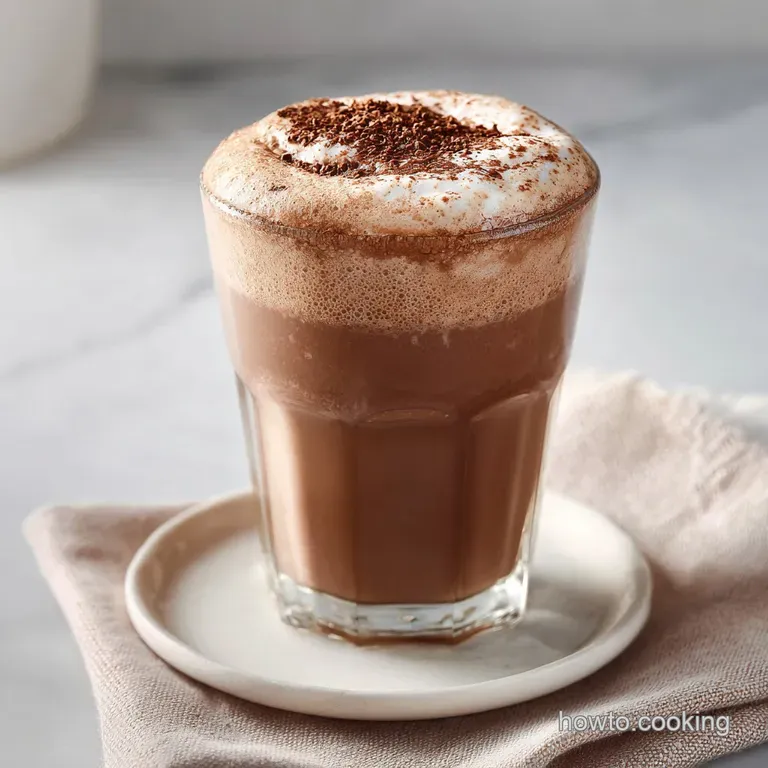
Frozen Mocha Hot Chocolate Recipe
- Time: Active 10 mins, Passive 5 mins, Total 15 minutes
- Flavor/Texture Hook: Silky, bittersweet mocha slush with a shatter crisp icy finish
- Perfect for: Mid afternoon caffeine boosts or a wholesome family dessert alternative
- Refreshing Frozen Mocha Hot Chocolate Bliss
- The Science of Velvety Slush
- Flavor Matrix and Component Analysis
- Essential Gear For Perfect Results
- Master the Blend Methodology
- Fixing Common Blending Mistakes
- Customizing for Specific Dietary Needs
- Smart Storage and Reuse Guidelines
- Perfect Pairings for Your Treat
- Common Myths
- Recipe FAQs
- 📝 Recipe Card
Refreshing Frozen Mocha Hot Chocolate Bliss
I still remember the first time I tried to make a frozen treat for my kids on a humid July afternoon. I thought I could just toss some cocoa powder, cold milk, and ice into a blender and call it a day. What came out was a watery, gritty disaster that separated before I could even find the straws.
The cocoa settled at the bottom in sandy clumps, and the ice was far too chunky. It was a complete flop, but it taught me my most valuable lesson about working with chocolate: it needs a little warmth to truly shine, even when the goal is an ice cold result.
Since that kitchen fail, I’ve spent years refining the process to get that coffee shop consistency at home. This version of Frozen Mocha Hot Chocolate is the one I make when I want to feel confident serving guests or simply want to treat my family to something that feels sophisticated but remains wholesome.
The aroma that fills the kitchen when the hot espresso hits the Dutch processed cocoa is enough to stop anyone in their tracks. It’s a deep, mahogany scent that promises a much more flavorful experience than any pre mixed powder ever could.
We’re moving past the "shortcut" methods today. While those are fine for a quick fix, they often lack the nutritional balance and depth of flavor we crave. By using real maple syrup and high-quality cocoa, you get a drink that is rich in antioxidants and free from the processed aftertaste of corn syrups.
It's about taking those few extra minutes to bloom the chocolate, which transforms the entire experience from a simple drink into a velvety, frozen indulgence that holds its own.
The Science of Velvety Slush
Thermal Blooming: Mixing cocoa with hot espresso dissolves the fat and solids, creating a stable emulsion that prevents a gritty mouthfeel.
Molecular Suspension: The maple syrup acts as an invert sugar, which interferes with ice crystal formation to keep the texture smooth rather than jagged.
Fat Stabilization: The proteins in 2% milk wrap around the air bubbles during blending, providing the structure needed to support the heavy cocoa solids.
| Method | Time | Texture | Best For |
|---|---|---|---|
| High Speed Blender | 10 minutes | Perfectly smooth | Ultimate consistency |
| Food Processor | 12 minutes | Thick and chunky | Spoonable treat |
| Hand Blended | 15 minutes | Coarse and icy | Minimal equipment |
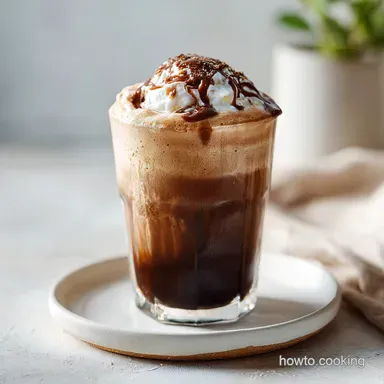
Finding the right balance between ice and liquid is the secret to a drink that doesn't melt into a puddle immediately. If you want a deeper chocolate profile, you might even consider trying this technique alongside my Ridiculously Rich Chocolate recipe for a decadent drizzle.
Flavor Matrix and Component Analysis
| Ingredient | Science Role | Pro Secret |
|---|---|---|
| Dutch processed cocoa | pH Neutralization | Sift it first to ensure the hot espresso can penetrate every particle instantly. |
| Hot Espresso | Solvent and Flavor Enhancer | Use a dark roast to mimic the toasted notes of the cocoa beans. |
| Maple Syrup | Viscosity Agent | Grade A Amber provides the best sugar to water ratio for a smooth slush. |
| 2% Milk | Emulsifier | Keep it ice cold until the very second it hits the blender to shock the hot base. |
There is a fascinating chemistry at play when we combine these specific elements. The salt, though it seems minor, is actually a flavor enhancer that suppresses bitterness while highlighting the fruity undertones of the coffee. Without that tiny pinch, the drink can taste flat and overly sweet.
Essential Gear For Perfect Results
To achieve that professional grade shatter in your ice, you really need a blender with a bit of "oomph." A high speed blender, like a Vitamix or a Ninja, is ideal because it pulverizes the 3 cups (450g) of large, solid ice cubes into a fine snow in seconds.
If you use a lower powered motor, you'll likely end up with larger ice chunks that make the drink harder to sip through a straw.
You'll also need a way to pull 2 shots (60ml) of hot espresso. If you don't have an espresso machine, a Moka pot or a very concentrated French press brew will work, though the crema from a true espresso adds a unique silkiness to the base. Finally,, grab a small heat proof whisk.
We want to ensure the 3 tbsp of cocoa is fully integrated into the hot liquid before it ever sees the blender. This step is non negotiable for a flavorful result.
Master the Blend Methodology

Start by gathering your 3 tbsp Dutch processed cocoa and 2 shots of hot espresso. Place the cocoa in a small bowl and pour the hot coffee directly over it. Use a whisk to stir until the mixture is a smooth, glossy paste with no visible dry spots.
Add the 2 tbsp maple syrup, 1 tsp vanilla extract, and a pinch of flaky sea salt to the warm chocolate mixture. Stirring these into the warm base helps the salt dissolve and the flavors meld into a unified syrup.
Let this "mocha base" sit for about 3 minutes. We want it to be warm enough to keep the fats fluid but not so hot that it instantly melts our ice when we start the blending process.
Pour the 1.5 cups of 2% milk into the blender jar first. Adding the liquid before the solids helps the blades spin more efficiently and prevents the cocoa from sticking to the bottom.
Gently pour your prepared mocha base into the milk. You'll see beautiful swirls of chocolate and white milk don't worry about mixing them yet; the blender will do the work.
Add the 3 cups of large, solid ice cubes. Note: Using large cubes rather than crushed ice results in a more consistent slush that stays frozen longer in the glass.
Secure the lid tightly and start the blender on its lowest speed. Slowly increase to high and blend for exactly 30 to 45 seconds until the sound of the ice hitting the blades becomes a dull hum.
Stop the blender and check the consistency. It should look like a thick, dark clouds of frozen joy. If it's too thick to pour, add a splash more milk and pulse once or twice.
Divide the mixture between two chilled glasses. Note: Chilling the glasses in the freezer for 10 minutes beforehand keeps the drink from melting at the edges as soon as you pour it.
Serve immediately with a straw and, if you're feeling fancy, a light dusting of extra cocoa powder on top. The contrast of the dark mocha against the white frost is visually stunning.
Fixing Common Blending Mistakes
My Mocha Is Gritty
This usually happens when the cocoa powder isn't fully dissolved in the hot liquid. If you skip the "blooming" phase or try to use cold coffee, the starch granules in the cocoa won't hydrate, leaving you with a sandy texture.
The Drink Is Watery
If your drink feels more like a cold juice than a thick slush, your ice to liquid ratio might be off. This often occurs if you use small, "hollow" ice cubes from an automatic door dispenser, which contain more air and less frozen mass than solid tray cubes.
| Problem | Root Cause | Solution |
|---|---|---|
| Separation | Improper emulsification | Ensure the espresso is hot when mixing with cocoa to bond the fats. |
| Too Bitter | Over extracted coffee | Use a slightly coarser grind for your espresso or reduce the cocoa by half a tablespoon. |
| Too Sweet | Maple syrup imbalance | Add an extra pinch of sea salt or a teaspoon of lemon juice to cut the sugar. |
Common Mistakes Checklist
- ✓ Always bloom the cocoa in hot liquid to avoid a "dusty" flavor profile.
- ✓ Use solid ice cubes to ensure the drink has enough body to stand up to the milk.
- ✓ Measure your maple syrup precisely; too much will prevent the ice from holding its shape.
- ✓ Don't over blend! 45 seconds is usually the limit before the motor heat starts melting your hard work.
Customizing for Specific Dietary Needs
If you are looking for a dairy-free version, this recipe is incredibly forgiving. I've found that oat milk is the best substitute because its natural creaminess mimics the mouthfeel of 2% milk perfectly. Just ensure you're using an unsweetened version so you don't throw the flavor balance out of whack. For those who want something even more unique, similar to the textures found in a How to Make recipe, you can experiment with adding a half teaspoon of xanthan gum to give it an almost "chewy" gelato like finish.
Chef's Tip: For a deeper flavor, freeze about half a cup of your 2% milk into ice cubes the night before. Replacing some of the regular ice with "milk cubes" prevents the drink from becoming watery as it melts, keeping it flavorful and wholesome until the very last drop.
- Keto Option: Replace the maple syrup with a monk fruit liquid sweetener and use heavy cream diluted with water instead of 2% milk.
- Protein Boost: Add a scoop of unflavored or chocolate collagen peptides into the hot mocha base before blending.
- Decaf Version: Simply swap the espresso for a high-quality decaf concentrate; the chocolate flavor will still carry the drink beautifully.
Smart Storage and Reuse Guidelines
Frozen drinks are best enjoyed the second they leave the blender, but life happens. If you find yourself with leftovers, don't throw them away! Pour the remaining liquid into an airtight container and keep it in the fridge for up to 24 hours.
While it will lose its "slush," it becomes a delicious, chilled mocha milk that is fantastic over cereal or as a base for your morning iced coffee.
For long term storage, you can pour the leftovers into an ice cube tray and freeze them. These "mocha cubes" are perfect for tossing into a glass of plain milk or even into a fresh blender batch the next time you make this recipe.
This zero waste approach ensures that every bit of that high-quality cocoa and maple syrup is utilized. Just remember that once frozen solid, the texture won't be as light and airy as the fresh blend, so a quick re blend might be necessary.
Perfect Pairings for Your Treat
Since this Frozen Mocha Hot Chocolate is quite rich, it pairs beautifully with snacks that offer a bit of salt or crunch. A handful of roasted almonds or a simple piece of toasted sourdough with a swipe of salted butter can balance the sweetness of the drink.
It’s also a fantastic companion to a light fruit salad, where the acidity of berries can cut through the dark chocolate notes.
If you're serving this as part of a larger dessert spread, consider contrasting it with something warm. A fresh out-of the-oven cookie or a warm slice of banana bread creates a wonderful "hot and cold" sensory experience.
The key is to keep the side dishes relatively simple so they don't compete with the bold coffee and cocoa flavors of the mocha.
Common Myths
One of the biggest misconceptions is that you can't use hot coffee in a frozen drink because it will melt the ice. In reality, the small volume of hot espresso (60ml) is quickly tempered by the cold milk (355ml), and the resulting mixture is just cool enough to preserve the integrity of the ice while still being warm enough to have dissolved the cocoa completely.
Another myth is that "Dutch processed" cocoa is just a marketing term. The "Dutching" process actually treats the cocoa with an alkalizing agent, which lowers its acidity. This results in a smoother, mellower flavor and a darker color that is much more "chocolatey" than natural cocoa powder, making it the superior choice for a drink where the chocolate is the star.
Finally, some people think that adding more ice will make the drink thicker. While it might seem logical, adding too much ice actually dilutes the flavor and creates a "dry" texture that is difficult to swallow.
The 3 cup ratio provided in the Schema is the "sweet spot" for a drink that is both thick and incredibly flavorful. Trust the measurements, and you'll have the confidence to make this perfectly every single time.

Recipe FAQs
Can I substitute milk with water when blooming the cocoa?
No, do not substitute milk with water for blooming. Cocoa solids require the fat content in milk or espresso to hydrate properly, ensuring a smooth texture; water alone leads to a gritty, unappealing result.
How to ensure the frozen mocha isn't watery after blending?
Use solid, large ice cubes instead of crushed ice or small dispenser ice. Solid cubes have a lower surface area to volume ratio, meaning they melt slower and dilute the flavor less quickly than airy, fractured ice.
Is it true that using hot espresso in a cold drink melts the ice instantly?
No, this is a common misconception. The small volume of hot espresso (60ml) is immediately cooled by the cold milk and large amount of ice, serving only to perfectly dissolve the cocoa solids before blending.
How to achieve a non-gritty texture when using cocoa powder?
Bloom the cocoa in the hot espresso first. Whisk the cocoa into the hot liquid until it forms a glossy paste; this process, similar to how fat stabilizes mixtures in our Classic Chewy Chocolate recipe, ensures full flavor extraction and eliminates graininess.
How to make this frozen mocha dairy-free?
Substitute 2% milk with unsweetened oat milk for the best creaminess. Oat milk’s composition best mimics the viscosity of dairy milk, preventing the drink from separating or becoming too thin.
What is the best way to store leftovers from the blender?
Refrigerate leftovers in an airtight container for up to 24 hours. The mixture will lose its icy slush texture and become a rich, chilled mocha milk, which is excellent poured over cereal.
How to get the deepest, least bitter chocolate flavor?
Use Dutch processed cocoa and add a small pinch of sea salt. The alkali treatment in Dutch processing mellows the acidity, while the salt enhances the perceived chocolate notes, preventing bitterness.
Frozen Mocha Hot Chocolate
Ingredients:
Instructions:
Nutrition Facts:
| Calories | 172 kcal |
|---|---|
| Protein | 7.9 g |
| Fat | 5.1 g |
| Carbs | 28.4 g |
| Fiber | 3.6 g |
| Sugar | 21.9 g |
| Sodium | 178 mg |
