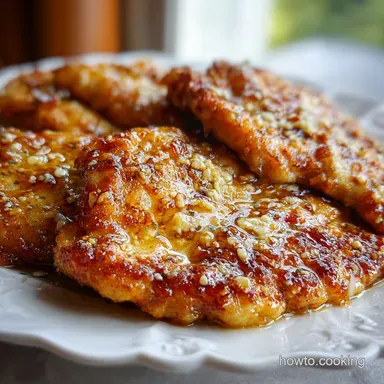
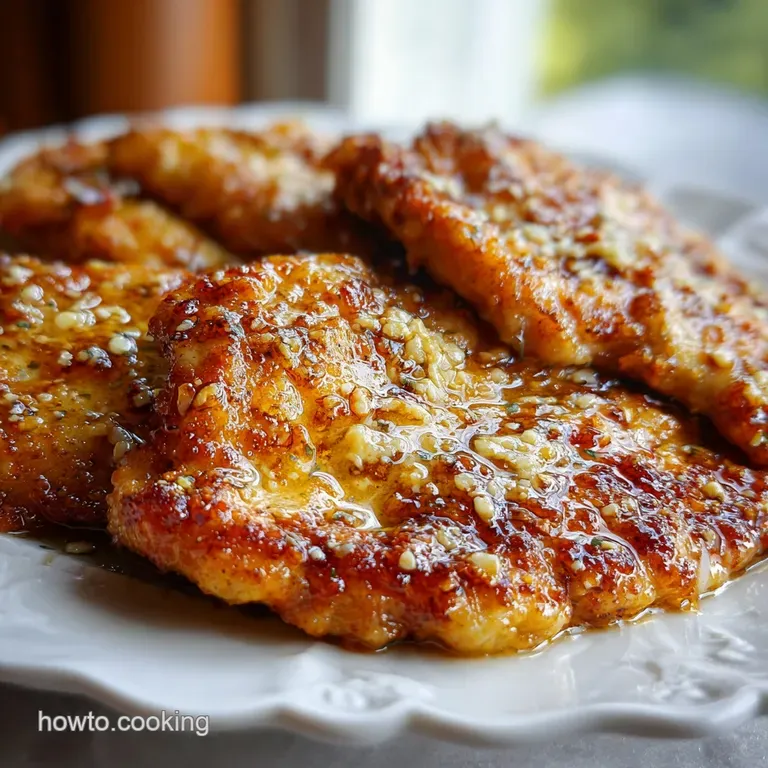
Garlic Parmesan Chicken: Creamy and Golden
- Time:10 minutes prep + 20 minutes cook = 30 minutes total
- Flavor/Texture Hook: Mahogany colored crust with a glossy, buttery sauce
- Perfect for: Weeknight luxury dinner or an impressive date night meal
Secrets to Searing Garlic Parmesan Chicken
That first sizzle when the butter foams in the pan is where the magic starts. I remember the first time I tried making a creamy chicken dish for my family, and I rushed the sear. The chicken was pale, the sauce was bland, and it felt more like a boiled meal than a dinner.
But once I learned to wait for that deep, mahogany crust to form, everything changed. It's the difference between a meal that's just "fine" and one that smells like a cozy Italian kitchen on a rainy Sunday.
This dish isn't just about the cheese, though. It's about the way the garlic blooms in the butter and the way the heavy cream carries those flavors across your palate. For me, this recipe represents the kind of comfort food that feels high end but doesn't require a degree in culinary arts to get right.
You can expect a meal that hits every note: the saltiness of the Parmesan, the bite of the red pepper flakes, and the freshness of parsley. We're going for a texture that is velvety on the outside and juicy on the inside. Let's get into how to actually make this happen without the stress.
Why the Flavors Actually Bind
When you're making a sauce this rich, a few simple things are happening in the pan that make it taste professional.
- Aromatic Bloom: Sautéing garlic in butter allows the fat soluble compounds to release, creating a deeper base than just boiling them in cream.
- Protein Browning: Searing the meat at high heat creates a savory crust, which adds a layer of complexity that balances the richness of the dairy.
- Starch Binding: The naturally occurring proteins in the Parmesan cheese act as a thickener, turning the cream into a glossy glaze.
- Heat Management: Lowering the temperature before adding the cheese prevents the fats from separating, keeping the sauce smooth.
| Thickness | Internal Temp | Rest Time | Visual Cue |
|---|---|---|---|
| 0.5 inch | 165°F | 3 mins | Opaque center, golden edges |
| 0.75 inch | 165°F | 5 mins | Firm to touch, mahogany crust |
| 1 inch | 165°F | 7 mins | Juices run clear, deep brown |
The Essential Component Analysis
Not all ingredients are created equal in this pan. Some are there for the bulk, while others are there to act as the glue for the flavor.
| Ingredient | Science Role | Pro Secret |
|---|---|---|
| Heavy Cream | Emulsion Base | Use full fat to prevent the sauce from breaking |
| Parmesan | Salt & Thickener | Grate it yourself; pre shredded has starch coatings |
| Unsalted Butter | Flavor Carrier | Start with oil to raise the smoke point, then add butter |
| Garlic | Primary Aromatic | Mince finely for a consistent, non bitter flavor |
Tools for the Job
You don't need a professional kitchen, but a few specific tools make this a lot easier. A wide stainless steel or cast iron skillet is your best friend here. I usually use a Lodge cast iron because it holds heat so well, which is critical for that initial sear.
If you use a non stick pan, you might miss out on some of those brown bits (the fond) that make the sauce taste so deep.
A whisk is also mandatory. While a spoon works, a whisk ensures the Parmesan integrates into the cream without leaving any clumps. Finally, an instant read thermometer is the only way to ensure your chicken is safe but not overcooked. According to USDA Food Safety guidelines, poultry must reach 165°F to be safe, but taking it off the heat a few degrees early and letting it rest can prevent it from becoming dry.
Cooking Flow and Execution
Right then, let's get to the actual cooking. This is a fast process, so have everything prepped and ready on your counter before you even turn on the stove.
Phase 1: Searing to Golden Perfection
- Season chicken cutlets generously with 1/2 tsp salt and 1/2 tsp black pepper. Note: Seasoning right before cooking prevents the salt from drawing out too much moisture.
- Heat 1 tbsp olive oil and 1 tbsp of butter over medium high heat until the butter foams.
- Add chicken and sear for 3–5 minutes per side until a mahogany colored crust forms and the internal temperature hits 165°F (74°C).
- Remove chicken to a plate and let it rest. Note: Resting allows the juices to redistribute so they don't leak out when you plate it.
Phase 2: Building the Garlic Base
- Lower the heat to medium.
- In the same skillet, add the remaining 1 tbsp of butter, 4 cloves minced garlic, and 1/4 tsp red pepper flakes.
- Sauté for 60 90 seconds until the garlic is fragrant but not brown.
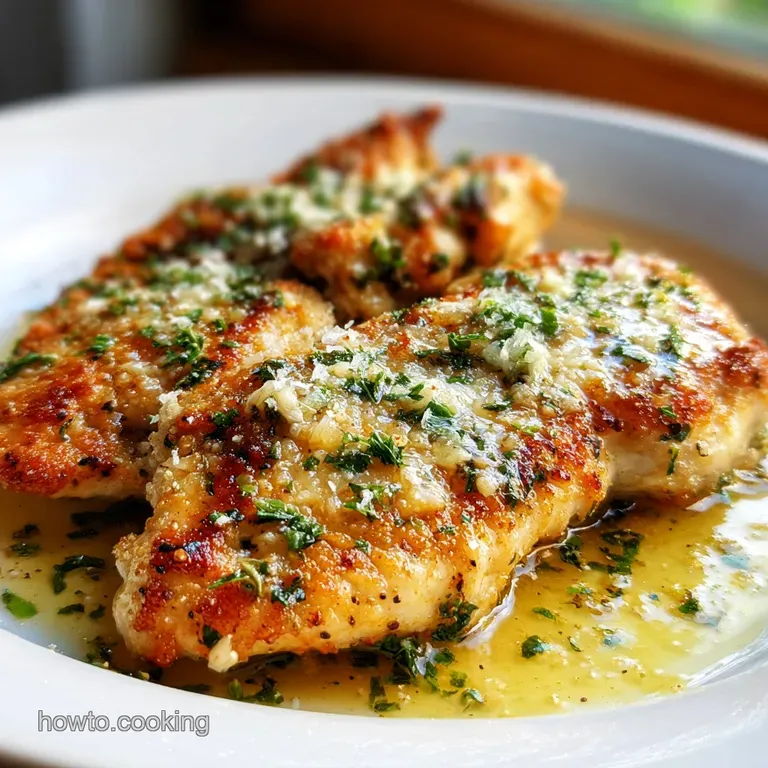
Phase 3: The Final Glaze
- Pour in 1 cup heavy cream and 1 tsp dried oregano.
- Bring to a gentle simmer for 2 minutes.
- Stir in 3/4 cup freshly grated Parmesan cheese, whisking constantly until the sauce is bubbling and glossy.
- Return the chicken and any resting juices to the pan, spooning the sauce over the meat for 1 minute to glaze.
- Garnish with 2 tbsp fresh parsley, chopped.
Fixing Common Kitchen Glitches
Even the best of us have moments where the sauce doesn't behave. Usually, it's a matter of temperature.
Why Your Sauce Separates
If you see little beads of oil floating on top of your cream, the sauce has "broken." This usually happens if the heat was too high when the cheese went in or if you used a low-fat cream. You can often fix this by whisking in a teaspoon of warm water or a tiny bit more cream over very low heat.
Why the Garlic Tastes Bitter
Garlic burns in seconds. If your garlic turns dark brown or black during the sauté step, it will taste acrid. The trick is to lower the heat before adding the butter and garlic. If it happens, it's better to wipe the pan and start the sauce over than to serve bitter chicken.
| Problem | Root Cause | Solution |
|---|---|---|
| Sauce too thick | Too much reduction | Stir in 1-2 tbsp of milk or water |
| Chicken dry | Overcooked during sear | Use a thermometer; pull at 160°F and rest |
| Bland flavor | Lack of salt in sauce | Add a pinch more salt or extra Parmesan |
Preventive Checklist:
- ✓ Pat chicken completely dry with paper towels before seasoning.
- ✓ Use a heavy bottomed pan to avoid hot spots that burn garlic.
- ✓ Grate Parmesan from a block for a velvety melt.
- ✓ Let the chicken rest for at least 3 minutes before adding it back to the sauce.
Adapting the Base Recipe
One of the best things about this Garlic Parmesan Chicken is how easily it pivots. If you're feeling adventurous, you can change the protein or the cooking method entirely.
For those who want a different texture, an air fryer garlic parmesan chicken version works well. Just toss the chicken in oil and spices, air fry at 380°F for 12-15 minutes, and then toss them in the prepared sauce at the end.
If you're looking for something heartier, try using garlic parmesan chicken thighs; they are more forgiving and stay juicier longer.
If you're in the mood for something different, you could check out my Velvety Chicken Cabbage StirFry for a lighter, faster alternative. Or, if you want to skip the cream and go for a more intense pan reduction, a Rosemary Chicken Sauce is a brilliant way to use similar searing techniques.
Decision Shortcut: If you want a pasta dish, serve this over linguine as a creamy garlic parmesan chicken pasta. If you want a low carb meal, serve the chicken over steamed cauliflower or sautéed spinach.
If you want a family feast, roast some potatoes in the oven to make garlic parmesan chicken and potatoes.
| Original Ingredient | Substitute | Why It Works |
|---|---|---|
| Heavy Cream (1 cup) | Half and Half (1 cup) | Lighter texture. Note: Sauce will be thinner and less rich |
| Parmesan (3/4 cup) | Pecorino Romano (3/4 cup) | Similar saltiness. Note: Stronger, tangier sheep's milk flavor |
| Chicken Breast | Chicken Thighs | Higher fat content. Note: More flavor and harder to overcook |
Storage and Waste Tips
Don't let the leftovers go to waste. This dish stays great in the fridge for up to 3 days. Store it in an airtight container, making sure the chicken is fully coated in the sauce to prevent it from drying out.
When reheating, avoid the microwave if you can. The microwave tends to split the cream sauce. Instead, place the chicken and sauce in a small skillet over low heat and add a splash of milk or water to bring the velvety texture back. If you must use a microwave, use a low power setting and stir every 30 seconds.
As for zero waste, if you have leftover sauce but no more chicken, it makes a killer base for a quick pasta or a dip for toasted sourdough. If you used whole cloves of garlic and have the papery skins left over, toss them into your scrap bag for homemade vegetable broth.
The Best Side Pairings
Because this is such a rich, savory dish, you need sides that provide a bit of contrast. I highly recommend something with a bit of acidity or a fresh crunch to cut through the butter and cream.
A simple arugula salad with a lemon vinaigrette is a classic choice. The peppery greens and citrusy dressing balance the saltiness of the Parmesan. Alternatively, roasted asparagus or charred broccoli provide a nice earthy tone that complements the garlic.
If you're going for maximum comfort, a side of garlic mashed potatoes or a crusty piece of ciabatta bread is the way to go. You'll want the bread to soak up every last drop of that glossy sauce from the bottom of the pan. Trust me, that's the best part of the whole meal.
High in Sodium
890 mg 890 mg of sodium per serving (39% 39% of daily value)
The American Heart Association recommends a daily sodium limit of 2,300mg to reduce the risk of high blood pressure and heart disease.
Tips to Reduce Sodium
-
Reduce Added Salt-25%
Eliminate or significantly reduce the 1/2 tsp of salt; the cheese already provides a significant amount of saltiness.
-
Limit Parmesan Cheese-15%
Reduce the amount of Parmesan cheese to 1/4 cup or substitute a portion with nutritional yeast for a similar nutty flavor.
-
Add Bright Acidity-10%
Squeeze fresh lemon juice over the chicken before serving to enhance flavors and mimic the 'brightness' of salt.
-
Maximize Fresh Herbs
Increase the amount of fresh parsley and oregano to build a more complex, aromatic flavor profile without adding sodium.
Recipe FAQs
What sides pair best with this chicken?
Pair it with a light, crisp vegetable. These garlic butter green beans provide a fresh contrast to the rich Parmesan sauce.
How to get a mahogany colored crust on the chicken?
Heat the olive oil and butter over medium high heat until the butter foams. Sear the cutlets for 3 5 minutes per side without overcrowding the pan to ensure a deep brown sear.
Is it true that pre-grated Parmesan works just as well as freshly grated?
No, this is a common misconception. Freshly grated Parmesan melts smoothly, while pre-grated cheese often contains anti clumping agents that cause the sauce to become grainy.
How to prevent the garlic from burning in the pan?
Lower the heat to medium before adding the garlic. Sauté for only 60 90 seconds and immediately pour in the heavy cream to stop the browning process.
Can I store the leftovers in the refrigerator?
Yes, for up to 3 days. Use an airtight container and keep the chicken fully submerged in the sauce to prevent the meat from drying out.
How to reheat the chicken without splitting the cream sauce?
Warm it in a small skillet over low heat. Add a splash of water or milk to revive the velvety texture, as microwaves often cause cream based sauces to separate.
Do I need to cook the chicken fully before adding it to the sauce?
Yes, sear until the internal temperature hits 165°F (74°C). This ensures the meat is safely cooked and has developed a proper crust before the final glaze.
Garlic Parmesan Chicken