Grandma's Secret: Foolproof Flaky Pie Crust
Recipe Introduction
Quick Hook
Ever wondered what that secret ingredient is to a perfect pie? Honestly, it all starts with the homemade pie crust . It's about creating those amazing flavors.
Brief Overview
Pie crust, a global staple, it's the foundation of desserts and savory delights. this recipe provides two 9 inch crusts. it’s a medium difficulty recipe.
Plan for about 20 minutes of prep and at least an hour chilling.
Main Benefits
This homemade pie crust is healthier than store-bought options. It also avoids unwanted additives. Bake this for any occasion. This all-butter crust brings a buttery, flaky taste.
Let's ditch the store-bought stuff, shall we? This crust is surprisingly simple. It's the star, a blank canvas for your creations.
This recipe is allegedly from Grandma. I’ve adapted it, of course. It uses a few simple ingredients. Ready for a delicious adventure?
Foolproof Flaky Pie Crust: The Secret's Out!
Okay, hands up. who's ever had a pie crust disaster? we've all been there. the flakey pie crust recipe is simple.
But martha stewart would even agree. keeping everything ice cold is the key!
Ingredients: The Flaky Pie Crust Recipe Easy!
Here's what you'll need. You can find everything in most supermarkets.
- 2 ½ cups (300g) all-purpose flour
- 1 teaspoon (5g) salt
- 1 cup (227g) unsalted butter, very cold
- 6-8 tablespoons (90-120 ml) ice water
Honestly? i sometimes throw the butter in the freezer for 15 mins before i cube it. absolute game changer! also, don’t be afraid to add more water if needed.
Just one tablespoon at a time! you are looking for a dough that easily forms a ball.
Equipment: Gather Your Arsenal
No need for fancy gear, but a few things will make your life easier:
- Food processor or pastry blender
- Large mixing bowl
- Plastic wrap
- Rolling pin
- 9 inch pie plate(s)
I highly recommend using a food processor if you have one! It cuts the butter in perfectly. The key thing is not overdoing the mixing process.
Alright, let's dive into what you'll need to whip up this incredible homemade pie crust. I promise it’s easier than you think! We're talking a flakey pie crust recipe good enough to make even Mary Berry proud!
Ingredients & Equipment
Forget shop bought. This recipe features a buttery flavour with a perfect balance of flakiness and tenderness.
Main Ingredients: Let's Get Precise
Here's the lowdown on the key ingredients. Get these right, and you're already halfway there!
- All-purpose flour: 2 ½ cups (300g), plus extra for dusting. Plain flour. Nothing fancy.
- Salt: 1 teaspoon (5g). Just regular table salt will do!
- Unsalted butter: 1 cup (227g), seriously cold, and cubed. I’m talking ice-cold butter.
- Ice water: 6-8 tablespoons (90-120 ml). It must be ice cold.
For the butter, look for a good quality one. Don't scrimp here! A higher fat content is what gives you that lovely, flaky texture. Trust me on this.
Seasoning Notes: The Simple Truth
We're keeping things pretty traditional here. No crazy spice combinations needed.
- Essential spice combinations: A tiny pinch of nutmeg can be nice. Adds warmth.
- Flavor enhancers and aromatics: Honestly, good butter and a bit of salt are all you need!
- Quick substitution options: If you’re feeling fancy, you could try brown butter... but maybe save that for later.
Equipment Needed: The Essentials Only
You really don't need a kitchen gadget graveyard for this one.
- Essential tools only: Food processor (if you have one, fab!), or a pastry blender/fork. A bowl, plastic wrap, a rolling pin, and a 9 inch pie plate.
- Common household alternatives: No food processor? No worries. Use your hands! Just work quickly and keep everything cold.
Seriously, that’s it. Nothing too scary, right? Let's do this.
Honestly, mastering a flakey pie crust recipe easy enough for a weeknight is a life skill. you know? then you can experiment with stuff like coconut oil pie crust or even a healthy pie crust .
Once you nail this version, it's game on! i found natasha’s kitchen pie crust also has a good guide.
Grandma's Secret: Foolproof Flaky Pie Crust
Honestly, who doesn't love a good pie? and let's be real, the crust can make or break it. this homemade pie crust recipe isn't just any recipe; it's my grandma's secret.
She swore it was passed down through generations... whether that's true or not, it makes one heck of a pie!
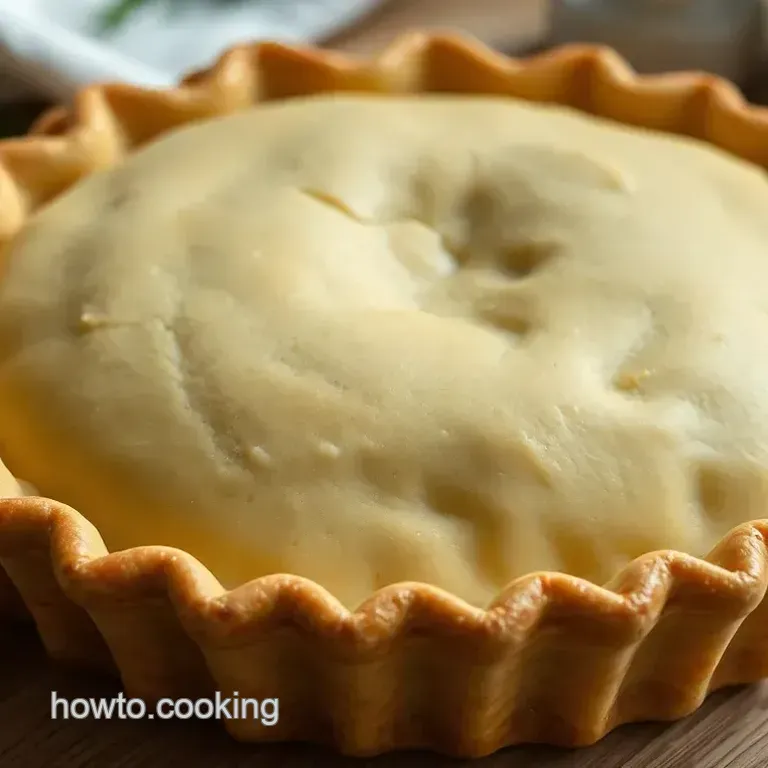
Forget the shop bought stuff. this all-butter crust is buttery, flaky, and get this surprisingly simple. the trick? keeping everything cold .
It’s your blank canvas, ready to elevate anything you bake.
This recipe is like a classic, but with my own little touch. think pie crust recipe martha stewart , but way less fussy.
It has a buttery flavour. it offers a perfect balance of flakiness and tenderness. this is achieved by incorporating cold butter and ice water into the flour mixture.
Level? Medium. Don't be scared. There is some patience required as well as a keen eye. You can totally nail it.
- Prep: 20 mins + 60 minutes chilling.
- Cook: Depends on your pie!
- Total: See above. A minimum of 1 hour 20 minutes , plus baking.
- Yields: Enough for two 9 inch pies. Perfect for a double crust apple pie, or two single crust wonders!
Prep Steps: Mise en Place, Sorted!
First, essential mise en place . basically, get your act together. measure out: 2 ½ cups (300g) of all-purpose flour, 1 teaspoon (5g) of salt, 1 cup (227g) of super cold, cubed unsalted butter, and 6-8 tablespoons (90-120 ml) of ice water.
Honestly, pop the butter in the freezer for 15 minutes before you even start.
Safety? Not much to worry about here, unless you’re prone to butter related accidents.
Time saver? Measure out everything before you start. Trust me, it helps.
Step-by-step to Flakey Pie Crust Recipe Easy
- Dry Stuff First: Whisk flour and salt in a bowl or food processor.
- Butter Time: Add cold butter. Pulse (or use a pastry blender) until it looks like coarse crumbs. Pea-sized butter chunks are good!
- Ice, Ice, Baby: Add ice water, one tablespoon at a time. Mix until the dough just comes together. Don't overmix!
- Disk-o-rama: Divide the dough. Form each half into a flat disk.
- Chill Out: Wrap them tight. Fridge time! Minimum 60 minutes , up to 2 days.
- Roll With It: Flour your surface. Roll one disk to a 12 inch circle.
- Pie Plate Plunge: Carefully move the dough to your pie plate.
- Crimp It Good: Crimp those edges fancy!
- Pre-Bake (If needed): Prick the bottom of the crust with a fork, line with parchment paper, and fill with pie weights or dried beans. Bake at 375° F ( 190° C) for 15- 20 minutes , or until lightly golden. Remove weights and parchment and bake for another 5- 10 minutes until golden brown.
- Fill and Bake (if not pre-baking): Fill with your desired pie filling and bake according to the pie recipe.
My Pro Tips for Flakey Pie Crust Recipe
- Cold is Key: Seriously, cold ingredients are vital! Best gluten-free Piecrust , Coconut Oil Pie Crust , Healthy Pie Crust , Natasha’s Kitchen Pie Crust , Coconut Flour Pie Crust or Oil Pie Crust . Whatever pie crust recipe you're going for, cold is the answer!
- Don't Overdo It: Overmixing = tough crust. Mix until just combined.
- Rest Up: Chilling lets the gluten relax. Happy gluten = tender crust.
- Mistake Alert : Using too much water. Add it slowly.
- make-ahead? Wrap those disks and freeze them! They’ll last for months. Defrost in the fridge overnight.
Honestly, mastering this homemade pie crust will make you feel like a baking wizard. Go on, give it a go!
Recipe Notes for the Perfect Pie
Right, so you’ve got the basic recipe for grandma's secret: foolproof flaky pie crust . ace! but like any good bake, there's always room for a bit of extra finesse, innit? so, let's chat about how to really nail this homemade pie crust .
Serving Up Some Style: Plating and Presentation
Honestly, a beautiful pie is half the battle! for a classic look, go for a simple lattice top. feeling fancy? try crimping the edges with a fork or your fingers for that rustic charm.
I like serving my apple pie warm with a big scoop of vanilla ice cream. or, if you're making a savoury pie, a fresh green salad cuts through the richness perfectly.
Think afternoon tea meets bake off .
Storing Your Pie Crust Like a Pro
Right, so you've made your dough, but you're not ready to bake? no worries! just wrap it up tight in cling film.
Pop it in the fridge for up to two days, or even better, freeze it for up to three months.
I mean, freezing is great. to defrost, stick it in the fridge overnight. for left overs keep them in air tight containers.
Reheating instructions : Reheat in a pre-heated oven for 10-15 minutes, or until warm to the touch.
Shake Things Up: Variations and Swaps
Want to add your own spin? Go for it!
- Dietary adaptations: For a Best gluten-free Piecrust , use a good quality gluten-free flour blend. For a lighter take, Coconut Oil Pie Crust , adds a subtle flavour.
- Seasonal Swaps: Stone fruits during summer! Nothing is better, but it is also fun to experiment!
Nutrition Nuggets: Keeping it Real
Okay, let's be honest, pie isn't exactly a health food. but everything in moderation, right? the healthy pie crust alternatives would include reducing fat, and sugar and increasing fiber.
A slice is around 300 calories, 4g of protein, 20g of fat, and 25g of carbs.
Right, that's your lot! don't be scared, get baking! remember, even if it doesn't look perfect, it'll still taste amazing.
Now go forth and create some pie crust recipe martha stewart level masterpieces, but with your own unique twist!
Frequently Asked Questions
Why is my homemade pie crust so tough? Sounds like chewing gum!
A tough pie crust usually means the gluten in the flour has been overdeveloped. Avoid overmixing the dough, especially after adding the water. Also, make sure you chill the dough adequately that resting time helps relax the gluten, resulting in a more tender, "melt-in-your mouth" crust, just like Granny used to make.
How do I prevent my pie crust from shrinking during baking? I'm getting a bit of the dreaded "slump".
Shrinkage is a common pie crust problem! Ensure the dough is thoroughly chilled before baking. When you place the dough into the pie plate, don't stretch it gently ease it in. Blind baking with pie weights is also key to helping the crust keep its shape.
Like a well tailored Saville Row suit, the crust needs a solid foundation!
Can I make this homemade pie crust ahead of time? Is it okay to prep it the day before?
Absolutely! In fact, making the dough ahead of time is a brilliant idea. You can store the wrapped dough disks in the refrigerator for up to 2 days or freeze them for up to 3 months. Just thaw the dough in the refrigerator overnight before rolling it out. It's like having a secret weapon in your baking arsenal.
What's the secret to getting a truly flaky homemade pie crust? Like, really flaky.
Flakiness comes from those little pockets of cold butter melting during baking and creating steam. Keep your butter and water ice-cold, and don’t overmix the dough you want to see pea-sized pieces of butter distributed throughout.
Think of it like creating layers of deliciousness; like a perfectly constructed mille feuille!
Can I use a food processor for this homemade pie crust recipe, or is it better to do it by hand?
A food processor can be a real timesaver! It quickly cuts the butter into the flour. However, be extra careful not to overprocess. Just pulse until the mixture resembles coarse crumbs. If you prefer doing it by hand, a pastry blender or even your fingertips will work just work quickly to keep the butter cold.
Think "The Great British Bake Off" - either method can win, but technique is key!
My pie crust is browning too quickly! What should I do?
If your crust is browning too fast, you can protect it with a pie shield or strips of aluminum foil around the edges. This will prevent the edges from burning while the rest of the pie bakes. Think of it as giving your pie crust a little sun protection!
Grandma S Secret Foolproof Flaky Pie Crust