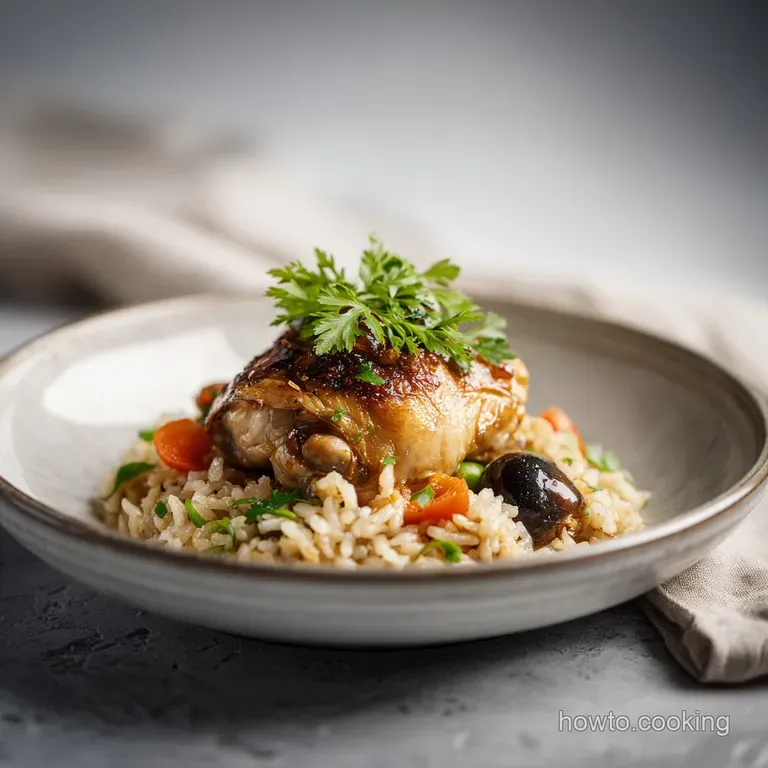
One Pot Chicken and Rice: Crispy and Herb-Infused
- Time:15 minutes active + 30 minutes cooking + 10 minutes resting = 55 minutes total
- Flavor/Texture Hook: Crispy skin against velvety, herb infused rice
- Perfect for: Stress free weeknight dinners or meal prep
- Making a Reliable One Pot Chicken and Rice Recipe
- Why This One Pot Meal Works
- Important Prep and Timing Details
- Smart Ingredient Choices and Budget Swaps
- Essential Tools for One Pot Cooking
- Step by Step Method for Perfection
- Preventing Sogginess and Common Mistakes
- Troubleshooting Common Issues
- Scaling Your Dinner for a Crowd
- Debunking Common One Pot Cooking Myths
- Smart Storage and Zero Waste Tips
- Vibrant Toppings and Serving Ideas
- Recipe FAQs
- 📝 Recipe Card
Making a Reliable One Pot Chicken and Rice Recipe
There is something deeply ancestral about a pot of chicken and rice sitting in the middle of a wooden table. Whether it is a Spanish Arroz con Pollo, a West African Jollof, or the simple "comfort in a bowl" my grandmother used to make on rainy Tuesdays, this dish is a global hug.
It is the kind of recipe that doesn't care if your kitchen is a bit messy or if you are still in your pajamas; it just wants to feed you well without creating a mountain of dishes.
I used to think that making this was as simple as throwing everything in a pot and hoping for the best. But honestly, my early attempts were... well, let's call them "textured." Sometimes the rice was crunchy enough to chip a tooth, and other times it was so mushy it resembled wallpaper paste.
The chicken would be pale and sad instead of golden and inviting. I realized that the real magic isn't in the ingredients alone, but in how they interact within that single pan.
This one pot chicken and rice recipe is my way of sharing those hard learned lessons with you. We are going to focus on getting that skin "shatter crisp" while ensuring every grain of rice is separate and infused with thyme and smoked paprika.
It is a humble meal, sure, but when you lift that lid and the steam hits your face with the scent of toasted garlic and schmaltz, you will feel like a professional. Let's get into what actually makes this work so you can nail it on the first try.
Why This One Pot Meal Works
To get those distinct, fluffy grains and juicy meat, we have to lean into a bit of kitchen physics. It isn't just about heat; it's about managing moisture and starch.
- Starch Reduction: Rinsing the rice removes surface starch, which prevents the grains from sticking together and turning into a gummy mass during the simmer.
- Fat Emulsification: Toasting the rice in the chicken fat (schmaltz) coats each grain in oil, creating a barrier that slows down water absorption and keeps the texture firm.
- Fond Utilization: Searing the chicken leaves behind browned bits (fond) that dissolve into the broth, providing a deep, savory backbone that bouillon alone cannot replicate.
- Carryover Steam: The 10 minute rest after turning off the heat allows the moisture inside the pot to redistribute, ensuring the top layer of rice finishes cooking without burning the bottom.
| Servings | Chicken Thighs | Rice Quantity | Pan Size | Cook Time |
|---|---|---|---|---|
| 2 People | 0.5 lbs (2 pieces) | 0.5 cup | 8 inch skillet | 25 minutes |
| 4 People | 1.2 lbs (4 pieces) | 1 cup | 10 inch skillet | 30 minutes |
| 6 People | 1.75 lbs (6-8 pieces) | 1.5 cups | 12 inch skillet | 30 minutes |
Finding the right balance of rice to liquid is the most common hurdle for home cooks. If you change the volume of rice, you must adjust the liquid proportionately, but keep in mind that larger pans allow for faster evaporation, which can slightly alter the final texture.
Important Prep and Timing Details
Success in a one pot meal is all about the "mis en-place" or, in friend speak, having your act together before the heat goes on. Because we are building flavors in stages, you won't have time to dice an onion while the garlic is already burning. You want everything lined up and ready to hit the pan.
The timing here is precise: 15 minutes of prep allows you to get your vegetables diced and your rice rinsed. Rinsing is the one step most people skip, but it is the difference between a "velvety" finish and a "clumpy" disaster.
Then, we move into the 30 minutes of cooking, which is divided between searing, sautéing, and the final simmer. Finally, that 10 minute rest is non negotiable don't even think about peeking under that lid!
| Component | Science Role | Pro Secret |
|---|---|---|
| Chicken Thighs | Provide fat and collagen | Pat the skin bone dry with paper towels to ensure it crackles rather than steams. |
| Long Grain Rice | Structural starch | Use a 1:1.6 ratio of rice to liquid for this specific one pot method to account for steam loss. |
| Chicken Broth | Flavor medium | Choose low sodium so you can control the seasoning without making the dish overly salty. |
| Yellow Onion | Aromatic base | Sauté until the edges are just starting to brown to unlock the natural sugars. |
The interaction between the chicken fat and the rice is where the magic happens. According to USDA data, chicken thighs contain enough natural fat to sauté your vegetables without needing excessive added oil, which keeps the dish feeling light rather than greasy.
Smart Ingredient Choices and Budget Swaps
I am a big believer that you don't need a huge budget to make a meal that tastes like a million bucks. This recipe uses simple, wholesome ingredients, but choosing the right versions of them makes a massive difference.
For instance, bone in, skin on thighs are usually the cheapest cut at the butcher counter, yet they provide the most flavor and moisture.
If you are looking to change things up or save a few more cents, there are ways to swap things out without ruining the integrity of the dish. Just remember that rice types behave differently; switching to brown rice, for example, would require a lot more liquid and a much longer simmer.
| Original Ingredient | Substitute | Why It Works |
|---|---|---|
| Chicken Thighs | Chicken Drumsticks | Similar fat content and cook time. Note: Skin won't get as uniformly crispy. |
| Long Grain Rice | Basmati Rice | Similar starch profile. Note: Adds a slightly floral aroma and stays very separate. |
| Smoked Paprika | Liquid Smoke + Chili | Provides that charred, woody flavor. Note: Use only a drop of liquid smoke; it's potent! |
| Chicken Broth | Water + Bouillon | High convenience. Note: Reduce added salt in the recipe as bouillon is quite salty. |
If you happen to have leftovers from another meal, like my Chicken Meatballs recipe, you could actually skip the searing step and stir them in at the end, though you'd miss out on that beautiful chicken fat for toasting the rice.
Essential Tools for One Pot Cooking
You don't need a kitchen full of gadgets, but the right pan is your best friend here. A 12 inch heavy bottomed skillet or a Dutch oven is the gold standard. You need something that distributes heat evenly so you don't end up with a "hot spot" in the middle that scorches your rice while the edges stay raw.
A tight fitting lid is also crucial. If the lid is loose, steam escapes, your rice stays crunchy, and the whole ratio gets thrown off. If your lid isn't a perfect fit, you can place a piece of aluminum foil over the pan before putting the lid on to create a tighter seal.
Beyond that, a simple wooden spoon for scraping the "fond" off the bottom is all you really need to be a hero in the kitchen today.
step-by-step Method for Perfection

Phase 1: Preparation and Searing
- Prepare the chicken. Season the 1.75 lbs of chicken thighs generously with 1 tsp sea salt, 0.5 tsp pepper, and 1 tsp smoked paprika. Note: Seasoning the skin directly helps it brown better.
- Rinse the rice. Place 1.5 cups of rice in a fine mesh strainer and run cold water over it until the water runs clear.
- Sear the skin. Heat 1 tbsp oil in your pan over medium high heat. Place chicken skin side down and cook for 5–7 minutes until golden and crisp. Flip for 2 minutes, then remove. Note: Don't crowd the pan or the skin won't crisp.
Phase 2: The Aromatic Base
- Sauté the vegetables. Add diced onion and 2 diced carrots to the chicken drippings. Cook for 4-5 minutes until softened and translucent.
- Add aromatics. Stir in 3 cloves minced garlic and 1 tsp dried thyme. Cook for 1 minute until the aroma fills the room.
- Toast the rice. Add the rinsed rice to the pan. Stir for 2 minutes until the grains look slightly translucent at the edges.
Phase 3: The Simmer
- Deglaze the pan. Pour in 2.5 cups of chicken broth. Scrape the bottom until all the brown bits are dissolved.
- Return the chicken. Nestle the thighs back into the rice, skin side up. Note: Keeping the skin above the liquid keeps it from getting soggy.
- Simmer. Cover tightly, reduce heat to low, and cook for 20 minutes until the liquid is fully absorbed.
- The Rest. Turn off heat, scatter 0.5 cup frozen peas on top, and replace the lid. Let it steam for 10 minutes until the rice is light and fluffy.
Preventing Sogginess and Common Mistakes
The biggest fear with any rice dish is the dreaded "mush factor." This usually happens because there is too much liquid or the rice was stirred too much during the cooking process. Stirring rice while it simmers releases starch, which is great for risotto but terrible for a fluffy pilaf style chicken and rice.
Another common pitfall is heat management. "Medium low" on one stove might be a "raging boil" on another. You want the gentlest possible simmer once the lid goes on. If you see huge clouds of steam billowing out, your heat is too high.
Troubleshooting Common Issues
| Issue | Solution |
|---|---|
| Why Your Rice Stayed Crunchy | If your rice is still hard after the 20 minute simmer, it usually means the lid wasn't tight enough, allowing too much liquid to evaporate before the rice could absorb it. |
| Why Your Rice Is Mushy | This is often the result of not rinsing the rice or using too much liquid. If you find yourself in this situation, you can try removing the lid and cooking on low for an extra 5 minutes to evaporate t |
| Why Your Chicken Skin Is Flabby | If you submerge the chicken completely in the broth, the skin will boil instead of staying crisp. Always nestle the chicken on top of the rice so the skin stays in the "steam zone" rather than the " |
Common Mistakes Checklist
- ✓ Pat chicken completely dry before searing (prevents steaming)
- ✓ Don't skip rinsing the rice (removes excess gluey starch)
- ✓ Avoid lifting the lid during the 20 minute simmer (keep the steam in!)
- ✓ Let the dish rest for a full 10 minutes after the heat is off
- ✓ Use a pan that is large enough so the rice layer isn't too thick
Scaling Your Dinner for a Crowd
If you are cooking for a big family gathering or hosting a dinner party, you can definitely double this recipe. However, don't just double everything blindly. When you scale up, the surface area of the pan changes, which affects how fast the liquid evaporates.
Scaling Down (For 2 People)
When cutting the recipe in half, use a smaller 8 inch skillet. You may need to reduce the simmering time by about 3-5 minutes because the smaller volume of rice cooks through faster. Always check for doneness at the 15 minute mark.
Scaling Up (For 12 People)
If you double the recipe, I highly recommend using two separate pans or a very large wide Dutch oven. If the layer of rice is more than 2 inches deep, the bottom will turn to mush before the top layer is even cooked.
Also, reduce the total liquid by about 10% when doubling, as less moisture is lost to evaporation in a crowded pot.
| Method | Time | Texture | Best For |
|---|---|---|---|
| Stovetop | 55 mins total | Fluffier, distinct grains | Quick weeknight meals |
| Oven (375°F) | 65 mins total | More even browning on top | Hands off cooking for guests |
If you choose the oven method, follow all the steps up until the simmer (Step 9). Instead of simmering on the stove, cover the pot and slide it into a preheated oven at 375°F (190°C) for about 25-30 minutes. This provides a more "roasted" flavor to the chicken skin. For another way to enhance your poultry dishes, you might want to try my Rosemary Chicken Sauce for a fancy finishing touch.
Debunking Common One Pot Cooking Myths
One of the biggest myths is that searing meat "seals in the juices." This simply isn't true. Searing is entirely about the Maillard reaction creating those complex, savory flavor compounds on the surface of the meat. The juice stays in the chicken because we don't overcook it and we let it rest.
Another misconception is that you need a "rice cooker" to get perfect rice. While rice cookers are amazing tools, a heavy bottomed pot with a tight lid is actually superior for this specific dish because it allows the rice to fry slightly in the chicken fat before the liquid is added.
This "pilaf method" is what gives the dish its characteristic nutty flavor.
Finally, don't believe that you have to use high end organic broth for a good result. While it’s nice, a simple one pot dinner can be made spectacular with just water, salt, and the fat rendered from the chicken itself. The chicken is the real star here; the broth is just the supporting cast.
Smart Storage and Zero Waste Tips
This dish actually tastes even better the next day as the flavors have more time to mingle. Store any leftovers in an airtight container in the fridge for up to 4 days. When reheating, add a tablespoon of water or broth to the rice before microwaving or heating on the stove to prevent it from drying out.
Freezing Guide
You can freeze this for up to 3 months. However, be aware that the rice texture will change slightly upon thawing it becomes a bit softer. For the best results, thaw it in the fridge overnight before reheating.
Zero Waste Kitchen
Don't throw away your onion skins or carrot peels! Keep a "scrap bag" in your freezer. When the bag is full, boil the scraps with some water to make your own vegetable stock for the next time you make this one pot chicken and rice recipe.
Also, if you have leftover rice that didn't get eaten, it makes the perfect base for a quick fried rice the following night.
Vibrant Toppings and Serving Ideas
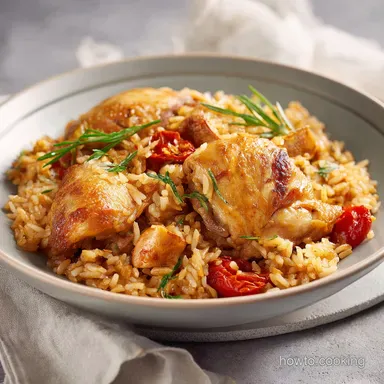
While this is a complete meal on its own, a few fresh additions can take it from "tasty" to "wow." Since the dish is quite savory and rich, I love adding something bright and acidic right before serving. A squeeze of fresh lemon juice or a sprinkle of chopped parsley cut through the fat perfectly.
For a bit of crunch, you could top the dish with toasted sliced almonds or even some crispy fried onions. If you want a bit of heat, a drizzle of chili oil or a few shakes of hot sauce works wonders. I often serve this with a side of simple steamed green beans or a crisp green salad to round out the plate.
If you are looking for more "set it and forget it" style meals that please a crowd, checking out various third culture cookbooks can provide endless inspiration for one pot wonders. Many global cuisines have mastered the art of the single pot meal, and there is always a new spice blend or technique to learn.
Whether you are a beginner or a seasoned pro, there is something deeply satisfying about mastering the basics of a good chicken and rice dish. It is a skill that will serve you and your friends for a lifetime.

Recipe FAQs
Can I cook rice and chicken together in one pot?
Yes, this is the intended method for this recipe. Cooking them together allows the long grain rice to absorb the flavorful drippings and chicken broth, creating a cohesive, savory dish.
Can you cook raw chicken and rice at the same time?
Yes, provided the chicken reaches a safe internal temperature during the 20-minute simmer. By searing the skin side of the thighs first, you develop flavor while the subsequent simmering stage ensures both the rice and meat finish cooking simultaneously.
Can you put uncooked rice in a crockpot with chicken?
No, this recipe is specifically calibrated for stovetop cooking. The liquid ratios and timing for a skillet or Dutch oven are precise; for a dedicated set-and-forget preparation, you might prefer the technique used in our creamy chicken skillet recipe to better manage texture.
How long to cook one pot of chicken and rice in the oven?
This recipe is optimized for the stovetop and should not be transferred to the oven. Stovetop simmering for 20 minutes with a tight fitting lid is required to properly hydrate the rice while keeping the chicken tender.
Why did my rice stay crunchy after 20 minutes?
The lid likely failed to maintain a tight seal. If steam escapes during the 20-minute simmer, too much liquid evaporates before the rice can fully absorb it, leaving the grains undercooked.
How to fix mushy rice?
Remove the lid and cook on low for an additional 5 minutes. This allows excess moisture to evaporate, though ensure you rinse the rice thoroughly in future batches to remove the excess starch that often causes this issue.
How to prevent flabby chicken skin?
Sear the thighs skin side down for 5 7 minutes until crisp before adding liquid. Avoid submerging the skin under the broth during the simmering process, as this preserves the crisp texture developed during the initial searing step.
One Pot Chicken And Rice
Ingredients:
Instructions:
Nutrition Facts:
| Calories | 428 kcal |
|---|---|
| Protein | 28.4 g |
| Fat | 14.8 g |
| Carbs | 42.5 g |
| Fiber | 2.2 g |
| Sugar | 2.4 g |
| Sodium | 685 mg |
