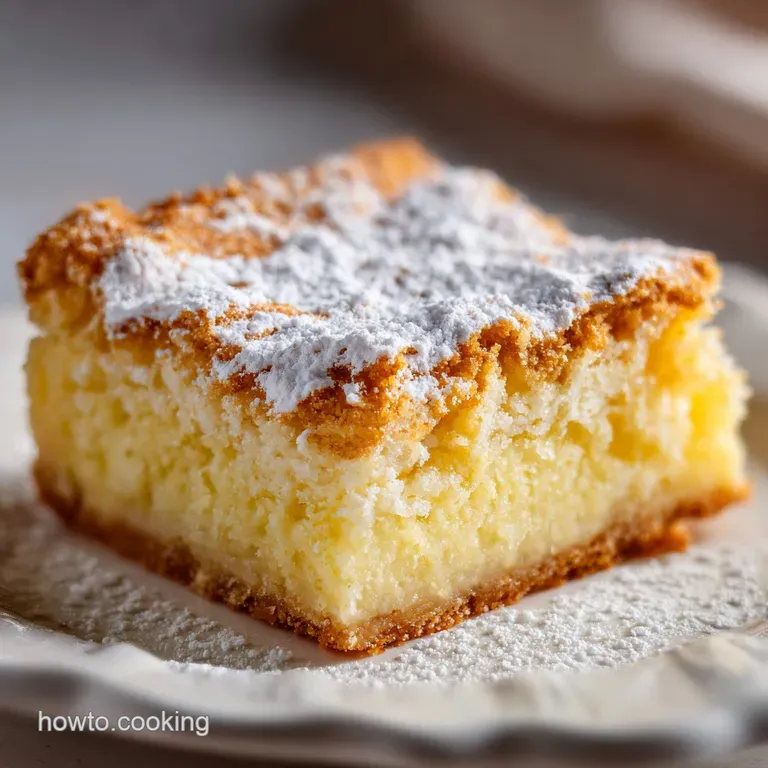
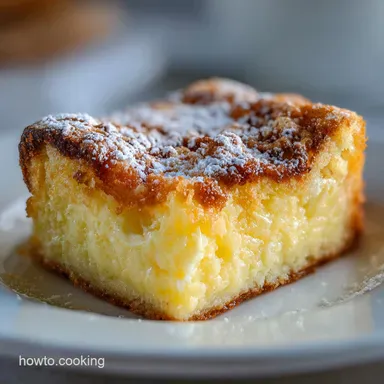
Ooey Gooey Butter Cake: Rich and Custard Style
- Time: Active 15 minutes, Passive 45 minutes, Total 60 minutes
- Flavor/Texture Hook: Silky smooth cream cheese topping over a chewy, golden crust
- Perfect for: Family reunions, bake sales, or lazy Sunday afternoon tea
- Creating the Ultimate Ooey Gooey Butter Cake Every Single Time
- Understanding the Essential Specs for a Successful Bake
- Selecting Wholesome Elements for the Most Authentic Flavor
- Tools and Gear to Ensure the Best Result
- Walking Through the Entire Baking Process From Scratch
- Solving the Most Frequent Baking Hurdles and Issues
- Scaling the Recipe for Different Crowds
- Fun Ways to Change Your Flavor Profile Today
- Keeping Your Leftovers Fresh and Using Every Bit
- Simple Ways to Serve Your Cake With Style
- Recipe FAQs
- 📝 Recipe Card
Creating the Ultimate Ooey Gooey Butter Cake Every Single Time
Imagine walking into a kitchen where the air is heavy with the scent of warm vanilla and toasted sugar. There is a pan sitting on the counter, still radiating a gentle heat, with a surface that looks like a map of golden, crinkled valleys.
When you slide a knife through it, you feel that distinct resistance from a sturdy crust followed by a slide into a velvety, almost liquid center. That is the magic of a classic St. Louis tradition that has found its way into homes across the country, and for good reason.
It is the kind of dessert that people hover over at potlucks, waiting for the first person to make a move so they can snag a corner piece.
I remember the first time I brought this to a neighborhood block party. I was a bit nervous because it looked so simple, almost too humble compared to the elaborate layered tortes others had brought. But within twenty minutes, the pan was scraped clean.
One neighbor actually asked if I had a secret ingredient hidden in the crust because it had such a satisfying chew. The truth is, the beauty of this dish lies in the contrast. You have this firm, buttery base that acts as a stage for the main event: a topping that is so soft it practically melts the moment it hits your tongue.
It is empowering to realize you don't need fancy techniques to make something that everyone remembers for years.
We are going for a texture that sits right between a blondie and a cheesecake. It is rich, yes, but because we use full fat cream cheese, there is a subtle tang that cuts through the sweetness of the sugar. This isn't just about mixing things together; it is about understanding how these layers interact in the oven.
When you master the "jiggle" of the center, you have officially leveled up your baking game. Let's get into why this works so well and how you can make sure your version comes out exactly how you want it, every single time.
Understanding the Essential Specs for a Successful Bake
There is a bit of magic happening in your oven when these two layers meet. The bottom layer is essentially a "short" dough, which means it has a high fat to flour ratio that keeps it from getting tough. Meanwhile, the top layer is a highly aerated emulsion.
If you’ve ever wondered why some cakes feel heavy while others feel light, it usually comes down to how much air you’ve managed to trap in the fats before they hit the heat.
- Fat Induced Tenderness: Using melted butter in the base ensures the flour particles are coated, which prevents long gluten strands from forming, keeping the crust chewy rather than bread like.
- Aeration Stability: Beating the cream cheese for a full two minutes before adding sugar creates a structural foam that holds the weight of the powdered sugar without collapsing.
- Sugar Caramalization: The high volume of powdered sugar doesn't just sweeten; it lowers the freezing point of the moisture in the cheese, ensuring the center never truly "sets" into a solid block.
- Maillard Browning: The proteins in the cake mix and the eggs react with the sugars at 350°F (175°C) to create that iconic golden brown perimeter that shatters slightly when bitten.
Before we dive into the ingredients, it is helpful to decide which path you are taking. While the original version from the 1930s was a happy accident involving yeast dough, the modern favorite uses a cake mix for a consistent, reliable crumb.
Both have their merits, but for a busy weeknight or a guaranteed win at a family gathering, the "fast" method is hard to beat.
| Method | Total Time | Texture Profile | Best For |
|---|---|---|---|
| Fast (Cake Mix) | 60 minutes | Consistent, fluffy, very sweet | Beginners & Busy Parents |
| Classic (Scratch) | 1 hours 30 mins | Denser, more buttery, nuanced | Weekend Projects |
| Cookie Version | 45 minutes | Crispy edges, soft centers | On the-go snacking |
Selecting the right method depends on your schedule. If you are looking for that classic, nostalgic flavor that reminds you of church socials, the cake mix version is the gold standard. It provides a specific type of "lift" and vanilla aroma that is very hard to replicate with just flour and baking powder. However, if you want to experiment with different fats, you might find that using a Homemade Butter recipe in the base adds a level of richness that store-bought sticks just can't match.
Selecting Wholesome Elements for the Most Authentic Flavor
When we talk about wholesome baking, it means choosing the best version of each component. Even when using a box mix, you can opt for brands that skip the artificial dyes. The quality of your cream cheese is the most important factor here.
Always reach for the foil wrapped blocks, never the whipped tubs or the low-fat versions. The water content in low-fat cream cheese is too high, and it will turn your "gooey" topping into a "soggy" mess.
| Component | Science Role | Pro Secret |
|---|---|---|
| Yellow Cake Mix | Provides the flour, leavening, and specific "boxed" nostalgia flavor. | Sift the mix first to remove any hard clumps for a smoother crust. |
| Cream Cheese | Acts as the structural fat and provides the necessary acidity. | Must be completely soft; if it's cold, you will get white lumps in your topping. |
| Powdered Sugar | Creates the "gooey" texture by preventing the eggs from fully curdling. | Use a scale if possible; 3.75 cups is roughly 450-480 grams depending on your scoop. |
| Vanilla Extract | Aromatics that bridge the gap between the cheese and the sugar. | Use pure extract over imitation for a floral, deep scent that lingers. |
The Essential Ingredient List
- 1 box (15.25 oz) yellow cake mix: This is your foundation. Why this? It contains the perfect ratio of starch and leavening for a sturdy base.
- Substitute: 15.25 oz of white cake mix (results in a paler, slightly less "buttery" looking crust).
- 1 large egg, room temperature (for crust): Binds the cake mix and butter. Why this? Room temp eggs emulsify better into fats.
- Substitute: 1/4 cup of unsweetened applesauce (makes the crust slightly softer and less chewy).
- 0.5 cup unsalted butter, melted and slightly cooled: Provides the "short" texture. Why this? Melted butter integrates faster than softened butter here.
- Substitute: Salted butter (just omit any extra salt if the recipe calls for it).
- 8 oz full fat cream cheese, softened: The heart of the topping. Why this? Fat content is vital for the silky mouthfeel.
- Substitute: Full fat Mascarpone (adds a more delicate, less tangy flavor).
- 2 large eggs, room temperature (for topping): Provides the rise and set. Why this? They act as the "glue" for the custard layer.
- Substitute: No direct substitute recommended for the topping; eggs are critical for the jiggle.
- 1 tsp pure vanilla extract: For flavor depth. Why this? Pure vanilla has over 200 flavor compounds.
- Substitute: Vanilla bean paste (for those beautiful black speckles).
- 3.75 cups powdered sugar: The "gooey" factor. Why this? It dissolves instantly into the cream cheese for a non gritty finish.
- Substitute: None. Granulated sugar will make the topping grainy and thin.
Tools and Gear to Ensure the Best Result
You don't need a professional kitchen to pull this off, but a few specific tools will make your life much easier. First and foremost, a solid 9x13 inch baking pan is a must. I prefer a metal pan for this specific recipe because it conducts heat more evenly than glass.
Glass tends to hold onto heat longer, which can lead to overbaking the edges while you wait for the center to finish.
A hand mixer is actually my preferred tool over a massive stand mixer for this. It gives you more control over the cream cheese layer, allowing you to feel the resistance of the batter as it thickens. You will also want a sturdy offset spatula.
Since the topping is thick and the crust is soft, trying to spread the gooey layer with a regular spoon can pull up the bottom layer, mixing the two into a swirl (which is fine for taste, but not the look we want).
Finally,, never underestimate the power of parchment paper. Lining your pan with parchment and leaving a little "overhang" on the sides allows you to lift the entire cake out of the pan once it has cooled. This makes cutting those beautiful, clean squares so much simpler.
If you try to cut it inside the pan, the first piece is almost always a sacrifice to the kitchen gods.
Walking Through the Entire Baking Process From Scratch

- Preheat your oven to 350°F (175°C). Lightly grease a 9x13 pan and line with parchment paper. Note: This ensures the cake won't stick and the edges get that golden finish.
- In a large bowl, combine the yellow cake mix, one egg, and the melted butter. Mix until a soft dough forms. until no dry streaks of flour remain.
- Press the mixture firmly and evenly into the bottom of the prepared 9x13 pan to form the crust. Note: Use the bottom of a flat measuring cup to get it perfectly level.
- In a separate bowl, beat the softened cream cheese until smooth and aerated, about 2 minutes. until it looks like thick whipped cream.
- Add the two remaining eggs and vanilla extract to the cream cheese. Beat on medium speed until fully incorporated. until the yellow of the yolks disappears.
- Reduce mixer speed to low and gradually add the powdered sugar. Increase speed to medium high and beat for 2–3 minutes until glossy. until the batter is silky and holds soft peaks.
- Pour the cream cheese mixture over the cake base and spread to the edges with an offset spatula. Note: Be gentle so you don't disturb the crust layer below.
- Bake for 40–45 minutes. The edges should be golden brown and puffed, while the center should still jiggle slightly when shaken. until the perimeter is firm but the middle waves back at you.
- Remove from the oven and let cool completely in the pan on a wire rack to allow the gooey center to set. Note: Patience is key here; cutting too early leads to a runny mess.
Solving the Most Frequent Baking Hurdles and Issues
One of the most common things people run into is a cake that comes out way too dry. If your "gooey" butter cake is just a "cakey" butter cake, you likely left it in the oven for five minutes too long. Remember that carryover cooking is real. When you pull that pan out, the residual heat will continue to set the center.
If it looks "done" in the oven, it's probably overdone.
Another issue is a grainy topping. This happens when the sugar isn't fully integrated or the cream cheese was too cold. If you see little white dots in your batter, stop and let it sit for ten minutes to warm up, then beat it again. It is worth the extra time to get that velvety finish.
Why Your Cake Turned Out Dry and Cakey
If your cake lacks that molten center, the temperature was likely too high or the timer went too long. Every oven is different, so start checking the "jiggle" at the 38 minute mark.
You want the edges to be set and slightly brown, but the middle 4 inches of the pan should still move like a bowl of pudding when you gently tap the side of the pan.
| Problem | Root Cause | Solution |
|---|---|---|
| Top is cracked | Overbaked or sugar was beaten too fast, trapping too much air. | Tent with foil if browning too fast; reduce beating time. |
| Bottom is soggy | Butter was too hot when mixed or pan was glass. | Let butter cool to room temp; switch to a light colored metal pan. |
| Topping is runny | Cake was sliced before it was fully cooled. | Chill in the fridge for at least 2 hours before slicing. |
Common Mistakes Checklist
- ✓ Always use room temperature eggs to ensure a smooth, stable emulsion in the topping.
- ✓ Do not over mix the bottom crust; you want a dough, not a paste.
- ✓ Ensure your cream cheese is "dead soft" leave it on the counter for 3 hours before starting.
- ✓ Check your oven temperature with a thermometer; many ovens run 25°F hotter than they say.
- ✓ Don't skip the parchment paper; it is the only way to get clean, Pinterest worthy slices.
Scaling the Recipe for Different Crowds
If you are just baking for two, you can easily halve this recipe. Use an 8x8 inch square pan and reduce the baking time by about 5-8 minutes. For the "half egg" in the crust, simply crack an egg, whisk it well, and use two tablespoons of the mixture. It sounds fussy, but it keeps the ratios perfect.
When scaling up for a huge party, I recommend making two separate 9x13 pans rather than one giant sheet pan. This ensures the heat distribution remains consistent. If you double the recipe into one massive pan, the edges will be burnt to a crisp before the middle even thinks about setting.
When doubling, remember to keep your spices and vanilla at 1.5x rather than a full 2x to keep the flavors from becoming overwhelming.
Fun Ways to Change Your Flavor Profile Today
While the original vanilla version is a masterpiece, this recipe is a fantastic canvas for other flavors. If you are a chocolate lover, you can use a devil's food cake mix for the base and add a half cup of cocoa powder to the topping.
For a holiday twist, pumpkin puree can be swirled into the cream cheese layer for a "pumpkin gooey butter cake" that puts pumpkin pie to shame.
If you find the cake a bit too sweet, a heavy handed sprinkle of flaky sea salt on top right after it comes out of the oven is a "chef's kiss" move. You could even drizzle it with a Dark Chocolate Sauce for a truly decadent finish that makes it feel like a restaurant dessert.
The Secret of the "Jiggle"
The jiggle is the most important part of this entire process. It’s the difference between a good cake and a legendary one. Think of it like a cheesecake; if it doesn't move in the middle, it's going to be dry. The center should have a slow, wave like motion, not a liquid splash.
Once it cools, that "liquid" center turns into a dense, fudgy custard that is absolutely addictive.
Quick Flavor Shortcuts
- Lemon: Use a lemon cake mix and add 2 tablespoons of fresh lemon zest to the topping.
- Almond: Add 1/2 teaspoon of almond extract to the crust for a professional bakery aroma.
- Birthday Cake: Toss 1/4 cup of rainbow sprinkles into the topping for a funfetti vibe.
Keeping Your Leftovers Fresh and Using Every Bit
This cake is surprisingly resilient. Because of the high sugar and fat content, it stays moist longer than a standard sponge cake. You can keep it at room temperature in an airtight container for up to 2 days, but I actually prefer it cold.
Keeping it in the fridge makes the topping even fudgier and the crust even chewier.
- Fridge: Store in an airtight container for up to 1 week.
- Freezer: Wrap individual squares in plastic wrap and then foil. They stay fresh for up to 3 months. Thaw on the counter for 20 minutes for a perfect chilled treat.
- Zero Waste Tip: If you have edges that got a little too crunchy, don't throw them away! Crumble them up and use them as a mix in for vanilla bean ice cream or as a topping for a fruit cobbler. The buttery crumbs add incredible texture.
Simple Ways to Serve Your Cake With Style
When it comes to presentation, less is more. A simple, light dusting of powdered sugar right before serving hides any cracks and gives it that classic "bakery" look. If you want to get fancy, serve a square in a shallow bowl with a few fresh raspberries or blackberries.
The acidity of the fruit balances the richness of the butter perfectly.
For the cleanest slices, use a sharp chef's knife and dip it in hot water, then wipe it dry between every single cut. This prevents the gooey topping from sticking to the blade and dragging through the layers.
It takes an extra minute, but the result is a set of perfectly sharp, professional looking squares that will have everyone asking which bakery you visited. Trust me, once you share this with your friends, you’ll be the designated "cake person" for every event from here on out!

Recipe FAQs
Is it true that I should bake this at 400°F for a crispier top?
No, this is a common misconception. You must preheat your oven to 350°F (175°C) as instructed to ensure the center stays perfectly gooey without burning the edges.
How to know if the cake is finished baking?
Check for golden brown, puffed edges while the center still jiggles slightly when shaken. This indicates the topping is set but retains that signature molten texture.
How to prepare the cream cheese for the perfect consistency?
Leave the cream cheese on the counter for 3 hours before starting to ensure it is dead soft. If you enjoyed mastering this creamy texture here, see how the same principle of ingredient temperature control applies to our homemade heavy cream process.
Can I speed up the cooling process in the refrigerator?
No, avoid the refrigerator until the cake has cooled completely at room temperature. Sudden temperature changes can cause the texture to become grainy rather than maintaining its glossy, smooth consistency.
How to prevent the cake from sticking to the pan?
Line your 9x13 pan with parchment paper after lightly greasing it. This step is non-negotiable if you want to achieve clean, professional looking slices without tearing the delicate crust.
Why is my crust turning into a thin paste instead of a dough?
You are likely over mixing the yellow cake mix, egg, and melted butter. Combine the ingredients only until a soft dough forms to ensure the base remains sturdy enough to hold the topping.
How to ensure the topping reaches a glossy finish?
Beat the cream cheese mixture for 2 3 minutes after adding the powdered sugar. This aeration process is critical for achieving that specific glossy, smooth top layer.
Ooey Gooey Butter Cake
Ingredients:
Instructions:
Nutrition Facts:
| Calories | 321 kcal |
|---|---|
| Protein | 3.2 g |
| Fat | 12.4 g |
| Carbs | 50.3 g |
| Fiber | 0.3 g |
| Sugar | 42.1 g |
| Sodium | 189 mg |
