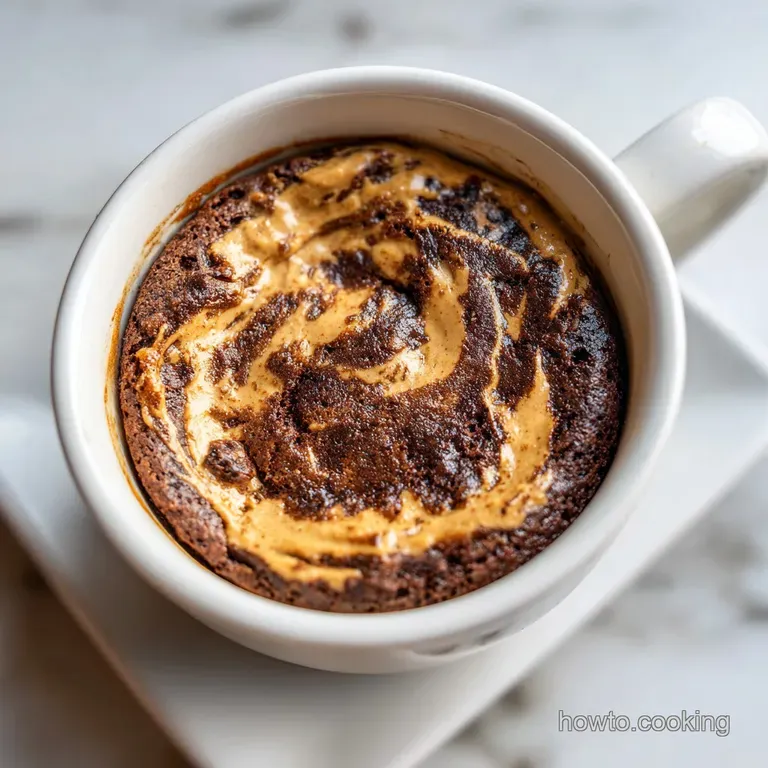
Peanut Butter Cake in a Mug: Velvety Center
- Time: Active 2 minutes, Passive 1 minute 15 seconds, Total 3 minutes 15 seconds
- Flavor/Texture Hook: Intense roasted nuttiness with a molten, velvety center
- Perfect for: Late night cravings or a wholesome single serve reward
- Why This Wholesome Warm Dessert Works
- Ingredient Science for a Velvety Crumb
- Everything Needed for Your Quick Bake
- Minimal Tools for the Busy Cook
- Step by Step Instructions for Success
- Fixing Common Microwave Baking Mistakes
- Flavorful Variations and Dietary Adjustments
- Managing Leftovers and Reducing Waste
- Final Flourishes for Your Mug Cake
- Recipe FAQs
- 📝 Recipe Card
You know those nights when you're staring at the pantry, craving something warm and nutty, but the thought of preheating the oven feels like an exhausting marathon? I used to be a total skeptic about microwave baking.
My first few attempts at a peanut butter cake in a mug resulted in something that looked and felt disturbingly like a pencil eraser. I almost gave up on the concept entirely, thinking it was just a gimmick for people who didn't care about texture.
But then I started treating it with the same respect I give a tiered sponge cake. I realized that the order of operations matters just as much in a ceramic mug as it does in a stand mixer.
When that first successful batch emerged, puffed and steaming with a nutty aroma that filled the entire kitchen, I knew I'd cracked the code. It wasn't just "good for a microwave cake" it was genuinely wholesome and satisfying.
Now, this is the treat I turn to when I need a moment of confidence building comfort without the mountain of dishes.
We're going to focus on building a stable emulsion before we even think about hitting that "start" button. You won't need a single specialized tool; just a fork and your favorite mug. Trust me, once you see how the crumb holds its structure while remaining moist, you'll never look at your microwave the same way again.
We're going for a result that feels like a hug in a cup, using simple, nutritious staples you already have in the cupboard.
Why This Wholesome Warm Dessert Works
Understanding the mechanics of microwave baking is the first step toward gaining kitchen confidence. Unlike a traditional oven that heats from the outside in using hot air, a microwave uses electromagnetic waves to vibrate water molecules inside the food.
This creates friction and heat, which effectively steams the cake from the inside out.
Molecular Agitation: The high water content in the whole milk and the moisture in the peanut butter absorb microwave energy rapidly, turning into steam that inflates the batter.
Starch Gelatinization: As the temperature rises, the flour's starches absorb the surrounding liquid and swell, creating the structural "skeleton" that keeps the cake from collapsing.
Fat Interference: The lipids in the peanut butter and neutral oil coat the flour particles, which limits gluten development and ensures the final texture remains tender and fudgy.
Chemical Leavening: Baking powder reacts twice first when it hits the wet ingredients and again when heated ensuring the cake rises even in the short cook window.
Microwave vs Traditional Oven Comparison
Choosing your heat source changes more than just the timer. While the oven provides a crusty, caramelized exterior, the microwave excels at preserving moisture and soft textures.
| Method | Cook Time | Final Texture | Heat Distribution |
|---|---|---|---|
| Microwave | 1 minute 15 seconds | Uniformly moist and steamed | Volumetric (heats all layers) |
| Standard Oven | 15-20 minutes | Crispy edges, dry top | Conductive (heats outside first) |
| Toaster Oven | 12-18 minutes | Firm crumb, toasted surface | Radiant (high risk of burning top) |
When you are looking for a quick fix that doesn't sacrifice the integrity of the ingredients, the microwave method is surprisingly superior for single servings. If you enjoy the depth of flavor in roasted peanuts, you might also appreciate the savory side of this profile in a Peanut Butter Satay recipe, which uses similar emulsification techniques to achieve a smooth finish.
Ingredient Science for a Velvety Crumb
To achieve a reliable bake every time, we need to look at how these specific components interact. It isn't just about mixing things together; it's about the chemistry of the crumb.
| Ingredient | Science Role | Pro Secret |
|---|---|---|
| All purpose flour | Provides structure via gluten | Level your spoons to avoid a dense, "brick like" cake |
| Creamy peanut butter | Acts as both fat and flavor | Use a room temperature jar for easier whisking and better aeration |
| Whole milk | Hydrates starches and proteins | Use full fat milk to ensure the richest mouthfeel and moisture |
| Baking powder | Creates essential air pockets | Check the expiration date; old powder means a flat, gummy cake |
The balance of these elements is what prevents the common pitfalls of mug desserts. If the ratio of liquid to flour is off by even a teaspoon, the texture shifts from cake like to chewy.
Everything Needed for Your Quick Bake
For this recipe, we are using standard pantry staples. These quantities are calibrated for a standard 12 ounce mug.
- 4 tbsp All purpose flour (30g): The foundation of our structure.
- 2 tbsp Granulated sugar (25g): Provides sweetness and helps with moisture retention.
- 1/4 tsp Baking powder: The primary lifting agent for the batter.
- 1 pinch Fine sea salt: Essential for balancing the sweetness and intensifying the peanut flavor.
- 3 tbsp Whole milk (45ml): The hydrating element that turns dry powder into a smooth emulsion.
- 1 tbsp Neutral oil: Adds a "slick" feel to the crumb, preventing it from tasting dry.
- 2 tbsp Creamy peanut butter (32g): Divided into 1.5 tbsp for the batter and 0.5 tbsp for the core.
- 1/4 tsp Pure vanilla extract: Rounds out the flavors and provides a wholesome aroma.
- 1 tsp Semi sweet chocolate chips: For a touch of decadence in every bite.
Chef's Tip: Freeze your chocolate chips for 10 minutes before pushing them into the batter. This prevents them from melting completely into the cake, leaving you with distinct "shards" of chocolate amidst the velvety cake.
If you find yourself frequently reaching for the jar of peanut butter, you've likely mastered the art of the cookie as well. For a different texture profile, my Peanut Butter Cookies recipe offers that classic "snap" and chew that a mug cake purposely avoids.
Minimal Tools for the Busy Cook
You don't need a kitchen full of gadgets for this. In fact, using fewer tools often leads to a better result because there's less room for over mixing.
- 12 ounce Microwave Safe Mug: Ensure it has straight sides to help the cake rise evenly.
- Small Fork or Whisk: A fork is actually better here for breaking up the peanut butter clumps.
- Measuring Spoons: Precision is non negotiable for a single serve bake.
Choosing the Right Vessel
The shape of your mug dictates the physics of the rise. A wide, shallow bowl will cause the cake to spread and dry out, while a tall, narrow mug forces the steam upward, resulting in a taller, fluffier cake.
Always check the bottom of your mug for the "microwave safe" symbol; glass and ceramic are best, while metallic rimmed mugs are strictly forbidden.
step-by-step Instructions for Success
Follow these steps in order. The sequence of mixing wet and dry ingredients is the secret to a lump free batter.
- Whisk the dry base. Combine 4 tbsp flour, 2 tbsp sugar, 1/4 tsp baking powder, and a pinch of salt directly in the mug.
- Aerate the mixture. Use your fork to stir the dry ingredients for 30 seconds until the mixture looks light and uniform. Note: This prevents clumps of baking powder from creating bitter spots.
- Incorporate the liquids. Pour in 3 tbsp whole milk, 1 tbsp oil, and 1/4 tsp vanilla extract.
- Add the flavor base. Drop in 1.5 tbsp of creamy peanut butter.
- Emulsify the batter. Whisk vigorously with the fork until the batter is smooth and no flour streaks remain.
- Create the molten core. Place the remaining 0.5 tbsp of peanut butter in the center and push it down slightly.
- Add texture. Sprinkle the 1 tsp of chocolate chips over the top.
- Calibrate the cook. Place the mug on the edge of the microwave turntable (not the center) and cook for 1 minute 15 seconds until the top is puffed and matte.
- Allow for carryover heat. Let the cake rest for 2 minutes inside the microwave before removing. Note: The center continues to set during this time.
The Resting Rule
The most common mistake is eating the cake the second the timer beeps. Because the microwave heats the center so intensely, the cake is technically still "cooking" for about 90 seconds after the power stops. If you dig in immediately, the texture will feel wet and underbaked.
That 2 minute rest allows the starches to firm up, creating that perfect, velvety crumb we're after.
Fixing Common Microwave Baking Mistakes
Even the simplest recipes can go sideways if the microwave power varies. Most household microwaves range from 800 to 1200 watts.
Why Your Cake Is Rubbery
If your cake feels like a bouncy ball, it’s usually due to over mixing or over cooking. When you whisk flour too much, you develop gluten, which is great for bread but terrible for a tender peanut butter cake in a mug. Mix just until the flour disappears.
If the texture is still tough, reduce your cook time by 10 seconds next time.
Why Your Cake Overflowed
Microwave cakes rise rapidly. If the batter filled more than half the mug before cooking, it will likely spill over. Use a larger mug or ensure your baking powder measurement was level.
| Problem | Root Cause | Solution |
|---|---|---|
| Dry/Crumbly Texture | Cooked too long | Reduce cook time by 15 seconds; check at 1 minute |
| Gummy/Unset Middle | Center stayed cold | Place mug on the edge of the turntable for better rotation |
| Bitter Aftertaste | Clumped baking powder | Sift or whisk dry ingredients thoroughly before adding liquids |
Common Mistakes Checklist
- ✓ Forgetting to level the flour (leads to a dense, dry cake).
- ✓ Using cold milk (makes it harder to emulsify the peanut butter).
- ✓ Skipping the salt (the flavor will taste flat and one dimensional).
- ✓ Eating immediately (the rest period is vital for the structure).
- ✓ Using a mug that is too small (causes a messy overflow).
Flavorful Variations and Dietary Adjustments
Once you have the base technique down, you can start getting creative with what's in your pantry.
Adapting for Dietary Needs
This recipe is surprisingly flexible. If you're out of whole milk or want to change the profile, use the table below to guide your swaps.
| Original Ingredient | Substitute | Why It Works |
|---|---|---|
| Whole Milk | Oat Milk (full fat) | High protein content mimics the structure of dairy milk |
| Granulated Sugar | Coconut Sugar | Adds a deep, caramel like undertone to the nuttiness |
| Neutral Oil | Melted Coconut Oil | Provides a subtle tropical scent. Note: Cake may firm up faster as it cools |
| All purpose Flour | 1:1 gluten-free Blend | Rice based blends work well. Note: Crumb may be slightly grittier |
The "Fluffernutter" Variation
If you want to take this to the next level, replace the center peanut butter dollop with a teaspoon of marshmallow fluff. As it heats, the marshmallow will expand and melt into the batter, creating a nostalgic, gooey center that pairs perfectly with the salty peanut butter.
Managing Leftovers and Reducing Waste
Since this is a single serve dessert, you won't often have leftovers, but here is how to handle them if you do.
- Storage: If you can't finish it, cover the mug with plastic wrap and keep it in the fridge for up to 2 days. The texture will firm up considerably as the fats solidify.
- Reheating: To bring it back to life, add a teaspoon of milk to the top and microwave for 15-20 seconds. This creates a steam effect that softens the crumb.
- Zero Waste: If you have a near empty peanut butter jar, you can actually mix the batter directly in the jar! The heat will help you scrape every last bit of peanut butter off the sides, and you won't even have to wash a mug. Just ensure the jar is microwave safe (no metallic lids or foil seals).
Final Flourishes for Your Mug Cake
Presentation matters, even if you're eating this on the couch in your pajamas. A little bit of visual flair can make this quick snack feel like a gourmet experience.
- The Dusting: A tiny sprinkle of powdered sugar through a mesh strainer adds a professional touch and a quick hit of sweetness.
- The Contrast: Top the hot cake with a cold scoop of vanilla bean ice cream. The way the cream melts into the warm peanut butter crevices is absolutely divine.
- The Crunch: Add a few crushed roasted peanuts on top after cooking to provide a structural contrast to the soft cake.
Making a peanut butter cake in a mug is about more than just satisfying a sweet tooth; it's about the confidence that comes from knowing you can create something nutritious and flavorful in the time it takes to brew a cup of tea.
It’s a reliable, wholesome shortcut that doesn't compromise on the joy of a home cooked treat. So, grab your favorite mug, and let’s get baking.

Recipe FAQs
How do you make 3 ingredient peanut butter mug cake?
Mix peanut butter, egg, and sweetener. Combine 3 tablespoons of creamy peanut butter with one medium egg and 1 tablespoon of your preferred sweetener (like maple syrup or sugar) directly in the mug. Whisk well until smooth, then microwave for about 60-90 seconds.
Can I bake cake in a mug?
Yes, absolutely. Mug cakes rely on the mug to contain the steam created during rapid microwave heating, forcing the batter to rise quickly and cook through.
Can I bake a cake in my microwave?
Yes, this is the primary method for this recipe. Microwaves cook by agitating water molecules, essentially steaming the cake from the inside out, which results in a very quick, moist cook.
How do I stop mug cake from being rubbery?
Cook less time and allow a carryover rest. Overcooking is the main culprit, as it overdevelops the minimal gluten structure present. Reduce the microwave time by 10-15 seconds next time, and always let the cake sit covered for two minutes after cooking so the residual heat finishes setting the center.
Is it true I must use a specific size mug for the best rise?
No, this is a common misconception, but shape matters more than absolute size. Use a mug with straight, taller sides rather than a wide, shallow bowl, as this forces the steam upward, resulting in a fluffier, less squashed cake.
What is the secret to ensuring a molten center instead of fully cooked cake?
Place an extra dollop of peanut butter in the center before cooking. This pocket of fat and protein absorbs less microwave energy than the flour mixture, maintaining a soft, gooey core even after the surrounding cake is set.
Can I use oil alternatives in this recipe?
Yes, melted coconut oil works well as a direct substitute for neutral oil. If you are mastering the technique of fat distribution here, see how the same principle of using lipids to coat flour particles ensures tenderness in our Classic Chewy Chocolate recipe.
Peanut Butter Mug Cake

Ingredients:
Instructions:
Nutrition Facts:
| Calories | 571 kcal |
|---|---|
| Protein | 11.6 g |
| Fat | 33.3 g |
| Carbs | 59.4 g |
| Fiber | 2.8 g |
| Sugar | 34.2 g |
| Sodium | 415 mg |
