Pillsbury Chicken Pot Pie Recipe
- look into into Comfort: My Love for Pillsbury Pot Pie
- Understanding the Magic
- Why You’ll Love It
- A Transition to Ingredients
- Essential Ingredients Guide
- Professional Cooking Method: The Heart of the Kitchen
- Pro Tips & Secrets for Your Pillsbury Chicken Pot Pie
- Perfect Presentation
- Storage & Make-Ahead Magic
- Creative Variations to Shake Things Up
- Complete Nutrition Guide
- Expert FAQ Solutions
- Conclusion: You've Got This!
- 📝 Recipe Card
look into into Comfort: My Love for Pillsbury Pot Pie
Oh man, let me tell you about my first attempt at making a pillsbury pot pie ! picture it: a chilly, rainy sunday afternoon, and i’m rifling through my freezer.
I spot this golden treasure of pre-made pie crust and chicken broth. suddenly, i have a lightbulb moment. it’s time to whip up a dish that feels like a warm hug, complete with creamy filling and colorful veggies .
You ever had a day when you just crave comfort food? yeah, that was me.
And you know what? this pillsbury chicken pot pie recipe is not just a meal; it’s a comforting slice of nostalgia.
By the end, i was devouring every last bite, thinking, “why didn’t i make this sooner?"
Understanding the Magic
Now, where did this brilliant creation come from? the pot pie dates back centuries, originating as a way to use leftover meats in the uk and beyond.
It’s evolved into the beloved dish we know today, especially popular across america as a staple in family friendly dinner ideas .
Fast forward to now: mixing up a homemade chicken pot pie or even a quick dinner recipe is as easy as grabbing a tube of pillsbury dough .
Sure, there are countless pot pie variations out there, but this version is super accessible. with just 45 minutes total from start to finish, you’ll be savoring a delightful crust that’s so flaky ! and let's be honest who doesn’t love a tender, buttery pie crust?
it’s the kind of meal that wins over anyone, no matter the occasion.
Why You’ll Love It
Let’s break it down, shall we?
Health benefits : sure, it’s not a salad, but hey it packs a punch with protein from the chicken and fiber from those bright frozen veggies.
If you’re looking for healthy pot pie alternatives , just load it up with more greens!
Easy to Customize : You can use whatever you’ve got on hand try different veggies or even switch to a vegetarian pot pie if that’s your jam.
Perfect for any occasion : whether it’s a cozy family dinner or you need something to impress dinner guests, this dish shines.
I often serve it with a side of garlic bread , and let me tell ya, it’s a game changer!
Saves Time and Money : Using a store-bought crust means you won’t spend hours in the kitchen perfect for those busy weeknight meals when you just can't even.
A Transition to Ingredients
Alright, enough chit chat it’s time to get into the nitty gritty of what makes this homemade chicken pot pie so delightful.
Essential Ingredients List
For the filling:
- 2 cups of shredded chicken (rotisserie makes it a breeze!)
- 1 cup of frozen mixed veggies
- 1/2 cup of milk
- 1/2 cup of cream of chicken soup
- A sprinkle of garlic and onion powder because flavor is everything!
- Seasoned to taste with salt and pepper
For the dough:
- A 13.5 oz package of Pillsbury refrigerated pie crusts
- An egg to create a lovely golden shine on top (optional, but oh so tasty)
With these simple ingredients, you’ll have a mouthwatering dish that’ll have your family begging for seconds. plus, it's a fantastic way to utilize leftover rotisserie chicken recipes, saving you time and reducing waste.
Stay tuned, and i’ll walk you through how to bring this beauty to life! remember, cooking should be fun, so don’t sweat it! let’s make this pot pie as comforting as a cozy blanket on a rainy day.
Essential Ingredients Guide
Alright, friends, let’s chat about the building blocks of kitchen success. having your essentials on hand can make cooking a joy, not a chore.
So, let’s break it down and keep it simple, whether you’re whipping up a pillsbury pot pie or diving into a new casserole style recipe.
Premium Core Components
First off, know your measurements ! In the U.S., most recipes use cups and tablespoons, but you can also keep a kitchen scale to get those grams down. Here’s a quick peek:
- 1 cup = 240 ml
- 1 tablespoon = 15 ml
When you reach for your ingredients, look for quality indicators . Fresh herbs should smell like they just jumped off the vine. Crushed spices? They should zing your senses, not sit flat.
Storage is key. most dry spices can last up to 2-3 years if kept in a cool, dark place. on the other hand, fresh produce like vegetables and herbs should be stored in the fridge and used within a week or so.
For things like frozen mixed veggies (hello, quick dinners), they can sit in your freezer for up to a year.
To keep things fresh, check for color and scent when you’re selecting ingredients. Bright green veggies? Yes, please! Wilted spinach? Time to toss that.
Signature Seasoning Blend
Now, let’s spice things up! a signature seasoning blend is what turns a simple dish into something you crave. start with essential spices like salt, pepper , and a pinch of garlic powder.
For that hearty comfort food vibe especially in a homemade chicken pot pie add dried thyme and onion powder.
Pairing the right herbs can transform your dish. for a creamy chicken pot pie , fresh rosemary and thyme play nicely with chicken.
Want it a bit worldlier? add in some cumin and coriander.
Regional variations are fun too! For a southern style pot pie, think biscuits on top instead of crust. It’s all about keeping it fresh and flavorful!
Smart Substitutions
Let’s face it, sometimes you don’t have what a recipe calls for. don’t sweat it! if you run out of cream of chicken soup for that easy chicken pot pie , substitute it with homemade white sauce .
You can also switch out chicken for a vegetarian pot pie ; maybe load it up with mushrooms, lentils, and beans for a hearty twist.
Need a healthy pot pie alternative ? use cauliflower as a base instead of heavy cream; your waistline will thank you!
Kitchen Equipment Essentials
You gotta have the right tools for the job, right? a solid mixing bowl , a whisk , and a consistent pie plate are absolute must haves.
But here’s the scoop: if you don’t have a pie plate, any oven safe dish will do. just remember, having a baking sheet underneath is smart.
Catch those drips!
For prepping, you can use a rolling pin or even a clean wine bottle if you're in a pinch. don’t forget to look at your storage solutions too keep your spices neat and easy to find.
One little tip I swear by is the pot pie egg wash technique . Just beat an egg and brush it over your crust before baking. It’ll give you that golden serendipity!
Wrapping It Up
So there you have it! these tips and tools will help you nail those family friendly dinner ideas like a classic pillsbury chicken pot pie .
By mastering your basic pie crust technique and keeping these essentials on deck, you'll create not just dinners, but memories around your table.
Next up, we’ll dive into the mouthwatering details of the Pillsbury Chicken Pot Pie recipe where we'll put all these fabulous ingredients into action. Get ready for some comfort food magic!
Professional Cooking Method: The Heart of the Kitchen
When it comes to cooking, especially comfort food like pillsbury chicken pot pie , it’s all about workflow. let’s break down some essential preparation steps that will elevate your cooking game.
Trust me, once you get the groove, you’ll feel like a pro in your own kitchen!
Essential Preparation Steps
First things first, let’s talk mise en place, which is just a fancy way of saying, “everything in its place.
” before you even think about turning on that oven, gather all your ingredients. for our pot pie, that means having your pre-cooked chicken, frozen veggies, and pillsbury pie crust ready to go.
Having everything at hand not only speeds things up but also helps you avoid that panicked scramble when you're elbow deep in dough!
Next up, time management. you don’t want to end up sautéing your veggies while your pie crust is burning. plan out your steps! for example, while you’re making that creamy filling, have your oven preheating to 425° f ( 220° c) .
Multi tasking is your best friend here.
Organization is a biggie too! clean as you go. keep your workspace tidy to avoid the chaos. plus, it helps prevent accidents safety first! always be aware of your knife skills when chopping and keep that cooking area clear of clutter.
step-by-step Process
Okay, now that you’re prepped, let’s dive into the cooking process. Here’s how to nail that Pillsbury Chicken Pot Pie step-by-step:
Preheat the Oven: First, crank that oven up to 425° F ( 220° C) so it’s nice and hot when you’re ready to bake.
Prepare the Filling: Combine your shredded chicken, frozen veggies, milk, cream of chicken soup, and spices in a mixing bowl. Stir it until everything is well mixed.
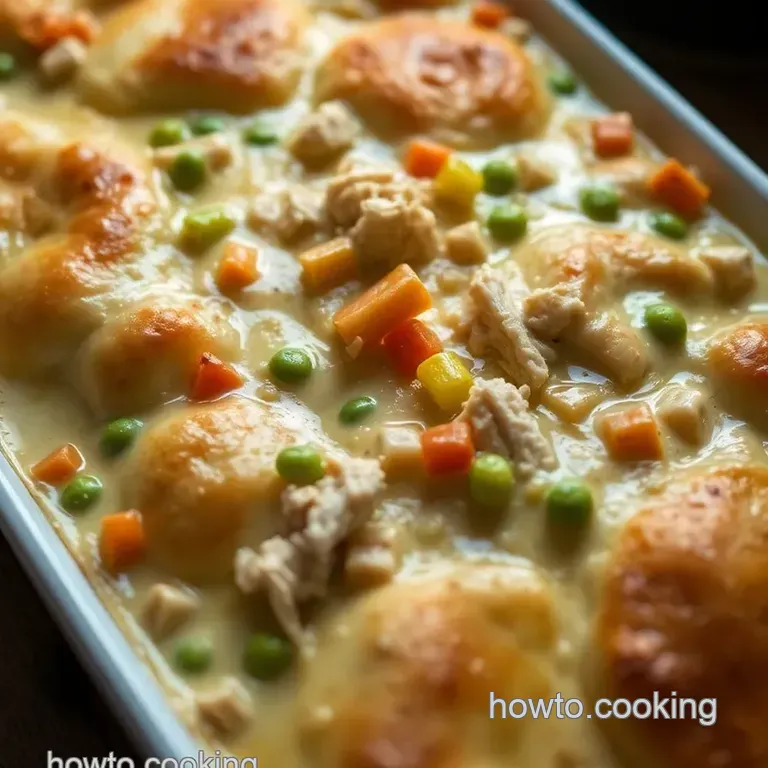
Assemble the pie: roll out one pillsbury pie crust into your pie plate, fill ‘er up with that delicious chicken mixture, and top it with the second crust.
Remember to pinch those edges. and hey, don’t forget to slice some steam vents in the top crust!
Time to bake: throw that pie into the oven for 25- 30 minutes . you know it’s done when the crust is golden brown and the filling is bubbling.
That’s your visual cue right there!
Expert Techniques
Now, let’s sprinkle in some expert techniques! one thing to keep in mind is temperature control the right heat makes or breaks your dish.
If you notice the edges of your crust are browning too quickly, cover them with foil to prevent burning.
Speaking of precision, timing is everything. you’ll want that pot pie to look like a golden marvel when it’s done.
Did i mention quality checkpoints? midway through baking, give it a little peek. if it’s not bubbling yet, it’s not ready!
If you run into any hiccups, don't sweat it! a too-thick filling? add a splash more milk to loosen it up.
Not enough flavor? a pinch of salt or some herbs can work wonders.
Success Strategies
Let’s be real here; even experienced cooks miss the mark sometimes, and that’s okay! avoid common mistakes, like overfilling your pie that’s a sure route to a soupy disaster.
Keep an eye on your cooking times and remember: it’s always easier to add ingredients than to take them away.
Quality assurance tips? Taste your filling before sealing up that crust! You want to ensure it’s seasoned just right, especially for that creamy chicken pot pie experience.
And guess what? if you ever want to plan ahead, this dish is perfect for make-ahead options. assemble the pot pie and pop it in the fridge for a couple of hours or even overnight.
Just bake it when you're ready!
With these tips in your back pocket, you’re ready to tackle Pillsbury Chicken Pot Pie with newfound confidence. This dish is not just easy; it’s a hug in pie form.
Ready to dig deeper? Stay tuned for some Additional Information on variations, troubleshooting, and side dishes that pair perfectly with that flaky pie crust! Your journey into the world of pot pies is just beginning!
Pro Tips & Secrets for Your Pillsbury Chicken Pot Pie
Let’s talk about some pro tips and secrets to make your pillsbury chicken pot pie absolutely to-die-for! first off, if you want to cut down on cooking time (and who doesn’t?), go for a rotisserie chicken .
Seriously, it’s a game changer. just shred that baby up, and you’re halfway there!
Next, let’s chat about enhancing that flavor. besides the classic garlic and onion powders , consider adding a sprinkle of fresh herbs like thyme or rosemary.
Fresh herbs can elevate your creamy chicken pot pie to a whole new level. oh, and don’t skip the egg wash on the crust for that beautiful golden finish.
It’ll make your pot pie look as good as it tastes!
Perfect Presentation
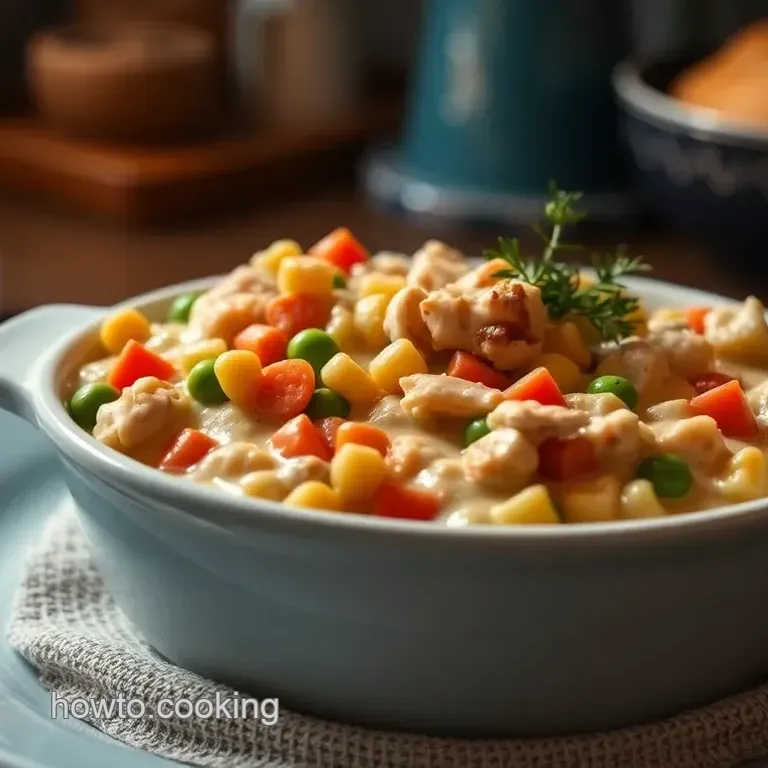
Alright, now that your filling is all set, let’s dive into presentation . a pot pie is all about that cozy vibe, so let’s make it look as inviting as it tastes.
When plating, consider using a deep dish or an attractive pie plate. if you really want to impress, buy some herb sprigs to place on top.
It adds that touch of elegance and color. 🍽️
Speaking of color, a mix of bright vegetables not only tastes amazing but also makes your dish pop. think orange carrots, green peas, and golden crust talk about a visual feast! plus, serving it with a side of garlic bread is a classic move.
It’s the perfect vehicle for mopping up that savory filling!
Storage & make-ahead Magic
Now, let’s be real: life gets busy. so how do you store this beauty? if you make it ahead of time, that’s totally cool! you can assemble your easy chicken pot pie and store it in the fridge for up to a day before baking.
Just cover it tight with plastic wrap. if you bake it first, it’ll last about three days in the fridge.
For longer storage, you can freeze it! i recommend freezing it before baking. just wrap it up tight with aluminum foil and toss it in the freezer.
It’ll be good for about three months. when you’re ready to bake, let it thaw in the fridge overnight and follow the usual baking instructions.
Creative Variations to Shake Things Up
So, you’ve got your classic pillsbury pot pie recipe down. but what if you wanna mix it up? let’s get creative! try switching out the chicken for cooked sausage or shredded turkey if you have leftovers hanging around.
Feeling adventurous? throw in some sautéed mushrooms or even butternut squash for a seasonal twist!
And for my vegetarian friends, you can totally make a vegetarian pot pie . just pile in all your favorite veggies, maybe add some great northern beans for protein, and you're set.
Don't forget the spices make it flavorful!
Complete Nutrition Guide
Now, let’s get down to the nitty gritty what's in that delicious pot pie? typically, a serving of this comfort food packs around 350 calories .
It's not too shabby! you’re getting protein from the chicken, and with the mixed veggies, you're diving into some vitamins too.
If you’re counting macros, keep in mind that it does have a fair bit of fat due to the crust, but hey, we all deserve a little indulgence, right? just consider portions if you're looking to balance your meal.
Expert FAQ Solutions
Got questions about your pillsbury chicken pot pie ? i hear ya! one common question i get is about the upper crust being soggy.
To avoid this, make sure to let the filling cool a bit before you assemble it. trust me; it'll make a difference.
Another question is whether you can skip the egg wash. sure, you can! but it’ll just be a little less golden and pretty.
And if your filling looks too runny, a quick fix is adding a tablespoon of cornstarch to bind it together.
Conclusion: You've Got This!
Look, making a pillsbury chicken pot pie is not just about the food it’s about bringing folks together, embracing those cozy vibes, and enjoying life’s simple pleasures.
Whether it's a weeknight meal or a special occasion, this recipe is truly one of those family friendly dinner ideas that you’ll treasure.
So gather your ingredients, roll out that flaky pie crust , and whip up something magical! you’ve got this!
Pillsbury Chicken Pot Pie Recipe

Ingredients:
Instructions:
Nutrition Facts:
| Calories | 350 kcal |
|---|---|
| Protein | 20 g |
| Fat | 18 g |
| Carbs | 30 g |
| Fiber | 2 g |
| Sugar | 1 g |
| Sodium | 750 mg |
