Ultimate Red Velvet Crinkle Cookies: Fudgy Center
- Time:15 minutes active + 30 minutes chilling = Total 1 hours 27 mins
- Flavor/Texture Hook: Velvety, cocoa rich center with a shatter crisp sugar shell
- Perfect for: Holiday platter, Valentine's Day, or a cozy weekend treat
I still remember the first time I tried making these. I was convinced that the "chilling" step was just a suggestion, so I rolled the dough and popped them straight in the oven. I didn't get crinkles, I got red velvet pancakes.
They were tasty, sure, but they looked like sad, flat discs instead of those gorgeous, snowy topped gems you see in bakery windows.
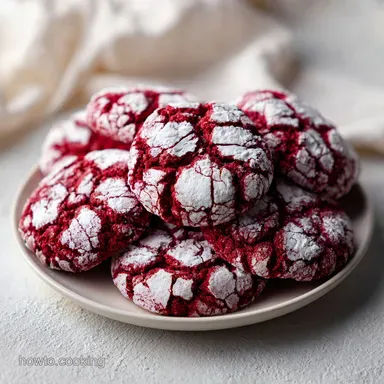
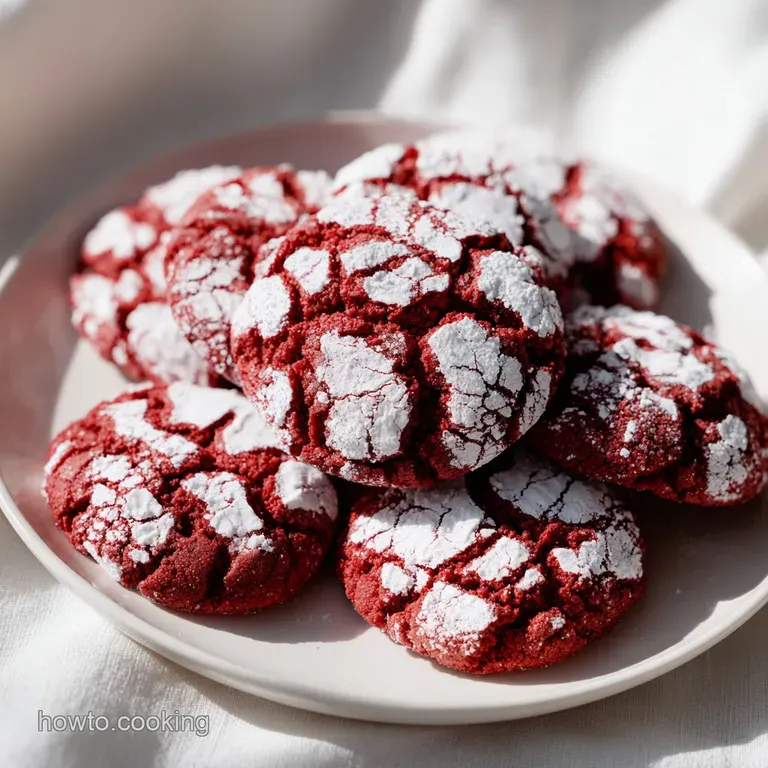
The magic really happens in that contrast, the way the deep mahogany red dough pushes through the white powdered sugar as it rises. It's a sensory trip, from the smell of cocoa and vinegar hitting the heat to that first bite where the sugar crust shatters before you hit the soft, velvety center.
Trust me, if you stick to the timing, these red velvet crinkle cookies are nearly impossible to mess up. We're skipping the fancy equipment and keeping things simple, focusing on the few key moves that actually make a difference in the final result.
Red Velvet Crinkle Cookies

Secret Techniques for Great Texture
Getting that specific look isn't about luck, it's about a bit of basic chemistry. Here is why this specific method works every single time.
- The Acid Base Lift: The vinegar reacts with the baking soda to create tiny bubbles, which gives the cookies their lift and creates the cracks.
- Fat Stabilization: Freezing the dough balls prevents the butter from melting too quickly, ensuring they stay plump rather than spreading.
- Osmotic Pull: The granulated sugar layer acts as a barrier, preventing the powdered sugar from soaking into the dough.
- Pigment Density: Using gel coloring instead of liquid keeps the batter thick, so the cookies don't flatten out.
Since we're aiming for that professional look without the stress, it's helpful to see how this from scratch version compares to the common shortcuts.
| Method | Prep Time | Texture | Best For |
|---|---|---|---|
| From Scratch | 15 minutes | Fudgy and rich | Those who love a deep cocoa taste |
| Cake Mix | 10 minutes | Spongy and light | Ultra fast baking for crowds |
| Melted Butter | 5 minutes | Chewier and thin | People who hate waiting for softening |
But wait, speaking of butter, how you handle your fats changes the whole structure. Some people like to melt butter on the stove, but for this recipe, that's a mistake.
| Butter Method | Time | Result | Best For |
|---|---|---|---|
| Room Temp Soften | 1 hour | Fluffy and structured | Classic crinkle height |
| Stovetop Melted | 2 minutes | Dense and oily | Chewy, flatter cookies |
Basic Recipe Specs
Before we dive in, let's talk about the gear. You don't need a professional kitchen here. A simple hand mixer, a couple of bowls, and a baking sheet are your best friends. If you don't have a mixer, you can use a sturdy whisk and a bit of elbow grease, though the butter and sugar will take a few more minutes to get fluffy.
I always recommend using parchment paper. It's not just about the cleanup, it's about the heat distribution. Greasing a pan with butter can sometimes cause the cookies to slide and spread more than they should, whereas parchment keeps them exactly where you put them.
Essential Ingredient Breakdown
I've found that the quality of your cocoa powder really dictates the final color. A darker, Dutch processed cocoa will give you a more sophisticated red, while a natural cocoa can sometimes lean a bit more orange.
| Ingredient | Science Role | Pro Secret |
|---|---|---|
| White Vinegar | Activates baking soda | Provides the classic "tang" |
| Gel Food Color | High intensity pigment | Use a toothpick for precise drops |
| Powdered Sugar | Creates the crust | Use a heavy hand when coating |
| Unsalted Butter | Structure and fat | Ensure it's "cool room temp" |
Necessary Baking Tools
Keep it minimal. You just need a medium mixing bowl for the wet stuff, a smaller one for the dry, and a baking tray. A cookie scoop is handy for keeping the sizes consistent, but a tablespoon works just as well.
If you're wondering about flour measurement, it's the one place where people usually go wrong. According to King Arthur Baking, weighing your flour is the only way to be 100% sure you aren't adding too much, which can make the cookies cakey instead of fudgy.
The Building Blocks
Here is exactly what you'll need. I've included some swaps in case your pantry is looking a bit bare.
For the Dough
- 1/2 cup (115g) unsalted butter, softenedWhy this? Provides the creamy base and rich flavor
- 3/4 cup (150g) granulated sugarWhy this? Helps with the crisp edges
- 1 large egg (50g)Why this? Binds everything and adds lift
- 1 tsp (5ml) vanilla extractWhy this? Balances the cocoa bitterness
- 1 tbsp (15ml) red food coloring gelWhy this? Gives that vivid red without adding liquid
- 1 tsp (5ml) white distilled vinegarWhy this? Reacts with soda for the "crinkle"
- 2 cups (250g) all purpose flourWhy this? Standard structure for a soft cookie
- 2 tbsp (15g) unsweetened cocoa powderWhy this? Adds the "velvet" chocolate note
- 1/2 tsp (3g) baking sodaWhy this? The primary leavening agent
- 1/4 tsp (1.5g) saltWhy this? Sharpens the chocolate flavor
For the Coating - 1/2 cup (60g) granulated sugar Why this? First layer to lock in moisture - 1/2 cup (60g) powdered sugar Why this? Second layer for the white contrast
| Original Ingredient | Substitute | Why It Works |
|---|---|---|
| Red Gel Color | Beet Powder (2 tbsp) | Natural alternative. Note: Color will be more earthy/muted |
| White Vinegar | Apple Cider Vinegar | Similar acidity. Note: Adds a slightly fruitier tang |
| Unsalted Butter | Coconut Oil (solid) | Same fat content. Note: Adds a slight coconut aroma |
| AP Flour | gluten-free 1 to-1 | Works for most. Note: May result in a slightly more fragile crumb |
Step by step Guide
Let's get into it. Follow these steps closely, especially the chilling part, or you'll end up with my "red pancakes" from years ago.
- Beat the softened butter and granulated sugar using an electric mixer until light and fluffy (about 2-3 minutes). Note: This incorporates air for a softer bite.
- Mix in the egg, vanilla extract, red gel coloring, and white distilled vinegar; beat until the color is a uniform mahogany red.
- In a separate bowl, whisk together all purpose flour, cocoa powder, baking soda, and salt. Note: Whisking removes cocoa clumps.
- Slowly incorporate the dry ingredients into the wet mixture until just combined, avoiding overmixing.
- Scoop the dough into 1 inch balls, place them on a tray, and freeze for 30 minutes to stabilize the fats.
- Roll each chilled ball first in granulated sugar, then heavily in powdered sugar until completely white. Note: The granulated sugar prevents the powdered sugar from melting into the dough.
- Place cookies on parchment lined baking sheets 2 inches apart.
- Bake at 350°F (175°C) for 10-12 minutes until edges are set but centers remain soft to the touch.
Chef's Tip: If you're feeling adventurous, try adding a handful of white chocolate chips to the dough in step 4. It adds a creamy contrast to the tang of the red velvet. If you love chocolatey treats, you might also enjoy my edible cookie dough as a little snack while these are chilling in the freezer.
Fixing Common Cookie Errors
Even the best of us have bad batches. Usually, it comes down to temperature or the way the sugar was applied.
Troubleshooting Common Issues
| Issue | Solution |
|---|---|
| Why My Cookies Spread Too Much | This usually happens if the butter was too soft or you skipped the 30 minute freeze. When the fat is too warm, it melts before the flour structure sets, leading to a flat cookie. |
| Why the Powdered Sugar Disappeared | If you only used powdered sugar without the granulated sugar first, the moisture from the dough absorbs the powder. The granulated sugar acts as a "shield" to keep the white color vivid. |
| Why the Red is Dull | Using liquid food coloring instead of gel often dilutes the color and adds too much moisture. Plus,, if you overbake them, the heat can brown the edges, masking the bright red. |
Pro Checklist for Success:
- ✓ Butter is softened but not greasy/melting
- ✓ Dough was frozen for exactly 30 minutes
- ✓ Cookies were rolled in BOTH types of sugar
- ✓ Oven was fully preheated to 350°F
- ✓ Removed from oven while centers still look slightly underdone
Adjusting Your Batch Size
If you're baking for a small group or a huge party, you can scale these red velvet crinkle cookies, but baking is a bit like a science experiment, so be careful.
Scaling Down (Half Batch) For a half batch, use 1/4 cup butter and 3/8 cup sugar. Since you can't easily halve an egg, beat one egg in a small bowl and use about 25g of it. Use a smaller baking sheet and check the oven 2 minutes early, as smaller batches can sometimes bake faster.
Scaling Up (Double or Triple) When doubling, don't just double the salt and baking soda, or the flavor can get metallic. Use 1.5x the leavening agents instead. Work in batches; if you crowd your mixer, you won't get that fluffy butter sugar base, and the cookies will be denser.
If you're planning a full dessert spread, these go great alongside some soft sugar cookies for a variety of textures on the platter.
Baking Truths and Lies
There are a few things people say about red velvet that just aren't true. Let's set the record straight.
Myth: Red velvet is just chocolate cake with red dye. Not quite. The addition of vinegar and buttermilk (or vinegar and butter in this case) creates a specific chemical reaction that changes the crumb and flavor. It's more of a hybrid between a vanilla and a chocolate treat.
Myth: More powdered sugar equals more cracks. Actually, it's about the temperature difference. The crack happens because the cold dough expands rapidly in the hot oven. The sugar just highlights where the dough split.
Freshness and Waste Tips
These cookies stay soft for a surprising amount of time if stored correctly. Keep them in an airtight container at room temperature for up to 5 days.
If you want them to last longer, they freeze beautifully. Flash freeze the baked cookies on a tray for an hour before transferring them to a freezer bag. They'll stay fresh for 3 months. To reheat, just pop them in a 300°F oven for 5 minutes to bring back that velvety center.
For zero waste, if you have leftover powdered sugar or granulated sugar from the coating process, don't throw it away. If it hasn't touched the raw dough, you can sift it and use it for your next batch. If it has touched the dough, you can actually use that sugar cocoa mix as a base for a quick chocolate frosting.
Plating and Gifting Ideas
Since these red velvet crinkle cookies are so visually striking, they don't need much help. For a holiday look, pile them in a glass jar with a red ribbon. The white powdered sugar looks like fallen snow against the red, which is why they're such a hit for Christmas.
If you're serving them for a party, try pairing them with a dollop of cream cheese frosting on the side for dipping. It mirrors the classic red velvet cake experience but keeps the cookies from getting soggy. For a more modern look, place them on a slate board with a few fresh raspberries to lean into those red tones.
Recipe FAQs
Why do I need to freeze the dough balls for 30 minutes?
It stabilizes the fats. Chilling prevents the cookies from spreading too thin and ensures they maintain a thick, soft center during baking.
Is it true that I only need powdered sugar for the coating?
No, this is a common misconception. You must roll the dough in granulated sugar first to create a barrier that prevents the powdered sugar from absorbing into the dough.
Can I use liquid food coloring instead of gel?
No, stick with gel. Liquid coloring adds too much moisture to the batter and often results in a duller red hue.
How to achieve the vivid white crinkle look?
Roll the chilled balls in granulated sugar first, then heavily in powdered sugar. This double coating method ensures the white color remains bright after baking.
How to tell when the cookies are perfectly baked?
Remove them when the edges are set but the centers remain soft to the touch. Following this cue prevents the cookies from becoming dry and cakey.
Can I use this dough for other styles of cookies?
Yes, the base is very versatile. If you enjoyed controlling cookie spread here, the same fat ratio logic applies to our raspberry thumbprint cookies.
How to store these cookies to keep them soft?
Place them in an airtight container at room temperature. This prevents the cookies from drying out and preserves the soft, fudgy texture.
Red Velvet Crinkle Cookies