Cloud Nine Toasted Marshmallow Whip Cheesecake with Graham Cracker Crust
- Elevating Comfort: The Genesis of This Toasted Cloud Dessert
- Why This Marshmallow Whip Cheesecake Deserves Center Stage
- Gathering Your Culinary Arsenal: What You'll Need
- Mastering the Components: Crust, Filling, and Topping
- Step-by-Step Blueprint for Baking Perfection
- Troubleshooting and Expert Advice for Your Cheesecake
- Recipe FAQs
- 📝 Recipe Card
Elevating Comfort: The Genesis of This Toasted Cloud Dessert
As an aficionado of transformative baking, there are few things as satisfying as taking a beloved classic and layering it with textures and flavors that elevate it into something truly memorable. This Marshmallow Whip Cheesecake is precisely that kind of triumph.
It’s more than just a dessert; it’s an experience a harmonious blend of rich, tangy baked custard and the ethereal sweetness of freshly toasted marshmallow fluff. We are essentially packaging the joy of a perfect campfire s'more inside the luxurious frame of a New York style cheesecake.
This creation stands as a testament to how simple, nostalgic ingredients, when treated with respect, can yield truly sophisticated results, placing it firmly among the best Cream Cheese Dessert Recipes you’ll ever encounter.
Why This Marshmallow Whip Cheesecake Deserves Center Stage
This is not your grandmother's dense, heavy dessert (though we adore those too!). This particular Marshmallow Whip Cheesecake Recipe is engineered for maximum impact with minimum fuss, especially when considering the topping.
It strikes a perfect balance that appeals to purists and adventurers alike.
A Sophisticated S'more Experience Unveiled
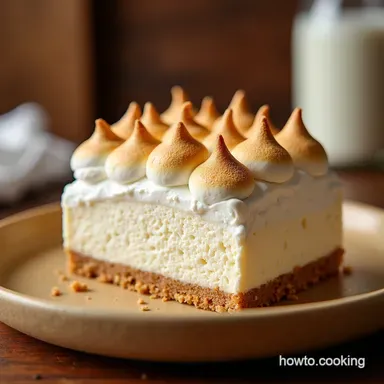
Imagine the crunch of a buttery graham crust giving way to a cool, velvety cheesecake interior, only to be met by a sticky, caramelized, golden brown cloud on top. This isn't just a dessert; it’s a sensory narrative.
The act of torching the topping transforms the straightforward sweetness of the fluff into something smoky and complex, echoing the best parts of a summer evening spent around a fire. It easily earns its place among standout Cheesecake Recipes with Marshmallows .
The Tangy Sweet Symphony: What Makes This Recipe Sing
The magic lies in the interplay between the base and the crowning glory. A truly great cheesecake needs a backbone of acidity to cut through its richness. That’s why we incorporate quality full fat cream cheese balanced with a healthy dose of sour cream or Greek yogurt.
This sharp tang provides the necessary structure against the intense, sugary sweetness of the Marshmallow Fluff Cheesecake topping. The result is an addictively smooth and balanced mouthful truly one of the most Creamy Cheesecake Desserts available to the home baker.
Who Should Bake This Dreamy Creation?
If you appreciate structure, value texture, and believe that no dessert is complete without a spectacular finish, this recipe is for you. It’s surprisingly manageable, even for bakers slightly intimidated by the reputation of baked cheesecakes.
While it requires patience, the steps are straightforward, positioning this as an Easy Marshmallow Dessert despite its impressive appearance. If you’ve ever wanted to master the water bath technique, this beautiful Fluff Cheesecake Recipe offers the perfect motivation.
Gathering Your Culinary Arsenal: What You'll Need

To create this stunning Marshmallow Whip Cheesecake , organization is key. We’ll rely on a precise blend of pantry staples and a few key textural components.
For the crust, you’ll need 1 ½ cups of graham cracker crumbs, ¼ cup of granulated sugar, and 6 tablespoons of melted unsalted butter. The filling demands 24 ounces of full fat cream cheese (softened completely!), 1 cup of granulated sugar, 3 room temperature large eggs, ½ cup of sour cream or full fat Greek yogurt, 1 teaspoon of vanilla extract, and a hint of lemon zest for brightness.
Finally, for the star attraction the topping a standard 7 8 ounce jar of store-bought Marshmallow Creme/Fluff is perfect, though ambitious bakers might choose to craft their own fluffy topping.
Related Recipes Worth Trying
- Peanut Butter Cup Mini Cheesecakes Foolproof Recipe — Create decadent Peanut Butter Cup Mini Cheesecakes without the cracks This foolproof recipe delivers rich saltysweet indulgence perfect for parties Get the...
- My FailProof NoBake Oreo Cheesecake Bites Recipe Zero Oven Fuss — Tired of oven fuss These creamy NoBake Oreo Cheesecake Bites are the absolute business The ultimate simple bite sized desserts perfect for easy zero oven...
- Easy Caramel Apple Cheesecake Bars The Ultimate Salted Caramel Shortbread Bars — Our Caramel Apple Cheesecake Bars Easy recipe is the bees knees Featuring buttery shortbread spiced apples and a dreamy filling The perfect autumn...
Mastering the Components: Crust, Filling, and Topping
Every layer of this dessert serves a crucial purpose, from grounding the richness to providing that airy contrast.
Essential Tools for Flawless Cheesecake Construction
Success hinges on having the right equipment ready. You absolutely must have a 9 inch springform pan, as its removable sides are essential for presentation. Equally vital is a large roasting pan, as we will employ the gentle heat of a bain marie , or water bath, which is the secret to a crack free, velvety finish.
On top of that,, an electric mixer (stand or hand) is required for achieving a smooth filling, and, for the crowning glory, a reliable kitchen torch is non-negotiable for achieving that authentic Toasted Marshmallow Cheesecake aesthetic.
Securing Peak Flavor: Ingredient Notes for the Tangy Base
Regarding the filling ingredients, temperature is paramount. Ensure your cream cheese and eggs are fully brought up to room temperature. Cold cream cheese clumps, forcing you to overmix the batter to smooth it out, introducing excess air the primary cause of cracking.
On top of that,, that small addition of sour cream or yogurt isn't just for moisture; it contributes essential lactic acid, enhancing the tanginess that perfectly balances the final sweet layer.
The Secret Ratio: Perfecting the Light Marshmallow Whip Texture
While many recipes use homemade meringue for a marshmallow topping, for a recipe focused on ease and stability, high-quality store-bought marshmallow fluff works wonderfully for our Marshmallow Whip Cheesecake .
It offers a dense, predictable texture that holds its shape beautifully when spread and torched. If you opt for a homemade approach, remember that incorporating a stabilizer like gelatin ensures your topping remains firm and chewy rather than weeping or collapsing post toasting.
Step-by-step Blueprint for Baking Perfection
Creating this masterpiece involves methodical layering, starting from the base up. Precision in temperature control and mixing technique will guide you flawlessly through this process.
Laying the Foundation: Prepping and Baking the Graham Base
Begin by setting your oven to 325° F ( 160° C). The preparation of the springform pan is critical: wrap the outside bottom and sides securely, using heavy duty aluminum foil two or even three times over.
This waterproof wrapping is your defense against the water bath. For the crust, thoroughly combine your graham crumbs, ¼ cup of sugar, and 6 tablespoons of melted butter. Press this mixture firmly and evenly into the base of the prepared pan, gently bringing some mixture up the sides if desired.
Bake this foundation alone for exactly 10 minutes to set the structure, then remove it to cool slightly while you prepare the filling.
The Art of the Creamy Interior: Mixing the Cheesecake Filling
In a large bowl, begin by beating the room temperature cream cheese until it is impeccably smooth and lump free. Gradually incorporate the 1 cup of sugar, mixing gently. Next, add the sour cream (or yogurt) and vanilla, mixing until just combined.
Now, add the eggs one at a time, mixing only until the yolk disappears before adding the next. Stop mixing the moment the last egg is incorporated. Overmixing at this stage is the fastest route to a sunken center. Pour this pristine filling over your slightly cooled crust.
Crafting the Celestial Marshmallow Cloud Topping
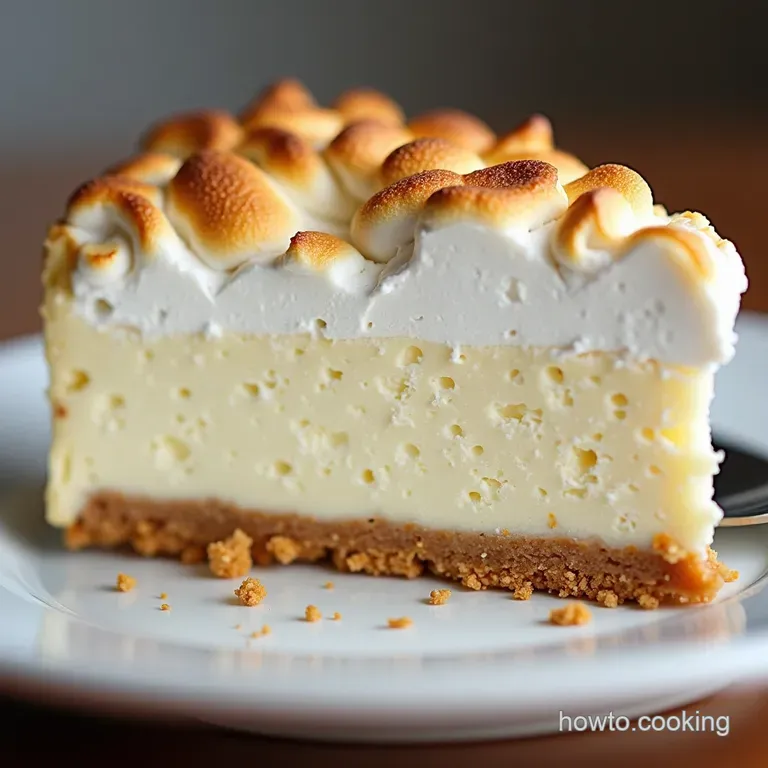
The topping is applied post baking and chilling, ensuring its texture remains pristine. Once the cheesecake is completely cold and firm ideally after an overnight rest gently spread the 7 to 8 ounces of marshmallow creme evenly across the top surface.
Use an offset spatula to create peaks and valleys, maximizing the surface area that will caramelize when torched.
The Grand Finale: Implementing the Torch for That Perfect Toast
This is the moment of drama! Using your kitchen torch, carefully move the flame steadily across the surface of the marshmallow topping. Keep the flame moving continuously, a few inches away from the fluff, until those peaks turn a beautiful, deep golden brown, mimicking the best bits of a freshly roasted marshmallow.
Troubleshooting and Expert Advice for Your Cheesecake
Even with the best blueprint, sometimes the culinary gods test us. The two main anxieties surrounding baked cheesecake are cracking and uneven texture.
Preventing Cracks: Essential Cooling Techniques
A crack usually signals a rapid temperature change. To counteract this, we employ a slow cool down. After the 60– 75 minutes of baking time (when the edges are set but the center still has a slight wobble), turn the oven off completely.
Prop the oven door open an inch or two a wooden spoon works perfectly and leave the cheesecake inside for a full hour. This gradual cooling reduces internal stress. Following this, remove it from the water bath, unwrap the foil, let it reach room temperature on a rack, and then refrigerate.
This multi step cooling is paramount for a flawless surface on your Marshmallow Whip Cheesecake .
Flavor Twists: Customizing Your Marshmallow Whip Cheesecake
While this recipe shines in its classic form, feel free to adapt. For a richer base, swap the graham crackers for crushed shortbread cookies. If you want to amplify the citrus notes in the filling, add a touch more lemon zest, which complements the sweetness beautifully.
For a chocolate lover’s variation, fold in 2 ounces of melted, slightly cooled dark chocolate into the filling just before pouring it into the crust, creating a marbled effect in your Cream Cheese Dessert Recipes .
How Long Can This Masterpiece Live in the Fridge?
Due to the high fat content of the cream cheese, this cheesecake keeps exceptionally well. Once completely chilled, cover it tightly with plastic wrap (ensuring the wrap doesn't touch the toasted topping, which can stick) and store it in the refrigerator for up to five days.
It maintains its peak creamy texture throughout this period.
Pairing Perfection: Beverages That Complement the Richness
The richness of this dessert demands something bold to balance it out. A strong, unsweetened black coffee or an earthy, robust herbal tea cuts through the sweetness perfectly. For an evening pairing, a small pour of an aged Tawny Port or a deep, slightly spicy VSOP Cognac will marry beautifully with the caramelized notes of the toasted marshmallow layer atop your No Bake Marshmallow Cheesecake (if you choose to skip the bake, though this recipe is baked!).
Recipe FAQs
My cheesecake always cracks! How do I avoid it with this Marshmallow Whip Cheesecake?
Ah, the dreaded crack it’s enough to make you throw your apron in the bin! The secret to a smooth top is a water bath (Bain Marie) and slow cooling. Ensure you mix the eggs in gently, and once baked, turn the oven off, crack the door open, and leave the cake inside for a full hour before removing it.
Patience is key here, old bean!
Can I make the marshmallow whip topping ahead of time, or must I torch it right before serving?
If you are using store-bought marshmallow fluff, you can certainly spread it onto the chilled cheesecake a few hours ahead of time. However, you must only torch it just before you plan to serve it, or the topping will start weeping and looking a bit sad.
If you made homemade meringue, wait until just before serving for the best texture.
I don't have a kitchen torch can I still get that lovely toasted look on top?
That's a right pickle, but fear not! If you don't have a torch, you can carefully place the assembled cheesecake under a preheated broiler (grill in the UK) on the highest rack. Keep a very close eye on it we're talking seconds here as it goes from golden to burnt alarmingly quickly.
A quick blast is all it needs.
How long does this Marshmallow Whip Cheesecake last in the fridge, and does the topping hold up well?
Once fully chilled and set, the plain cheesecake base will keep happily for up to 4 days, covered tightly. However, once you torch that marshmallow topping, the quality starts to degrade faster due to moisture.
It’s best enjoyed within 24 hours of torching for peak fluffiness, though it will still be edible for 2-3 days.
My cream cheese was cold what happens if I mix it anyway?
If your cream cheese is cold, you'll end up with a lumpy batter, which ruins that essential velvety texture we're aiming for. If you've already started, stop mixing and let the bowl sit on the counter for 30 minutes until the lumps soften.
Cold eggs will also cause the batter to seize slightly when added, so always ensure everything is properly room temperature!
Toasted Marshmallow Cheesecake