Best Buffalo Chicken Dip Recipe
- Time: Active 10 minutes, Passive 20 minutes, Total 30 minutes
- Flavor/Texture Hook: Molten, sharp cheddar paired with a velvety, tangy buffalo base.
- Perfect for: Game day gatherings, family potlucks, or confident hosting.
- Mastering the Best Buffalo Chicken Dip Recipe
- Essential Recipe Metrics for Success in the Kitchen
- Selecting Wholesome Ingredients for Maximum Flavor Impact
- Necessary Kitchen Tools for a Seamless Cooking Experience
- Methodical Steps to Create the Ultimate Creamy Texture
- Solving Common Texture Problems and Fixing Heat Levels
- Exciting Variations to Customize Your Spicy Appetizer Experience
- Ensuring Safety and Quality During Storage and Reheating
- Serving Ideas for a Balanced and Flavorful Meal
- Very High in Sodium
- Recipe FAQs
- 📝 Recipe Card
Mastering the Best Buffalo Chicken Dip Recipe
The first time I attempted this dish for a neighborhood block party, I pulled a tray out of the oven that looked more like a science experiment gone wrong than an appetizer. A thick layer of orange oil was swimming on top, and the chicken had turned into something resembling damp cardboard.
It was embarrassing, but that failure taught me everything about the chemistry of dairy and heat. I realized that throwing ingredients in a bowl isn't enough; you need to understand how to keep those fats bonded so every bite is silky rather than slick.
Since then, I have refined this process to focus on what actually matters: the structural integrity of the cheese and the moisture of the chicken. We are moving away from the oily, broken sauces of the past and moving toward a dip that holds its texture even as it cools on the table.
You will find that when you treat the cream cheese and the buffalo sauce with a bit of respect, the results are far more nutritious and satisfying for your guests. It’s about building confidence in the kitchen by mastering these simple, reliable steps.
We are going to focus on a version that uses wholesome ingredients and smart techniques to ensure success every single time. Whether you are using a standard oven or looking for the convenience of a slow cooker, the principles remain the same.
This isn't just about heat; it is about the balance of acidity from the vinegar in the sauce and the richness of the cheddar. Let's get into the specifics of how to make this work in your own kitchen.
Essential Recipe Metrics for Success in the Kitchen
Emulsification Stability: The lactic acid in the cream cheese acts as a stabilizer, preventing the fats in the cheddar from separating into an oily mess when heated. Using room temperature dairy ensures these bonds form before the heat is even applied.
Protein Integrity: Shredding the chicken by hand rather than dicing it creates more surface area for the sauce to cling to, ensuring every strand of meat is hydrated and flavorful.
Maillard Reaction: While the dip is primarily creamy, the sharp cheddar on top undergoes a chemical change at 180°C that creates a complex, savory crust without drying out the interior.
| Method | Total Time | Texture | Best For |
|---|---|---|---|
| Standard Oven | 30 minutes | Golden, bubbly crust with molten center | Traditional entertaining |
| Slow Cooker | 2 hours 15 mins | Extra velvety and consistently warm | Long parties and potlucks |
| Instant Pot | 15 minutes | Uniformly soft and integrated | Last minute preparation |
Choosing the right method depends entirely on your schedule, but the oven remains the gold standard for that specific texture contrast between the crisp edges and the silky middle.
If you are preparing this for a long event where people will be grazing for hours, the slow cooker is your best friend to keep the dairy from seizing as it cools.
Regardless of the tool you choose, the internal temperature should reach 74°C to ensure the chicken is safely reheated and the cheeses are fully incorporated. I often find that people pull their dip out too early because they see a few bubbles, but waiting for that deep golden hue on the edges makes a significant difference in the flavor profile.
Selecting Wholesome Ingredients for Maximum Flavor Impact
When it comes to the components of this dish, quality is the foundation of flavor. I always recommend starting with 4 cups shredded cooked chicken breast that you have prepared yourself, perhaps from a roasted bird earlier in the week. This provides a far more nutritious and satisfying texture than anything from a tin.
| Ingredient | Science Role | Pro Secret |
|---|---|---|
| Cream Cheese | Primary Emulsifier | Must be fully softened to prevent "beading" in the sauce. |
| Buffalo Hot Sauce | Acidic Catalyst | The vinegar cuts through the fat, preventing a "heavy" mouthfeel. |
| Sharp Cheddar | Flavor & Structure | Hand grated cheese melts smoother than pre shredded bags with starch. |
| Blue Cheese | Umami Depth | Adds a salty punch that balances the heat of the cayenne. |
If you find yourself missing a specific item, don't worry. This recipe is quite forgiving as long as you maintain the ratios of fat to acid. For instance, if you don't have ranch dressing on hand, a mix of sour cream and a touch of lemon juice can provide that necessary tang and creamy body.
- 16 oz cream cheese, softened: This is the backbone. If it’s cold, your dip will be lumpy.
- 1 cup buffalo hot sauce: I prefer a cayenne based sauce for that authentic zing.
- 1 cup ranch dressing: Adds herb notes and extra creaminess.
- 1 tsp garlic powder: Provides a savory base layer.
- 4 cups shredded cooked chicken breast: Use poached or roasted breast for the best texture.
- 2 cups sharp cheddar cheese: Always grate this yourself for the best melt.
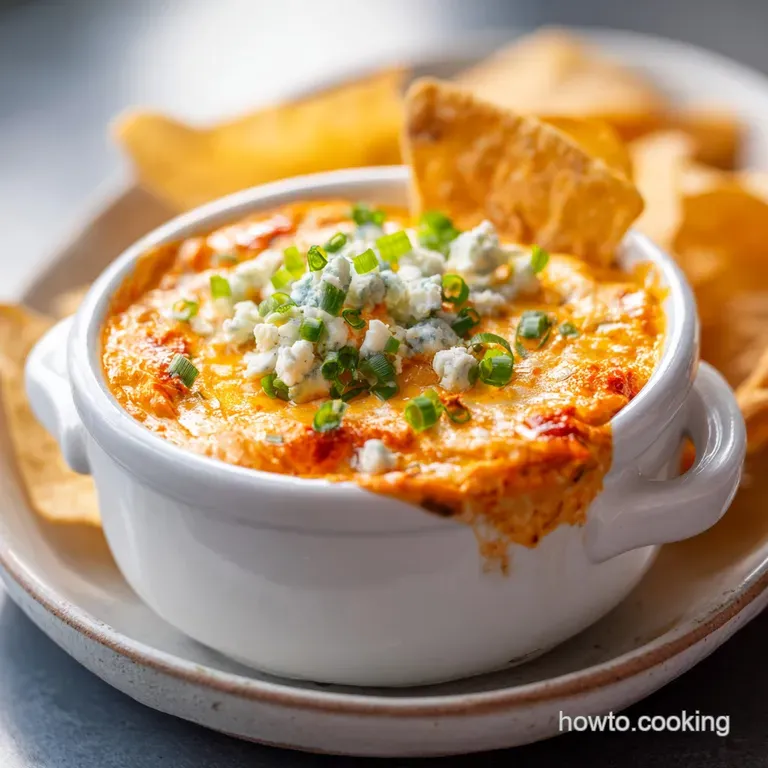
- 1/2 cup blue cheese crumbles: Adds a sophisticated funk.
- 1/4 cup fresh chives: The freshness cuts the richness.
For another comforting meal that utilizes similar shredded chicken techniques, you might enjoy my Chicken and Dumplings recipe which focuses on that same tender, hand pulled protein.
Necessary Kitchen Tools for a Seamless Cooking Experience
One of the reasons I love this dish is that it doesn't require a kitchen full of gadgets. You really only need a large mixing bowl and a sturdy baking dish. I typically use a 9x13 inch ceramic baker because it retains heat beautifully, keeping the dip molten for longer once it hits the table.
A silicone spatula is also helpful for scraping every bit of that velvety base out of the bowl.
If you are someone who values efficiency, a stand mixer such as a KitchenAid with the paddle attachment can shred your warm chicken breasts in about 30 seconds. It’s a trick I learned years ago that saved my wrists during holiday prep. Otherwise, two forks and a bit of patience will get the job done just as well.
| Original Ingredient | Substitute | Why It Works |
|---|---|---|
| Sharp Cheddar | Monterey Jack | Melts even more easily, though it has a milder flavor profile. |
| Ranch Dressing | Blue Cheese Dressing | Doubles down on the funky notes. Note: Increase chives to balance. |
| Buffalo Hot Sauce | Sriracha + Butter | Creates a thicker, stickier heat. Note: Adjust salt levels downward. |
Speaking of efficiency, if you love dishes that maximize a few high-quality ingredients, this pairs well with the vibes of my Parmesan Crusted Chicken recipe which also relies on a beautiful cheese crust for flavor and texture.
Methodical Steps to Create the Ultimate Creamy Texture

- Preheat the oven. Set your oven to 180°C. Note: This moderate temperature allows the cheese to melt without the oils separating prematurely.
- Soften the cream cheese. Place 16 oz cream cheese in a large bowl. Note: It should be soft enough that a finger leaves an easy indentation; this ensures a velvety base.
- Combine the liquids. Add 1 cup buffalo hot sauce, 1 cup ranch dressing, and 1 tsp garlic powder to the cream cheese.
- Whisk until smooth. Use a whisk or spatula to blend until no white lumps of cream cheese remain.
- Prepare the chicken. Fold in 4 cups shredded cooked chicken breast. Note: Ensure the chicken is evenly coated so it stays moist during the bake.
- Add the primary cheese. Stir in 1 cup of the sharp cheddar cheese and the 1/2 cup blue cheese crumbles.
- Transfer to the dish. Spread the mixture into your baking pan, smoothing the top with your spatula.
- Layer the topping. Sprinkle the remaining 1 cup of sharp cheddar over the surface.
- Bake the dip. Place in the oven for 20 minutes until the edges are bubbling and the cheese is golden.
- Garnish and serve. Sprinkle with 1/4 cup fresh chives immediately after removing from the heat.
Chef's Tip: If you want an even more intense flavor, try "blooming" your garlic powder. Mix it into the buffalo sauce and let it sit for 5 minutes before adding it to the cream cheese. This hydrates the powder and releases more of its savory oils.
Solving Common Texture Problems and Fixing Heat Levels
One of the most frequent issues I hear about is the dip becoming too oily. This usually happens because the oven was too hot or the cheddar was pre shredded. Pre packaged shredded cheese is coated in potato starch or cellulose to prevent clumping in the bag, but that same starch can interfere with a smooth melt.
Always take the extra three minutes to grate a block of sharp cheddar; your taste buds will thank you.
Why Your Dip Separated
If you see a pool of oil on top, it means the emulsion "broke." This happens when the proteins in the cheese tighten up too much and squeeze out the fat. This usually occurs if the dip is overbaked or if the heat was too high. To fix it, give it a very gentle stir to re incorporate the fats before serving.
Why Your Dip Is Too Spicy
Heat is subjective, and sometimes a specific bottle of buffalo sauce is punchier than expected. If your dip has too much "kick," do not panic. You can balance the heat by stirring in an extra dollop of ranch dressing or a spoonful of sour cream.
The fats in the dairy contain casein, which literally washes the capsaicin off your tongue's receptors.
| Problem | Root Cause | Solution |
|---|---|---|
| Gritty Texture | Lumpy cream cheese | Ensure dairy is room temp or microwave for 15 seconds before mixing. |
| Dry Chicken | Overcooked protein | Use thigh meat or ensure chicken is thoroughly folded into the sauce base. |
| Lack of Flavor | Not enough acidity | Add a teaspoon of apple cider vinegar or extra buffalo sauce. |
Common Mistakes Checklist
- ✓ Never use "light" or fat free cream cheese; it lacks the stabilizers needed for a hot bake.
- ✓ Soften the cream cheese for at least 1 hour on the counter before starting.
- ✓ Grate your cheddar fresh from the block to ensure a smooth, molten texture.
- ✓ Don't skip the resting period; let the dip sit for 5 minutes after baking to set.
- ✓ Use a "shred" rather than a "cube" for your chicken to maximize sauce coverage.
Exciting Variations to Customize Your Spicy Appetizer Experience
While the classic version is hard to beat, I often find that small tweaks can make the dish feel brand new. For those who aren't fans of blue cheese, substituting it with crumbled feta can provide a similar salty bite without the intense aroma.
If you are looking for more texture, adding half a cup of diced celery to the mix provides a "shatter crisp" contrast that mimics the experience of eating actual buffalo wings.
The Buffalo Chicken Dip Crock Pot Method
For those busy days, you can simply combine all the ingredients in a slow cooker. Set it to "Low" for about 2 hours. This is an excellent way to keep the dip at a safe, nutritious temperature throughout a long game.
Just be sure to stir it every 30 minutes to prevent the edges from scorching.
The Low Carb Alternative
If you are mindful of carbohydrates, this recipe is naturally quite low in them. To keep it that way, serve it with sliced bell peppers, cucumber rounds, or celery sticks rather than traditional chips.
The crunch of a cold vegetable against the molten cheese is incredibly satisfying and highlights the flavors of the buffalo sauce beautifully.
If you enjoy recipes that offer flexibility, consider checking out this Rosemary Chicken Sauce recipe which also focuses on building a stable, flavorful emulsion with pan juices.
Ensuring Safety and Quality During Storage and Reheating
If you happen to have leftovers which is rare in my house this dip stores quite well. Place it in an airtight container and keep it in the fridge for up to 4 days. Because it contains both poultry and dairy, you want to make sure it's chilled promptly.
When reheating, the microwave can be a bit harsh and might cause the oils to separate. I recommend putting a portion in a small oven safe dish and heating it at 150°C until it’s warmed through.
If you must use the microwave, do it in 30 second bursts, stirring in between to keep the emulsion stable.
Zero Waste Tip: If you find yourself with just a small amount of dip left, don't toss it! It makes a spectacular filling for a grilled cheese sandwich the next day. Spread it between two slices of sourdough with an extra slice of cheddar and toast until golden.
You can also use the leftover chicken scraps or the ends of your celery stalks to start a nutritious bone broth for later in the week.
Serving Ideas for a Balanced and Flavorful Meal
Presentation is where you can really show off your confidence as a cook. I love serving this in a cast iron skillet for a rustic, farmhouse feel. The black iron against the orange dip and green chives is visually stunning.
Surround the dish with a variety of textures: sturdy tortilla chips, pita bread, and plenty of fresh vegetables.
- The Classic Crunch: Use thick cut kettle chips. They are strong enough to scoop up the heavy dip without snapping.
- The Bread Bowl: Hollow out a loaf of sourdough, fill it with the dip, and bake the whole thing. Then, use the bread you pulled out as dippers.
- The Fresh Balance: A side of carrot sticks and celery is essential. The watery, crisp nature of the vegetables resets the palate between rich, cheesy bites.
- If you want Maximum Crunch
- Use a cast iron skillet and broil the cheese for the last 2 minutes.
- If you want Easier Dipping
- Increase the ranch dressing by 1/4 cup to thin the consistency slightly.
- If you want Deep Flavor
- Use a rotisserie chicken, including some of the dark meat for extra juiciness.
By following these steps, you are not just making an appetizer; you are mastering the science of heat and fat. It’s a dish that brings people together, and once you have the technique down, you will find yourself reaching for this recipe every time you need a reliable, flavorful win in the kitchen.
Enjoy the process and the molten, spicy reward at the end!

Very High in Sodium
1182 mg mg of sodium per serving (51% % of daily value)
The American Heart Association recommends limiting sodium intake to about 2,300mg per day.
Tips to Reduce Sodium in Your Buffalo Chicken Dip
-
Lower Sodium Cheese-20%
Replace the regular cheddar cheese and blue cheese with low-sodium versions. This simple swap can significantly reduce the overall sodium content, particularly since cheese is a major contributor.
-
DIY Hot Sauce-15%
Many store-bought buffalo hot sauces are very high in sodium. Try making your own using chili peppers, vinegar, and spices for a lower sodium and customizable alternative.
-
Homemade Ranch-15%
Prepared ranch dressing often contains a surprising amount of sodium. Make your own ranch dressing from scratch using herbs, spices, and a base of Greek yogurt or sour cream for a lower sodium and healthier option.
-
Unseasoned Chicken-10%
Ensure the cooked chicken breast you're using is unseasoned or cooked with no added salt. If you cook the chicken yourself, avoid using any high sodium broths or seasonings.
-
Fresh Herbs & Spices
Enhance the flavor of the dip with fresh herbs and spices like onion powder, smoked paprika, black pepper, or cayenne pepper to compensate for the reduced sodium without sacrificing taste.
Recipe FAQs
What dip is always a crowd pleaser?
Yes, Buffalo Chicken Dip almost always wins. Its balance of creamy, spicy, and tangy flavors appeals to a wide audience at any gathering, from game days to holidays.
What to use instead of ranch in buffalo chicken dip?
Use sour cream mixed with a splash of lemon juice. This substitutes the necessary creaminess and acidity that ranch usually provides, helping to stabilize the cheese base.
How many chicken breasts do you use for buffalo chicken dip?
Aim for about 4 cups of shredded cooked chicken breast. Shredding the chicken by hand allows the sauce to cling better to the fibers, ensuring a consistently moist bite rather than large, dry chunks.
Can you prepare buffalo chicken dip ahead of time?
Yes, assemble the entire mixture up to 24 hours in advance. Keep it covered tightly in the refrigerator, and add an extra 5-10 minutes to the baking time since you are starting with a cold base.
Is it true you must use room temperature cream cheese?
No, this is a common misconception that causes lumps. The cream cheese must be fully softened to blend seamlessly with the sauce, acting as the primary emulsifier before heating begins.
How do I prevent the cheese layer from turning oily?
Bake at a moderate temperature, around 180°C, and avoid overbaking. The goal is to melt the fats gently; high heat causes the cheese proteins to seize and squeeze out the oil, leading to separation.
How to get a richer, deeper flavor profile if I don't have blue cheese?
Substitute feta cheese and add a teaspoon of Worcestershire sauce. The saltiness of the feta mimics the funk, and the umami depth from the Worcestershire helps balance the heat, similar to techniques used in our The Lamb Shepherds recipe.
Best Buffalo Chicken Dip

Ingredients:
Instructions:
Nutrition Facts:
| Calories | 473 kcal |
|---|---|
| Protein | 28.5 g |
| Fat | 37.4 g |
| Carbs | 4.2 g |
| Fiber | 0.1 g |
| Sugar | 2.5 g |
| Sodium | 1182 mg |
