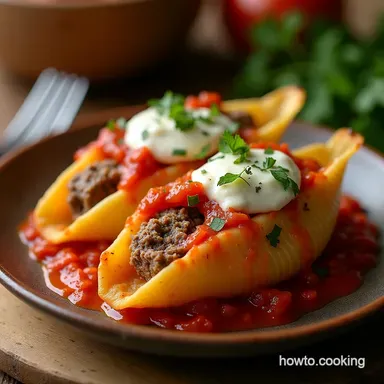
Marvellous Melty Ricotta Beef Stuffed Shells with Rustic Tomato Ragù
- Unveiling the Ultimate Italian-American Comfort Classic
- Why This Creamy Ricotta Beef Stuffed Shells Recipe Reigns Supreme
- Essential Components for Glorious Shell Assembly
- Step-by-Step Guide to Assembling Your Baked Masterpiece
- Baking Protocol for Golden-Topped Perfection
- Troubleshooting and Advanced Tips for Stellar Shells
- Customizing Your Creamy Ricotta Beef Stuffed Shells Experience
- Recipe FAQs
- 📝 Recipe Card
Unveiling the Ultimate Italian American Comfort Classic
There are few dishes that evoke the warmth and nostalgia of a cherished family gathering quite like a platter of beautifully baked, overflowing pasta. Among these beloved classics, the Creamy Ricotta Beef Stuffed Shells stand head and shoulders above the rest.
This isn't just dinner; it’s an event. We are talking about jumbo pasta shells, perfectly cooked to a tender bite, cradling a rich, flavourful filling, all swimming luxuriously beneath a vibrant, slow simmered tomato ragù.
This Best Stuffed Shells Recipe balances the heartiness of seasoned ground beef with the cool, cloud like texture of fresh ricotta, creating a harmony of flavour that defines true Italian American soul food.
If you’re searching for that quintessential Christmas Pasta Dinner centerpiece or the anchor for a wonderful Sunday supper, look no further.
Why This Creamy Ricotta Beef Stuffed Shells Recipe Reigns Supreme
What elevates this particular preparation beyond the ordinary is the careful attention paid to each of the three core elements: the sauce, the filling, and the structural integrity of the pasta itself. Many recipes falter by using overly acidic canned sauce or a filling that dries out in the oven.
Our goal here is the opposite: maximum moisture, maximum flavour penetration, and a textural contrast that keeps you coming back for one more shell. This Creamy Ricotta Beef Stuffed Shells Recipe guarantees richness in every bite.
A Dish Designed for Sunday Supper Indulgence
This Stuffed Shells With Meat Sauce version is engineered for comfort and sharing. The process, while involving a few steps, is meditative and deeply rewarding.
Browning the beef until deeply savoury, allowing the tomatoes to break down into a thick, aromatic base, and then lovingly stuffing each shell it’s a labour of love that pays dividends when the aromas fill your kitchen.
It becomes the focus of the meal, easily serving six hungry people with generous portions.
Achieving that Signature Melty, Mouthwatering Texture
The secret to the irresistible texture lies squarely in the filling composition. We utilize whole milk ricotta for its superior fat content, which prevents the cheese from becoming grainy when baked.
Combined with a lightly beaten egg acting as a binder and the finely chopped fresh herbs, the Beef Stuffed Shells With Ricotta filling achieves an almost custardy consistency once heated through.
The subtle heat of the oven gently warms this creamy core, ensuring that when you cut into a shell, the filling yields softly.
The Brilliance of Our Slow Simmered Tomato Foundation
A truly great baked pasta dish requires a robust, nuanced sauce that acts as both a cushion and a flavour bath. We skip the quick jarred shortcuts. By sautéing onions and garlic first, then introducing high-quality crushed tomatoes and tomato sauce, and allowing this mixture to simmer slowly for at least 45 minutes, we develop deep umami notes.
A tiny touch of sugar balances the natural acidity of the tomatoes, resulting in a mellow, complex ragù perfect for enveloping these Ricotta Stuffed Pasta creations.
Essential Components for Glorious Shell Assembly
To build this masterpiece successfully, having the right structure and quality ingredients is paramount. We are dealing with Large Stuffed Shells Recipe dimensions, meaning we need substance in our filling and strength in our sauce to hold everything together until it reaches the table.
Sourcing the Best Jumbo Pasta Shells for Stuffing
The vehicle for our flavour the shell itself must be jumbo size (often labelled Conchiglioni ). Purchase a quality brand, as these tend to hold their shape better during the crucial pre-boiling phase.
Remember, we cook these shells to be deliberately underdone —about two minutes shy of package instructions. They will finish cooking gently in the oven sauce, preventing the dreaded mushy outcome that plagues lesser baked pasta dishes.
The Creamy Core: Mastering the Ricotta Component
Do not substitute low-fat ricotta here if you seek the best results. Whole milk ricotta provides the necessary richness and creaminess. If your ricotta seems excessively wet, a quick 30-minute drain in a fine mesh sieve can prevent the filling from becoming watery and seeping out prematurely during assembly.
The incorporation of grated Parmesan cheese into the ricotta mix not only adds a salty, nutty dimension but also helps stabilize the mixture.
Essential Kitchen Arsenal: Tools Needed for Success
While you don't need specialized equipment, organization is key for making this an Easy Creamy Ricotta Beef Stuffed Shells process rather than a chore. A deep Dutch oven is perfect for developing the sauce slowly.
A sturdy 9x13 inch baking dish is necessary to ensure the shells lie in a neat, single layer. For the actual stuffing, a small spoon is often easier and less messy than attempting a piping bag, especially when dealing with the substantial beef mixture.
Related Recipes Worth Trying
- Proper Crispy Beef and Cheese Chimichangas Recipe Easy TexMex — Master the art of the Crispy Beef Chimichangas recipe Slowcooked ground beef and melted Monterey Jack fried to golden perfection Try this satisfying Mexican...
- Slow Cooker Garlic Butter Beef Bites Potatoes Easy Weeknight Comfort — Our Slow Cooker Garlic Butter Beef Bites Potatoes recipe is pure comfort food magic Tender beef swimming in a rich savoury sauceperfect for a hearty meal
- OnePan Creamy Spinach Mushroom Orzo Recipe 40 Mins — Need a satisfying Spinach Mushroom Orzo Dinner tonight This Tuscaninspired onepan orzo with mushrooms recipe is quick creamy and utterly foolproof Find out...
Step-by-step Guide to Assembling Your Baked Masterpiece

Once your sauce has deepened in flavour and your beef is browned and cooled, the assembly phase begins. This is where your efforts merge into the final, glorious presentation.
Prepping the Sauce and Par-Boiling the Pasta
Start by ensuring your slow simmered ragù is ready; it should be thick enough to cling to the back of a spoon. Next, boil the jumbo shells until they are just shy of tender (al dente minus two minutes).
Drain them immediately and rinse gently with cool water to stop the cooking process and prevent them from sticking together into one giant, unusable pasta clump. Lay them out gently on a sheet tray while you prepare the filling.
Techniques for Mixing and Seasoning the Beef and Ricotta
In a large bowl, combine your drained, slightly cooled ground beef with the whole milk ricotta, the lightly beaten egg, the grated Parmesan, and the finely chopped fresh parsley and basil. Season generously with salt and pepper. The key here is to mix just until everything is incorporated.
Overmixing activates the proteins in the egg and meat, potentially leading to a denser texture instead of the desired fluffy, Creamy Ricotta Beef Stuffed Shells filling.
The Art of Efficiently Filling Each Shell Cavity
This is the most meticulous part of making Creamy Ricotta Beef Stuffed Shells . Take one cooked shell at a time. Using a small spoon, scoop a generous amount of the filling enough to mound slightly above the opening of the shell.
Gently press the filling into the cavity without cracking the shell. Aim for a consistent amount in each one so they bake evenly.
Layering Strategy: Sauce First, Then Shells, Then Toppings
The foundation of a successful bake begins with a proper layer of sauce. Spread about 1.5 cups of your rustic ragù across the bottom of your 9x13 baking dish. This layer serves two vital purposes: preventing the shells from sticking and providing moisture from below.
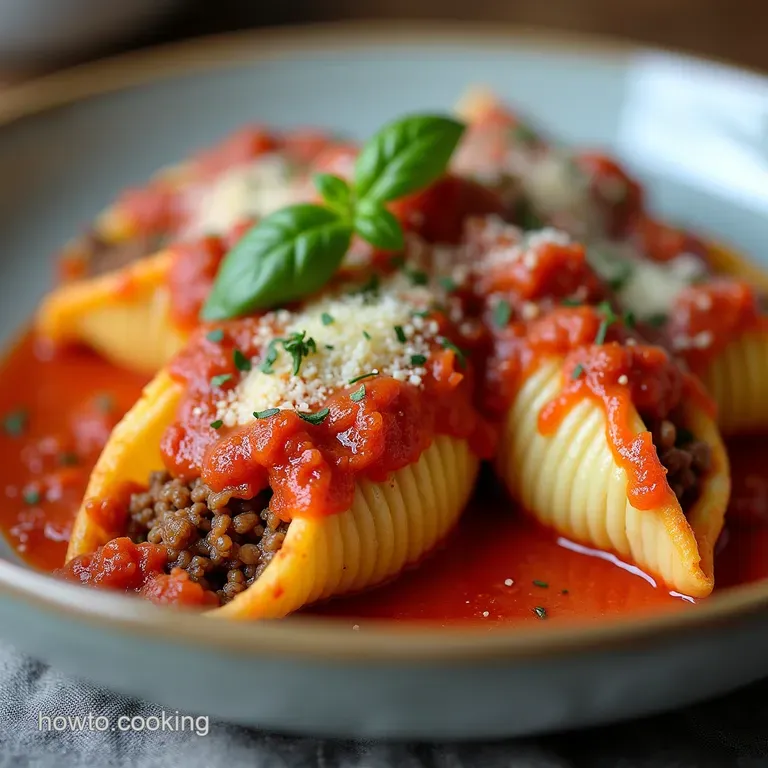
Arrange the filled shells snugly, side-by-side, across this saucy base. Then, ladle the remaining sauce evenly over the top of the stuffed pasta, ensuring every surface is coated. Finish with a generous blanket of shredded low-moisture mozzarella and a final sprinkle of Parmesan.
Baking Protocol for Golden Topped Perfection
The final bake transforms your assembled components into a unified, bubbling casserole. Temperature and timing are crucial for melting the cheese beautifully while ensuring the filling heats through completely without drying out the pasta edges.
We initiate the baking process by covering the dish tightly with aluminum foil. This traps the steam released by the sauce, gently cooking the shells further and preventing the top layer of cheese from burning before the centre is piping hot.
After 20 minutes under the foil at 375° F ( 190° C), remove the foil. This final 10-minute exposure allows the mozzarella to melt completely, brown slightly, and achieve those desirable, golden, slightly crisp edges.
Troubleshooting and Advanced Tips for Stellar Shells
Even the most experienced cook can benefit from knowing how to navigate potential pitfalls when creating a complex baked dish like this.
- Preventing Dry Edges: The most common issue is pasta edges drying out before the center is hot. Ensure your bottom sauce layer is generous, and that the very edges of the shells resting against the baking dish walls are thoroughly covered by the top sauce layer.
- The Filling Escape Act: If your filling seems determined to spill out, you are likely overfilling the shells. Remember, the ricotta mixture will expand slightly during heating. Fill them generously, but avoid creating large, unstable domes of filling.
- Temperature Control: Always rely on visual cues the sauce should be bubbling vigorously before you declare it done but if you have an instant read thermometer, aim for an internal temperature of at least 160° F ( 71° C) in the centre of the dish.
Customizing Your Creamy Ricotta Beef Stuffed Shells Experience
While the foundational recipe is superb, flexibility is key in the kitchen. Small adjustments can tailor this meal perfectly to your preferences or schedule.
Secrets to Freezing and Future Proofing Your Shells
These shells freeze exceptionally well, making them ideal for holiday meal prepping. Assemble the entire dish, but do not bake it. Cover the baking dish tightly with two layers of plastic wrap, followed by foil, and freeze for up to three months.
When ready to bake, transfer the frozen dish (foil still on) to a cold oven, set the temperature to 375° F ( 190° C), and bake for 90 minutes covered, then uncover and bake for an additional 15- 20 minutes until piping hot.
Pairing Suggestions: What Sides Complement This Hearty Pasta?
Because this dish is rich, acidic, and dense, complementary sides should offer freshness and crunch. A simple green salad dressed with bright lemon vinaigrette cuts through the richness perfectly.
Steamed or lightly sautéed green beans tossed with toasted almonds also offer a nice textural contrast to the soft pasta.
Ingredient Swaps for Dietary Adjustments
For those looking to reduce meat, substitute the ground beef with a mixture of finely chopped sautéed mushrooms and lentils for a deeply savoury, vegetarian take on the filling.
If dairy is an issue, use a quality dairy-free mozzarella substitute for the topping, though note that the texture of the internal ricotta filling relies heavily on the whole milk dairy components for that signature creamy mouthfeel.
Ensuring Even Cooking and Preventing Dry Edges
To guarantee every shell is perfectly cooked and the entire dish reaches temperature simultaneously, rest the assembled, unbaked casserole on the counter for 20 minutes while the oven preheats.
This allows the cold ingredients (especially the ricotta filling) to warm up slightly, reducing the time needed inside the hot oven and minimizing the risk of scorching the edges while waiting for the centre to catch up.
Recipe FAQs
Why are my Creamy Ricotta Beef Stuffed Shells watery after baking?
This is usually down to two things: under drained ricotta or overcooked pasta. Make sure you slightly drain your ricotta before mixing the filling, or it will release liquid during the bake.
Also, remember to cook your shells 2 minutes less than the package suggests, as they finish cooking in the sauce, preventing that dreaded soupy bottom layer.
Can I make the sauce and filling ahead of time? I'm worried about timing.
Absolutely! This dish is perfect for batch prepping, much like a classic Sunday roast. You can make the Rustic Tomato Ragù up to three days ahead it actually tastes better the next day!
The filling can also be mixed a day ahead and kept covered in the fridge; just be sure to let it warm up slightly before stuffing the shells.
What's the secret to getting the filling to stay inside the shells while baking?
The key is twofold: first, don't overstuff them to the point where the ricotta mixture is bursting out leave a little wiggle room. Second, ensure you have a good, thick layer of sauce spread across the bottom of the baking dish before you nestle the shells in, as this helps them stay snugly in place and prevents the bottom shells from drying out.
I don't eat beef; what's a good substitute for the filling in these Stuffed Shells?
You've got several smashing options! For a non-meat version, you can swap the beef for an extra 10oz of thawed, thoroughly squeezed spinach and perhaps some sautéed mushrooms for an earthy depth.
If you still want a meat flavour, substitute with ground Italian sausage (sweet or hot) for a richer, more seasoned filling.
How should I store leftovers of the Ricotta Beef Stuffed Shells?
Leftovers are brilliant for lunch the next day! Once cooled, cover the baking dish tightly with foil or transfer portions to an airtight container. They keep wonderfully in the fridge for up to four days.
For reheating, pop them covered in a 350°F oven until heated through, or simply microwave them for a quick, comforting fix.
Melty Ricotta Beef Shells