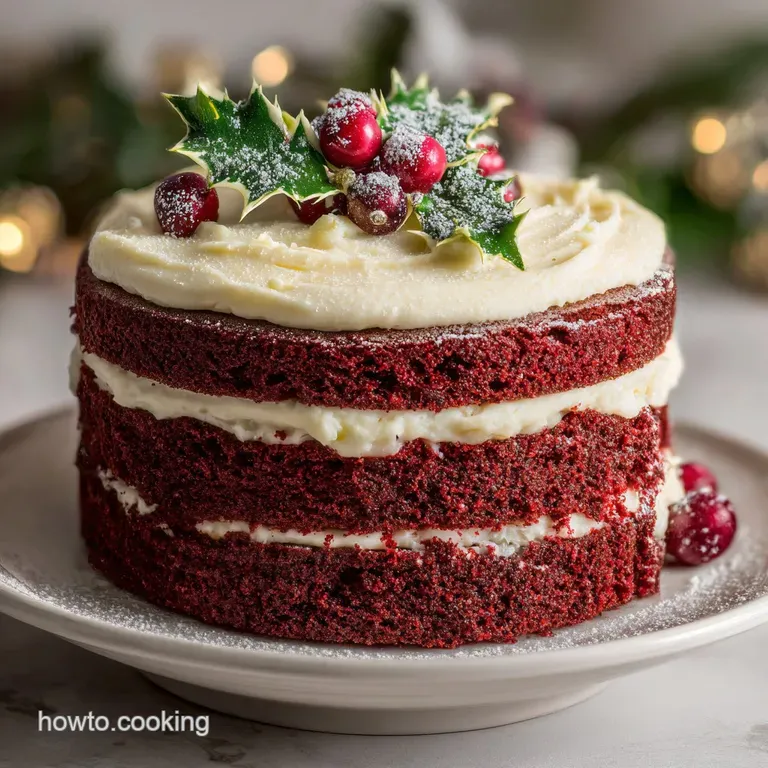
Mouthwatering Southern Red Velvet Christmas Cake
- Time: Active 20 mins, Passive 35 mins, Total 55 mins
- Flavor/Texture Hook: Tangy, velvety crimson sponge with billowy cream cheese clouds
- Perfect for: Christmas gatherings, festive celebrations, or a wholesome family dessert
- Bake the Mouthwatering Southern Red Velvet Christmas Cake
- The Science of the Crumb
- Essential Recipe Specifications
- Smart Ingredient Breakdown
- The Right Tools for Success
- Step-by-Step Baking Guide
- Fixing Common Baking Errors
- Variations and Customizations
- Storage and Zero Waste
- Perfect Pairings and Serving
- Recipe FAQs
- 📝 Recipe Card
Bake the Mouthwatering Southern Red Velvet Christmas Cake
I still remember the first time I pulled a red velvet cake out of the oven only for it to look more like a sad, brownish maroon brick than the vibrant masterpiece I’d seen in magazines. The kitchen smelled like cocoa, but the texture was coarse, almost like a dry muffin.
It was a holiday disaster that sent me down a rabbit hole of chemistry and Southern tradition. I realized then that red velvet isn't just a chocolate cake with red dye; it’s a specific emulsion of acid and starch that requires a bit of confidence and the right wholesome ingredients.
After years of testing, I’ve found that the secret isn't in expensive specialty fats, but in the humble interaction between vinegar, baking soda, and buttermilk. That "fizz" you hear when the vinegar hits the soda? That’s the sound of your cake's lift. This version is my ultimate holiday pride and joy.
It’s a Mouthwatering Southern Red Velvet Christmas Cake that feels luxurious but uses smart, nutritious swaps like Greek yogurt to keep things moist without feeling greasy. We're going to make something flavorful and stunning that will actually make you feel proud to set it on the table.
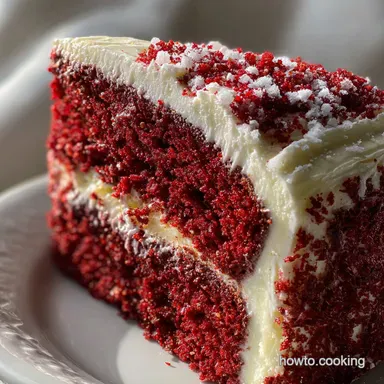
You won't believe how the crumb shatters slightly when your fork hits it, only to melt into a silky, cocoa kissed bite. It’s a wholesome approach to a classic that doesn't compromise on that iconic "velvet" feel.
Whether you're a seasoned baker or just finding your confidence in the kitchen, we’re going to walk through this together. Trust me, once you see that bright crimson batter smooth out under your spatula, you'll know exactly why this is the only recipe you'll ever need for the holidays.
The Science of the Crumb
Understanding the "why" behind the bake gives you the power to troubleshoot any kitchen situation. Red velvet is a scientific marvel disguised as a dessert.
- Acid Base Reaction: The distilled white vinegar reacts with baking soda to create carbon dioxide, ensuring the cake rises with a fine, airy texture.
- Starch Gelatinization: low-fat buttermilk provides the acidity needed to tenderize the flour’s gluten, resulting in a velvety rather than chewy crumb.
- Anthocyanin Activation: While we use food gel for color, the traditional red hue originally came from the reaction between non alkalized cocoa and acid.
- Emulsion Stability: Using vegetable oil instead of butter keeps the cake tender at cold temperatures, as oil remains liquid while butter solidifies.
- Moisture Retention: Plain Greek yogurt adds protein and fat that traps water molecules, preventing the sponge from drying out during the bake.
| Feature | Classic Method | Fast Modern Method | Benefit of Classic |
|---|---|---|---|
| Fat Source | Creamed Butter | Vegetable Oil/Yogurt | Oil provides a more consistent "velvet" texture |
| Acid Source | Plain Milk + Vinegar | Buttermilk + Vinegar | Double acidity ensures a better rise and tang |
| Leavening | Baking Powder | Baking Soda + Vinegar | Stronger reaction for a tighter, more traditional crumb |
One of the most important things to remember for this recipe is that temperature control is your best friend. If your ingredients are all at a uniform room temperature, they will emulsify much more easily. For another festive option that pairs beautifully with the tangy notes here, you might enjoy my Christmas Cranberry Sauce recipe.
Essential Recipe Specifications
To ensure your cake turns out exactly like mine, we need to stick to these specific metrics. Precision leads to confidence in the kitchen!
| Thickness | Internal Temp | Rest Time | Visual Cue |
|---|---|---|---|
| 5 cm (per layer) | 96°C | 15 mins | Edges pull away from the pan |
| 3 cm (thin layer) | 96°C | 10 mins | Surface springs back when touched |
| Cupcake size | 96°C | 5 mins | Toothpick comes out with dry crumbs |
The baking time is set at 35 minutes for standard 20cm rounds, but always start checking at the 30 minute mark. Every oven has its own personality, and we want to catch the cake right when it reaches that wholesome, fully baked state without losing its moisture.
If you use a single large rectangular pan, you may need to add an extra 5 to 8 minutes to the clock.
Smart Ingredient Breakdown
Selecting high-quality, nutritious ingredients is the foundation of a flavorful cake. We are using a mix of traditional staples and smart, cost effective swaps.
| Ingredient | Science Role | Pro Secret |
|---|---|---|
| Dutch process Cocoa | Provides depth and flavor | Sift it with the flour to avoid bitter lumps |
| Plain Greek Yogurt | Adds moisture and fat | Use full fat for the most luxurious texture |
| Neufchâtel Cheese | Creates the creamy base | Chilling it prevents the frosting from breaking |
| Baking Soda | Primary leavening agent | Ensure it's fresh for a powerful reaction |
For a Perfectly Velvety Crumb
The 315g of all purpose flour provides the structure, but it’s the 240ml of buttermilk that breaks down the proteins to give us that signature soft feel. Don't be tempted to use regular milk; that acidity is non negotiable.
For a Healthier, Moist Sponge
Replacing a portion of the fat with 120g of plain Greek yogurt is a brilliant move. It keeps the cake incredibly moist while adding a slight nutritional boost and a wonderful tang that complements the cream cheese.
For Vibrant Color with Less Dye
We use 2 tablespoons of red food gel. Unlike liquid coloring, gel is concentrated, so you get that "Mouthwatering Southern Red" look without adding excess liquid that could throw off the batter's hydration.
The Right Tools for Success

You don't need a professional kitchen, but a few specific tools will make your life much easier.
- Two 20cm Cake Pans: These provide the ideal height for a layered Christmas showstopper.
- Whisk and Spatula: For folding in ingredients without overworking the gluten.
- Stand Mixer or Hand Mixer: Essential for getting the 450g of cream cheese and 115g of butter into a billowy, cloud like frosting.
- Sifter: Do not skip sifting the 375g of powdered sugar; lumps are the enemy of a silky finish.
- Cooling Rack: Vital for allowing air to circulate around the cakes so they don't get soggy on the bottom.
Chef Tip: Grease your pans with oil and then dust them with a little cocoa powder instead of flour. This prevents those unsightly white streaks on the outside of your beautiful red cake!
step-by-step Baking Guide
Right then, let's get into the actual process. Keep your focus on the textures as you move through each stage.
1. The Aeration Phase
Preheat your oven to 175°C. In a large bowl, whisk together 315g all purpose flour, 300g granulated sugar, 15g cocoa powder, 1 tsp baking soda, and 0.5 tsp salt. Note: Sifting these together ensures even distribution of the leavening agent.
2. The Crimson Emulsion
In a separate medium bowl, combine 240ml buttermilk, 120ml vegetable oil, 120g Greek yogurt, 2 large eggs, 2 tbsp red food gel, 1 tsp vinegar, and 2 tsp vanilla extract. Whisk until the color is a uniform, shocking red.
3. Combining the Elements
Slowly pour the wet ingredients into the dry. Use a spatula to fold gently. Note: Stop mixing the moment no streaks of flour remain to keep the cake tender.
4. The Precision Bake
Divide the batter evenly between two greased 20cm pans. Bake for 35 minutes until a toothpick inserted in the center comes out clean.
5. The Cooling Process
Remove the pans from the oven and let them sit on a rack for 15 minutes. Invert them carefully to remove the cakes and let them cool until they are completely cold to the touch.
6. Preparing the Frosting
Beat 450g chilled Neufchâtel cheese and 115g softened butter until smooth. Note: The cheese must be chilled to maintain structure.
7. The Sweetened Finish
Gradually add 375g sifted powdered sugar and 1 tsp vanilla bean paste. Beat on high until the frosting is billowy and holds its shape.
8. The First Layer
Place one cake layer on your serving plate. Spread about a third of the frosting over the top, reaching right to the edges.
9. Stacking the Masterpiece
Place the second layer on top. Cover the top and sides with the remaining frosting, using a swirling motion for a festive look.
10. The Festive Garnish
Decorate with a few fresh berries or a sprinkle of extra cocoa. Refrigerate for at least 30 minutes until the frosting is set and firm.
Fixing Common Baking Errors
Even the best cooks run into trouble. If things don't look right, don't panic! Most errors have a simple fix. If you're looking for more tips on achieving the perfect bake, you can check out this Red Velvet Cake recipe.
Why Your Cake Is Brownish
This usually happens if the pH balance is off. If you use natural cocoa instead of Dutch process, or if your baking soda is old, the red won't pop. Stick to the specified ingredients for that crimson glow.
Why Your Cake Is Dry
Overbaking is the most common culprit. Because this cake is red, it's hard to see "browning." Use the toothpick test and trust the 35 minute mark. Also, make sure you aren't over measuring your flour spoon it into the cup rather than packing it down.
| Problem | Root Cause | Solution |
|---|---|---|
| Runny Frosting | Butter or cheese too warm | Chill for 20 mins, then re whip |
| Sunken Center | Opening oven door too early | Keep door closed until 30 min mark |
| Coarse Texture | Over mixing the batter | Fold by hand until just combined |
Common Mistakes Checklist
- ✓ Ensure eggs are at room temperature (prevents the oil from curdling).
- ✓ Sift the powdered sugar twice if it looks particularly clumpy.
- ✓ Don't skip the vinegar; it's essential for the bright red color and the rise.
- ✓ Let the cakes cool 100% before frosting, or the cream cheese will melt into a puddle.
- ✓ Use gel food coloring, not liquid, to maintain the batter's thick consistency.
Variations and Customizations
One of the best things about this Mouthwatering Southern Red Velvet Christmas Cake is how adaptable it is to your family's needs. If you're wondering How to Make recipe variations for different diets, here are my favorite wholesome tweaks.
For an Extra Festive Crunch
Fold in 50g of toasted pecans or walnuts into the frosting. The earthy crunch provides a wonderful contrast to the velvety sponge and the tangy cream cheese.
Plant Based Adaptations
You can swap the eggs for flax eggs (2 tbsp ground flax + 6 tbsp water) and use a high-quality vegan butter and cream cheese. Ensure your "buttermilk" is made by adding 1 tbsp vinegar to 240ml of soy milk and letting it sit for 10 minutes.
Refined sugar-free Options
While it changes the texture slightly, you can use a granulated monk fruit sweetener for the cake and a powdered version for the frosting. The result is still incredibly flavorful and satisfying.
Adjusting for Scale
If you need to feed a larger crowd, you can easily double this recipe. Scaling Down (½): Use a smaller 15cm pan, reduce bake time by 5-7 minutes, and use 1 large egg plus 1 yolk. Scaling Up (2x): Bake in batches rather than crowding the oven.
Keep spices and leavening at 1.5x the original amount to avoid an overly "soapy" flavor from too much baking soda.
Storage and Zero Waste
This cake is quite sturdy, but the cream cheese frosting means it needs a little extra care.
Storage Guidelines: Store any leftovers in an airtight container in the fridge for up to 5 days. The oil based sponge actually stays quite moist when cold. For longer storage, you can freeze individual slices. Wrap them in parchment paper, then foil, and they will stay fresh for up to 3 months.
To eat, simply thaw in the fridge overnight.
Zero Waste Tips: If you leveled off the tops of your cakes to make them flat, don't throw those scraps away! Crumble them up to use as a garnish on top of the frosting. You can also mix the crumbs with a little leftover frosting to make red velvet cake pops. If you have extra buttermilk, it's perfect for making a batch of Southern Comfort recipe for dinner the next day!
Perfect Pairings and Serving
A cake this stunning deserves a proper presentation. I love serving this on a white pedestal stand to let the crimson color really shine against the snowy frosting.
Beverage Pairings: A strong, dark roast coffee is the perfect partner for this cake. The bitterness of the coffee cuts through the sweetness of the cream cheese frosting beautifully. For a festive evening, try a glass of sparkling dessert wine or a chilled glass of milk for the kids.
The Physics of Slicing: To get those clean, professional looking slices, use a long, thin knife dipped in hot water. Wipe the knife clean between every single cut. This prevents the red crumbs from smearing into the white frosting, keeping each piece looking like a work of art.
Myth: Red velvet is just chocolate cake. Actually, the amount of cocoa is very small (only 15g). The primary flavor should be a delicate balance of vanilla, tangy buttermilk, and the richness of the cream cheese. If it tastes like a Hershey bar, it's not true red velvet!
Myth: You must use beets for color. While historically beets were used for moisture and color during wartime rationing, modern red velvet relies on the chemical reaction of acid and cocoa.
Using food gel is the standard way to achieve that "Mouthwatering Southern Red" intensity we all love during the holidays.
Making this cake is all about building your kitchen confidence. It looks impressive, but once you understand the science and the steps, it's a wholesome, joyful process. Enjoy every velvety bite!

Recipe FAQs
Can I make this cake ahead of time?
Yes, bake the sponges up to 2 days in advance. Wrap them tightly in cling film once completely cool to maintain their freshness and moisture.
Why is my red velvet cake brownish instead of red?
This is usually due to an off pH balance or using the wrong cocoa. Natural cocoa, old baking soda, or a lack of sufficient acid from buttermilk and vinegar can prevent the vibrant red color from developing properly.
What's the secret to a velvety crumb in red velvet cake?
It comes down to the acid base reaction and proper ingredient ratios. The combination of buttermilk and vinegar reacting with baking soda creates tiny air bubbles, tenderizing the flour's gluten for that signature melt-in-your mouth texture, much like mastering emulsification in a dressing for our
Salad Dressing Recipe.
How do I prevent my cream cheese frosting from being too runny?
Ensure your cream cheese and butter are properly chilled before whipping. If the frosting becomes too soft, chill the mixture in the refrigerator for about 20 minutes before re-whipping it until it holds its shape.
What's the best way to store leftover red velvet cake?
Store any leftovers in an airtight container in the fridge for up to 5 days. The oil-based sponge remains moist when cold, and you can also freeze individual slices wrapped well for up to 3 months.
Can I make a vegan version of this red velvet cake?
Yes, you can adapt it for a plant based diet. Swap eggs for flax eggs, use vegan butter and cream cheese, and create vegan buttermilk by adding vinegar to soy milk; it's a versatile technique similar to making a dairy-free Chocolate Mousse.
Is red velvet cake just a chocolate cake with food coloring?
No, this is a common misconception. While it contains cocoa, the distinct flavor comes from the reaction between acidic ingredients like buttermilk and vinegar with baking soda, which traditionally influenced the original color before food coloring became prevalent.
Southern Red Velvet Cake
Ingredients:
Instructions:
Nutrition Facts:
| Calories | 569 kcal |
|---|---|
| Protein | 8.8 g |
| Fat | 24.5 g |
| Carbs | 81.4 g |
| Fiber | 1.1 g |
| Sugar | 58.2 g |
| Sodium | 208 mg |
